In this tutorial, we will share the download links of the GApps (Google Apps) package for all devices running the latest Android 11. It will be valid across all the types of custom ROMs, whether highly customized, AOSP based, and everything in between. On that note, we will also list out the complete installation instructions of this GApps package via TWRP Recovery. And to help the first time users, detailed steps for booting or flashing the TWRP Recovery onto your device will also be given. And if you face TWRP Error 20, then refer to our guide on How to Fix TWRP Error 20 GApps after flashing LineageOS.
There is literally no end where one could put a full stop when it comes to customizations in Android. This could take two routes: the general users who try out icon packs, themes fonts, and custom launcher, and the other half who travels the road less taken. This website of ours mostly focuses on the latter half of the population. These tech geeks are mostly interested in unlocking the device’s bootloader, flashing custom recovery like TWRP, and installing tons of Custom ROMs.
Along the same lines, they also get access to the system partition by rooting their devices via Magisk. As of now, the latest iteration of Android has just been released by Google. Well, it has released some months ago, but at that point in time, it was in the Developer and Beta phases. At the time of writing, it has been welcomed in the stable build. Along the same lines, many OEMs have come forward to adopt this Android 11 version.
CUSTOM ROMS GUIDES
- Install Custom ROMs on any Android Device- Includes A/B Partition
- How to Flash a Custom ROM without TWRP Recovery
- Flash Custom ROM After Wiping Internal Storage Without SD Card or OTG
- How to Go Back to Stock ROM from GSI ROM (All Android Devices)
In this regard, the Open Public Beta is now live for OnePlus 8 and 8 Pro, ColorOS 11 has just been made official today (September 14th), Realme UI 2.0 and MIUI 12 for Realme and Xiaomi are also among the corners. Similarly, One UI 3.0 is in the beta phase for users in the US and Korea. But here is the thing: apart from Pixel devices, all these OEMs Android 11 updates are either in the beta build or yet to arrive. We aren’t complaining about the same because a lot of behind the scenes has to go before the build becomes stable for the daily users. This is where the Custom Development scene comes to the play.
Surprisingly, quite a few custom ROMs based on the latest Android are already live. For example, CarbonROM, and AOSP, both based on Android 11 are up and running for many android devices just a few days after the launch of the new OS from the Silicon Valley giants. However, when it comes to these Custom ROMs, there are two different types: one that has all the Google apps and services pre-installed and the others without any GApps. As an example, Pixel Experience falls in the former category whereas CarbonROM belongs to the latter.
If you wished to flash any custom ROM that doesn’t have the Google Apps prebuilt, then you might have downloaded the GApps package from the OpenGApps page. They provide many different variants of Google Apps, Services, and Frameworks. However, as of now, it hasn’t been released for Android 11. Until that happens, this guide of ours will come in handy. From this post, you could download the GApps (Google Apps package) for all devices running the latest Android 11. We will also list out the GApps flashing instructions as well as the steps to install TWRP onto your device. Follow along.
TWRP GUIDES
- How to Install OTA Updates in Rooted Android Device
- How to Permanently Install TWRP without TWRP ZIP File (only using TWRP.img file)
- Root Android Devices Without TWRP Recovery
- How to Fix TWRP Error 7 (While Flashing Custom ROM via TWRP)
Table of Contents
Download GApps (Google Apps) for Android 11
Let’s cut straight to the point. Here is the download link for two different Google Apps packages for Android 11 that I could get a hold of. The first one has been personally tested by me on various AOSP Android 11 ROMs. Likewise, I have also tested the second one. Haven’t tested the third one as of now, but there is no reason why it shouldn’t work. Not sure which one to download?, Proceed with the NikGApps only.
- [TESTED ON LINEAGEOS 18.1]: MindTheGApps
- [TESTED ON AOSP ANDROID 11 ROMS]: NikGapps.
- [TESTED] Generic Android 11 GApps for ARM64: DOWNLOAD LINK. Credits for this GApps goes to Sagar Makhar
- [Unofficial, NOT TESTED] Nano Open GApps for Android 11 for ARM64: DOWNLOAD LINK
Once you have downloaded the GApps for Android 11, you could now proceed with the below installation steps
How to Install GApps (Google Apps) Android 11 on any device
Before we list out the steps to do so, there are a few prerequisites that your device needs to qualify. Please go through them and make sure your device ticks marks all these requirements.
Prerequisites
- To begin with, your device’s bootloader needs to be unlocked. You could refer to our detailed Unlock Bootloader tutorials for various OEMs: OnePlus | Google | Xiaomi | Realme | Vivo | Motorola | Sony
- Next up, download the TWRP Recovery for your device. For the official builds, you could head over to the TWRP website. If your device isn’t yet available on the TWRP website, then you could make use of an unofficial TWRP, which you could get from XDA forums. Just download it as of now. We will list out the flashing instructions later on in this guide.
- Download and install the Android SDK Platform Tools on your PC. This will give us the necessary ADB and Fastboot binaries.
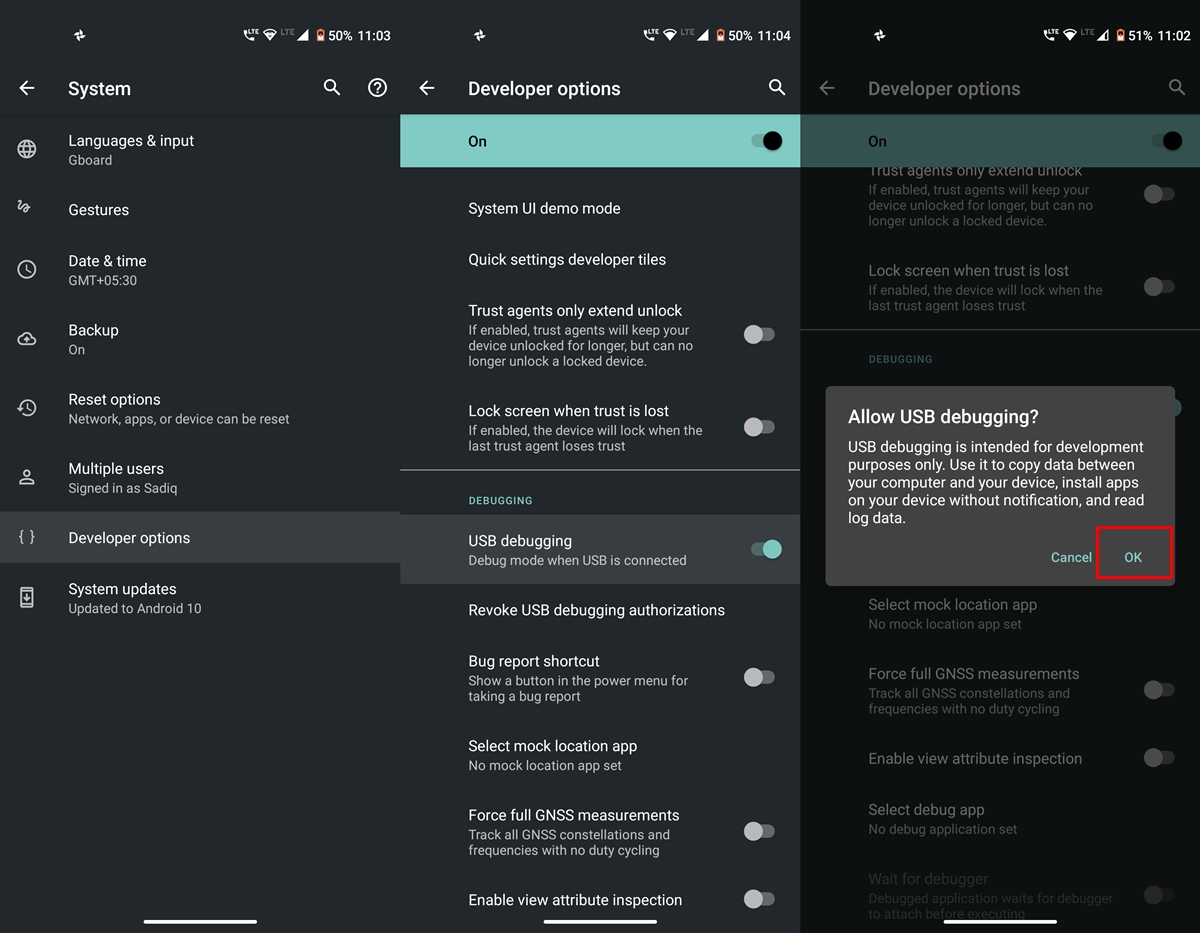
- If you know the hardware key combination to boot your device to Fastboot and Recovery Mode, well and good. otherwise, enable USB Debugging on your device. We would then be executing the ADB commands to boot your device to both these modes. So head over to Settings > About Phone > Tap on Build Number 7 times > Go back to Settings > System > Advanced > Developer Options > Enable USB Debugging. [DON’T MISS: Enable USB Debugging on a Broken Android Device’s Screen? Here’s a Workaround].

USB Debugging on Android - Apart from that, make sure you have the desired Android 11 Custom ROM downloaded. Also, your device should be sufficiently charged and you should have taken a backup beforehand. Backup is also important since you are about to flash custom ROM which anyways requires wiping the data and system partition.
- On that note, here are the required instructions to install the GApps (Google Apps) for Android 11 onto your device.
MAGISK GUIDES
- [GUIDE] Flash ROMs/Magisk/TWRP/Kernels on A/B Partition Devices
- Everything About Magisk- Manager, Modules, and More
- Best Magisk Modules of 2020 [PART-1]
- [3 METHODS] Unroot any Android Device-Uninstall Magisk
STEP 1: Boot your device to TWRP Recovery
- Connect your device to PC via USB Cable.
- Then head over to the platform-tools folder, type in CMD in the address bar, and hit Enter. This will launch the Command Prompt.
- Now there are two different approaches to this. If you have already flashed the TWRP Recovery, then you could directly boot to it using the following commands:
adb reboot recovery
- On the other hand, if you haven’t installed the TWRP Recovery yet, then you could either boot your device to TWRP or permanently flash it. For a one-time boot, transfer the downloaded TWRP recovery to the platform-tools folder. Then rename it to twrp, hence the complete name will then be twrp.img: You could now execute the below command to boot your device to TWRP:
fastboot boot twrp.img
- On the other hand, if you wish to permanently install it, then download the TWRP ZIP file as well. If there is a ZIP file as well, then transfer it to your device. Furthermore, if your device is A/B partition, then there will no recovery partition. Hence you will have to boot the recovery IMG file and then flash the ZIP/IMG file. On the other hand, if it is non-A/B, then there will be a recovery partition. In that case, you could directly flash it onto your device. In both cases, the TWRP IMG file needs to be kept inside the platform-tools folder only.
- With that said, for A/B partition, you could boot your device to TWRP as follows:
fastboot boot twrp.img
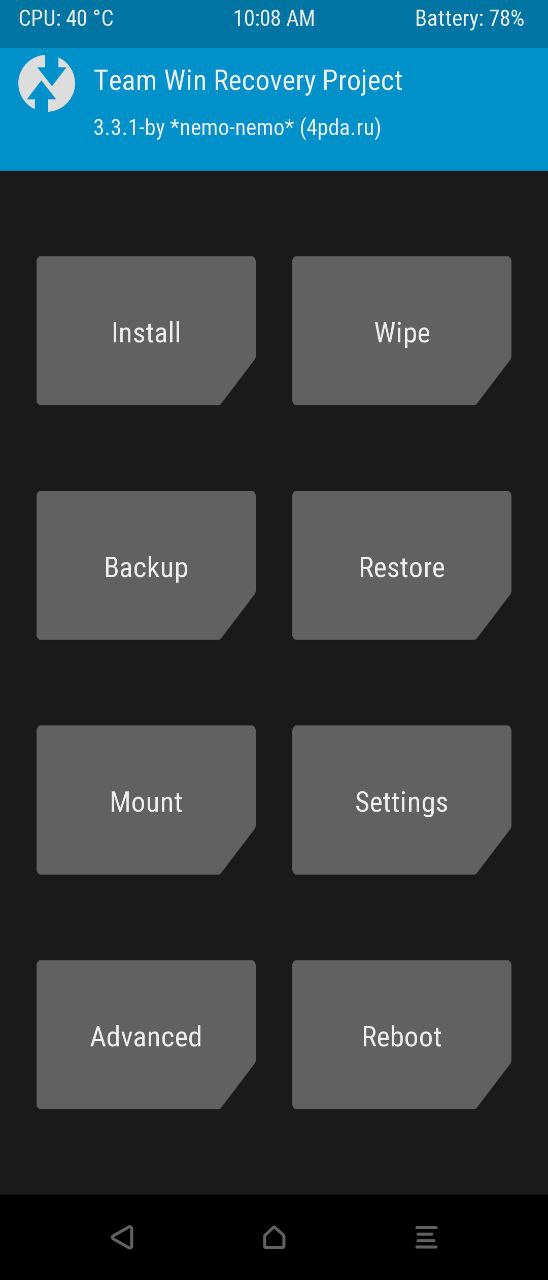
- Once your device is booted to TWRP, head over to Install and select the TWRP ZIP file. Perform a right swipe to permanently install it.
- On the other hand, if your device doesn’t have the A/B partition, then you could directly flash the ZIP file to the recovery partition using the following command:
fastboot flash recovery twrp.img
- Now that your device is booted to TWRP, you could flash the Custom ROM followed by GApps (Google Apps) for Android 11 onto your device. Here are the required instructions for that

STEP 2: Flash the Custom ROM
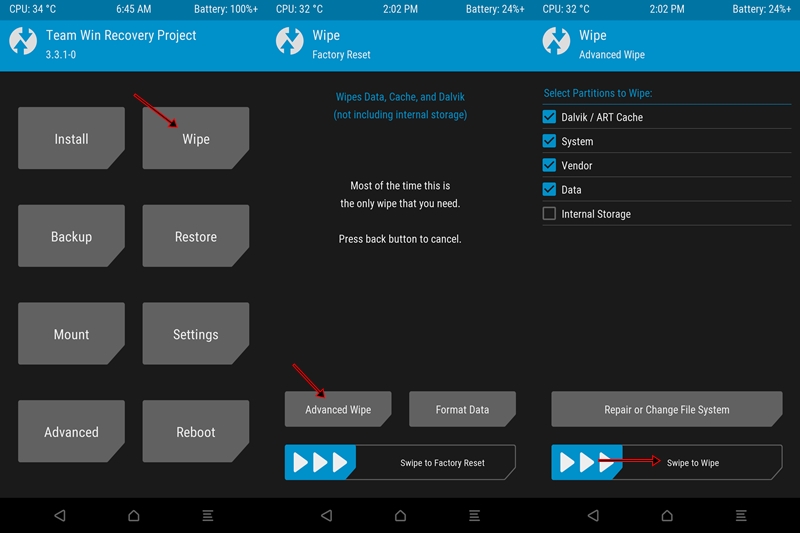
- You will now have to flash the desired Custom ROM. For that, head over to Wipe, and select Advanced Wipe.
- Then select Data, Cache, System, and Vendor (this is the general user, your ROM might ask/not ask to wipe any of these partitions). Perform a right swipe to wipe the selected partition. [If by mistake you end up wiping the partition that has the GApps/ROM file, then refer to our guide on Flash Custom ROM After Wiping Internal Storage]
- Once the formatting is done, DO NOT reboot your device, rather go to the TWRP main menu.
STEP 3: Flash GApps (Google Apps) Android 11
- It is now time to flash the GApps (Google Apps) based on Android 11 onto your device.
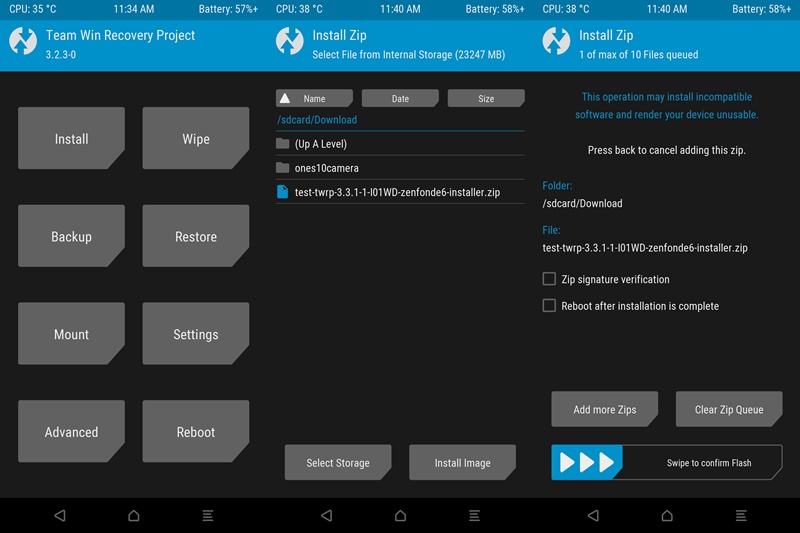
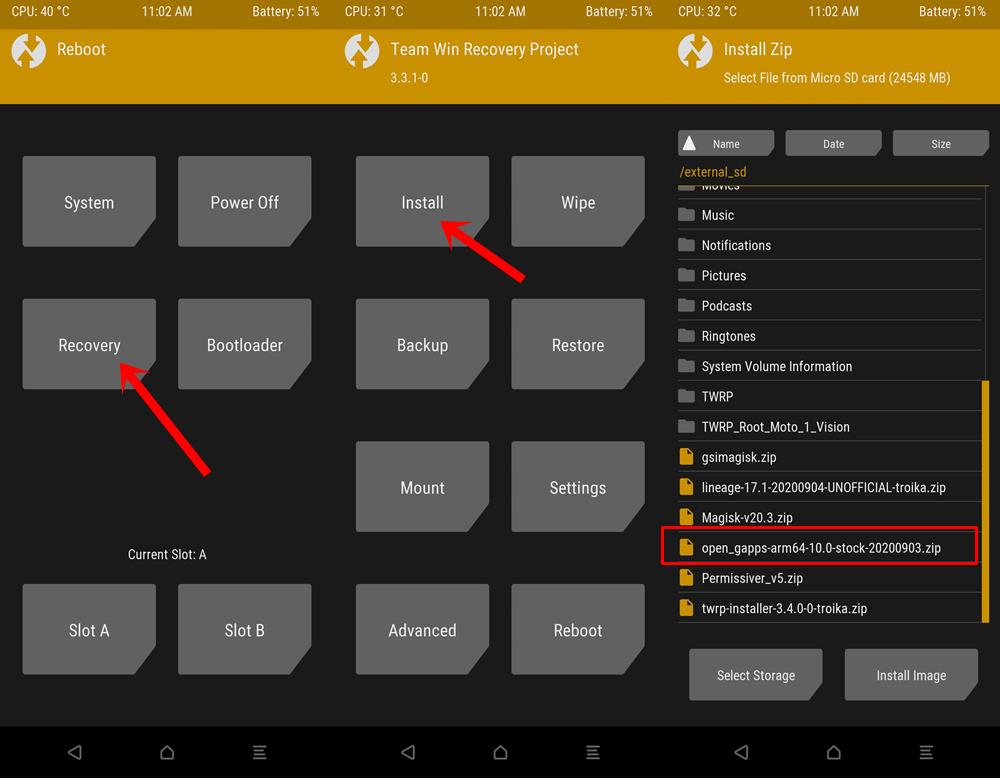
- For that, head over to Install and select the GApps ZIP file.
- Then perform a right swipe to install it onto your device.
- Once that is done, you could flash any other files if you prefer (like Magisk for Root, any mods, frameworks, etc). If not, you could then boot your device to the newly installed OS. To do so, head over to Reboot and select System.
With this, we conclude this guide on how to download and install the latest GApps (Google Apps) for Android 11. In case you have any doubts whatsoever, just let us know in the comments. We will get back to you with a solution as soon as possible.
A/B Partition Guides
- [GUIDE] Flash ROMs/Magisk/TWRP/Kernels on A/B Partition Devices
- How to Flash Various Files in A/B Partition Devices
- Install Custom ROMs on any Android Device- Includes A/B Partition
- How to Fix FAILED (remote: unknown command) Error