In this tutorial, we will show you how to unlock the bootloader on Google Pixel 4A. While there is no dearth of Android smartphones, one can’t help but praise this offering from the Silicon Valley Giants. The Pixel series has always been known to provide the purest and cleanest stock Android experience without single bloatware as such.
Add to the fact that it is the fastest to receive the Android upgrades, and you are in for a treat. Even then if you aren’t convinced, then you should look no further than its camera modules. The Pixel series has always been known to have the best camera among all the Android devices and sometimes, it may easily challenge its Apple counterparts.
And then when one set their foot in the custom development, then they would be welcomed with a plethora of tweaks and customizations. There is a plentitude of custom ROMS, mods, frameworks, themes, and other tweaks available for Pixel devices that we guess not many could claim. And the best part about this is that their support never dies down.
Even today, there are regular developments going on for Pixel 1 as well! However, for all of these tweaks to be effectively carried out, you need to bypass a gateway in the form of unlocking the device’s bootloader. And in this guide, we are there to help you achieve just that. So without further ado, here are the steps to unlock the bootloader on the latest Pixel 4A device. Follow along.
TWRP GUIDES
- How to Install OTA Updates in Rooted Android Device
- How to Permanently Install TWRP without TWRP ZIP File (only using TWRP.img file)
- Root Android Devices Without TWRP Recovery
- How to Fix TWRP Error 7 (While Flashing Custom ROM via TWRP)
Table of Contents
What is Bootloader?
According to Google “A bootloader is a vendor-proprietary image responsible for bringing up the kernel on a device. It guards the device state and is responsible for initializing the Trusted Execution Environment (TEE) and binding its root of trust”. Confused? So am I! let us leave all this aside. In simpler terms, a Bootloader is software that runs every time your phone boots (start). It contains a set of instructions that tells the device which program to load at what instance.
It also decides whether to boot your device to ‘Android OS’ or the ‘recovery mode’. By default, most of the OEMs ships their devices with a locked bootloader. The reason for their part is quite simple: they only want you to run the OS that they ship on their device. The reason for the same is due to security concerns. But they still leave a window of opportunity for the tech geeks who wish to tweak their device’s system. And if you are one of them, then this guide is all that you will require.
Perks of Pixel 4A Bootloader Unlock
Unlocking your device’s bootloader is like opening the gate to a plethora of opportunities. To begin with, you could try an altogether new customized version of Android OS, known as Custom ROMs. Apart from that, you could even replace the device’s stock recovery with a custom one like TWRP. Along the same lines, you could also get administrative rights over your device.
This will then allow you to try out tons of Magisk Modules, Xposed Framework, or even modify the device’s system partition. All this is made possible by rooting your device via Magisk. What is even more interesting is the fact that just by using a single line of code, the bootloader could be unlocked. So what are you waiting for, go ahead and give it a try, or should you? Before beginning with the process, make sure to read the downsides of unlocking it. All this is mentioned in the below article.
Downsides of Unlocking Bootloader on Pixel 4A
The biggest downside of unlocking the bootloader is that the warranty of your device would be void. But why do the manufacturers do this? The answer is simple. All the OEMs ship their devices with a locked bootloader so that the users could only use the stock OS that comes pre-installed.
The device vendors do not want the users to try out the customized version of the OS as they are launched by third-party sources such as LineageOS or Resurrection Remix. The manufacturers are in no way related to these creators, and hence they distance themselves from all this. The biggest disadvantage to come out of all this is that your device’s warranty will be null and void.
Apart from that, you will also lose all the data stored on your device. Moreover, some apps like Google Pay or Pokemon Go might not function as expected. Furthermore, the L1 Widevine Certificate will also get degraded to L3. This means you wouldn’t be able to stream Netflix content in HD quality. Last but not the least, there’s always some chances of your devices getting bootloop or ending in a bricked state.
MAGISK GUIDES
- [GUIDE] Flash ROMs/Magisk/TWRP/Kernels on A/B Partition Devices
- Everything About Magisk- Manager, Modules and More
- Best Magisk Modules of 2020 [PART-1]
- [3 METHODS] Unroot any Android Device-Uninstall Magisk
How to Unlock Bootloader on Pixel 4A
The below instructions are listed under separate sections for ease of understanding. Make sure to follow in the exact same sequence as mentioned. Droidwin and its members wouldn’t be held responsible in case of a thermonuclear war, your alarm doesn’t wake you up, or if anything happens to your device and data by performing the below steps.
STEP 1: Take a Backup
Make sure to take a backup of all the data on your device. This is because the process will wipe off all the stored data.
STEP 2: Install Android SDK

First and foremost, you will have to install the Android SDK Platform Tools on your PC. This is the official ADB and Fastboot binary provided by Google and is the only recommended one. So download it and then extract it to any convenient location on your PC. Doing so will give you the platform-tools folder, which will be used throughout this guide.
STEP 3: Enable USB Debugging and OEM Unlocking on Pixel 4A
Next up, you will also have to enable USB Debugging and OEM Unlocking on your device. The former will make your device recognizable by the PC in ADB mode. This will then allow you to boot your device to Fastboot Mode. On the other hand, OEM Unlocking is required to carry out the bootloader unlocking process.
![]()
So head over to Settings > About Phone > Tap on Build Number 7 times > Go back to Settings > System > Advanced > Developer Options > Enable USB Debugging and OEM Unlocking.
STEP 4: Boot Pixel 4A to Fastboot Mode
- Now connect your device to the PC via USB cable. Make sure USB Debugging is enabled.
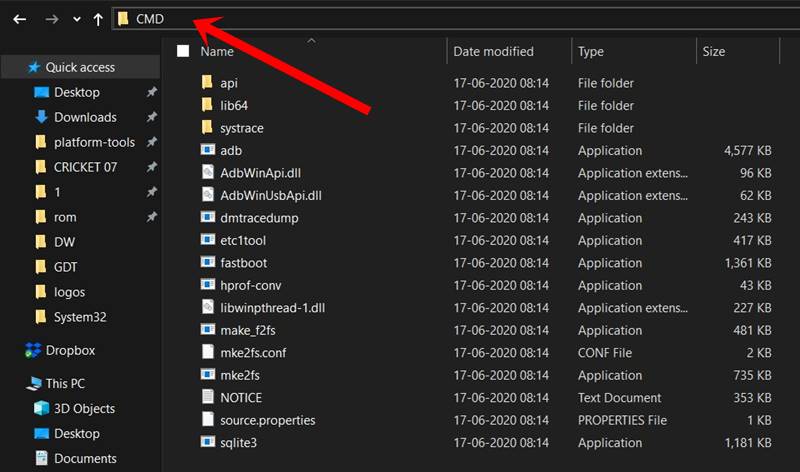
- Then head over to the platform-tools folder, type in CMD in the address bar, and hit Enter. This will launch the Command Prompt.

- Type in the following command in the CMD window to boot your device to Fastboot Mode
adb reboot bootloader

- To verify the Fastboot connection, type in the below command and you should get back the device ID, as shown in the image.
fastboot devices
- You may now proceed with the steps to unlock the bootloader on your Pixel 4A device. Follow along.
STEP 5: Unlock Bootloader Pixel 4A
- Finally, type in the following command to unlock the bootloader on your Google Pixel 4A device:
fastboot flashing unlock

- You might get a confirmation message on your Pixel 4A device at this point in time. Use the Volume keys to select Unlock the Bootloader option, and the Power key to confirm your decision.

- Your device will now reboot to Fastboot Mode, but this time, the Device State will be Unlocked. This verifies that the process stands successfully completed.

- You may reboot your device to the system (if that doesn’t happen automatically). For that either press the Power key once or use the below fastboot command:
fastboot reboot
That is all from this guide on how to unlock the bootloader on Google Pixel 4A. If you have any queries, do let us know in the comments section below. We will get back to you with a solution at the earliest.
PIXEL 4A GUIDES
- How to Root Google Pixel 4A Using Magisk Patched boot.img
- How to Root Pixel 4A without TWRP Recovery (via Magisk)
- How to Root Pixel 4, 4A, 4A XL running Android 11 without TWRP


Rew
OEM unlock is grayed out.
Can’t enable it
Alan
How to relock bootloader on pixel 4a
Sadique Hassan
To relock the bootloader, use the following command (make sure you are on stock firmware with no mods installed. Moreover, it will wipe all the data on your device): fastboot flashing lock
Brendo
Hi there,
I followed all the steps but I’m getting “Waiting for Device” When I tried fastboot flashing unlock. My device shows up when I check for fastboot devices. OEM unlocking is enabled and USB debugging is enabled. I’m not sure what the problem is.
Sadique Hassan
Hi Brendo, make sure you are using the official USB cables. Next up, please use USB 2.0 Port (3.0 is known to cause issues with Fastboot). Finally, verify that the CMD window is opened inside the platform-tools folder itself. If you qualify all these requirements, then install the Google’s Android Bootloader Interface Drivers and then see the results
Marco
I do all correctly but ehen I send the command “fastboot flashing unlock” it gives me back a message with the possible commands but it doesn’t unlock the bootloader. How can I solve this?
Sadique Hassan
Hi Marco, here are a few things that you should check:
1. Is your device successfully booted to Fastboot and connected to PC via USB cable? Type in fastboot devices and if you get device ID, then the connection is successful, otherwise, reverify the driver installation.
2. Likewise, also make use that OEM unlocking is enabled under Developer Options.
3. Furthermore, make sure you are launching the CMD window inside the platform-tools folder only.
–> Please let me know if you have done the above things and if you’re still facing this error, then we will proceed ahead with other fixes.
Anonymous
i have done all those steps and fastboot devices shows nothing
Sadique Hassan
It seems to be a driver issue. When you used the adb reboot bootloader command, were you able to boot successfully to Fastboot. Or you had to use hardware keys for the same? FUrthermore, please try the tweaks mentioned here and do let me know the results: How to fix ADB Device not found [List of Devices Attached is blank]