In this guide, we will make you aware of the steps to find all the partitions on your Android device along with their SDA Addresses. This open-source OS from the Silicon Valley giant beholds a slew of different types of partitions, each with its own set of dedicated tasks. Moreover, most of these partitions are read-only by default to prevent a malicious program or a user [unintentionally] from making changes to these partitions [if there’s really a need for the same, then you’ll have to first gain administrative privileges by rooting your device]. With that in mind, let’s check out the functionalities of each of these partitions, after which we will list out the steps to find their SDA Address on your Android device. Follow along.
Table of Contents
What are Partitions on Android

Partitions on an Android device are distinctive storage areas, each of which stores a specific type of data within itself, whether it a system data, user data, or even the OS as a whole. In this regard, here are a few common partitions that you would come across on most Android devices, irrespective of the OEM:
System
It stores all the core system partition files along with system-level apps. Not to mention the fact that the Operating System resides in this partition as well.
Boot
It stores kernel and bootloader-specific files that are required for the booting up of the OS. It contains the bootloader, recovery image, and the kernel files as well.
Recovery
It beholds the recovery which could be used to sideload files and factory reset the device. Moreover, even the custom recoveries that you flash are stored in this partition.
Data Partition
It stores user data, app data, user-installed apps, photos, videos, documents, and other related files. When you perform a reset, then this partition is deleted.
Modem
It houses network-related config files and on some phones [especially the older ones], is also responsible for controlling WiFi, Bluetooth, and GPS [on newer phones it is handled by kernel]. Your call, SMS, and internet are dependent on this partition, which is also known as radio or NON-HLOS on some phones.
Cache
The Cache partition stores temporary app and system data to speed up the app and OS booting process. However, over the due course of time, a lot of temporary data might get accrued which in turn could slow down the OS. Therefore, it’s recommended to delete these cached data at regular intervals [it will not impact the Data partition, aka the user data].
Vendor
It contains proprietary files, drivers, and firmware that are required for hardware compatibility and functionality.
Vendor_Boot
This partition is present on some phones and contains boot-related files specific to that vendor. Moreover, nowadays, there has been an increase in the devices that use “vendor_boot-as-recovery” (“vendor_boot”) instead of the standard “boot-as-recovery”. A “vendor_boot” ROM has its recovery resources in the “vendor_boot” partition, instead of the standard “boot” partition. A “vendor_boot” ROM requires a different kind of recovery – one that is installed into the vendor_boot partition, instead of the one in the recovery partition.
Persist
As is evident by its name, persist stores “persistent” system data, configuration settings, WiFi Passwords, and user preferences that need to survive across reboots. If it wasn’t for this partition, then you’d probably have to set up your device upon every reboot.
ODM
Also known as Original Device Manufacturer, this partition holds additional vendor-specific files and configurations.
Do note that these are just some of the popular partitions that we have listed here, there are a plethora of others present on your device. So let’s now make you aware of the steps to find all the partitions on your Android device along with their SDA Addresses. Follow along.
How to Find Partitions on Android
https://youtu.be/5jJqVS0PpZw
There exist two different methods through which you could get this job done- each with its own set of perks and drawbacks. Go through both these methods once and then try out the one that is in sync with your requirements.
Via ADB Shell Command
Benefit: Doesn't require root.
Drawback: Requires the use of PC.
- To begin with, download and extract the Android SDK Platform Tool on your PC.
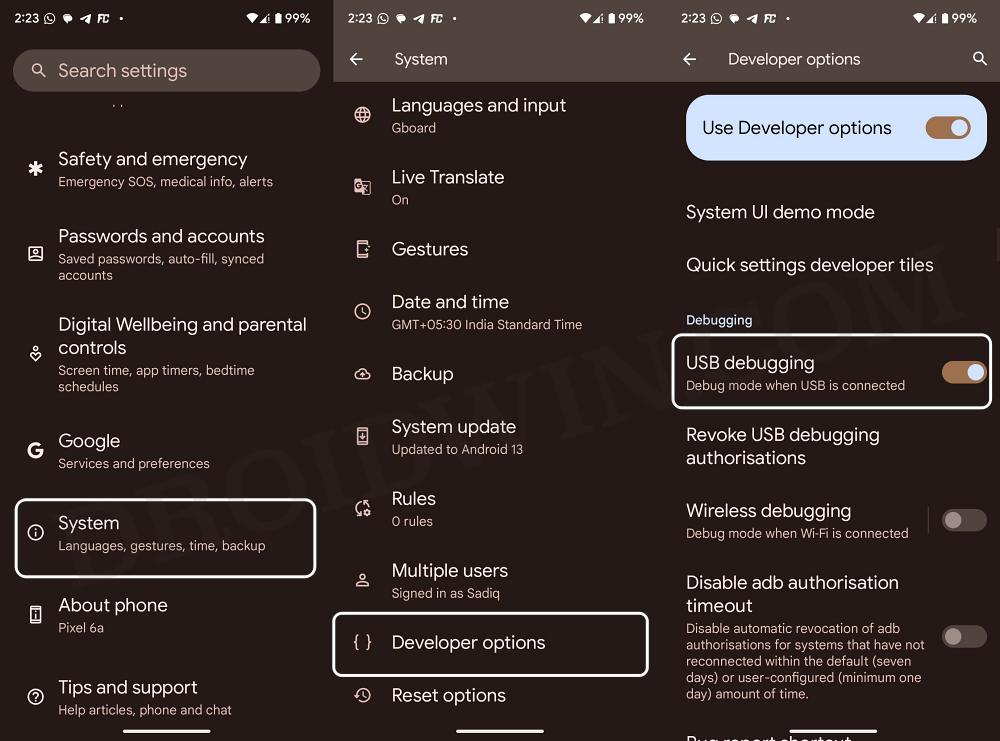
- Then enable USB Debugging on your device and connect it to PC via a USB cable.
- For that, go to Settings > System > Developer Options > Enable USB Debugging.

- Now go to the platform-tools folder address bar, type in CMD, and then hit Enter.
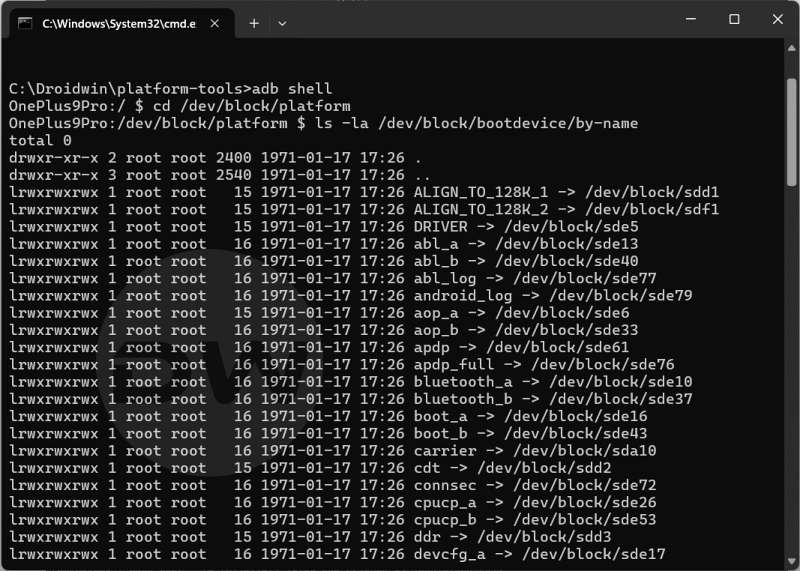
- This will launch Command Prompt. Type in the below commands in CMD window
adb shell
cd /dev/block/platform
ls -la /dev/block/bootdevice/by-name
- You might get an ADB prompt on your device, make sure to tap on Allow. That’s it.
Via Third-Party App
Benefit: Doesn't require the use of a PC.

Drawback: Requires root [and obviously the installation of an additional third-party app].
- To begin with, root your Android device via Magisk.
- Then download and install Termux from Play Store.
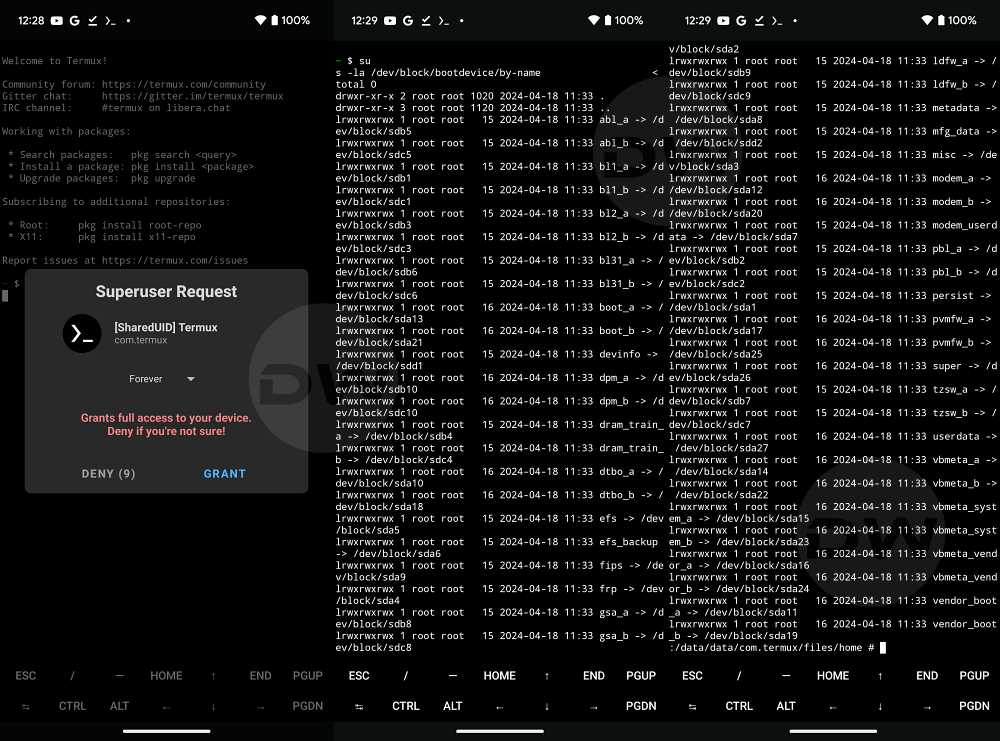
- Now launch Termux and type the below command:
su
- You’ll get a SuperUser request, tap on Grant/Allow.
- Now type the below command to get the partition list.
ls -la /dev/block/bootdevice/by-name
That’s it. These were the two different methods through which you could find all the partitions on your Android device along with their SDA Addresses. If you have any queries concerning the aforementioned steps, do let us know in the comments. We will get back to you with a solution at the earliest. Likewise, if you wish to know more about a particular partition, then do let us know in the comments section below.


