In this guide, we will show you the steps to install OTA updates on your rooted Samsung device. The devices from the South Korean conglomerate have always acted as an awkward middle child in the tech community. While there’s a generic approach of unlocking the bootloader, rooting the device, and flashing files that near about every Android device follows, Samsung decided to take the road less traveled.
For instance, you cannot unlock the bootloader via the fastboot flashing unlock command, instead, you’ll have to use the Download Mode. Likewise, you cannot flash partition files via Fastboot Mode, instead, you’ll have to take the help of the Odin Tool. Talking about flashing, you cannot even flash in the Fastboot Mode, instead, that is taken care of by the OEM’s own Download Mode.
Then if we turn our attention towards root, you can’t patch boot/init_boot and flash via Fastboot, instead, you’ll have to use the patched AP and flash it via Odin. And the list doesn’t end here. You also cannot install OTA updates on your rooted Samsung device the conventional way. But fret not as there does exist a nifty method that will help you get this job done. So without further ado, let’s get started.
Table of Contents
How to Install OTA Updates on Rooted Samsung Device
When we root our device, we use the CSC file instead of the Home_CSC because a factory reset is a must during root. However, that isn’t required when you are just doing an upgrade. In other words, you could flash the Hom_CSC instead of the CSC and preserve your data while updating your rooted device. As far as the update process goes, you cannot simply patch and flash the AP from the latest firmware, instead, you’ll have to flash the entire firmware [patched AP, BL, CP, and Home_CSC].
If you just flash the AP, then Odin might end up shrinking the data partition, so to prevent that from happening, you should flash the entire firmware. Lastly, while the process will not wipe off any data [as we are using Home_CSC instead of CSC], still take a backup of all the data on your device, just to be on the safer side. Droidwin and its members wouldn’t be held responsible in case of a thermonuclear war, your alarm doesn’t wake you up, or if anything happens to your device and data by performing the below steps.
STEP 1: Download and Extract Latest Firmware
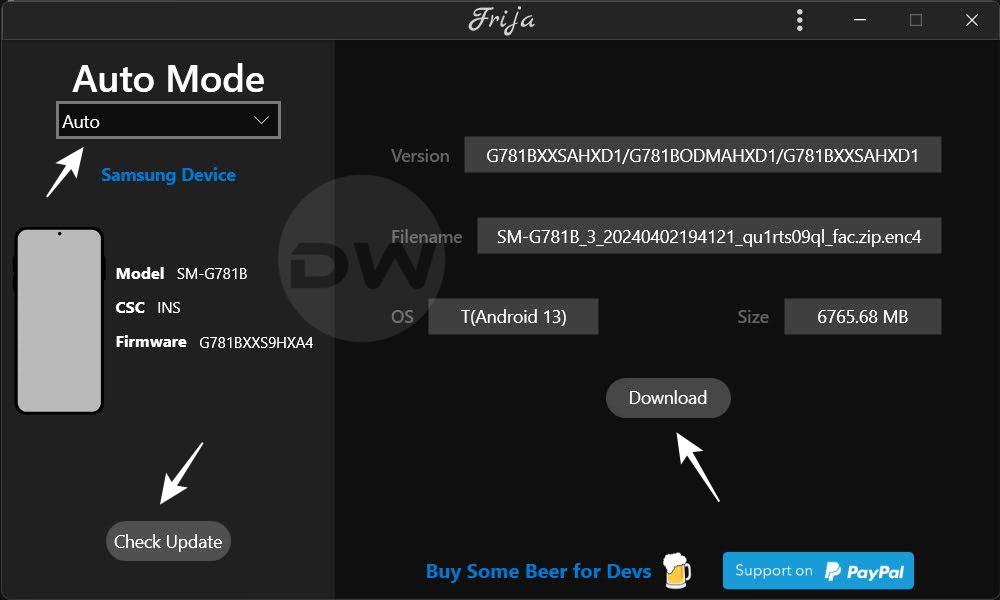
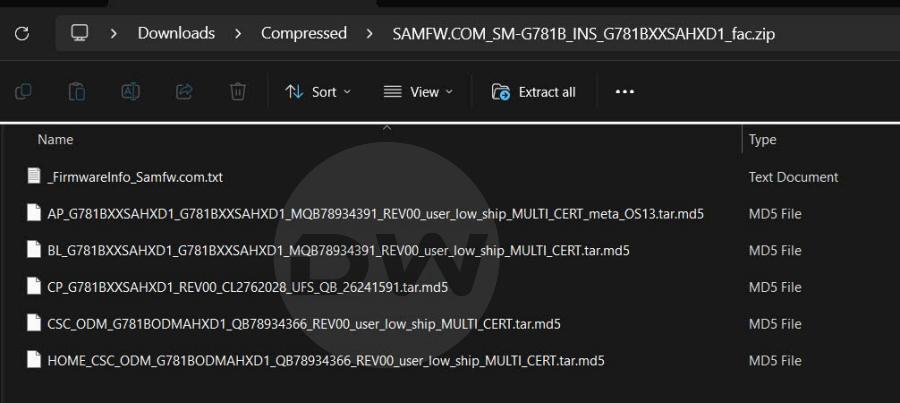
- First off, download the latest available firmware for your device, either using the Frija Tool or the SamFw website.

- Once downloaded, extract it onto your PC. Doing so will give you the AP, BL, CP, CSC, and Home_CSC files.
STEP 2: Patch AP
You’ll now have to patch the AP file that you have extracted from the latest firmware, via Magisk. Here’s how it could be done:
- First off, transfer the AP file to your device.
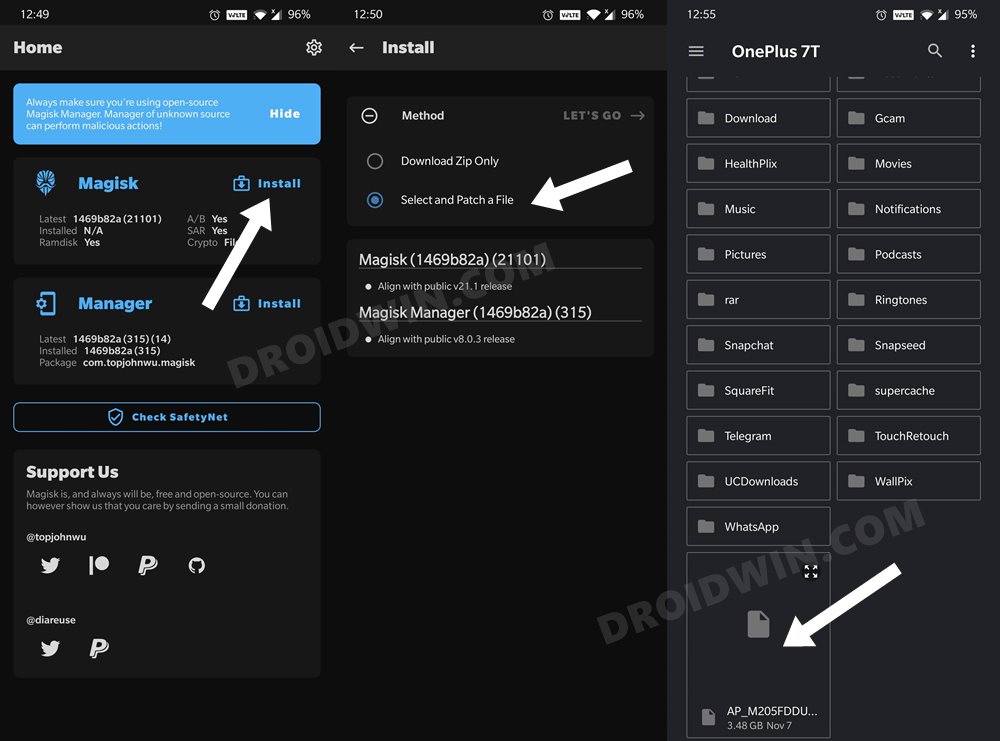
- Then launch the Magisk app and tap on Install > Select and patch a file.
- Now choose the AP firmware file and tap on Let’s Go. The patching will take a few seconds.
- Once done, you should get the magisk_patched.tar file placed inside the Download folder.
- Transfer this file to inside the same directory where the rest of the extracted firmware files are present.
STEP 3: Boot to Download Mode
You will now have to boot your Samsung device to the Download Mode so that Odin can interact with it and we can henceforth flash the required files. So do check out our detailed guide on How to Boot any Samsung Device to Download Mode or you could also refer to the shorter instructions given below:
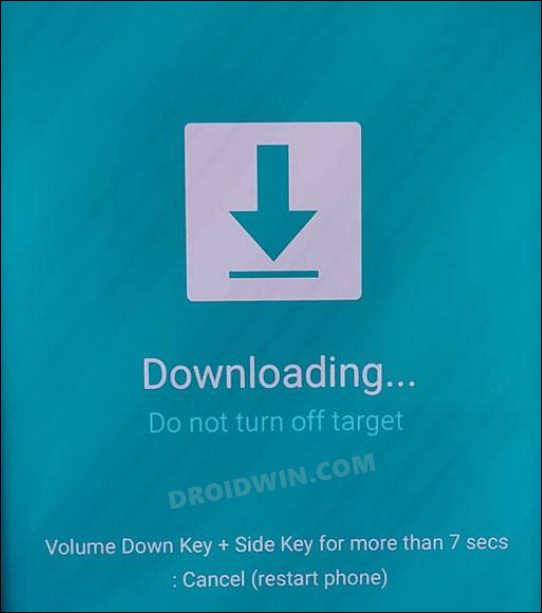
- To begin with, power off your device,
- Then press and hold Vol Up + Vol Down together and connect your device to the PC via a USB cable.
- As soon as you see the Warning message on your device, release the pressed keys.
- Now press the Volume Up key once and your device will be booted to Download Mode.
STEP 4: Flash Patched AP
You’ll now have to flash the patched AP file via Odin. However, as instructed before, do not flash it individually, instead, you should flash all the other firmware files as well, which includes BL, CP, and Home_CSC [we are flashing Home_CSC instead of CSC because there is no need to do a factory reset]. So either refer to our detailed guide on How to Flash magisk_patched.tar (patched Samsung AP file) via Odin or check out the below shorter instructions:
- First off, download and extract the Odin Tool on your PC.
- Then transfer the magisk_patched AP file to your PC where the other firmware files ( BL, CP, and HOME_CSC) are present.
- Now connect your Samsung device to the PC via USB Cable and load the following files to the Odin tool:
- First off, click ‘BL‘ and load the BL firmware file.
- Then click ‘AP‘ and load the magisk_patched.tar file.
- After this, click ‘CP‘ and load the CP firmware file.
- Finally, click ‘CSC‘ and load the Home_CSC firmware file.
- Once all the files have been loaded, go to the Options tab and checkmark Auto Reboot.
- Finally, click Start to begin the process. Once done, you should get the PASS!‘ message.
- Likewise, your device will reboot to the latest OS with the root being preserved as well.

That’s it. These were the steps to install OTA updates on your rooted Samsung device. If you have any queries with regards to the aforementioned steps, do let us know in the comments. We will get back to you at the earliest.