In this guide, we will show you the steps to root your Android device without using TWRP Recovery. One of the biggest perks of having an open-source OS like Android is the plethora of customizations that it allows you to carry out. Back in the day, rooting was the go-to choice for every other user, but nowadays, many OEMs themselves provide most of the features that were earlier only possible after gaining administrative access.
But for us, the tech enthusiast, rooting is still at the top of the priority queue as there as some mods that none of the OEMs could compete with [Viper4Android being the perfect example of the same]. So in this regard, there exist two different methods through which you could root your Android device- using WRP and without TWRP.
Earlier, using a custom recovery was the de-facto choice for rooting, however, now that has been replaced with the non-TWRP method, mainly due to the complications involved in developing a recovery from Android 12 onwards. So keeping all these points in mind, this guide will show you the steps to root your Android device without TWRP. But first, let’s have a sneak peek at the benefits and risks involved in this process.
Table of Contents
Benefits and Risks of Rooting
Once you root your device, you will be in a position to flash a plethora of mods. These include the likes of Magisk Modules, Substratum Themes, Xposed Framework via LSPosed, and Viper4Android among others. Along the same lines, you could also flash a custom kernel and implement your desired CPU profile. However, such tweaks do come in with a few risks as well.
To begin with, rooting requires you to unlock the bootloader- which will wipe off all the data and could nullify the warranty as well. Likewise, SafetyNet will be triggered [FIXED] which will result in your inability to use banking apps [FIXED]. So if all that’s well and good, then let’s get started with the steps to root your Android device without using TWRP Recovery.
Root Android Devices without TWRP Recovery
The below instructions are listed under separate sections for ease of understanding. Make sure to follow the same sequence as mentioned. Droidwin and its members wouldn’t be held responsible in case of a thermonuclear war, your alarm doesn’t wake you up, or if anything happens to your device and data by performing the below steps.
STEP 1: Install Android SDK
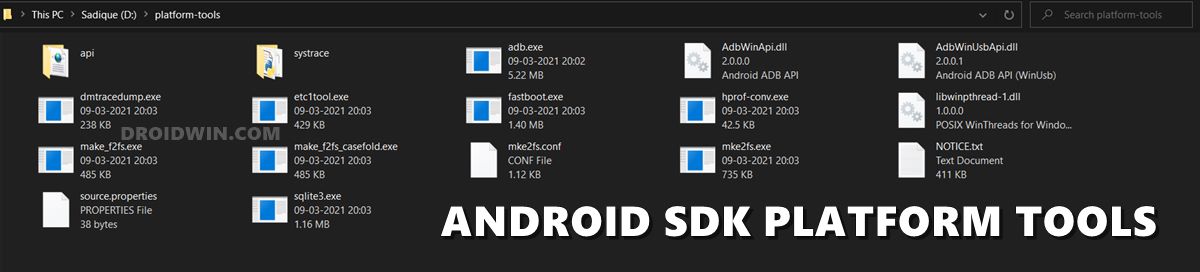
First and foremost, you will have to install the Android SDK Platform Tools on your PC. This is the official ADB and Fastboot binary provided by Google and is the only recommended one. So download it and then extract it to any convenient location on your PC. Doing so will give you the platform-tools folder, which will be used throughout this guide.
STEP 2: Enable USB Debugging and OEM Unlocking
Next up, you will also have to enable USB Debugging and OEM Unlocking on your device. The former will make your device recognizable by the PC in ADB mode. This will then allow you to boot your device to Fastboot Mode. On the other hand, OEM Unlocking is required to carry out the bootloader unlocking process.
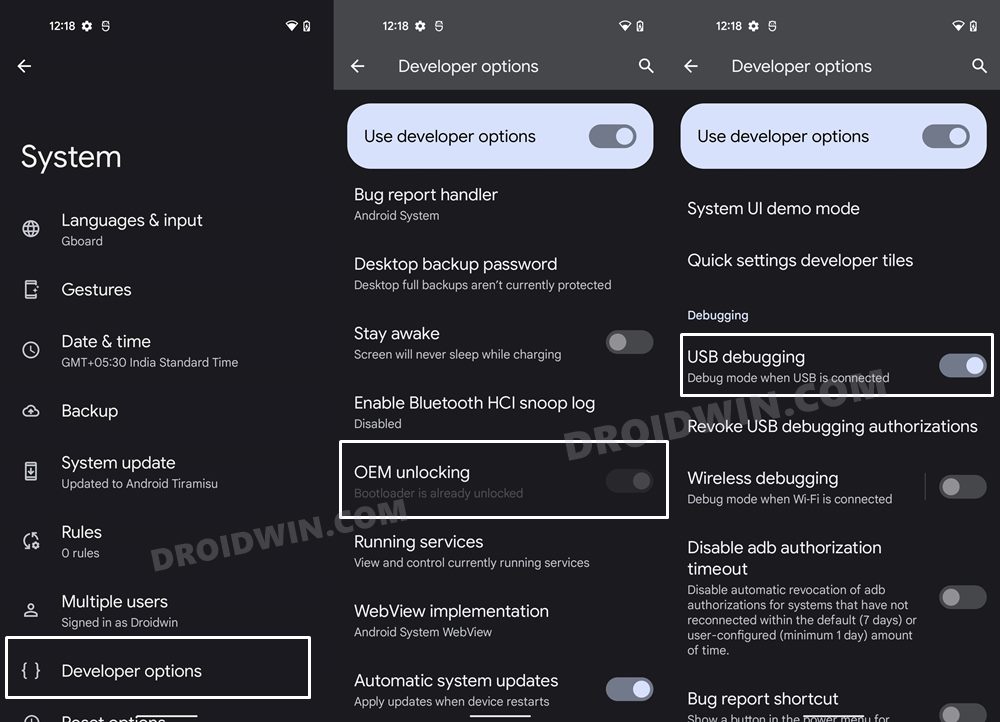
So head over to Settings > About Phone > Tap on Build Number 7 times > Go back to Settings > System > Advanced > Developer Options > Enable USB Debugging and OEM Unlocking.
STEP 3: Unlock Bootloader
Next up, you will also have to unlock the device’s bootloader. Do keep in mind that doing so will wipe off all the data from your device and could nullify its warranty as well. So if that’s all well and good, then please refer to our detailed guide on How to Unlock the Bootloader on any Android Device.
STEP 4: Extract Stock Boot/Init_boot
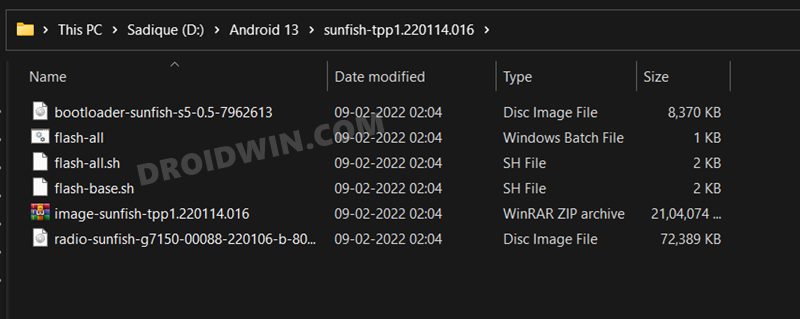
- To begin with, download the stock firmware [factory image] for your device.

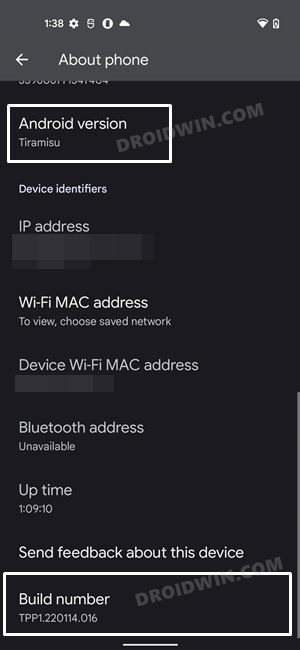
- Make sure to download the same version that is currently installed on your device. To check the same, head over to Settings > About Phone > Build Number.
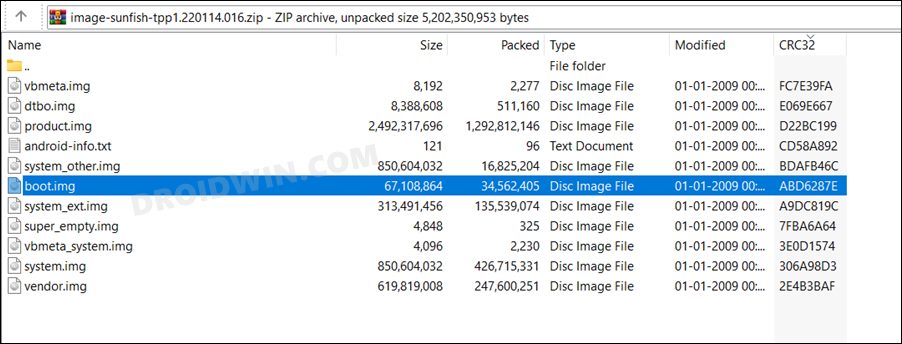
- Once downloaded, extract it to any convenient location on your PC. For Pixel devices, you can simply extract the firmware via WinZIP/WinRAR and get the boot.img from the Images folder.
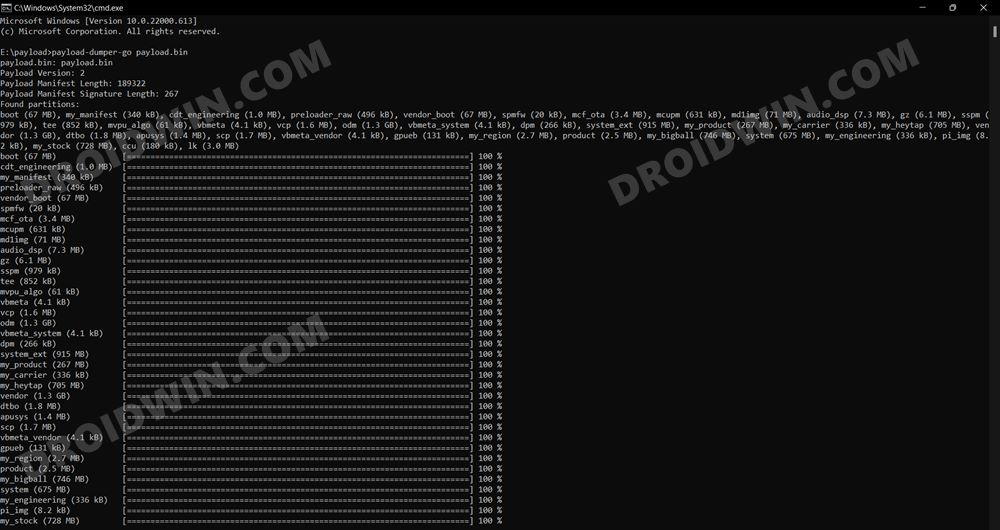
- However, for other OEMs, things are a little bit different. So refer to your device-specific guides to extract the stock boot.img file for your device from the below links:
Extract OnePlus payload.bin and get the stock boot image file
How to Extract OZIP Realme/Oppo Stock ROM (Firmware)
Extract Sony Boot.sin and get the Stock Boot.img File
How to Extract Boot.img from LG KDZ or DZ Firmware
- Now if your device was launched with Android 12 or older versions, then transfer the boot.img file to your device.
- On the other hand, if your device was launched with Android 13 or higher versions, then transfer the init_boot.img.
STEP 5: Patch Boot/Init_boot via Magisk
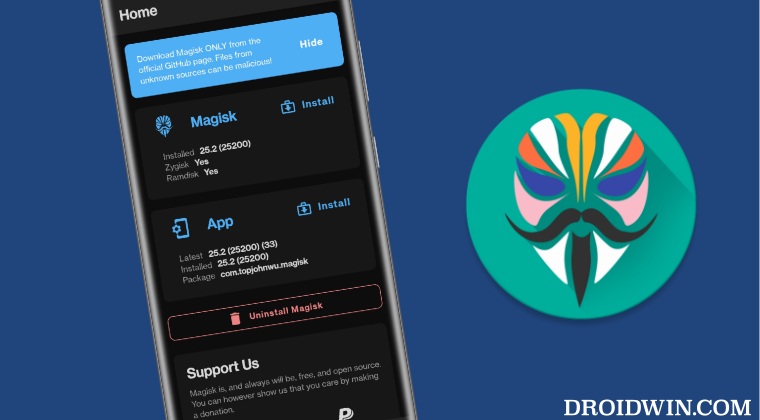
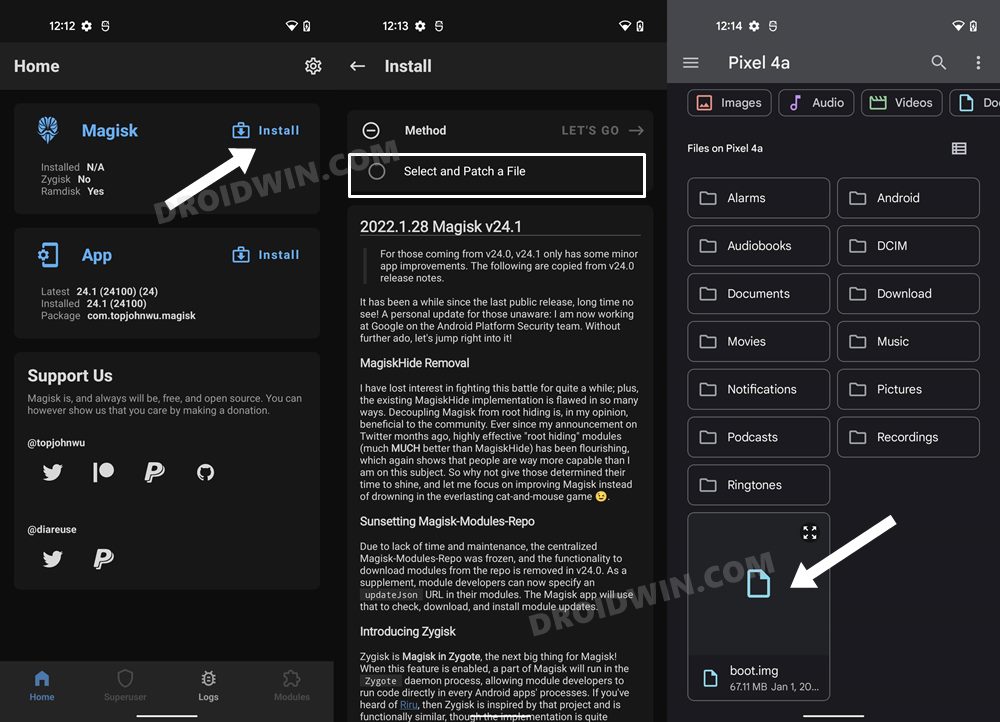
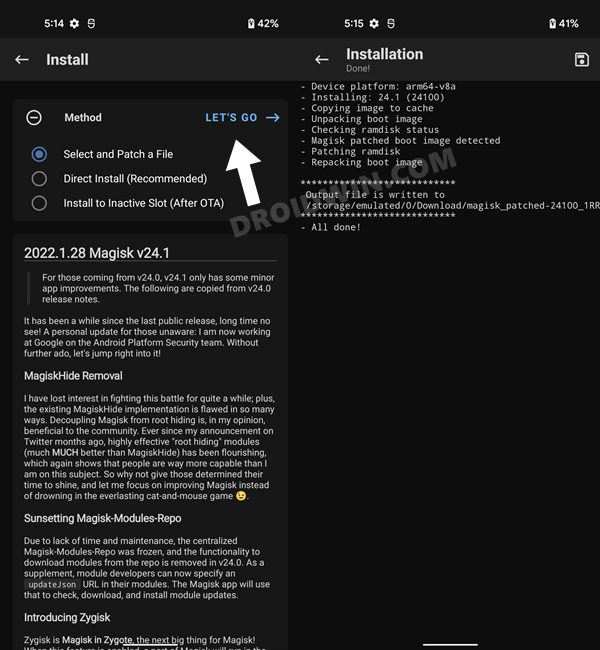
- Download and install the latest Magisk APK onto your device.
- Then launch it and tap on the Install button next to Magisk.
- After that, choose ‘Select and Patch a File’, navigate to the stock boot.img/init_boot, and select it.
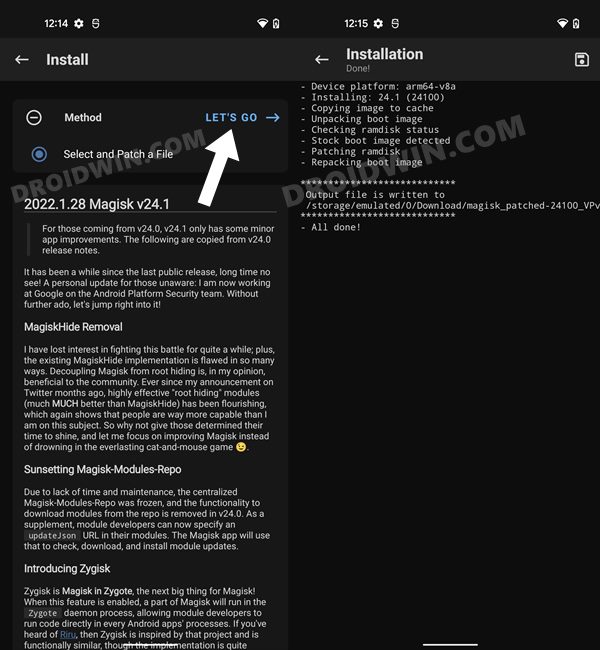
Patching boot.img via Magisk - Then tap on the Let’s Go button situated at the top right.
- The boot.img file will now be patched and placed under the Downloads folder.
- [If Magisk is unable to patch the boot.img, then try out its Canary version and then retry the patching process].
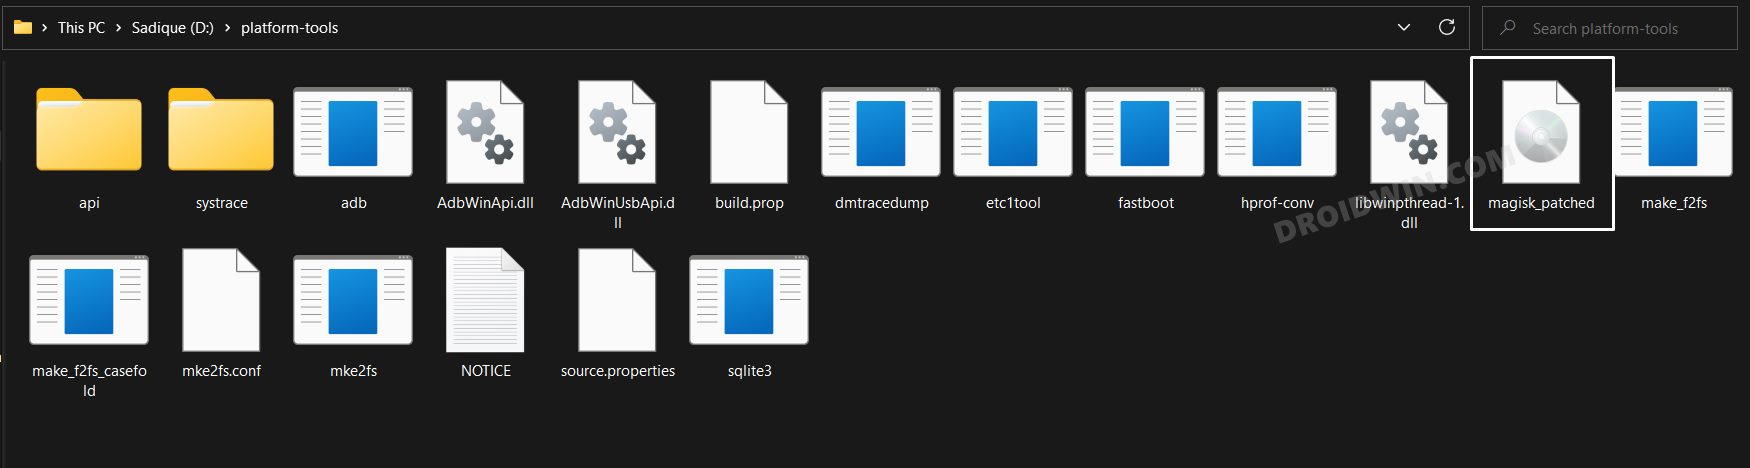
- You should transfer this file to the platform tools folder on your PC. Also, rename it to magisk_patched. We will now be using this file to root your Android device.
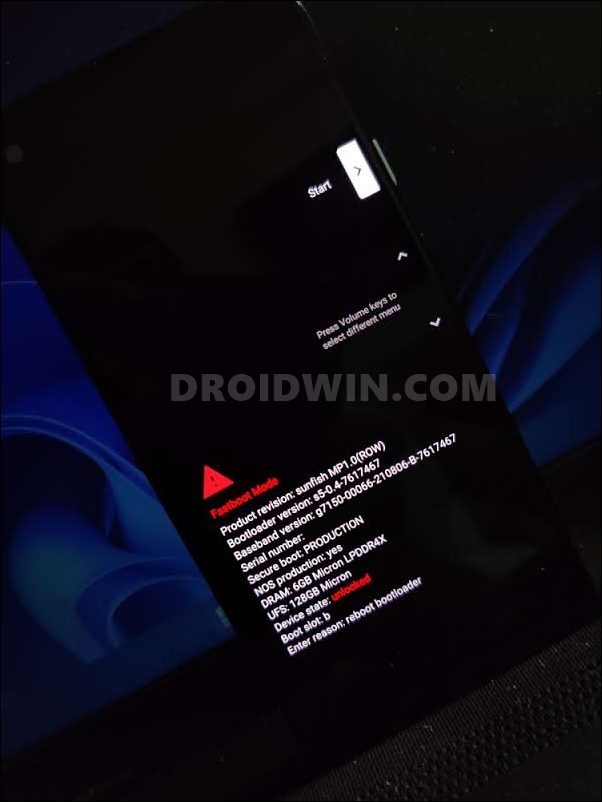
STEP 6: Boot to Fastboot Mode
- Now connect your device to the PC via USB cable. Make sure USB Debugging is enabled.
- Then head over to the platform-tools folder, type in CMD in the address bar, and hit Enter. This will launch the Command Prompt.
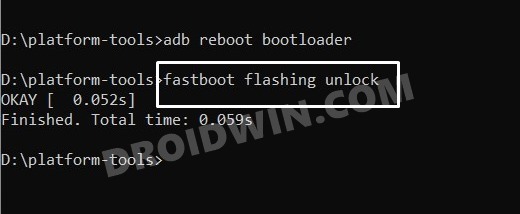
- Type in the following command in the CMD window to boot your device to Fastboot Mode
adb reboot bootloader
- To verify the Fastboot connection, type in the below command and you should get back the device ID.
fastboot devices

Now, if your device was launched with Android 12 or older versions, then carry out STEPS 8A and 8B. On the other hand, for devices launched with Android 13 or higher versions, then carry out STEP 9.
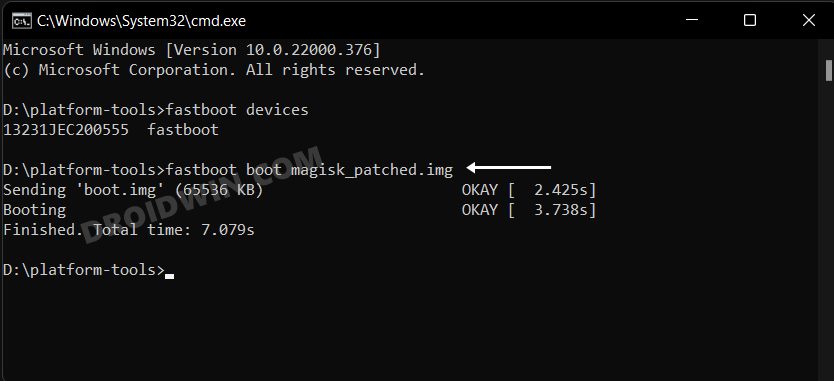
STEP 8A: Boot Android using Magisk Patched Boot.img [Android 12 or older]
It is always recommended to first boot your device via the patched boot.img, rather than directly flashing it. This way you will be able to check if everything is working well or not. If everything is on the good side, then you may proceed to the permanent root. If for some reason, the patched boot.img fails, then you just need to restart your device once.
Upon the next reboot, the patched boot will be replaced by stock boot.img and your device will then boot to the OS. So use the below command to boot your device via Magisk patched boot.img and hence attain temporary root.
fastboot boot magisk_patched.img
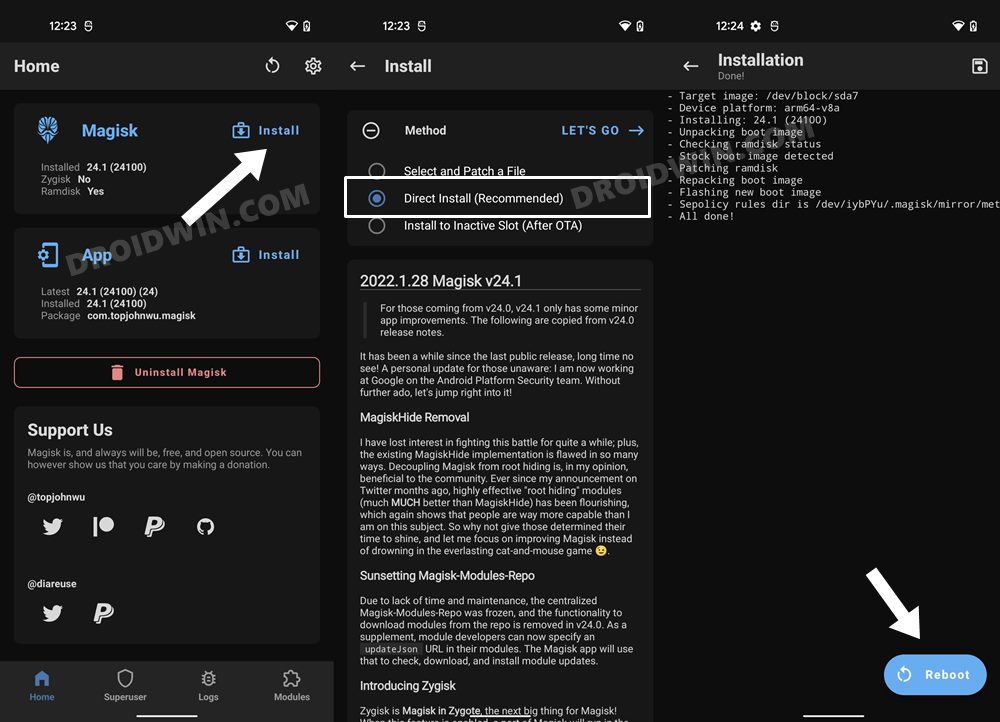
STEP 8B: Permanent Root via Magisk Direct Install
Now that your device is booted without any issues with a temporary root, let’s now make this root permanent. So refer to the below instruction steps to try it out.
- To begin with, launch the Magisk Manager App.
- Then tap on Install > Direct Install (Recommended) and tap Let’s Go situated at the top-right.
- Once done, hit the Reboot button situated at the bottom right.
- That’s it, your device will now boot to the rooted OS.
So with this, we round off the guide on how you could root your Android device running Android 12 or older versions via Magisk patched boot.img/init_boot without using TWRP.
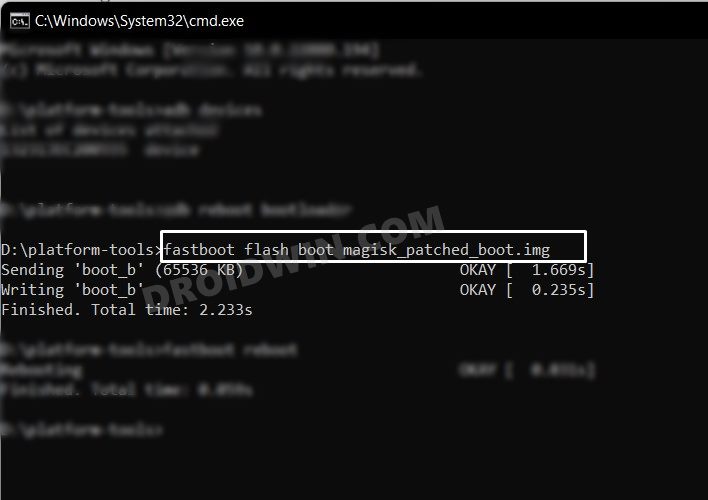
STEP 9: Root Android 13+ via Magisk patched init_boot
When it comes to init_boot, you cannot temporarily boot your device using it, instead, you’ll have to directly flash it to its partition. So execute the below command to flash the patched init_boot to its init_boot partition:
fastboot flash init_boot magisk_patched_boot.img
That’s it. These were the steps to root your Android device running Android 13 or higher versions via Magisk patched boot.img/init_boot without using TWRP.
Fastboot Boot vs Fastboot Flash for Root
As already discussed before, we choose fastboot boot to root your device because in case something goes wrong [say, you have used an incorrect boot.img file] and you had done temporary root, then simply restarting your device would replace the patched boot with stock boot and this will fix the bootloop issue within seconds. On the other hand, if you had permanently rooted and something went wrong, then upon restating, it will still have the corrupt patched boot [since you had permanently installed it].
So you will then have to manually flash the stock boot.img or in some cases, the entire payload.bin via Fastboot Commands. Apart from that, temporary root has many other benefits. For example, if you need to test a module for just a one-time usage, then you could temporarily create a rooted environment, try out that mod, and then restart your device to remove the root! Owing to all these benefits, we used the temporary boot method to root your Android device via Magisk without TWRP.
- With that said, if, for some reason, you still want to directly flash the magisk patched boot.img, then just execute the below command:
fastboot flash boot magisk_patched.img
- NOTE: If you are getting the Failed (remote: Flashing is not allowed for partition) error, then you’ll have to flash the patched init_boot to the FastbootD Mode instead of the Fastboot/Bootloader. For that, use the fastboot reboot fastboot command to directly boot to FastbootD Mode and then use the above [or below] command to flash the file.
- In some instances, for devices with an A/B partition, you need to flash the patched boot file to both partitions. So you could use the following two commands for the same:
fastboot flash boot_a magisk_patched.img
fastboot flash boot_b magisk_patched.img
- Finally, use the below command to boot your device to the rooted OS
fastboot reboot
Disabling vbmeta for Root
Many Xiaomi devices require you to flash the vbmeta and disable verification/verity checks before you could boot your device to the rooted OS. Here’s how it could be done:
- Extract the vbmeta.img from the stock firmware and transfer it to the platform-tools folder.
- Then boot your device to Fastboot Mode and connect it to the PC via a USB cable.
- Now launch CMD inside the platform-tools folder and execute the below command to flash vbmeta and hence disable verity check
fastboot --disable-verity --disable-verification flash vbmeta vbmeta.img
- Once that is done, you may now boot your device/permanently flash the Magisk patched boot.img file.

Flash Patched Vendor_Boot for Root
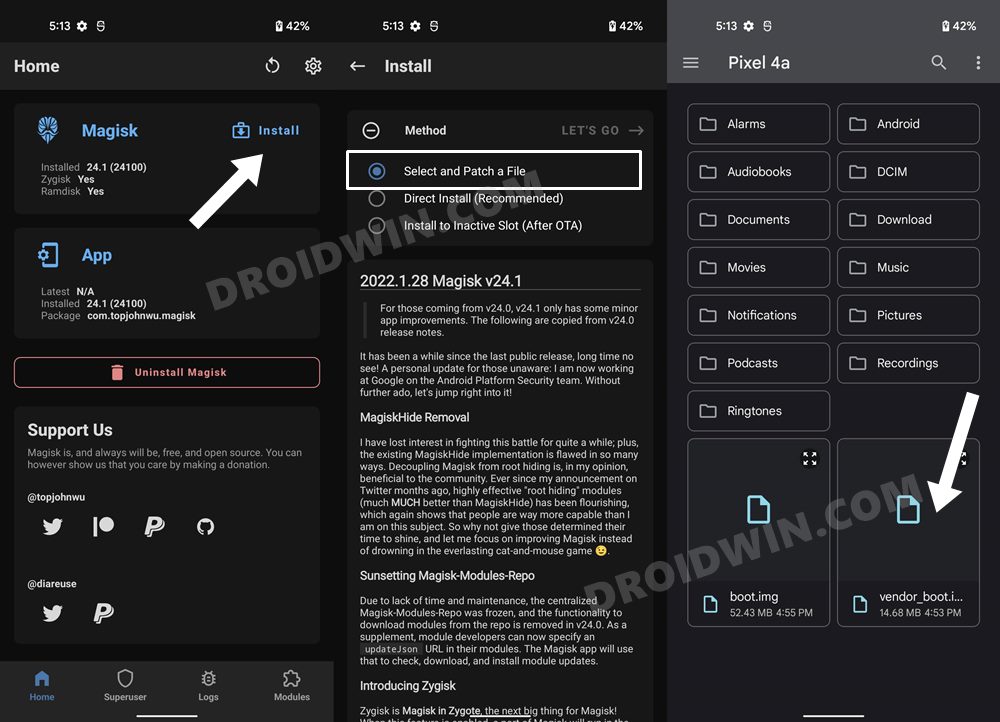
Apart from the patched boot and vbmeta, some devices like the OnePlus 10 series require you to patch and flash the vendor_boot as well. Here’s how it could be done:
- Extract the vendor_boot.img from the stock firmware and transfer it to your device.
- Then launch Magisk, tap on Install next to Magisk and choose Select and Patch a File.
- After that, select vendor_boot.img file and tap on the Let’s Go button situated at the top right.
- It will now patch this file as well. Once done, this patched file will also be present in the Downloads folder
- Transfer it to the platform-tools folder on your PC and rename it to magisk_patched-vb.img.
- Then boot your device to Fastboot Mode and connect it to the PC via a USB cable.
- Now launch CMD inside the platform-tools folder and execute the below command to flash the patched vendor_boot
fastboot flash vendor_boot magisk_patched-vb.img
- Once that is done, you may now flash the rest of the files to root your Android device without TWRP.
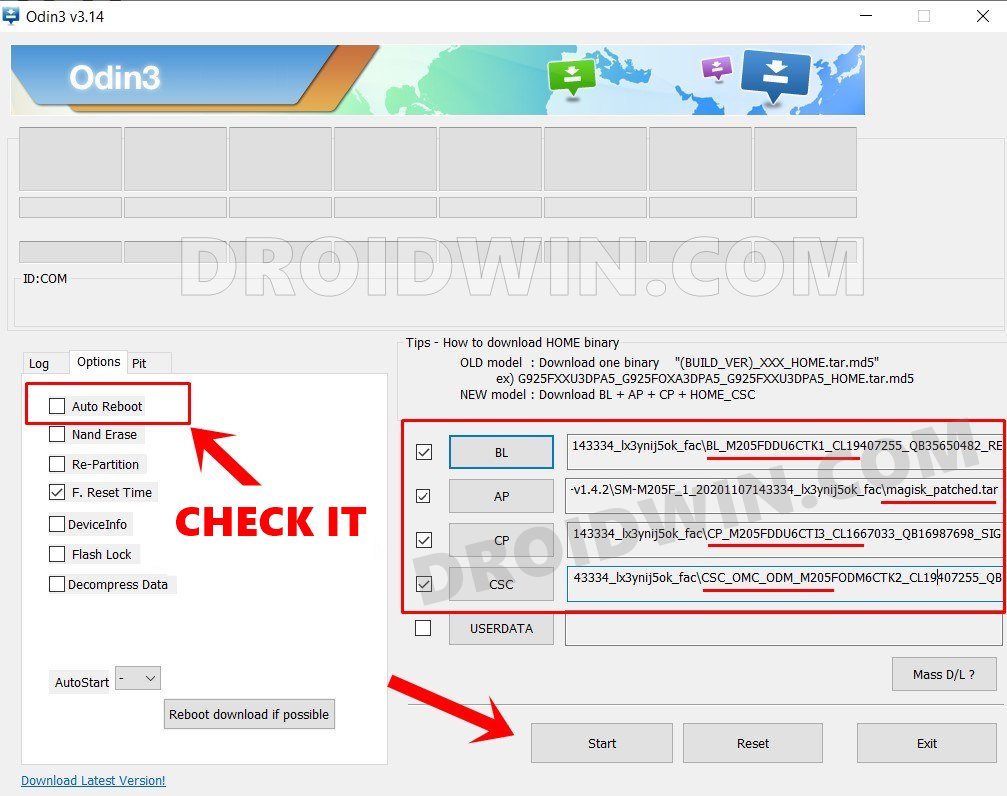
Rooting Samsung Device via Magisk without TWRP
When it comes to rooting Samsung devices, then the process is somewhat different in comparison with the rest of the devices. In Samsung, you will first have to download the firmware via Frija, extract the AP file, patch it via Magisk and then flash it in the Download Mode via Odin. So if you own a Samsung device, then please check out our separate guide on Root Samsung Devices via Magisk Patched AP.
FIX Couldn’t parse partition size ‘0x’
If you get the fastboot: error: Couldn’t parse partition size ‘0x’ issue, as some users have mentioned in the comments, then please refer to our detailed guide: How to Fix fastboot: error: Couldn’t parse partition size ‘0x’.


Evi1M4chine
Well, now the only question is: Where do I get that stock firmware from?
I mean my device can check if it is up-to-date. So I presume I can intercept that communication and/or fake it, and get the firmware, right?
Or even simpler: Can’t I just download the boot.img from the device via SP Flash tool? If only that one would work on Linux. (It doesn’t.)
Garrett
Hey there! I have the Sense TW102 on Android 11. Im trying to root device but cant seem to find boot.img
AlBasti
Thanks for the awesome content
Also Checkout
Nell
Hi, I need to root my phone (samsung S21) in order to recover deleted photos. Do I have to install TWRP recovery before using the kingroot app to root my phone? Or can i just use the Kingroot app, recover the photos and unroot once this is done?
ken w stapleton
trying to root i12 pro without TWRP , has android 10. when entered “fastboot reboot” or”fastboot flash boot magisk_patched.img” in cmd it responds ” waiting for any devices”. the i12 pro says it is in fastboot mode. will not go any further. any advice is appreciated.
Lastcell
Samsung phone doesn’t have fastboot mode especially mine with Samsung Galaxy J5 2016. Is there any way to fastboot magisk without fastboot? Maybe other command?
slycomm
After patching and flashing android 11 device boot.img phone keeps restarting until i flash stock boot.img
i used the canary version to patch
Asim Khan
Sir, i flashed patch boot. Img via pc flash Was done but Root is not installed..
Please Help
My Device:
Vivo S1 Android 11 version
Chipset MT6768
khurram
Hi sadiq,
On my A127f
I patched AP with magisk and flash with Odin.
Root is done.
Do i need No Verity to do, if yes.
can we do without TWRP.
Because the spoofing location software i use on my S8 are not working on this A12, i am suspecting it could be no verity file which is not flashed thats why its not working here.
Braden Loftus
Hi! Can you please tell me how to update my Magisk? I rooted a Eonon 10.1 Android 10 Head Unit (really 8.1, API 27) via SP Flash Tool. I have the boot_magisk_patched files along with MT8127_android_scatter file. But i cannot download any modules because it isnt Magisk 24. I try to update Magisk but I fail. I cannot use the recovery menu because i do not have the physical volume + or – keys. It is all touch screen. Please help!
Rehoboth
Please guy can you give me the boot.img for itel Prime 4 v608 – 7.0-OP-20180414
Christian
Good day Sir. I have done all the steps as instructed. However after trying to flash the patched boot file, the powershell is stuck on . Of note the patched file had a longer name that just magisk_patched.img so I renamed it to that and then tried. Would really appreciate any help as I have been trying to root SM-T530NU without success. Using Crdroid version 2.3
Mj
i have tried with specifying the path And know new error
failed remote not allowed in lock state
Sadique Hassan
Hi Mj, the error (remote not allowed in lock state) suggests that your device’s bootloader is still locked. Please unlock the bootloader using this guide: How to Unlock Bootloader of Any Android Device
Faizul Khan
Hey Sadique!
Got to say, the variety and quality of articles published by you are great! Do keep this going!
I have a OnePlus 7 Pro GM1911, running Resurrection Remix ROM (v8.6.8, Android 10), and using a custom recovery (TWRP version 3.5.2_9-0, latest version as of this moment). In order to gain root access, I followed the steps as mentioned in this article (and was successful in the same); however, I lost the TWRP custom recovery in the process. When I try to boot into recovery, the LineageOS recovery is what shows up on the screen.
Now, I could manually reinstall TWRP by flashing the .img and .zip files, but doing so will unroot my phone, right? Is there a way to keep TWRP after gaining the root access as outlined by you?
Sadique Hassan
Hi Faizul, since you are able to flash TWRP Recovery, you could consider directly flashing the Magisk ZIP via TWRP to obtain root. Moreover, if you are downloading Magisk version 22 or later build, make sure to rename Magisk APK to Magisk ZIP to make it a TWRP flashable file.
Wh
In the end of the process (or after fastboot flash boot_b patched_boot.img command) is the phone formatted?
I don’t want to loose datas on it.
Sadique Hassan
Rooting, in general, wouldn’t wipe your data. But there’s always an element of risk involved in custom development, and so we recommended a backup. if data is of paramount importance, then I would suggest that you don’t root your device. Because if not by rooting, then flashing a custom mod or binary could result in a brick/data loss one day or the other,
Felix Argyle
After rebooting into the bootloader and attempting to flash the patched file, the command window responds ‘Waiting for any device’ and doesnt continue, any idea how to fix this?
Sadique Hassan
Hi Felix, I have documented the fix for this issue here: Fix Waiting for Device Error in ADB or Fastboot Commands
Nisarg
hey can you give link for boot image ONLY for vivo1727
software version PD1730BF_EX_A_6.70.6
Mart
Hello i like to try this method But im lack of Data Could you please download Boot.img, My Rom is vivo 1726(y85).Advance thanks
Sadique Hassan
Hi Mart, will surely do so. Please let me know the current firmware or software version installed on your device as well. It might be under Settings > About Phone.
barry
How to install TWRP for Samsung Galaxy M11 SM-M115F ?
I couldn’t find the way to do it.
Daniel
Hello, i would like to know: How do i install Magisk in recovery without an custom recovery (like TWRP for e.g.) with the recovery.img (since Magisk shows I dont have Ramdisk in my device)?
My device is an Multilaser G.
Sadique Hassan
Hi Daniel, apologies for the delay. As of now, you need to patch the recovery.img file via Magisk (don’t forget to enable Recovery Mode in Magisk Manager). Then transfer it to the platform-tools folder and use the fastboot flash recovery patched_recovery_filename.img to flash it onto your device. I am also writing a detailed guide on this topic. If I forgot to update this comment, make sure to check my site within a couple of days. Thanks for your patience.
EDIT: Here’s the guide, as promised: Install Magisk in Recovery and Root Android [No Ramdisk]