In this tutorial, we will show you how to flash any custom ROM without using TWRP Recovery. Android devices usually behold a plethora of customizations. From installing launchers and icon packs to trying out numerous font styles,. there’s no stopping you. But this is just the tip of the iceberg. These are just some of the tweaks that an everyday user effectively carries out.
But then how could one make their device stand out from the crowd. Well, there is just one requirement that your device needs to qualify, and one you bypass that, you have literally opened the floodgates to the plenitude of modifications. That requirement is an unlocked bootloader.
Many OEMs ship their devices with a locked bootloader. The reason on their part is perfectly simple- they only want the user to try out the stock OS experience that they have shipped. But then, here is the problem. Not everyone is a fan of this stock ecosystem and they want a change from this. Enters the concept of an unlocked bootloader. Once you do so, you could carry out an ocean of tweaks, with the ability to install custom ROMs occupying the top spot.
There are quite a few big players in this domain. These include the LineageOS, HavocOS, Pixel Experience, and many others. Apart from installing custom ROMs, you could replace stock recovery with a custom one like TWRP, or even gain admin privileges by rooting your device via Magisk (with or without TWRP). Likewise, tons of Magisk Modules, Xposed Frameworks mods, and Substratum themes are all waiting for you.
Fortunately, most of these tweaks could effectively be carried out without even using a TWRP Recovery. But there has been this long-standing doubt as to whether one could flash a custom ROM without even installing TWRP Recovery. In this guide, we will address this question in the best possible manner and then list out detailed steps to achieve this. Follow along.
- How to Install OTA Updates in Rooted Android Device
- How to Permanently Install TWRP without TWRP ZIP File (only using TWRP.img file)
- Root Android Devices Without TWRP Recovery
- [GUIDE] Flash ROMs/Magisk/TWRP/Kernels on A/B Partition Devices
Table of Contents
Why Flash a Custom ROM without TWRP
There is no denying the fact that TWRP beholds quite a lot of useful functionalities. Not only the installation of custom ROMs, ZIPs, and IMGs, but there is also an option to create Nandroid backup, wipe device partitions, and carry out advanced functionalities like Fixing bootloop, Recovery Ramdisk, Terminal Window among others. So why would anyone want to part its way with this custom recovery?
The reason stands simple- not every device has a working TWRP Recovery. For some there exists a direct official build, for others an unofficial build that developers have created and could be accessed via forums like XDA. But even if we combine these two, there exist a plethora of other devices that are left bereft of working custom recovery like TWRP.
That is why one of our main focus always remains to give equal weights to the devices without a TWRP recovery. For example, you could root any Android device without TWRP or even permanently flash TWRP just by using its IMG file (without the need of TWRP ZIP). So while we could effectively deal with them, could we also install a custom ROM via TWRP Recovery? The answer is YES, YOU COULD FLASH A CUSTOM ROM WITHOUT TWRP. How? Let’s check it out!
- Run ADB Fastboot Commands directly on Android without Root
- How to Use ADB and Fastboot Commands on Android Without PC
- How to fix ADB Device not found [List of Devices Attached is blank]
- Detailed Steps to Fix adb is not recognized Error
How to Flash a Custom ROM without TWRP
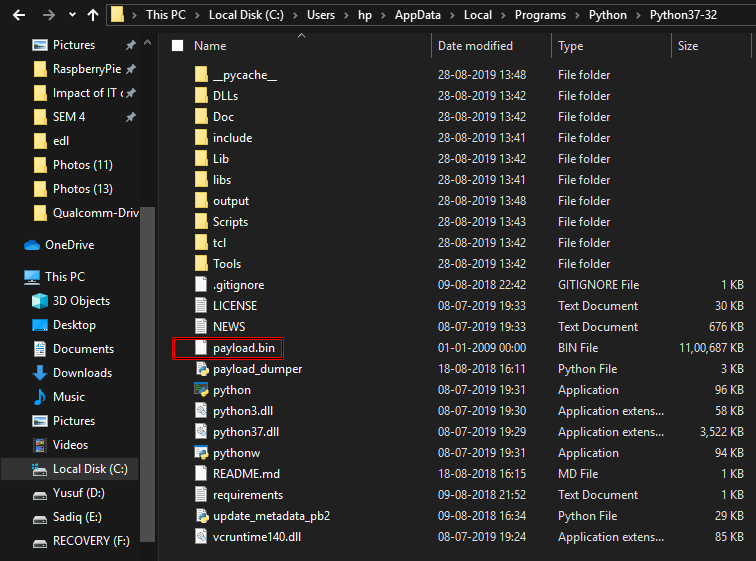
Just to simplify the explanation process, let’s take the practical route. Here are the contents of a custom ROM (HavocOS).
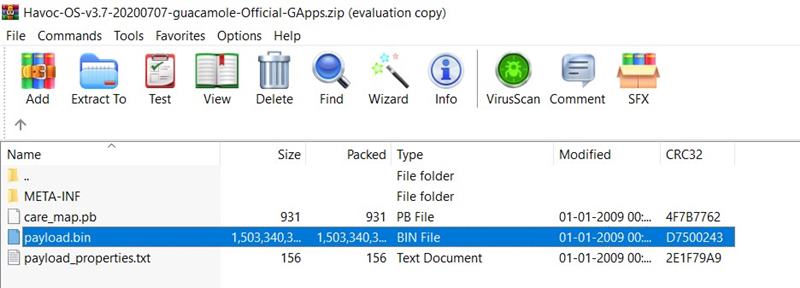
As you can see, nearly all the contents have been kind of compressed inside a single file- payload.bin. So this straight out signifies that all the important files are present inside this single file. Now the all-important question- how to extract the content of this file?
For that, you will need Python installed on your PC. Yes, the steps might seem daunting at first, but trust us this is just a one-time process. From the second time onwards, you would only have to exert 10% of the efforts. With that said, head over to the below requirements section and get yourself acquainted with the required tools.
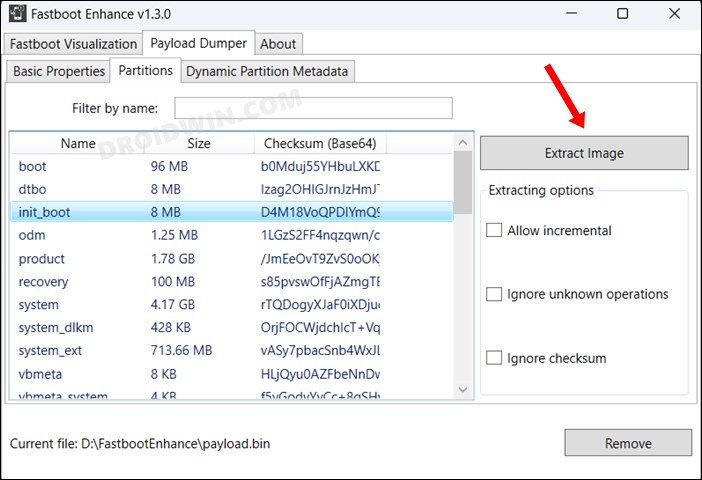
UPDATE [NEW]
Instead of carrying out the Prerequisite and STEPS 1 to 3, you may now directly use the Fastboot Enhance Tool to get the job done and then start off with STEP 4. This will save you a considerable amount of time.
Prerequisites
- For extracting the Payload.bin file, you need a Payload Dumper Tool. We would like to thank Gregory Montoir for creating this tool. You can download it from the following link: payload_dumper.zip
- Likewise, you should also have to install Python on your PC. Download Python v3.8.5 (latest version at the time of writing).
That’s all you need to flash a custom ROM without TWRP. Now proceed with the installation steps. Just make sure that you are double-sure what you are doing. DroidWin or any of its members won’t be held responsible in case anything happens to your device. However, if that happens, the comments section is all yours. Drop in your queries and we will get back with a solution.
- [GUIDE] Flash ROMs/Magisk/TWRP/Kernels on A/B Partition Devices
- Everything About Magisk- Manager, Modules and More
- Best Magisk Modules of 2020 [PART-1]
- How to Fix FAILED (remote: unknown command) Error
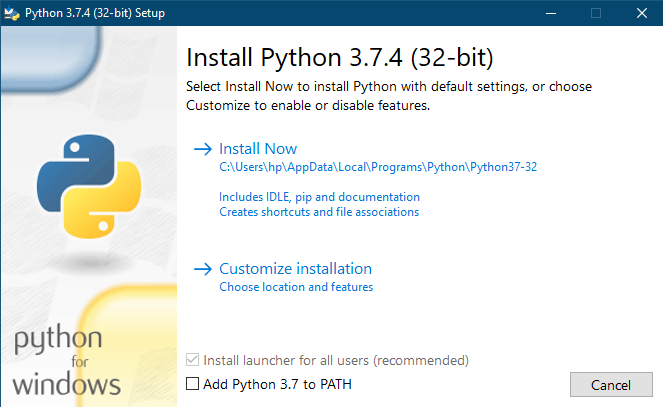
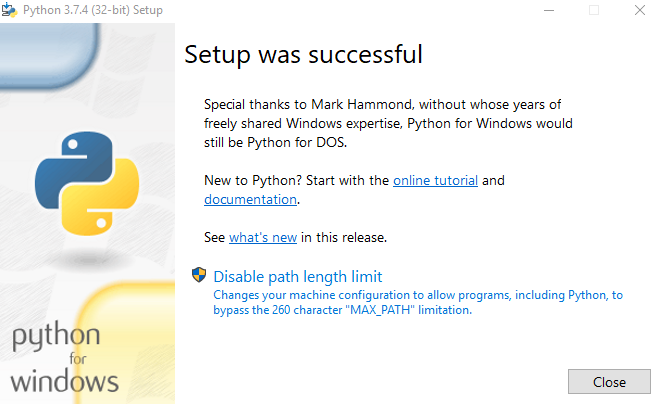
STEP 1: Install Python on your PC
- Launch the Python EXE setup file. It will then ask for the installation directory. Click on Install Now if you wish to proceed with the default one, which would make it easier for you to follow this guide. Or you could also click Customize Installation if you want to change the directory.

- Whatever installation directory you end up choosing, make sure to keep a note of it as it will be needed later on. The installation process will be completed within a minute or two. When that is done, hit the Close button to exit the setup wizard.
STEP 2: Install Payload Dumper file
Now that you have installed Python, you could proceed with the extraction of the Payload.bin file. For that, we will be making use of the Payload Dumper Tool. Follow the below steps for that:
- Extract all the contents of the Payload Dumper Tool inside the folder where you have extracted Python.
- If you have chosen the default directory while installing Python, then the contents should be extracted inside:
C:\Users\USER-NAME\AppData\Local\Programs\Python\Python <version number>
STEP 3: Extract Payload.Bin
- Now copy the payload.bin file from the Custom ROM and move it to the folder where you have installed Python.
- Hence, this directory will now have the Payload Dumper Tool, the payload.bin file, and the Python software.
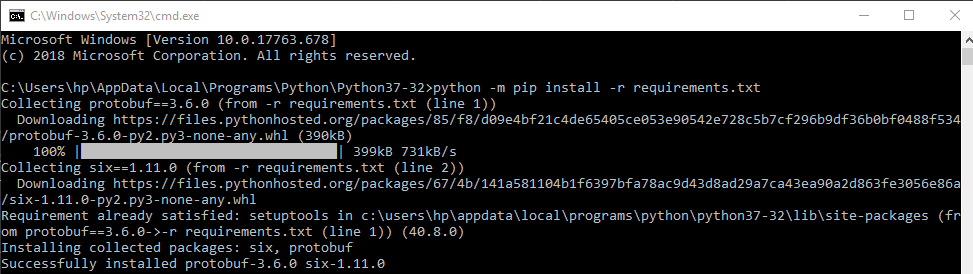
- Inside the same folder, type in CMD in the address bar and hit Enter. This will launch the Command Prompt.
- Type in the below command to install the necessary dependencies:
python -m pip install -r requirements.txt
- Finally, execute the below command to extract all the contents of the payload.bin file. It will take some time, depending on the size of the package.
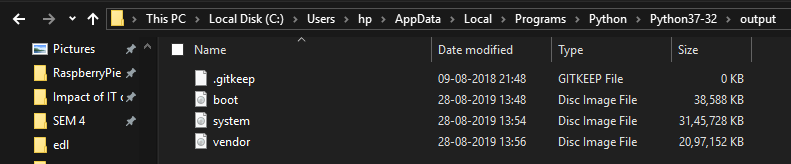
- In our case, the payload.bin file gave us three files: boot, system, and vendor. In some cases, you could also get dtbo, and a couple of other files as well. That is not an issue. We will show you how to deal with that as well.
- Anyways, moving on, once the process is complete, all the extracted files be placed in a folder named Output. If you have installed python in the default directory, then the location of the output folder will be:
C:\Users\USER-NAME\AppData\Local\Programs\Python\Python<version-number>/Output

Now we would be using these files. Head over to the below instructions to complete the process of flashing custom ROM without TWRP Recovery.
- How to Flash Stock Firmware via Fastboot Commands
- Fix Unauthorized Device with ADB Commands [3 methods]
- How to Update Magisk ZIP and Magisk Manager (without TWRP)
- Fix Magisk Module Bootloop without TWRP Recovery
STEP 4: Wipe Device Partitions via Fastboot Commands
Well. before flashing any custom ROM, you will also have to wipe off various device partitions. These include wiping the data partition, and system partition doing a complete factory reset to decrypt the data, etc. However, different ROMs follow different procedures in this regard, hence you might have to check the ROM thread or their official website.
If you still face any issues, then you could inform me via the comments section (please include the device and the ROM name as well). The general commands usually include the ones that we have mentioned below, however, it is better to check with the ROM developers what they instruct to wipe.
fastboot erase userdata // erase data partiton [optional]
fastboot -w // factory reset [compulsory]
STEP 5: Flashing the Custom ROM Files Manually
Now that we have extracted all the contents of the custom ROM, its time to install them onto your device. Here is how to flash the custom ROM onto your device without the TWRP Recovery. We would only be making use of the fastboot commands.
- Download and install the Android SDK Platform-Tools folder on your PC.
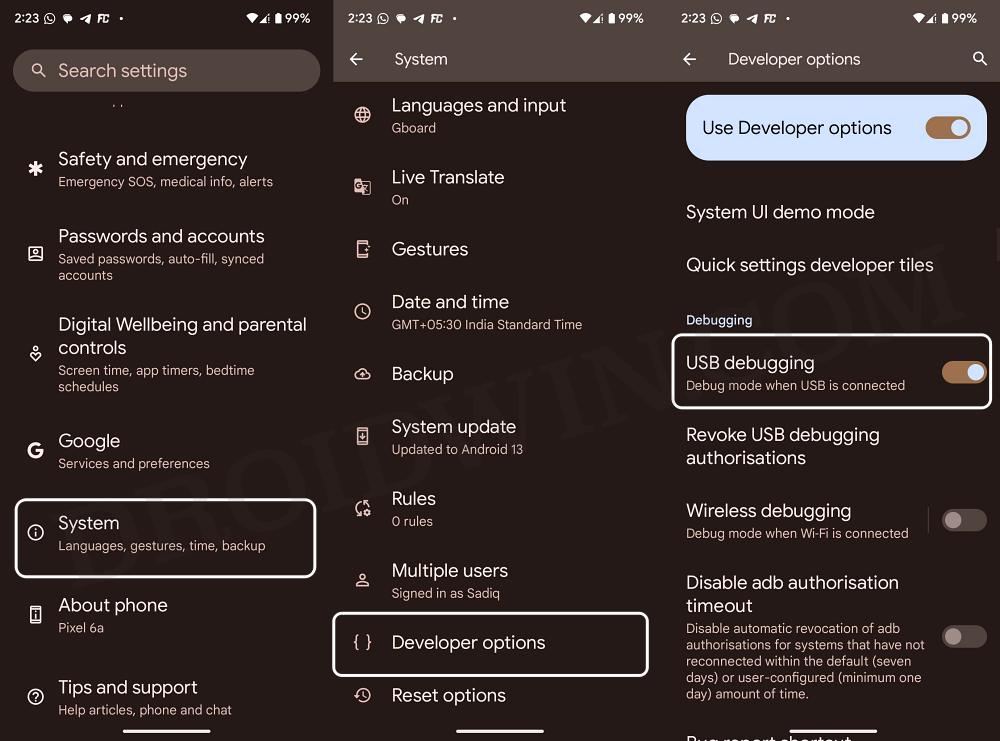
- Now enable Developer Options onto your device followed by USB Debugging. Then connect your device to PC via USB cable.
- Also, transfer all the extracted files (boot, system, and vendor, etc) to the platform-tools folder as well.
- Inside this same platform-tools folder, type in CMD in the address bar, and hit Enter. This will launch the Command Prompt.
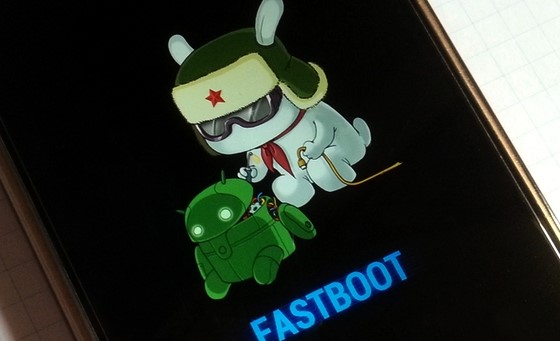
- Now type in the below command to boot your device to fastboot/bootloader mode:
adb reboot bootloader
Fastboot Mode in Xiaomi - First off, perform a factory reset via the below command:
fastboot -w
- Then change your active slot to A via the below command:
fastboot --set-active=a - You may now flash the required files with the help of the following commands:
fastboot flash --slot=all boot boot.img
fastboot flash dtbo dtbo.img
fastboot flash --slot=all modem modem.img
fastboot flash vendor_boot vendor_boot.img
fastboot flash vbmeta vbmeta.img
fastboot flash vbmeta_system vbmeta_system.img
fastboot flash vbmeta_vendor vbmeta_vendor.img
- Now boot your device to FastbootD Mode via the below command:
fastboot reboot fastboot
- Then flash the remaining files via the below commands:
fastboot flash --slot=all abl abl.img

fastboot flash --slot=all aop aop.img

fastboot flash --slot=all bluetooth bluetooth.img

fastboot flash --slot=all cpucp cpucp.img

fastboot flash --slot=all devcfg devcfg.img

fastboot flash --slot=all dsp dsp.img

fastboot flash --slot=all engineering_cdt engineering_cdt.img

fastboot flash --slot=all featenabler featenabler.img

fastboot flash --slot=all hyp hyp.img

fastboot flash --slot=all imagefv imagefv.img

fastboot flash --slot=all keymaster keymaster.img

fastboot flash --slot=all multiimgoem multiimgoem.img

fastboot flash --slot=all oplus_sec oplus_sec.img

fastboot flash --slot=all oplusstanvbk oplusstanvbk.img

fastboot flash --slot=all qupfw qupfw.img

fastboot flash --slot=all qweslicstore qweslicstore.img

fastboot flash --slot=all shrm shrm.img

fastboot flash --slot=all splash splash.img

fastboot flash --slot=all tz tz.img

fastboot flash --slot=all uefisecapp uefisecapp.img

fastboot flash --slot=all vm-bootsys vm-bootsys.img

fastboot flash --slot=all xbl xbl.img

fastboot flash --slot=all xbl_config xbl_config.img

fastboot flash vendor vendor.img

fastboot flash odm odm.img

fastboot flash system system.img

fastboot flash system_ext system_ext.img

fastboot flash product product.img

fastboot flash my_bigball my_bigball.img

fastboot flash my_carrier my_carrier.img

fastboot flash my_company my_company.img

fastboot flash my_engineering my_engineering.img

fastboot flash my_heytap my_heytap.img

fastboot flash my_manifest my_manifest.img

fastboot flash my_preload my_preload.img

fastboot flash my_product my_product.img

fastboot flash my_region my_region.img

fastboot flash my_stock my_stock.img
- Once again, do a reset via the below command:
fastboot -w
- Finally, you may now reboot to the newly flashed OS:
fastboot reboot

These are some of the files that you are likely to come across. If apart from them you find any other files as well (rare, but the possibility is still there), then do let us know in the comments. We will provide the fastboot commands of that file as well.
Flashing Instructions for Devices with A/B Partitions
If your device is an A/B partition, then there will be a slight variation in the commands. Some devices require the flashing of files to the current active slot, whereas others require to be flashed to both the slots. Here is the example for both.
- Install Custom ROMs on any Android Device- Includes A/B Partition
- [GUIDE] Flash ROMs/Magisk/TWRP/Kernels on A/B Partition Devices
- How to Flash Various Files in A/B Partition Devices
For Devices with Current Active Slot “A” (or ‘B”)
If your device has the current active slot as A, then the below commands will be handy. On the other hand, if it is B, then don’t consider switching slots. It might happen that your inactive slot might not have the OS installed, and you could end up in a bootloop. Rather a much safer approach will be to just change the ‘a’ keyword with ‘b’ in the below commands.
fastboot flash vbmeta_a vbmeta.img
fastboot flash oem_a oem.img
fastboot flash logo_a logo.bin
fastboot flash boot_a boot.img
fastboot flash dtb_a dtb.img
fastboot flash dtbo_a dtbo.img
Devices that require Flashing to Both Slots
Let us suppose you have to flash the system.img file to both the partitions. Then the command will be
fastboot flash system_a system.img
fastboot flash system_b system.img
You could modify this command accordingly for all the partitions that you need to flash. But if you aren’t sure then please don’t for a hit and trial approach. Rather, drop in your queries in the comments below. So with that said, this was all from this guide on how to flash a custom ROM without TWRP Recovery. We hope we were able to clear off all your doubts, if not you own the comments section!
FAQ: How to Flash a ROM via Recovery
If your device has support for custom recovery, whether TWRP, OrangeFox, or PitchBlack, then it’s highly recommended that you flash the ROM via the recovery itself. Before starting, make sure that you are on the latest version of the firmware. If that is not the case, then install the pending updates beforehand and then proceed with the below steps.
Moreover, the process will wipe off all the data from your device, so take a complete device backup.
- First off, unlock the bootloader on your device.
- Then install the TWRP Recovery on your device.
- Now download and extract Android SDK Platform Tools on your PC.
- Then enable USB Debugging and connect your device to PC via USB.
- Now open the Command Prompt inside the platform-tools folder.
- Then type in the below command to boot your device to TWRP:
adb reboot recovery
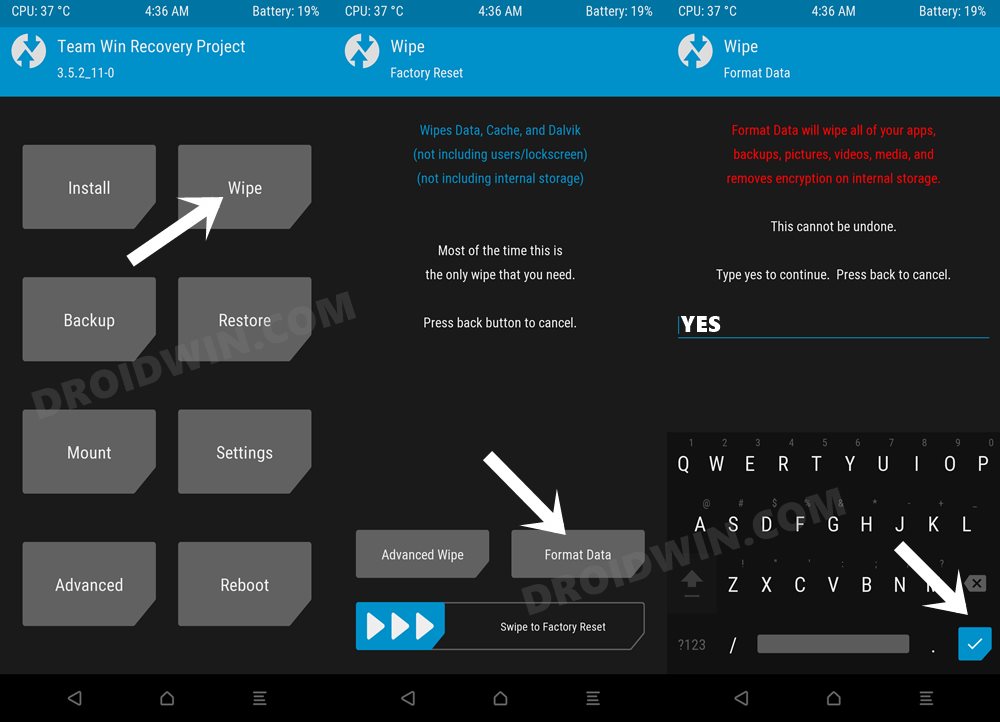
- From there, go to Wipe > Format Data > Type in YES > hit the checkmark.
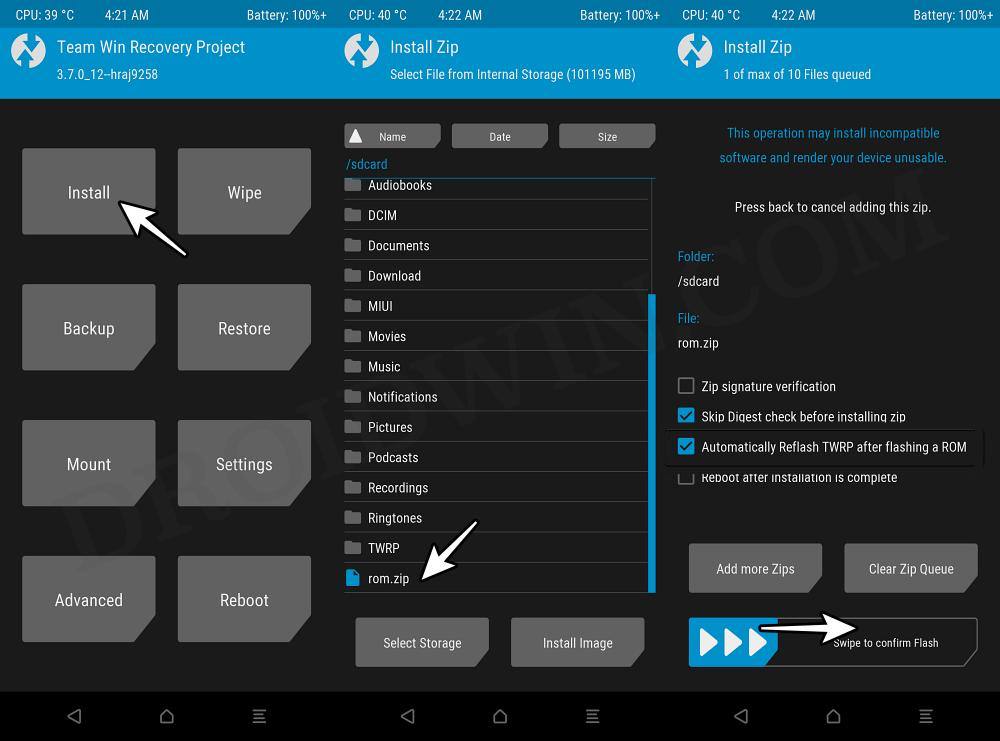
- Once done, transfer the ROM ZIP file to your device.
- Now go to Install, select the ROM ZIP file, and perform a right swipe to flash it.
- Once done, again go to Wipe > Format Data > Type in YES > hit the checkmark.
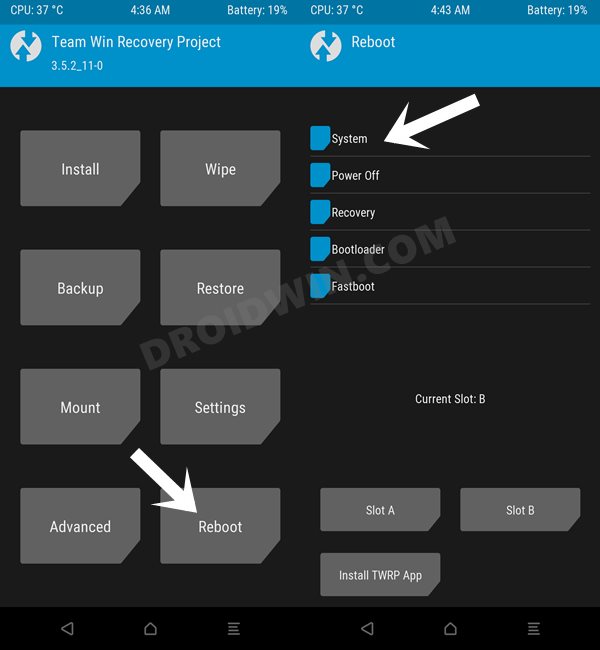
- Finally, go to Reboot and select System. Your device will now reboot to the OS.


maew
I have more than 20 files. Flash all or flash what is needed.
maew
mi12t slot a/b or 1 slot
maew
I have more than 20 files. Flash all or flash what is needed.
Evergreen
My device is Motorola Moto g8 power. It has both a and b slot. With slot a as active slot. Do I need to flash it at both slot. Sorry I forget to include it in my first post. Please bear with me
Evergreen
Hello, please help me on how to flash this files accordingly. In my rom I find,
boot.img,
system.img
vendor.img
dtbo.img
product.img
recovery.img
vbmeta.img
super_empty.img
Thanks
Jimmy
How do I know if my device needs to flash the files on not partitions (Nokia 7.2)
Rohit
i am using LG G7 with partition A/B. I am trying to boot Evolution X rom.
I want to know if i need to flash in both partitions? because when i flash stock rom i saw in actions(LGUP app) its flashing in both a and b.
or magisk img(to root) i flashed boot.img in both a and b partitions.
And also tell me if these commands are correct in order
adb reboot bootloader
fastboot -w
fastboot flash system_a system.img
fastboot flash system_b system.img
fastboot flash boot_a boot.img
fastboot flash boot_b boot.img
fastboot flash vendor_a vendor.img
fastboot flash vendor_b vendor.img
same for vbmeta and dtbo a/b.
Ben
Hey
I run the programm a couple of times and know i have all .img files. 🙂
Yugendhra venkatesh
sir when i pass this command ‘fastboot flash system system.img’ its showing ‘Invalid sparse file format at header magic’ what to do sir. please solve this issue!!
Sadique Hassan
Hi Yugendhra, you don’t need to worry about this error, its normal. Just proceed ahead with the next command.
Yugendhra Venkatesh
What is the Fastboot Commands to Wipe Device Partitions on oneplus 8 pro for flashing Evolution X ROM.
itachi
i used twrp for installing custom rom . By mistake it leads to complete format of my os . while tring to install other custom rom , shows lots of error like : ” failed to mount?vendor (invalid argument )” . can i use your method to install some other rom on my device or is there any other ways to install through twrp . please reply . Sorry for my bad english . please help
Sadique Hassan
Yes, you may definitely try this guide. As far as any other method is concerned, you may try flashing the stock firmware, then flash twrp again. After that, wipe data, Dalvik cache, and format data. Then try flashing the custom ROM and let me know the results.
SushiX
hey, I’m thinking about this method since I have problem with twrp on my xiomi mi a1 (the touch control doesnt work and I haven’t found a solution).
I just wanted to ask about the exact procedure: shouldn’t I first wipe/format something? or is the fastboot flash comand doing it? sorry if it is a stupid question, I don’t understend the tech behind all that, I just folow the guides ;o)
Sadique Hassan
Hi SushiX, it is a genuine question, glad you asked. Yes, you will have to wipe the data and in some cases, the system partition as well. Could you let me know which ROM are you planning to flash on your Mi A1 device so that I may list down the instructions related to that ROM itself.
SushiX
hi and thanks for quick response.
I’m on the last stock rom with unlocked bootloader and was thinking about something stable to replace it since it’s been discontinued. so maybe the pixel experience 10plus? that’s what I was about to try before I ran into the twrp touch problem…
AKASH
I tried booting into twrp but it shows black screen
AKASH
hi i am using poco f1
it is A partition
i want to flash pixel experience rom
it has these file : https://drive.google.com/file/d/14injdlgirvxKHwQB42pmaPrs399M3cnh/view?usp=sharing
Can you please help me how to flash these files
My device is stuck on fastboot mode
Sadique Hassan
Hi Akash, apologies for the delay. For the situation that you are currently stuck in, I would suggest you go ahead and flash the TWRP Recovery and then follow the ROM flashing instructions. For that, use the fastboot flash recovery twrp.img command to install TWRP and then use the fastboot boot twrp.img to boot your device to TWRP. Once booted, you may then proceed with flashing the ROM. [Make sure that you have renamed the recovery file to twrp and have also moved it to the platform-tools folder.]
A K De
I have a mi A1 device with pixel experience plus rom installed in slot a. Don’t know whether slot b also contains the same os. I flashed this rom with twrp 3.0, just temporarily booting. Now this rom gets incremental update of November 20. I downloaded and tried to install it through pixel experience plus’s recovery as well as twrp but without a success. Can I install this increamental updated by extracting payload.bin file using python & payload dumper tool after getting system & boot img files? Kindly advice. Thanks
Sadique Hassan
Hi AK, incremental updates are never known to cause any issues as such. Could you please let me know the error that you are facing on installing it via TWRP/LineageOS. As far as the payload method goes, well I have never tried updating a ROM via that method, but I “guess” that method should work as well. I’m stressing on the word ‘guess’ because I haven’t tried it myself yet and until I do so, I don’t write about it or recommended it either. However, if you are ready to do so, then please take a complete backup beforehand and then try it out. And let me know the results as well.
A K De
Thanks for your reply. As I mentioned you, I own a MI A1 device ( it is A/B device) in which I recently flashed pixel experience plus rom. I used twrp 3.4 recovery to flashed the rom, booting from fastboot not installing though.I can’t install November 20 incremental update of PE plus. For update I used PE’s own recovery which was installed with the rom by default. During update installation, an error msg displayed ” Installation can’t be made as the system partion was modified by installing some add on or custom kernal”. While twrp 3.4 says ” Error in sideloading pakage.zip ( killed by signal 7). I flashed the update in twrp by booting from fastboot not installing. Kindly help me to install the update. Thanks. A. K. De, Uttarakhand.
Sadique Hassan
Hi AK, have you flashed a custom kernel on your Mi A1, or more importantly, have you installed the Xposed Framework on your device. if that is the case, then please uninstall all these tweaks/mods. However, if you don’t have these installed, then please execute the instructions given here and let me know the results: How to Fix TWRP Error 7 (While Flashing Custom ROM via TWRP).
A K De
This is not related to error 7 because ota update zip file contains meta – inf, payloadbin,etc. In meta- inf folder, there is no scricpt file. It has only metadata & otacert under com>android> folder. I know how to delete assert script from script file using notpad ++. I think the problem is that the inactive slot (b) where update will be installed has no OS at all. In my case slot a is active. What do you think. Thanks.
darius
Extracted payload bin had only two files, what is the problem?
Sadique Hassan
Could you please let me know the ROM that you are trying? is it a GSI or Custom, and if custom, which one?
saulius
Boot, system – only 2 files extracted, vendor is missing…
Sadique Hassan
Could you please let me know the ROM that you are trying? is it a GSI or Custom, and if custom, which one?
Orz
This method required unlock bootloader or not. Sorry for my bad English
Sadique Hassan
Yes, it does require an unlocked bootloader
Heller
There is no payload.bin file in any custom roms that in cudes even Havoc Os 3.7
Sadique Hassan
Well, the thing is not every custom or GSI ROM bundles their files under payload.bin. Some even today follows the old route of simply packing in the files inside the ZIP which one could directly get hold of quite easily. Even the offical Android 11 GSI released by Google has all the required files (system and maybe vbmeta) under the ZIP format. Simply extract it and flash it via Fastboot. In case of Havoc, does it follows the .br extension for vendor and system files (boot should be image, that’s for sure). Just update me for the other two and I will let you know 🙂
marco
My fastboot doesn’t show anything on device, but it works by terminal. I’m installing lineage on my sony xz premium. the rom has system and vendor in the .br extension, so I didn’t get the dumper to work, if it should. Any advice? Thank you
evans
it’s in an image file