In this tutorial, we will show you the steps to fix the adb is not recognized as an internal or external command operable program or batch file. The complete error message reads: ‘adb’ is not recognized as an internal or external command, operable program, or batch file. When we talk about an open-source ecosystem like Android, it straightway translates to the ability to carry out a plethora of tweaks. The general users are usually satisfied with installing custom launchers, icon packs, and fonts. Whereas tech enthusiasts take this a step further. They start by unlocking the device’s bootloader.
This then allows you to flash custom ROMs like AOSP, Pixel Experience, install custom recoveries like TWRP or LineageOS recovery. Along the same lines, you could gain access to the system partition by rooting the device via Magisk. However, near about each of these tasks calls for the execution of ADB or Fastboot Commands. Apart from that, booting your device to fastboot or recovery (whether stock or custom) also requires the execution of these commands.
While you could do so via hardware keys, it is a tough job remembering all these shortcuts. On the other hand, these universal ADB and Fastboot are valid across all Android devices and all versions. However, some users seem to be having an issue or two while executing these commands. The most common among them is the adb not recognized error. In this regard, this guide will help you out. Today, we will be sharing some handy tips that will help you fix the adb is not recognized as an internal or external command operable program or batch file error
- How to Fix FAILED (remote: unknown command) Error
- How to Extract payload.bin and get the stock boot image file
- Fix: pip is not recognized as an internal or external command
- Fix Mi Account Authorization | Unbrick Xiaomi | EDL Mode
Table of Contents
How to Fix adb is not recognized as an internal or external command operable program or batch file
Do make sure to follow the below-mentioned instructions in the exact same sequence as mentioned. Without further ado, let’s get on with the guide.

STEP 1: Download Google’s ADB package
To begin with, it is highly recommended that you only download and install Google’s Android SDK Platform Tools. Although there are a plethora of tools that offer this, yet they usually have one or two binaries missing. Therefore you should only stick with the offering from Google own. Why this tool is needed? Well, it provides all the necessary ADB and Fastboot files that are needed for the proper execution of these commands. Hence install the Android SDK Platform Tools and once done, head over to the next step to fix the adb not recognized error.
STEP 2: Recheck USB Debugging | Authorization
The first one is along the obvious lines, the second one, not so much. To begin with, make sure you have enabled the USB Debugging on your device. This is needed so that your device gets recognized by your PC in the ADB mode. So head over to Settings > About Phone > Tap on Build Number 7 times > Go back to Settings > System > Advanced > Developer Options > Enable USB Debugging. On the other hand, Debugging Authorization is needed so that the PC is able to authorize the connected device.
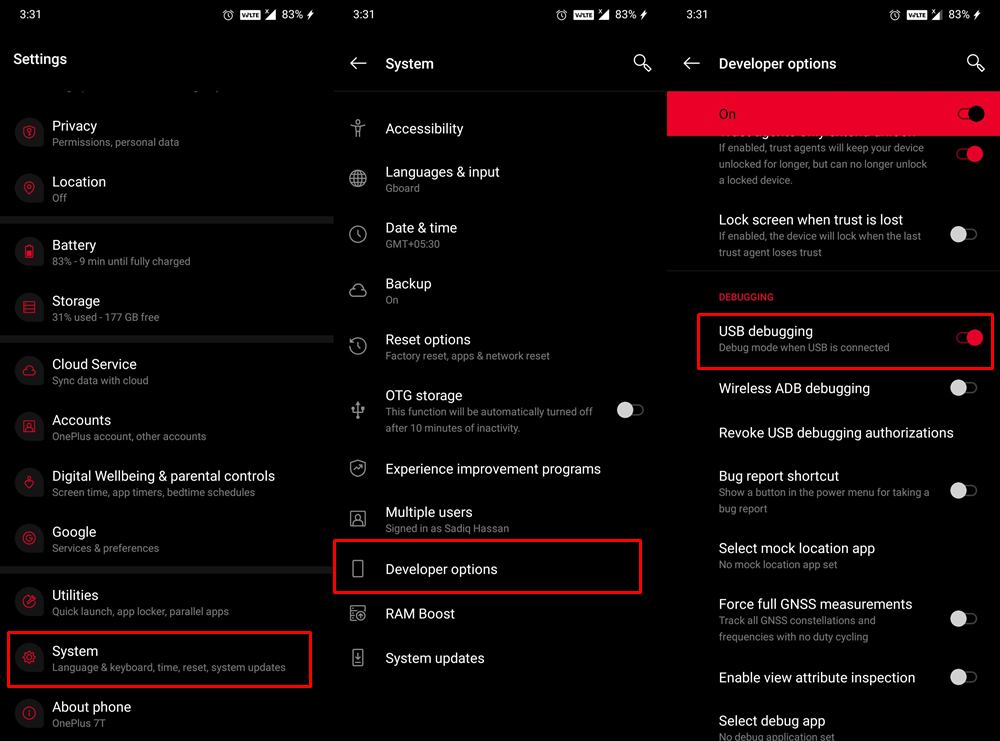
Otherwise, you will get an “unauthorized device” error. If that is the case with you as well, then refer to our guide on How to Fix Unauthorized Device with ADB Commands. However, if you don’t wish to go through our detailed guide, then here is the shorter explanation: go to Developer options > Debugging section and enable the Revoke USB Debugging Authorization option. So now that you have enabled USB Debugging as well as Authorization, proceed to the next step to fix the adb not recognized error.
- Disable DM-Verity or Android Verified Boot without TWRP
- How to Update Magisk ZIP and Magisk Manager (without TWRP)
- Everything About Magisk- Manager, Modules, and More
- How to Extract OZIP Realme Stock ROM (Firmware)
STEP 3: Launch CMD inside ADB Folder
First and foremost, always keep a safe distance from PowerShell. You should only use the Comand prompt. Not only it is faster but it’s free from all the complications that PowerShell has. For example, PowerShell requires you to input .\ before every command, so a simple adb devices command corresponds to \ adb devices. This extra effort is just one of the many reasons why I don’t go for this tool. So it is always a better option for Command Prompt.
Now there are two different approaches for the same. You could either launch the Command Prompt as you normally do and then change its directory to the folder that has the ADB and Fastboot files. But this again calls for a lot of effort as you will first have to copy the location and paste it in the CMD window and then only you could execute the commands. Fortunately, there is an easier way out to fix this issue, and hence the adb not recognized Error.
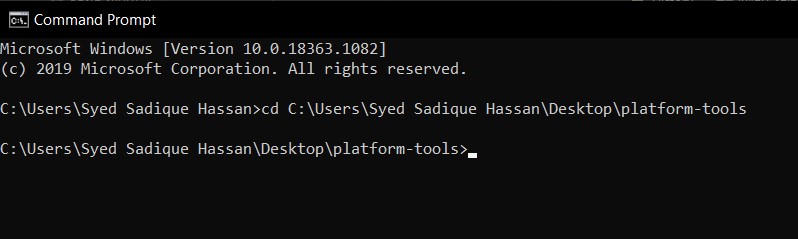
Head over to the location where you had installed the Android SDK Platform Tools in the first step. There you should find the platform-tools folder. Go to that folder’ address bar, type in CMD, and hit Enter. This will launch the Command Prompt and you could now easily execute the desired commands. What you had done just now is that you have launched the CMD window inside the folder where ADB and Fastboot files are present.

So the CMD window automatically picks up that location and you no longer have to change the directory manually. Well, this should fix the “adb not recognized” error for most of our readers and they might skip the next step. However, if you are still facing the error, then you should move over to the next step. Well, even if you have fixed the error, we would still recommend you go through it as it might help you out with other software/tools/apps in the near future.
- Fix TWRP Error 7 (While Flashing Custom ROM via TWRP)
- How to Fix FAILED (remote: unknown command) Error
- How to Permanently Install TWRP without TWRP ZIP File (only using TWRP.img file)
- Root Android Devices Without TWRP Recovery
STEP 4: Add the Missing Environmental Variables
In some instances, the CMD window or Powershell for that matter isn’t able to get hold of the ADB installation directory. This is because of the missing environmental system variable related to the Android SDK. While this issue might sound scary. the fix is fortunately not. You just need to add the installation directory, i.e, platform-tools folder location to the System Environment Variables. Here are the required instructions to carry out the aforementioned task and hence fix the “adb not recognized” error.
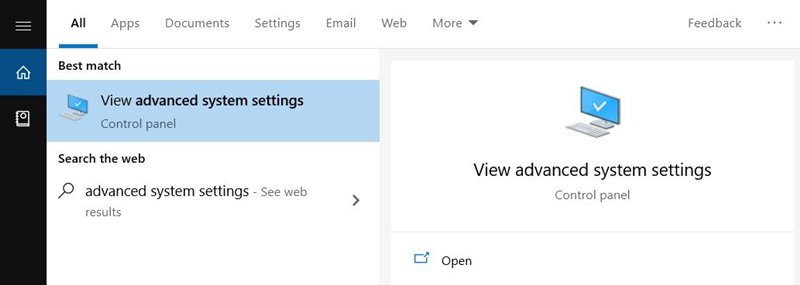
- Head over to the Start menu and search for View Advanced System Settings.

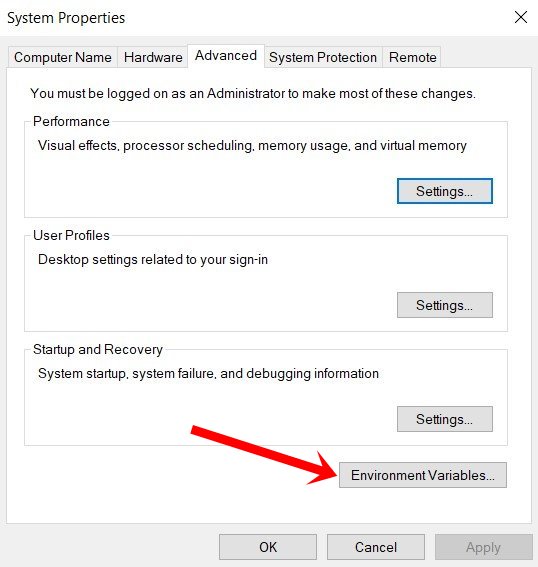
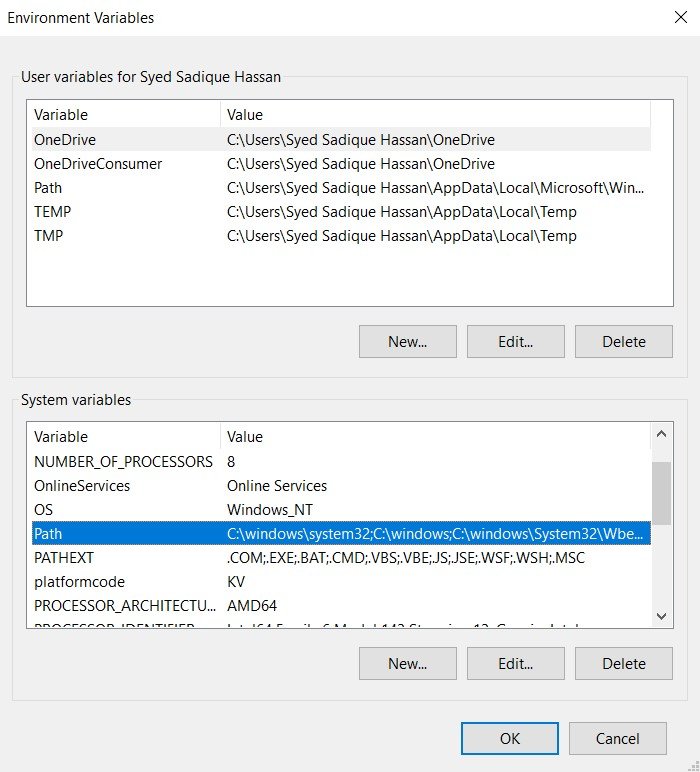
- Go to the Advanced tab and click on the Environmental Variables button.
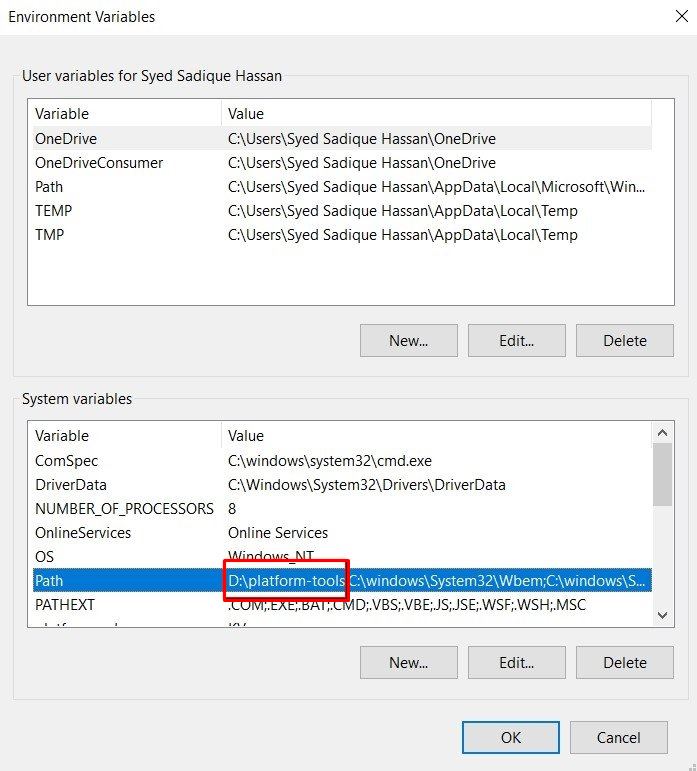
- You should now see two sections: User Variables and System variables. As for this guide, we would be dealing with the latter.
- So select Path from the System Variables and click on Edit.
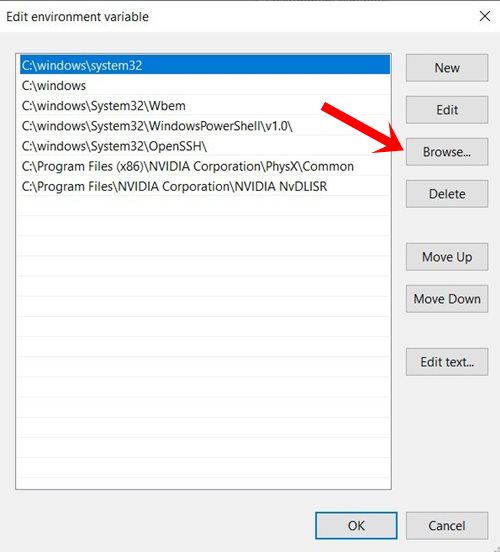
- It will bring up the Edit environment variable option, click Browse from the right-hand side.
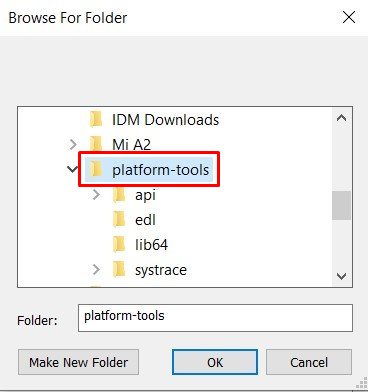
- Now navigate to the location where you have installed the ADB and Fastboot binaries and select the platform-tools folder and click OK.
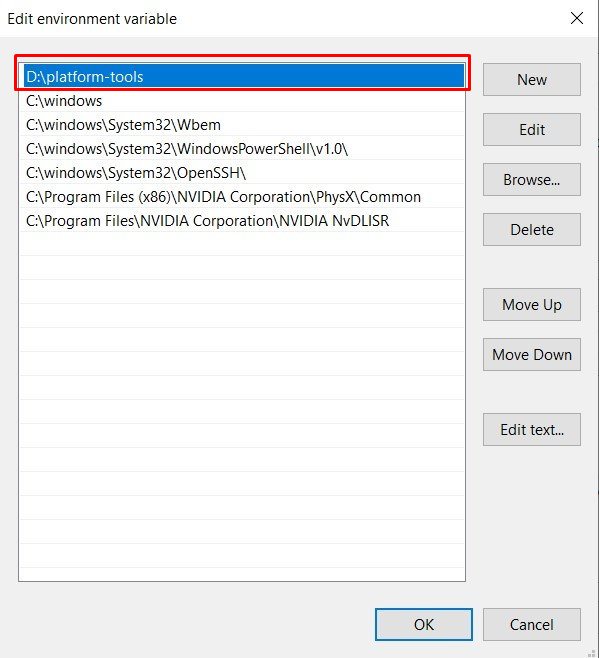
- You should now see this directory successfully added to the environment variables. Click OK to close the dialog box.
- Likewise, the path will also be visible in System variables under Environment Variables, as shown in the below image. Click OK to close this dialog box as well. That’s it. Your error now stands rectified.
With this, we conclude the guide on how to fix the “adb is not recognized as an internal or external command operable program or batch file” error. We have listed four detailed instructions steps for the same. If you have any queries concerning the above-mentioned steps, do let us know in the comments. We would help you by clearing all your doubts.


coutant
Good morning,
even having done all the possible manipulations above
the breakdowns and always the same?
Do you have a solution ?
cordially