In my earlier blog, I already covered the explanations about the A/B partitions, including how it works, its advantages, etc (You could refer here: How to Flash ROMs/Magisk/TWRP/Kernels on A/B Partition Devices). This guide will have an in-depth look at How to flash various files, including Custom ROMs, TWRP, Kernels, Magisk, etc in A/B Partition Devices. Just be sure to follow each and every part of this tutorial in the exact same manner as mentioned.
For your convenience, this tutorial will be broken down into short sections, with each section having instructions for different types of files to flash.
- How to Update Magisk ZIP and Magisk Manager (without TWRP)
- Fix Magisk Module Bootloop without TWRP Recovery
- [Update: Added Magisk 21] Everything About Magisk- Manager, Modules and More
- How to Fix TWRP Error 20 GApps after flashing LineageOS
Before beginning with the process, keep the following things in mind:
- When you flash a ROM through Recovery, it will be flashed to the inactive slot. This is the reason why you need to switch slots every time (so as to move to the ‘inactive’ slot and in the process make it the ‘active’ one) after flashing a custom ROM and then flash everything else.
- But until you reboot the device from Recovery, your active slot isn’t going to change and you will still be the previous OS (and not the ROM you just installed). That is why we recommend rebooting the device so as to get to the slot where the newly installed OS is present, and hence make it the active one.
- Always flash the files in the following order:
- TWRP
- Custom ROM
- Custom Kernel (optional)
- Magisk (for root).
Table of Contents
Prerequisites
- A complete backup of all the data on your device is extremely important. This is because, during the process, your device’s storage will completely be wiped off.
- Keep your device at a minimum of 60% charged so that it doesn’t turn off in between.
- Make sure to unlock the bootloader of your device. Refer to our guide on how to do so.
- Download and install the ADB and Platform Tools. Now head over to this platform-tools folder, type in CMD in the address bar, and hit Enter. This will launch the Command Prompt.

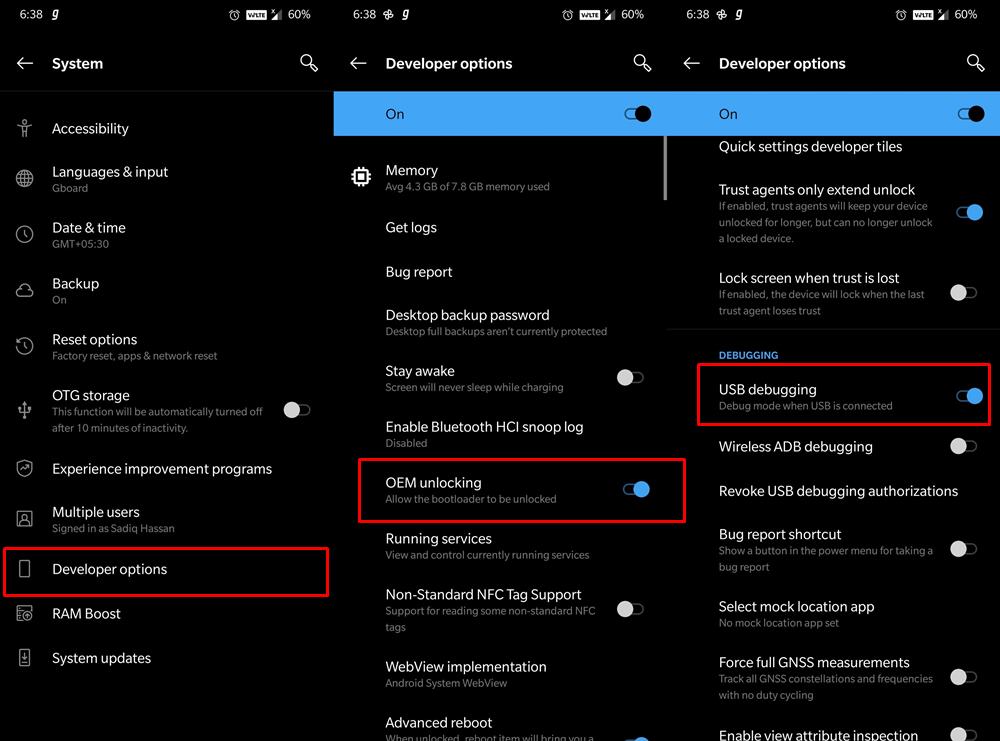
- Enable USB Debugging and OEM Unlocking on your device: Go to ‘Settings’ > ‘About Phone’ > Tap on the ‘Build Number’ 7 times > Go back to ‘Settings’ > ‘Developer Options’ > Toggle on the ‘USB Debugging’ and ‘OEM Unlocking’ switch.
Reference Image

- Fix error boot prepare- device stuck in fastboot
- Fix Android stuck in Recovery Mode: No Command screen
- Detailed Steps to Fix adb is not recognized Error
- How to Fix FAILED (remote: unknown command) Error
Downloads
- Download the TWRP Recovery (both the image and zip file) for your device from the official site. If it isn’t officially released yet for your device, try the unofficial one. It would be available at the XDA forum.
- Next, download the Custom ROM and Kernel of your choice. Custom ROMs could be downloaded here: Top 5 Custom ROMs based on Android 9.0 Pie (2019). or you could check out the XDA site as well.
- Also, download the latest Magisk installer zip file: Magisk latest file (for root-access).
- Finally, download the GApps package corresponding to the device’s architecture and Android OS. Then choose the desired variant.
A note on GApps
- Under device architecture, select ARM64 for your device. However, if you want to double-check, download the ‘CPU-Z’ app. Under the ‘System’ tab, look for the ‘Kernel Architecture’- if it is armv7a, armv8l or related types, then it is definitely ARM64.
- If you are short on time (and also internet), then simply go for the ‘mini‘ variant. It contains the most basic yet important Google Apps and Services. The rest could be downloaded once the device boots up to the OS.
- Some ROMs like the ‘Pixel Experience’ already have Gapps included, so you wouldn’t be needing it. Always check on the ROMs’ development/support page (or ask me in the comments section) before downloading the Gapps for any ROM.
STEP 1- Setting Up Your Device
If you are coming from a stock ROM, you need to wipe your data and files. Follow the below points:
- First off, connect your device to PC via the USB Cable.
- Next, in the PowerShell window, type in the below code to boot your device to fastboot mode:
adb reboot bootloader
- Now type the below code to wipe all of your device’s data and files:
fastboot -w
An important point worth discussing: The custom ROM you are about to flash will be flashed to the inactive slot. So we will be starting this tutorial by taking Slot B as the active slot (hence Slot A would be the inactive slot- where the custom ROM would be installed). If you have Slot A as the active, change it right now by typing the below code in the PowerShell Window:
fastboot set_active b
STEP 2: Installing TWRP Recovery
With Slot ‘B’ as the active slot, we will begin with the installation process. The process starts with booting the TWRP Recovery and then subsequently flashing it on your device. Carry out the below-mentioned steps for the same:
- Don’t Miss: How to Boot Any Android Device to TWRP Recovery
- Rename the downloaded TWRP recovery (the .img file) to twrp (the complete name would hence be twrp.img)
- Place it inside the folder where you have installed ADB and Fastboot Platform Tools.
- Now we will be temporarily booting the device to recovery mode. I have already explained in my previous guide that there is no separate recovery partition for A/B partition devices. Hence TWRP could not be flashed directly by fastboot commands. As it is present inside the boot partition, therefore we will be booting into recovery first and then flashing it. Type the below code to boot into recovery:
fastboot boot twrp.img
(If this method of booting to recovery doesn’t work out for you, refer to the FAQs section at the end of the guide).
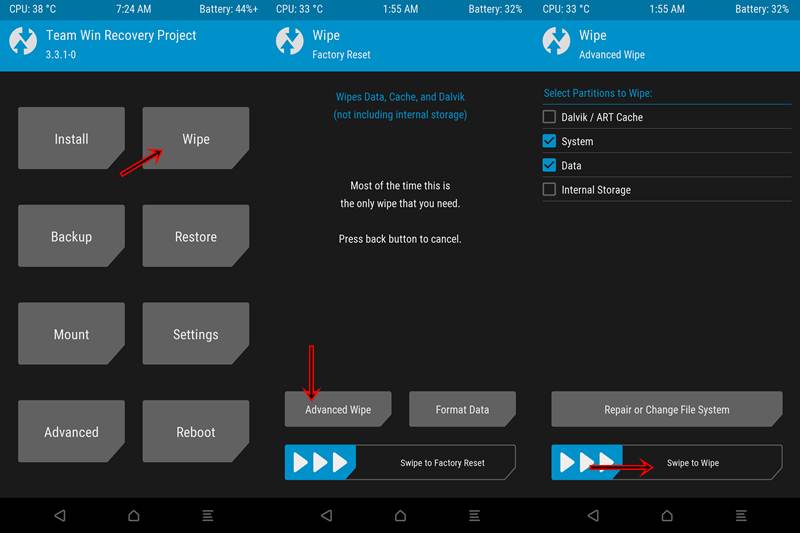
- Your device will boot to TWRP Recovery. Now you need to erase all the data present on the device. Go to ‘Wipe’ > Select ‘System’ and ‘Data’ > Right swipe on the ‘Swipe to Wipe’ button to wipe the selected partitions.
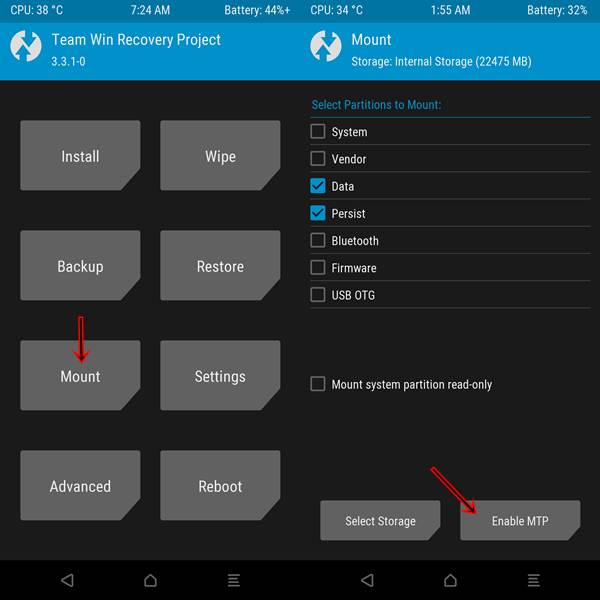
- Next, go to ‘Mount’ and enable the ‘MTP’ option. The device will now be visible on your PC. Transfer the TWRP zip file, ROM, GApps package, Magisk, Kernel and anything else you need to flash. (If MTP didn’t work out for you, refer to the FAQs section at the end of this guide).
- We will start by flashing the TWRP zip file. Go to ‘Install’, select the TWRP zip file and perform a right swipe on ‘Swipe to confirm Flash’.
- [IMPORTANT] Now reboot your device again to TWRP Recovery. Go to the ‘Reboot’ option of TWRP and select ‘Recovery’.
That’s it. The first part of the guide on how to flash various files in A/B partition devices is now over. Head over to the next section to install a Custom ROM.
- Fix Magisk patched boot.img issue while Rooting Android 11
- Fix: pip is not recognized as an internal or external command
- How to Update Magisk ZIP and Magisk Manager (without TWRP)
- Fix Magisk Module Bootloop without TWRP Recovery
STEP 3: Installing a Custom ROM/Kernel/Magisk
- Go to Install and select the ROM you wish to install.
- Right swipe on the ‘Swipe to confirm Flash’ to install the selected ROM.
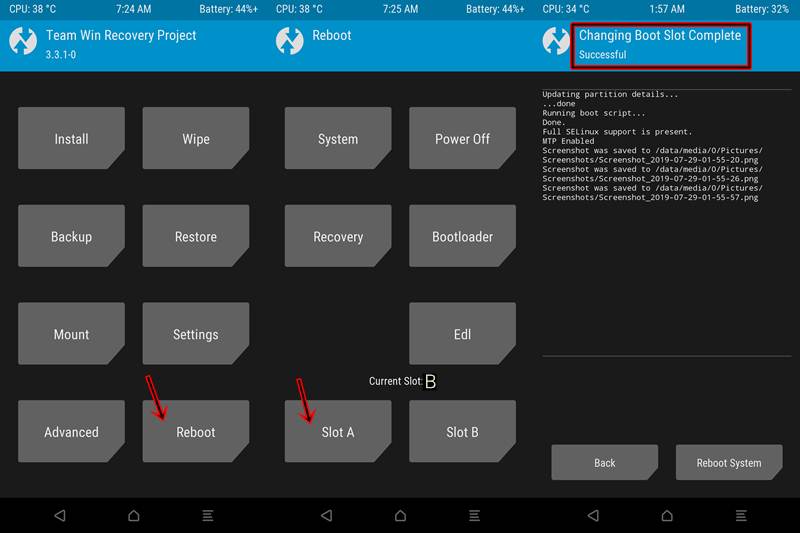
- Currently, the ROM would be installed on the inactive slot (Slot A), whereas you are working on the active slot (Slot B).
- Go to ‘Reboot’ and select ‘Slot A’ – the current inactive slot on which the Custom ROM is installed.
- In order to make Slot A the active one, Reboot your device to Recovery. Tap the back button and select ‘Recovery’ from the TWRP ‘Reboot’ menu.
- Now flash ‘GApps‘ if required by your ROM.
- [Optional] Flash a custom kernel if you want.
- [Optional for Custom ROM, Compulsory for Stock] Flash DM-VERITY & FORCE ENCRYPT DISABLER. This is needed to disable DM verity and encryption in the vendor partition. Most of the custom ROMs already do this. But Stock ROM doesn’t. So it is necessary to flash this file if you prefer to stay on the stock. Still, if you are using a custom ROM, consider flashing it. It wouldn’t do any harm even if isn’t required by your custom ROM.
- Now, if you want root access, consider flashing the ‘Magisk‘ zip file. Select ‘Magisk-v19.3.zip’ and right swipe to confirm flash.
- Finally, go to ‘Reboot’ and select ‘System’. This will reboot the device to the Android Operating System.
Final Thoughts
After performing the above steps, you will be able to boot your device to the TWRP Recovery. Then using the Recovery, you would have flashed a custom ROM. And finally, you rooted the device using the Magisk Installer zip file. Therefore, in a nutshell, this is what we did:
- Temporary Booted to TWRP Recovery using Fastboot.
- Permanently installed the TWRP Recovery using the booted TWRP.
- Installed the Custom ROM via TWRP.
- Installed Kernel (if you chose to).
- Flashed DM Verity and Force Encrypt Disable (compulsory on stock, optional for custom ROMs).
- Finally, we flashed the Magisk zip file from the TWRP recovery to get root access.
So this was the comprehensive guide on How to Flash Various Files and Mods in A/B Partition Devices. If you are having any queries with respect to any part of this guide, first have a look at FAQs below. However, if the problem still persists, do let me know in the comments section below. Happy Flashing!
FAQs
Q1) How to boot my device to TWRP recovery if the fastboot boot twrp.img command fails?
A1) If the above command fails or gives you a bootloop, ‘force shutdown’ the device and try the above fastboot command again.
Q2) “Transferring files using MTP didn’t work”.
A2) You may try any one of the following alternatives:
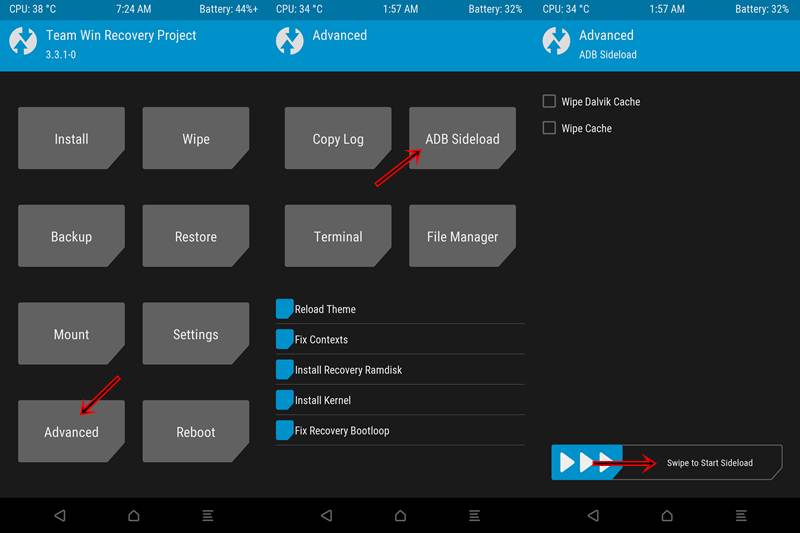
- USE THE SIDELOAD METHOD: Transfer the file to be flashed to ADB and Fastboot Platform Tool’s folder. Next, under TWRP, go to ‘Advanced’ > ‘Sideload’ > ‘Swipe to Start Sideload’. Now, in the PowerShell window, enter the following command- ‘adb sideload filename.zip’.
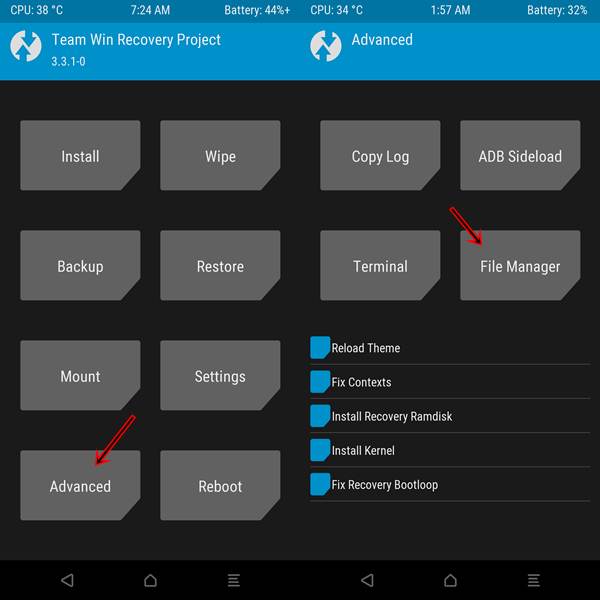
- USE THE ADB PUSH METHOD: The file to be flashed should be present inside the ADB and Fastboot Tools folder. Under TWRP, go to ‘Advanced’>’File manager’.
Now navigate to the ‘data/media’ folder. If the folder named ‘0’ is not present there, then create it. This can be done by going to ‘Advanced’>’Terminal’ and typing the below codes (codes are after the image):
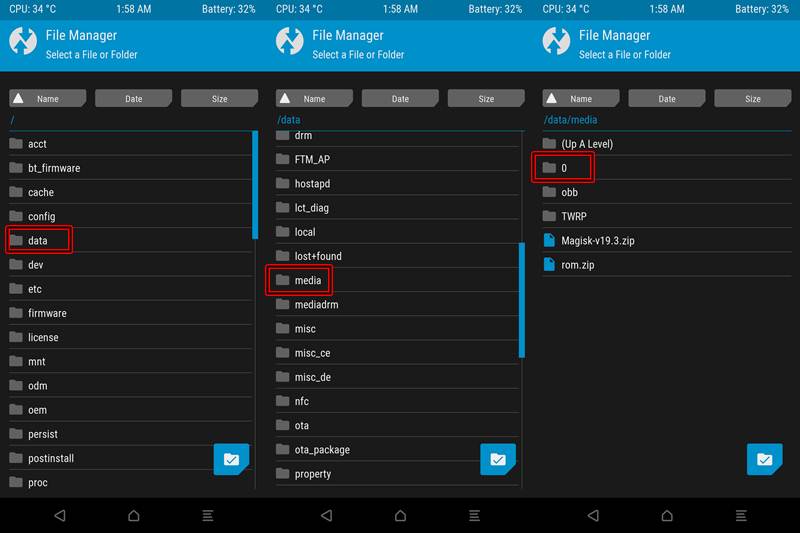
cd /data/media
mkdir 0
- Next, open PowerShell window on your PC and type the below code:
adb push filename.zip /data/media/0/
That’s all from the tutorial on How to Flash Various Files in A/B Partition Devices.


JFV
Hi, thanks for this valuable information .
I would like to know if you can explain how to make a full nandroid backup on oneplus devices. Which partition slot to use and what to choose for a backup. How to restore and which slot, A/B to use. Is Platform tool necessary for this to be done etc.
PS. This is very important to know.
Hope you replay soon. Thanks…
Device: Oneplus 9 Le2117
Senior Member of Xda since 2011
Nehemiah
when runing fastboot boot twrp i found the error below. i have changed usb cable, update all drivers but still face the same issues i am using Redmi note 11 pro
C:\Users\HP\Desktop\BENA\Minimal+adb_fastboot_platform-tools_r29.0.6_2020_2\platform-tools>fastboot boot twrp.img
Sending ‘boot.img’ (38418 KB) OKAY [ 0.896s]
Booting FAILED (Status read failed (Too many links))
fastboot: error: Command failed
JITESH Mannewar
Hi There,
I am JITESH
Brand : MOTOROLA
Model : One Fusion Plus
Problem :
No valid OS found. This device can not boot.
Bootloader is LOCKED!
TWRP Not installing.
Rescue Assistant by Lenovo FAILED (Flashing Single Partition Error).
USB Debugging is ON.
What should i do ?
PLZ REPLY SOON,
I am in big TROUBLE.
parsh
you have flash boot partition fastboot flash boot twrp.img
yuval
hello while trying to boot twrp(fastboot boot twrp.img) , the twrp stucks on twrp logo. im currently using google pixel 2xl. any advice why its get stuck on twrp logo. yes its an a/b partitioned device
Ayakashi Kitsune
Thank you for the wonderful, great explanation information.
What about upgrading?
Example I install FIRST TIME a custom rom like in your process which says,
1. go to recovery(boot)_B
2. Flash rom.
3. Set active slot_A
4. Reboot.
So if my active slot is A. Then if wanted to flash a new update, then I’ll be going to Slot_A’s recovery(BOOT_A). Right?
What I’m thinking is, is it right to flash TWRP in both BOOT SLOTS?
Petar
Hi, i liked your detailed explanation. Tho things that i didn’t understand tho. First being if i wipe system partition from your example that you gave, will that handicap me from recovering to it in a fail-safe scenario (in case custom ROM fails to flash). Second one is if i put active partition on b and install TWRP after booting on it, is TWRP installed in ramdisk or I’m mistaken.
Ps. Thanks for answer in advance.
Z
You create a backup before wiping then make sure backup is off device to be extra safe
Matthew
thanks for the post!!
I have a doubt yet.
Recently I flashed to LineageOS but now I want to re-flash again to a newer version, my device is a Mi A3 . Can I wipe both partitions before TWRP to a clean reflash?
Thanks for support!
Kay
when I type this command: fastboot boot twrp.img
it showed error: FAILED (remote: unknown command)
Please help me fix it. Thanks.
Sadique Hassan
Hi Kay, could you let me know your device name?
Kay
fastboot boot twrp.img
Sending ‘boot.img’ _______ OKAY
Booting ___________________FAILED (remote: unknown command)
fastboot: error: Command failed
How can I fix booting to twrp? Please help.
Raghav
does platform-tools command work in “Minimal adb and fastboot”. Cause platform tools don’t work in my pc. Thanks in advance.
Sadique Hassan
Hi Raghav, yes, all the platform-tools command will work in “Minimal adb and fastboot”
Eve
Mr. HASSAN
Interesting article (though I couldn’t understand it all) no one this far has a solution to my dilemma . . . The browser keeps struggling to display online lottery app – it keeps changing sizes in the window. . . Can you steer me – what it might be? Android phone/ OS 10. . ?
Thanks,
Eve
Vladyslav
Finally, the secrets of A / B devices are dispelled! Thank you!
Sadique Hassan
Glad that I could help you out. Thanks for the appreciation!
DW
its my understanding that twrp won’t persist no matter what you do as it’s not been rewritten for a b?
Sadique Hassan
So here’s the thing. Since a/b devices don’t have the recovery partition, you will have to boot the recovery to the boot partition (fastboot boot twrp.img) and then flash the TWRP ZIP Installer file via TWRP itself. Or if there’s no TWRP ZIP file for your device but the device is still the A/B, then this guide might help you out: How to Update Magisk ZIP and Magisk Manager (without TWRP)
FotisG
PS: the device its Poco F3 with unlock bootloader and usb debugging its on. My notice and problem is on step 3,Thanks in advance!