In this tutorial, we will show you how to install the latest Android 11 onto your Redmi Note 4 device. One of the biggest perks of the open-source ecosystem of Android is the tons of customizations and modifications that it brings with itself. The everyday users try their hands on third-party launchers, themes and icon packs, etc. On the other hand, tech enthusiasts take this a step further. They replace the device stock recovery with a custom one like TWRP, try out an altogether new Android-based OS based on AOSP.
Likewise, they could even gain administrative rights by rooting their device via Magisk. All that is needed is an unlocked bootloader. After this, you could then easily try out all the aforementioned tweaks. Among the top of the list is the ability to try out various Custom ROMs. What many people discuss when we talk about this modified Android firmware is the fact that these ROMs have a lot to offer. Well, that is definitely true. But there is another pretty important and useful feature associated with these ROMs that doesn’t get much attention.
We are talking about the everlasting Android upgrades that the popular devices are blessed with. Ths guide on how to install Android 11 on Redmi Note 4 is a perfect example of the same. Announced at the beginning of 2017, it is really quite astonishing to note that the device is among the front runners in getting blessed with the latest Android build. Coming from the Xioami/Redmi family, and it ends up adding more feathers to your cap. With that said, in this guide, we will list out the complete instructions set that will help you to install the latest Android 11 onto your Redmi Note 4 device. Follow along.
TWRP GUIDES
- How to Install OTA Updates in Rooted Android Device
- How to Permanently Install TWRP without TWRP ZIP File (only using TWRP.img file)
- Root Android Devices Without TWRP Recovery
- How to Fix TWRP Error 7 (While Flashing Custom ROM via TWRP)
Table of Contents
Android 11: What’s New
There have been a plethora of new and useful additions to the latest iteration of Android. Google has focused on People, Privacy, and Control in this build. Keeping that in mind, here are all the noteworthy features improvements, and optimizations that you are about to welcome to your Redmi Note 4.
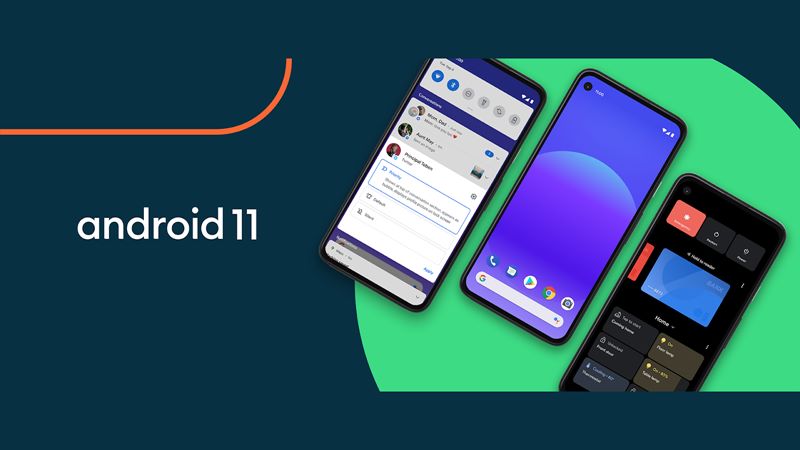
- Conversation notifications: A separate section for all your important messages’ notifications
- Notification history: Get back all the accidentally swiped notifications from the pst 24 hours
- Chat bubbles: All your conversations will be under a bubble overlay (Facebook Messenger anyone?)
- Screen recorder: Finally, a native screen recorder!
- Media controls: Media Player has now been shifted to the Quick Settings section.
- Smart devices: All your smart devices directly from the Power menu.
- Permissions: The new Only this time permission for one session permissions.
- Dark theme schedule: Schedule the dark theme based on the time of the day.
- Play Store updates: Major Android updates (minus Android version and security patches) directly via Play Store
- Share sheet apps: Pin your favorite apps to the share sheet.
- And tons of other noteworthy features…….
No doubt this is a pretty impressive feature list. Now you too could get a taste of the latest Android 11 via a Custom ROM named CarbonROM. Let’s first check out what exactly is this ROM and its offering to the masses. After this, we will also show you how to flash this Android 11 based custom ROM onto your Redmi Note 4 device.
CarbonROM Feature List
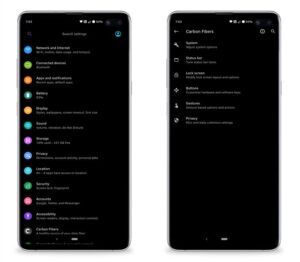
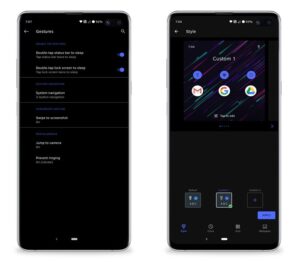
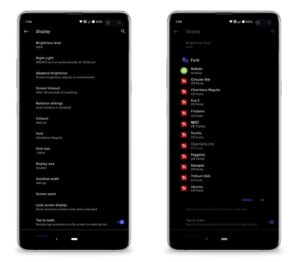
The team behind this custom ROM likes to call themselves an aftermarket firmware based on the Android Open Source Project. it has been created with the purpose of adding versatility and customization to stock Android. But even after adding a plethora of features, stability seems to remain their top-most priority. Talking about the feature list, there is a dedicated customization section named Carbon Fibers where you could modify various different sections.
These include System, Status bar, Lock Screen, Buttons, Gestures, and Privacy. It promises to be the best alternative to a stock operating system, and it seems to have delivered on this promise up to a great extent. On that note, let’s check out the screenshots of this ROM. After that, we will list out the steps to install the latest Android 11 onto your Redmi Note 4 device. Follow along for the detailed instructions set.
Screenshots
MAGISK GUIDES
- [GUIDE] Flash ROMs/Magisk/TWRP/Kernels on A/B Partition Devices
- Everything About Magisk- Manager, Modules, and More
- Best Magisk Modules of 2020 [PART-1]
- [3 METHODS] Unroot any Android Device-Uninstall Magisk
Prerequisites
Before you head over to install the CarbonROM Android 11 onto your Redmi Note 4, there are a few prerequisites that your device needs to qualify. Please go through then and only then begin with the installation part.
- First and foremost, create a complete device backup. This is because we will have to wipe off all the data from your device later on.
- The install the Android SDK Platform Tools on your PC. This will provide the required ADB and Fastboot binaries.
- Likewise, also enable USB Debugging. This is done so that your device gets recognized by your PC in the ADB Mode. We would be using ADB commands to boot your device to the Fastboot Mode. To enable it, head over to Settings > About Phone > Tap on Build Number 7 times > Go back to Settings > System > Advanced > Developer Options > Enable USB Debugging.
- Also, if you want Google Apps on your device, you will have to flash the GApps package. So download the GApps for Android 11. As of now, this is the only working GApps for Android 11.
- Download the TWRP Recovery for Redmi Note 4: By XDA Developer Coface | Official. Flashing instructions follows below in this guide.
- [IMPORTANT] You will also need to download Disable DM Verity ZIP file. Do keep in mind that This device uses dm-verity. This means that swiping to allow system modifications will prevent you from being able to boot if you are using the stock kernel. So you could either flash a custom kernel that has dm-verity disabled in the fstab (NOT RECOMMENDED). Or much better, just flash a Disable DM Verity Disabler ZIP file (RECOMMENDED). And, in this guide, we will be doing the latter.
Download Android 11 for Redmi Note 4
You may now download the CarbomROM v.8.0 that will provide your Redmi Note 4 with the latest Android 11.
- Codename: mido
- Version: CARBON-CR-8.0
- Android: 11
- Type: Recovery
- Download: Link
How to Install Android 11 on Redmi Note 4
We have listed the entire instructions set in separate sections for the ease of understanding. Follow them exactly as mentioned. And if you have doubts, do let us know in the comments before proceeding ahead to install this Android 11 ROM onto your Redmi Note 4 device.
Always proceed ahead at your own risk, Droidwin wouldn’t be held responsible in case your cats sleep more than 12 hours or your device gets bricked or damaged. While you could anyway each us via the comments when it comes to issues concerning your Android device and we will try our best to rectify it. As far as cats go, well you should probably let them sleep a little longer till the flashing has been successfully flashed.
A/B Partition Guides
- [GUIDE] Flash ROMs/Magisk/TWRP/Kernels on A/B Partition Devices
- How to Flash Various Files in A/B Partition Devices
- Install Custom ROMs on any Android Device- Includes A/B Partition
- How to Fix FAILED (remote: unknown command) Error
STEP 1: Unlock Bootloader
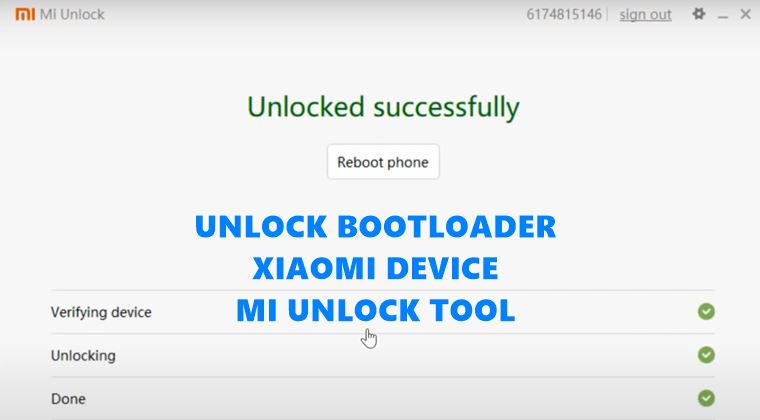
First and foremost, you need to unlock the bootloader on your Xiaomi device. For that, you will be needing the Mi Unlock Tool. So head over to our detailed guide on How to Unlock Bootloader on any Xiaomi Device and get hold of all the information. Once that is done, reboot your device and then set it up via your Google ID. Then transfer the CarbonROM, GApps, and the Disable DM Verity file to your device.
STEP 2: Boot Redmi Note 4 to Fastboot
- Next up, you will have to boot your device to Fastboot Mode. here is how it could be done:
- Connect your device to PC via USB Cable. Make sure USB Debugging is enabled.
- Then head over to the platform-tools folder on your PC, type in CMD in the address bar, and hit Enter. This will launch the Command Prompt window.

- Now type in the below command to boot your device to Fastboot Mode (you should see the Mi Bunny logo as shown in the below image):
adb reboot bootloader
Fastboot Mode in Xiaomi - Now move over to the next section to install the TWRP and then the Android 11 ROM onto your Redmi Note 4.


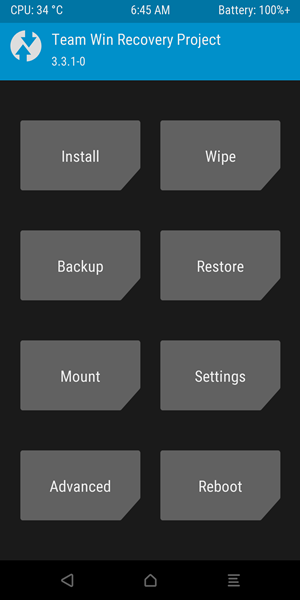
STEP 3: Install TWRP
- It’s time to install the TWRP Recovery onto the device. For that, you will have to move it to the platform-tools folder. Furthermore, it is also recommended to rename it to twrp (the complete name will then be twrp.img).
- Your device will already be connected to the PC in a fastboot mode. Likewise, the CMD window will be opened in the platform-tools (if not, then do so right away).
- Now there are two ways forward. You could either temporarily boot your device to TWRP. This way when the next time your device reboots, it will be replaced with stock recovery. Or the second approach is to permanently install the TWRP, As for me, I personally go for the second route (after all what use is of stock recovery after unlocking the bootloader!). Anyways, I have listed the commands for both these methods.
- So go ahead and type in the below command in that CMD window to temporary boot your device to TWRP
fastboot boot twrp.img
- For the permanent install of TWRP, the following command will come in handy:
fastboot flash recovery twrp.img
- No matter which command you have executed out of the two, your device will be booted to TWRP. On that note, its now time to flash the Android 11 ROM and its associated files onto your Redmi Note 4 device.
STEP 4: Install Android 11 on Redmi Note 4 via TWRP
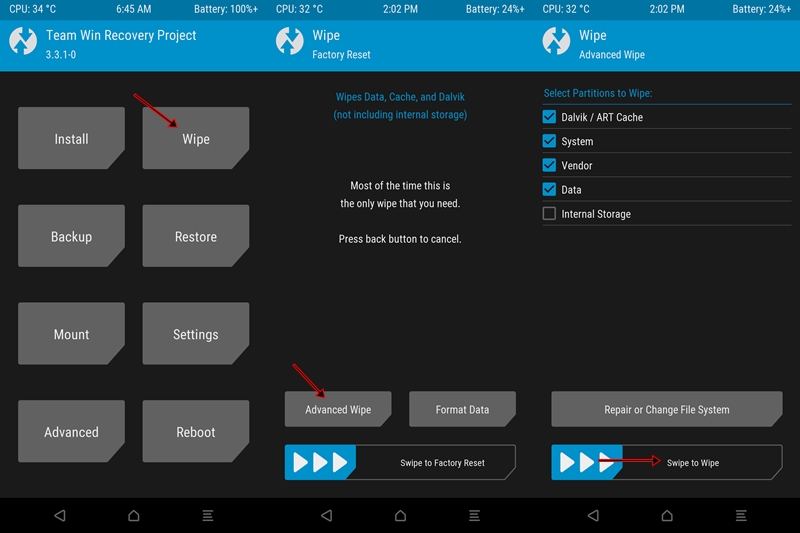
- Once your device has been booted to TWRP, head over to the Wipe section.
- Select Data, Cache, System, and Vendor partitions. When that is done, perform a right swipe to wipe the selected partitions.
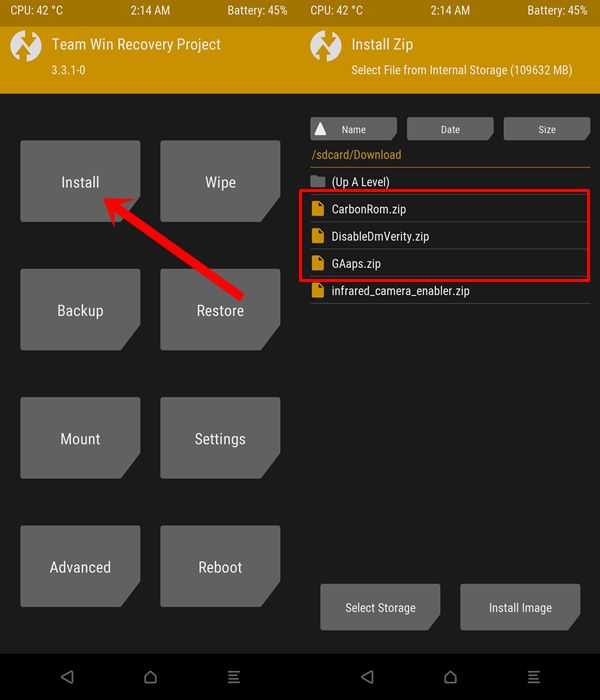
- Next up, head over to Install, select the CarbonROM file, and perform a right swipe to flash it. The process might take up some time.
- Then again go to Install and this time flash the GApps package if you want Google Apps, Services, and Frameworks. Simply navigate to the GApps package ZIP file and perform a right swipe to flash it.
- Likewise, you now need to install the Disable DM Verity ZIP file. This is needed to disable the dm-verity in the fstab. So head over to Install, select the ZIP file and perform a right swipe to wipe the selected partitions.
- When that is done, it is recommended to reboot your device back to TWRP once again. Hence, go to Reboot and select Recovery.
- Once your device reboots to TWRP, you may now boot it to the newly installed Android 11. For that, head over to Reboot and select System.

That’s it. Your device will now reboot to CarbonROM 8.0. And with this, we conclude the guide on how to install the latest Android 11 onto Redmi Note 4. Once you have installed it, do let us know your experiences about the same in the comments. Furthermore, if you have any queries with respect to the aforementioned steps, let us know in the comments section. We will get back to you with a solution pretty quickly.
SOCIAL MEDIA TIPS AND TRICKS
- How to Get a Temporary Blue Tick on Instagram
- Edit any Webpage, Website or even WhatsApp Chats (Both Sent and Received)!
- How to Send Fake Live Location on WhatsApp
- How to Restore an Old WhatsApp Chats Backup


