In this tutorial, we will show you the steps to root OnePlus 8, 8Pro, and 8T without using the TWRP Recovery (via Magisk). We would be extracting the stock boot.img file from the stock firmware and then patch it via Magisk. After this, we would flash this patched boot.img file via Fastboot commands. The entire procedure will be carried via Magisk Manager APK only. We wouldn’t use TWRP or Magisk Installer ZIP. Follow along for the complete instructions steps. [Update 1: Added a Fix for Android 11 Boot.img patch issues].
When it comes to making full use of Android’s open-source ecosystem, OnePlus is right there at the top. It is among the most active player in custom development. Right from unlocking the bootloader to flashing custom binaries, the possibilities are endless. Along the same lines, as soon as the kernel source gets released, there are a plethora of custom ROMs that you could flash. These include Pixel Experience, AOSP, etc. Then to take all this a step ahead, users gain access to the system partition. In other words, they root their device via Magisk.
Once they achieve that, they gain administrative-level privileges to their device. This in turn opens the gates to a plethora of customizations. You could flash a custom kernel, flash Magisk Modules, install Xposed Framework, install Substratum Theme engine, among others. With so many if associated perks, no doubt rooting is on top of the priority list for many users. In this regard, today we will show you how to root OnePlus 8, 8 Pro, and 8T via Magisk without using the TWRP Recovery. [Don’t Miss: How to Root OnePlus 8, 8 Pro, and 8T via TWRP and Magisk]
- How to Install OxygenOS OTA on Rooted OnePlus devices
- Download Stable Android 11 OxygenOS 11 for OnePlus 8/ 8 Pro
- How to Extract Stock Boot.img from OnePlus OxygenOS Stock ROM
- How to Install Split APKs (APKM) on any Android Device
Table of Contents
Why Root without TWRP?
Well, this is a genuine question consider the method of achieving the said task. So for the unawares, there are two different methods to root any Android device: Without TWRP (via MAgisk Manager) | Via TWRP (using Magisk Installer ZIP). If we talk about the latter method, you just need to boot your device to TWRP and flash the Magisk Installer ZIP file and that’s it, your device will be rooted.
On the other hand, if you go for the ‘Without TWRP’ method, it calls for quite a few steps. To begin with, you will have to get hold of the stock boot image file for your device. After this, this file needs to be flashed via Magisk Manager. Once patched, the file is then patched via Fastboot Commands, and your device is then rooted. So this brings us to an all-important question- why take the longer route? Here’s the thing.
When a new Android device is released, it takes weeks to months before even an unofficial TWRP build is released. If we talk about official builds, well ins some instances it might not even be released for your device. In all these cases, the best bet is to root your device without using TWRP Recovery. And this is what we would be doing here as well. Given below are the detailed instructions to root OnePlus 8, 8 Pro, and 8T via Magisk without using the TWRP Recovery.
- How to Update Magisk ZIP and Magisk Manager (without TWRP)
- How to Update Magisk ZIP and Magisk Manager (without TWRP)
- Disable DM-Verity or Android Verified Boot without TWRP
- How to Flash a Custom ROM without TWRP Recovery
How to Root OnePlus 8, 8 Pro, and 8T without TWRP (via Magisk)
Before we list out the instruction steps, there are a few prerequisites that your device needs to qualify. Make sure to checkmark all the below requirements before proceeding with the steps.
Prerequisites
- To begin with, we would suggest you take a complete device backup. While rooting doesn’t wipe off data but unlocking the bootloader does. “But I have already unlocked my device’s bootloader”? Well, no issues, still take a backup to be on the safer side.
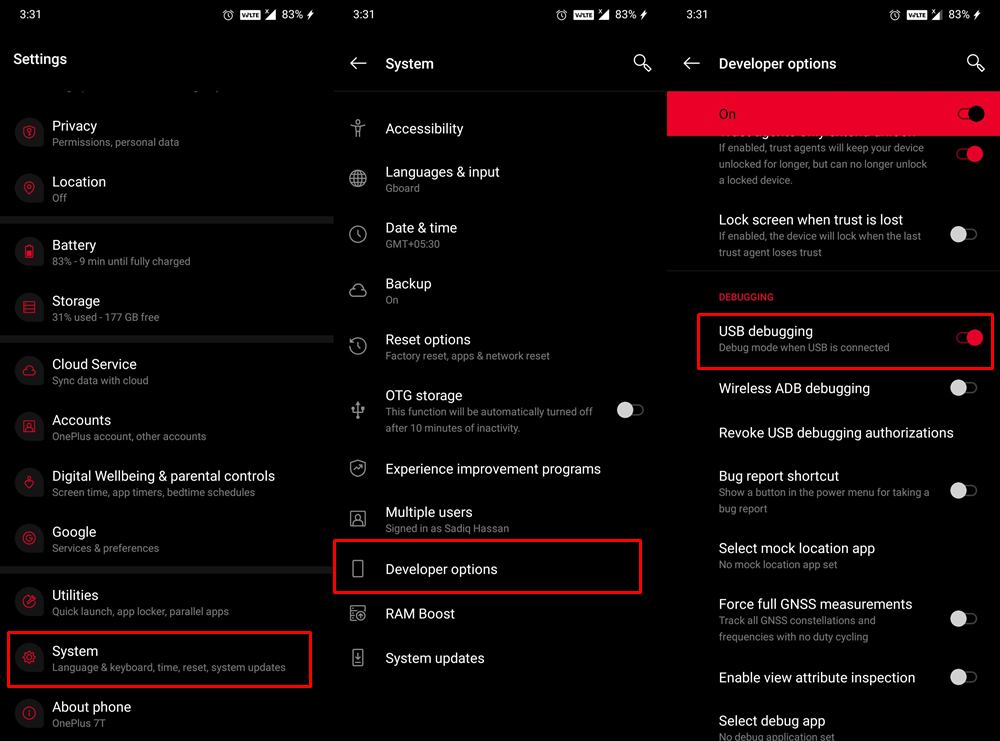
- Likewise, enable USB Debugging on your device. This will be needed so that your device gets recognized in ADB Mode. But why ADB mode? So that we could then boot your device to Fastboot Mode. So head over to Settings > About Phone > Tap on Build Number 7 times > Go back to Settings > System > Advanced > Developer Options > Enable USB Debugging. [Don’t Miss: Enable USB Debugging on a Broken Android Device’s Screen? Here’s a Workaround!].

- Next up, install Android SDK platform Tools on your PC. This will provide you with the necessary ADB and Fastboot binary files.
- Finally, download the latest Magisk APK. This will be needed to patch the stock boot.img file.
That’s it. You may now proceed with the steps to root OnePlus 8, 8 Pro, and 8T via Magisk without using the TWRP Recovery.
STEP 1: Unlock Bootloader
First and foremost, you need to unlock the bootloader on your OnePlus device. If you haven’t done so, then refer to our guide on How To Unlock Bootloader of OnePlus 8/8T/8 Pro. For a shorter version: just execute the fastboot oem unlock command after booting your device to Fastboot and the bootloader will be unlocked.
STEP 2: Get Stock Boot.Img file
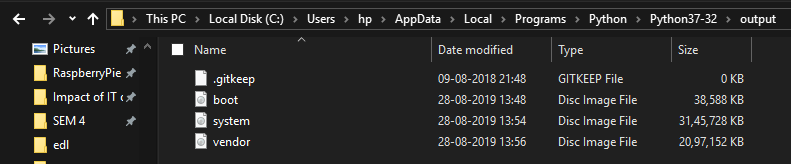
The second step in this guide to root OnePlus 8, 8 Pro, and 8T via Magisk without TWRP requires the stock boot.img file. This could be extracted from the stock firmware for your device. However, these files are placed in the payload.bin package inside the firmware. Hence, you need to extract that payload file. This guide should help you in out in this regard: How to Extract Stock Boot.img from OnePlus OxygenOS Stock ROM.
Here are some OnePlus 8, 8 Pro, and 8T extracted stock and patched boot.img file that you could directly download [Credits: XDA Recognized Developer mauronofrio]
- OnePlus 8: Download Link 1 | Download Link 2
- OnePlus 8 Pro: Download Link 1 | Download Link 2
It is extremely important that you only download the stock/patched boot image file for your region as well as the software version. Otherwise, a bricked device is on the cards. On that note, I would highly recommend that you download the entire stock firmware of the current software version from the OnePlus site and manually extract the stock boot.img file. Or you could also drop in your device name, software info, and region in the comments, I will upload the stock boot.img for you guys on Google Drive (if time permits).
- [GUIDE] Flash ROMs/Magisk/TWRP/Kernels on A/B Partition Devices
- Everything About Magisk- Manager, Modules and More
- Best Magisk Modules of 2020 [PART-1]
- [3 METHODS] Unroot any Android Device-Uninstall Magisk
STEP 3: Patch Stock Boot.img file via Magisk
UPDATE 1: Quite a few Android 11 users are facing issues while patching the stock boot.img file via Magisk manager. Well, I have found the fix to this issue, please refer to our detailed guide on the same: Fix Magisk patched boot.img issue while Rooting Android 11. If you wish to save a click, then here’s the explanation in short: You have to install the Magisk Canary build instead of the stable and then change the update channel to Canary from within the app itself. Once you have done the said change, you may then proceed with the below steps to patch the stock boot image file using Magisk and flash it via Fastboot commands to root OnePlus 8, 8 Pro, and 8T.
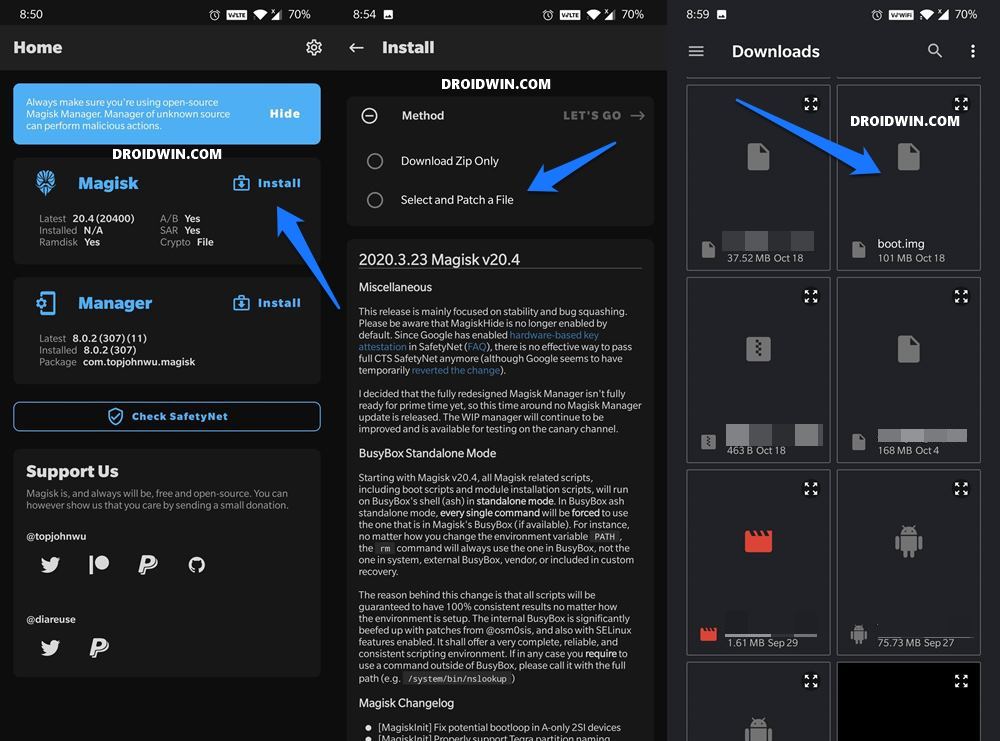
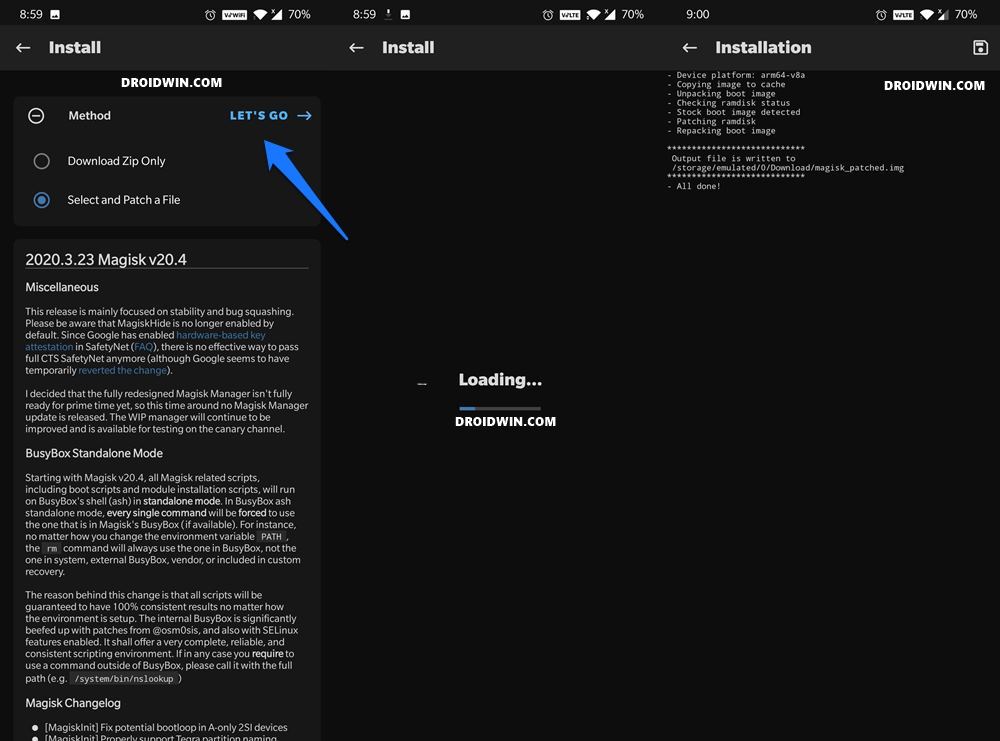
- Once you have grab hold of the stock boot.img file, transfer it to the device’s internal storage.
- Now launch the Magisk Manager APK on your device.
- Tap on the Install option situated next to the Magisk.
- Then choose the “Select and Patch a file” option.
- Navigate to the stock boot.img file and select it.
- Then tap on the Let’s Go option situated at the top right.
- Magisk will now begin the process of loading, downloading, and patching the stock boot.img file.
- Once done, head over to Internal Storage > Downloads and you should see the magisk_patched.img file.
STEP 4: Flash Patched Boot.img File
The fourth and finals section to root OnePlus 8, 8 Pro, and 8T via Magisk without using the TWRP calls for flashing the patched boot.img file via Fastboot Commands.
- For that, connect your device to the PC via USB cable. Make sure USB Debugging is enabled.
- Then transfer the magisk_patched.img file from your device to your PC’s platform-tools folder. This is the folder that you have got after the installation of Android SDK Platform Tools.
- Once you have transferred the file, you need to open the Command Prompt window inside the same folder. For that, type in CMD in the platform-tool folder’s address bar and hit Enter.
- Now enter the below command in the CMD window to boot your OnePlus device to Fastboot Mode:
adb reboot bootloader
- Finally, execute the following command to flash the patched boot image file
fastboot flash boot magisk_patched.img
- The flashing should only take a couple of seconds, once done, you may now reboot your device to the system via the following code:
fastboot reboot

That’s it. These were the steps to root OnePlus 8, 8 Pro, and 8T via Magisk without using the TWRP Recovery. If you have any queries, do let us know in the comments section below.
FAQ1: Install OTA on Rooted OnePlus 8, 8 Pro, and 8T
Many users have asked us whether they could install OTA updates on their rooted OnePlus device. Well, the question is completely genuine, and the answer is in the affirmative. Yes, you could install OTA updates on your rooted OnePlus 8, 8 Pro, and 8T. Refer to our comprehensive guide to know the detailed steps for the same: How to Install OxygenOS OTA on Rooted OnePlus devices.
FAQ2: Hide Root on Rooted OnePlus 8, 8 Pro, and 8T
As you might be aware, upon rooting your OnePlus 8, 8 Pro, and 8T via Magisk without TWRP, DM Verity gets triggered. This results in the inability of apps like Google Pay to function properly. Likewise, the WideVine L1 Certification of Netflix gets degraded to L3 and you wouldn’t be able to watch videos in HD. However, there is a handy method to hide root on your OnePlus and let all the apps function as it would normally do. This guide shall help you out: How to Pass Magisk SafetyNet on Rooted Android 11.


Jason
I was under the impression that TWRP does not work oxygen OS 11. Is that no longer the case?
Sadique Hassan
Yes Jason, the issue is still there. TWRP is not compatible with OxygenOS 11, one of my friends even tried it and it resulted in the Qualcomm Crash Dump mode!
Tsystem
Hi,
Thanks this turotrial ( and the other ones too ) I follow all your steps 2 times ( softbrick my phone one time reading to fast….)..And second time doing all step without any problem but after reboot , root checker give me “root access not properly installed…” restart again for the 3rd time … but same result …. maybe an idea ?
(phone is a OP 8T 11.0.4.5.KB05BA)
Thanks bu advance
tsystem
Ok, i got my solution ! found this on xda and it works perfectly maybe a little addon to do :
https://forum.xda-developers.com/pixel-3a/help/magisk-parched-boot-img-android-11-t4160323
Great thanks for tuto
Sadique Hassan
Thank you so much for the update. Seems like it is taking the shape of a pretty common issue, so will cover it up in a separate guide.