After our previous two guides on installing AOSP Android 11 and LineageOS 17.1 on OnePlus Nord, we are back with another new custom ROM for your device. In this tutorial, we will show you the steps to install the Pixel Experience on OnePlus Nord. When it comes to budget offering, not many could claim the kind of dominance OnePlus has. However, in recent years, there was a notion building that the OEM has shifted somewhat from its USP of affordable pricing. This point was mostly raised when the company launched its recent flagships, OnePlus 8 and 8 Pro.
While the specs sheet justified its pricing up to an extent, however, the thing was people didn’t necessarily link OnePLus with high priced devices. However, all that changed with ‘One’ masterstroke. The OnePlus Nord is the latest addition to the OnePlus family which has stuck to the company’s proposition of providing feature-rich devices at affordable prices. While there are still a few hits and misses (especially in the camera department), yet it is still a pretty impressive offering, considering the price to which it belongs. An octa-core Snapdragon 765G chipset with up to 256GB 12GB RAM and a 4115 mAh battery with 30W Fast charging, well there’s not much one could have asked for.
However, all these are just the beginning. Thanks to the open-source nature of the Android ecosystem, there exists a plethora of tweaks that you could carry out. From unlocking the bootloader, rooting, to flashing custom recoveries and ROM, the possibilities stand endless. And in this guide, we would be focusing on one of the most popular custom developments, aka installing a custom ROM. Today, we will show you the steps to install the Pixel Experience on your OnePlus Nord. Follow along for the complete instructions.
- How to Root OnePlus Nord using TWRP Recovery
- How to Root OnePlus Nord without TWRP (using Patched Boot file)
- Download OnePlus Nord Stock Boot Image Files [All Versions]
- How to Install OxygenOS OTA on Rooted OnePlus devices
Table of Contents
What is Pixel Experience
There are quite a few ROMs part of the Android Open Source Project. In this regard, there exist two broad categories. While some like to make a safe distance from Google Apps, others come baked in with Google services, apps, and frameworks. And Pixel Experience belongs to the latter category. Well, its name spells out clearly this fact as well.
![]()
All in all, if you are looking for a clean stock Android experience that Pixel devices have to offer, then this should be your go-to choice. It also scores pretty well on the stability front. You aren’t likely to get hold of a plethora of features and customizations- and this is one major reason why people try out this ROM. On that note, let’s make you aware of all the working features and bugs present in this ROM. After this, we will list out detailed instructions to install the Pixel Experience on your OnePlus Nord.
Pixel Experience on OnePlus Nord: What’s Working
Wifi
RIL
Mobile data
GPS
Camera
Flashlight
Camcorder
Bluetooth
FM radio
Fingerprint reader
Face unlock
NFC
Lights
Sound/vibration
90 Hz Display refresh rate
Call Audio
VoLTE
Alert Slider
Bugs
Google Play System Update
How to Install Pixel Experience on OnePlus Nord
To begin with, there are a few prerequisites that your device needs to qualify. Make sure you go through them and download the required files. After that, you may proceed with the installation steps.
- Install Custom ROMs on any Android Device- Includes A/B Partition
- Flash Custom ROM After Wiping Internal Storage Without SD Card or OTG
- How to Go Back to Stock ROM from GSI ROM (All Android Devices)
- Fix Magisk Module Bootloop without TWRP Recovery
Prerequisites
- We would recommend that you take a complete device backup. This is because we would have to wipe off all the data from the device while flashing the ROM to decrypt the internal storage.
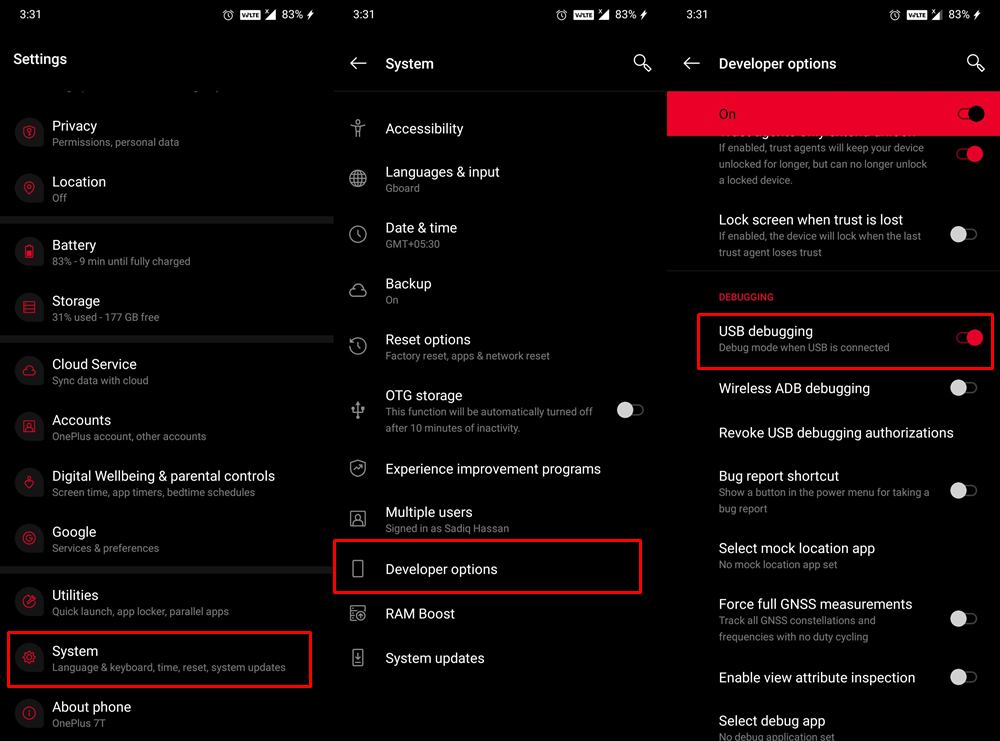
- Next up, enable USB Debugging. This is needed so that your device gets recognized by your PC in ADB Mode. Then we could easily boot the device to Fastboot/Bootloader Mode. So head over to Settings > About Phone > Tap on Build Number 7 times > Go back to Settings > System > Advanced > Developer Options > Enable USB Debugging. [Don’t Miss: Enable USB Debugging on a Broken Android Device’s Screen? Here’s a Workaround]

- Likewise, install Android SDK Platform Tools on your PC. This will provide you with the necessary ADB and Fastboot binaries.
Downloads
- ROM OS Version: Android 10
- ROM Kernel: Linux 4.x
- Firmware Required: Latest OOS
- Based On: AOSP
- Pixel Experience on OnePlus Nord: Download Link
We would like to thank XDA Senior Member CryllicBuster273 for this ROM. On that note, these were all the requirements. You may now proceed with the steps to install Pixel Experience on OnePlus Nord.
STEP 1: Unlock Bootloader on OnePlus Nord
First and foremost, you will have to unlock the bootloader on OnePlus Nord. Do keep in mind that doing so will wipe off all the data from your device and could make the warranty null and void, so proceed with caution. With that said, refer to our detailed guide on How to Unlock the Bootloader on OnePlus Nord. In short, you need to execute the fastboot oem unlock command to unlock the device’s bootloader. [Don’t Miss: How to Watch Netflix in HD on Rooted Devices ( Get Widevine L1 Support )].
STEP 2: Install TWRP Recovery
Next up, you will have to install the TWRP Recovery on your device. Again, we have a detailed guide on this topic, please refer to it: How to Install TWRP Recovery on OnePlus Nord. In short, use the fastboot boot twrp.img command to boot your device to TWRP. As a sidenote, Pixel Experience does come with its own custom recovery (similar to LineageOS Recovery).
But for the sake of simplicity and the fact that TWRP is universally accepted and used by a wider audience, we would be flashing the ROM via TWRP only. However, if you wish to flash the ROM via Pixel Experience, do let us know in the comments. We would cover a detailed guide on how to install Pixel Experience Recovery and flash a custom ROM via it. As of now, TWRP should suffice.
- [GUIDE] Flash ROMs/Magisk/TWRP/Kernels on A/B Partition Devices
- Everything About Magisk- Manager, Modules, and More
- How to Flash Various Files in A/B Partition Devices
- [3 METHODS] Unroot any Android Device-Uninstall Magisk
STEP 3: Boot OnePlus Nord to TWRP
You now have to transfer the Pixel Experience ROM to your device. Once that is done, you may then either refer to our guide on How to Boot into Recovery (TWRP/Stock) from Fastboot Mode, or follow the below steps:
- Connect your device to PC via USB Cable. Make sure USB Debugging is enabled.
- Then head over to the platform-tools folder, type in CMD in the address bar, and hit Enter. This will launch the Command Prompt.
- Type in the below command in the CMD window to boot your OnePlus Nord to TWRP:
adb reboot recovery
- That’s it. Your device will now boot to TWRP. Follow the below steps to install Pixel Experience ROM on OnePlus Nord.
STEP 4: Install Pixel Experience on OnePlus Nord
To begin with, you will have to encrypt internal storage. And that requires completely wiping your Internal Storage. So we would again like to highlight the fact that you should create a complete backup. You could also create a Nandroid backup and keep that backup on your SD Card or transfer it o your PC via three different methods. Once that is done, proceed with the below steps:
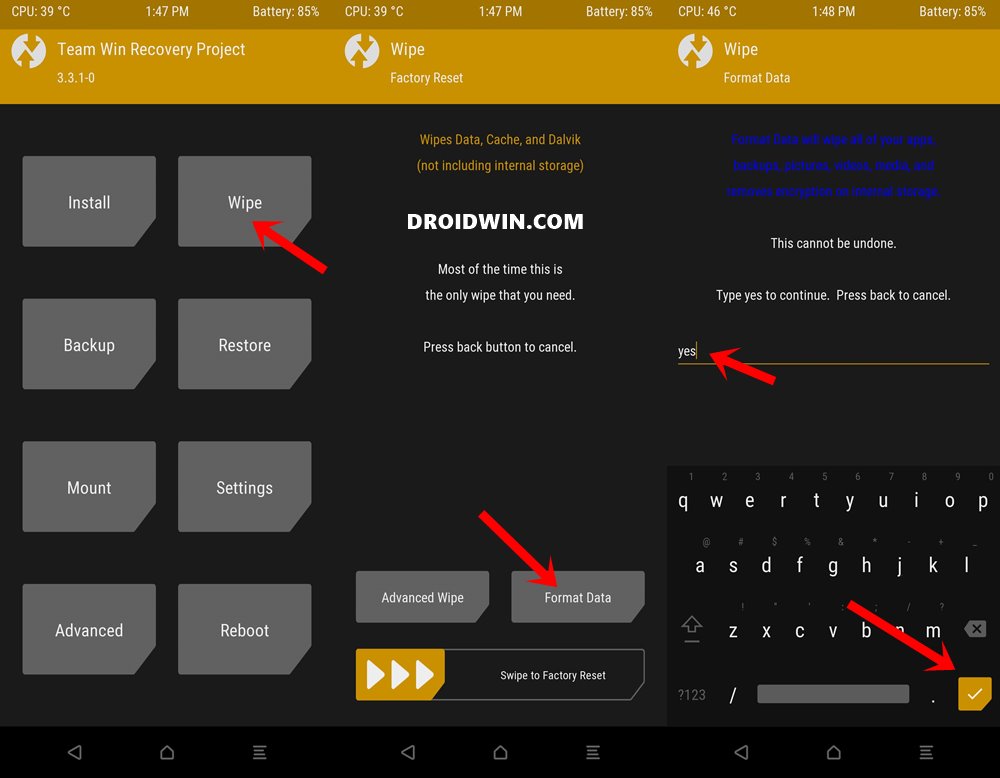
- Go to the Wipe section of TWRP and tap on Format Data.
- Type in YES in the space provided and tap on the tick-mark situated at the bottom right.
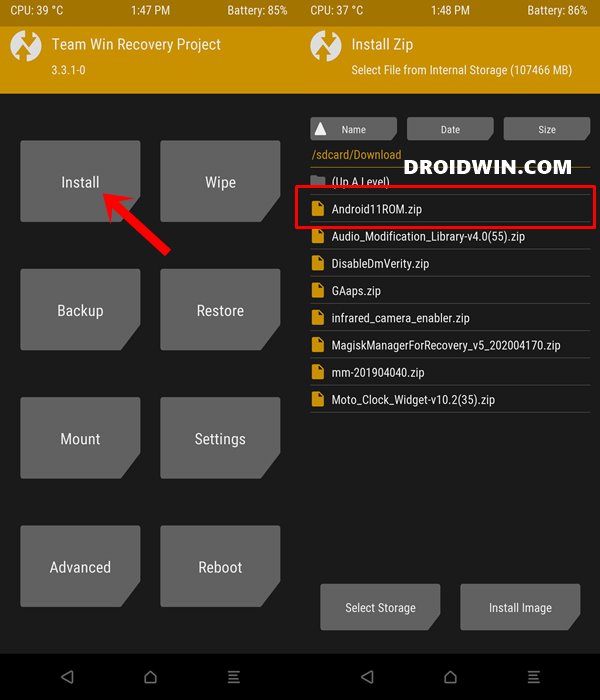
- Now go to the TWRP main menu and tap on Install.
- Then select the Pixel Experience ROM and perform a right swipe to flash it.
Generic Screenshot - [OPTIONAL: If you wish to flash any other mods or ZIP files, you should first boot your device to TWRP and then flash the desired files].
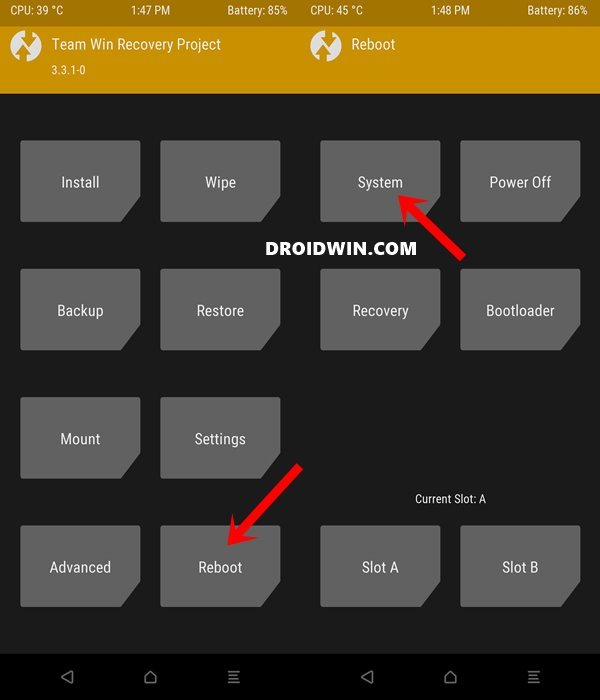
- Finally, its time to boot your device to the newly installed OS. For that, go to Reboot and tap on System.
With this, we conclude the guide on Pixel Experience ROM onto OnePlus Nord. Do keep in mind that the first boot might take up some time. This is completely normal. Along the same lines, you might have to set up your device from scratch after logging in to your Google Account. Once that is done, do share your experiences about this ROM in the comments section. Likewise, if you have any issues or queries with the aforementioned steps, do let us know in the comments. We will get back to you with a solution as soon as possible.


