UPDATE 1: Added a new method to Extract Stock Boot.img from OnePlus OxygenOS Stock ROM [See METHOD 2: Extract Payload.bin via Payload Dumper Go]. As of now, we would recommend you over for this method only as it doesn’t require Python or any other setup as such. Moreover, the entire process hardly takes a few seconds!
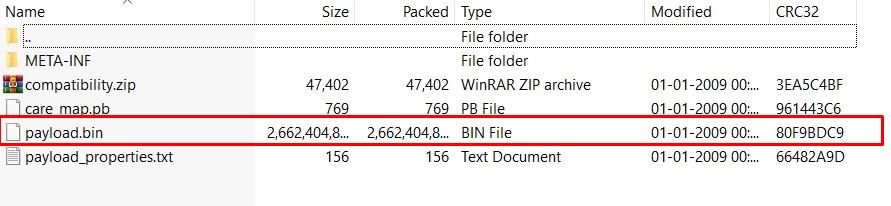
In this tutorial, we will show you the steps to extract stock boot.img from the OnePlus device’s OxygenOS stock ROM. This tutorial is valid for all the OnePlus devices whose stock firmware consists of the payload.bin file. Well, as of now, near about every OnePlus devices follow this format. Furthermore, when you download the stock firmware, you would see it to be in a ZIP format. But when you extract the contents, you wouldn’t find boot.img, vendor.img, system.img, and other such files.
Rather, there would be a compatibility ZIP file, a META-INF folder, a text file, a PB file, and most importantly the payload.bin file. So where are the aforementioned IMG files? Well, they are packed inside the payload.bin file and you cannot extract them via WinZIP or WinRAR. For that, you will need Python and a Decrypt Tool. In this guide, we will show you how to extract stock boot.img from the OnePlus device’s OxygenOS stock ROM. But first, let’s check out the need to carry out this process.
- How to Install OxygenOS OTA on Rooted OnePlus devices
- Install Custom Kernel ElementalX 1.00 on OnePlus Nord
- Disable DM-Verity or Android Verified Boot without TWRP
- How to Update Magisk ZIP and Magisk Manager (without TWRP)
Table of Contents
Why Extract OnePlus OxygenOS Stock Firmware Payload.bin?
Android OS, thanks to its open-source ecosystem allows you to carry out a plethora of tweaks. The everyday users might be contained with installing a custom launcher, using different font styles, and changing the icon packs. On the other hand, tech enthusiasts take this a step further. After unlocking the device’s bootloader, they flash custom ROMs like AOSP and Pixel Experience, install custom recoveries like TWRP or gain access to the system partition. The latter is possible by rooting their device via Magisk.
This in turn takes two different approaches: via TWRP and without TWRP. In the case of the former, you just need to flash the Magisk Installer ZIP file. While the latter calls for extracting stock boot.img, patching it via the latest Magisk Manager (that now support for Android 11) and flashing it via Fastboot. So everyone should go for the first method, right? Well, the option isn’t always in the user’s hand. This is because not every Android device has a TWRP build.
And while you could expect devices from OnePlus to have one, it would take some time to be available. Even the unofficial builds might take a month or two (depending on the release of the kernel source). As a result, people prefer to root their device using the method that doesn’t involve TWRP. The first step for which requires you to grab hold of the stock boot.img file. In earlier days, OEMs used to upload their firmware in a simple ZIP format, extract it and grab hold of the required files. However, now things have changed.
OnePlus uses payload.bin, Realme and Oppo use OZIP, and so on. As for this guide, our focus will be on the former. In this guide, we will show the steps to extract stock boot.img from the OnePlus device’s OxygenOS stock ROM. After this, you may patch it via Magisk ad flash it via Fastboot to the desired slot. Follow along for the complete instruction steps. If you have an OnePlus Nord, then you could directly download the stock boot.img file from here as well: Download OnePlus Nord Stock Boot Image Files [All Versions].
Method 1: Extract payload.bin File via Payload Dumper
Before we list out the instruction steps, there are a couple of prerequisites that you need to go through. Make sure to checkmark all the requirements and only then proceed with the steps to extract stock boot.img from the OnePlus device’s OxygenOS stock ROM. Follow along.
Prerequisites
- For extracting the Payload.bin file, you need a Payload Dumper Tool. We would like to thank Gregory Montoir for creating this tool. You could download it from the following link: payload_dumper.zip
- Likewise, you should also have to install Python on your PC. Download Python v3.8.5 (latest version at the time of writing).
- [GUIDE] Flash ROMs/Magisk/TWRP/Kernels on A/B Partition Devices
- Everything About Magisk- Manager, Modules, and More
- Best Magisk Modules of 2020 [PART-1]
- How to Fix FAILED (remote: unknown command) Error
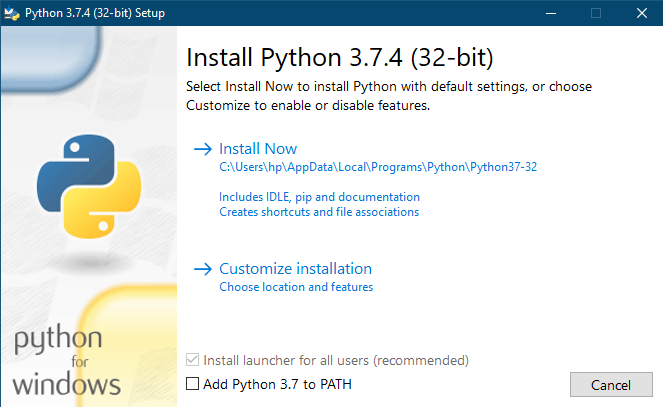
STEP 1: Install Python on your PC
- Launch the Python EXE set up file. It will then ask for the installation directory. Click on Install Now if you wish to proceed with the default one, which would make it easier for you to follow this guide. Or you could also click Customize Installation if you want to change the directory.
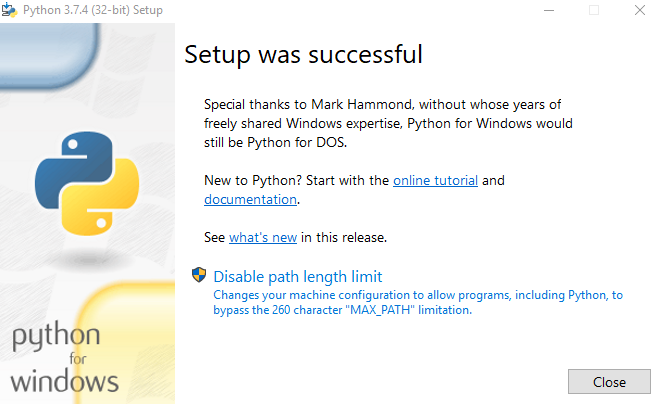
- Whatever installation directory you end up choosing, make sure to keep a note of it as it will be needed later on. The installation process will be completed within a minute or two. When that is done, hit the Close button to exit the setup wizard.
STEP 2: Install Payload Dumper file
Let’snow move onto the next step to extract stock boot.img from the OnePlus device’s OxygenOS stock ROM. Now that you have installed Python, you could proceed with the extraction of the Payload.bin file from OnePlus OxygenOS stock firmware and then get the stock boot image file. For that, we will be making use of the Payload Dumper Tool. Follow the below steps for that:
- Extract all the contents of the Payload Dumper Tool inside the folder where you have extracted Python.
- If you have chosen the default directory while installing Python, then the contents should be extracted inside:
C:\Users\USER-NAME\AppData\Local\Programs\Python\Python <version number>
STEP 3: Extract Payload.Bin
- To begin with, extract the downloaded OnePlus Stock ROM. It would be in ZIP format, so you could use WinZIP or WinRAR to extract it. Once the extraction is complete, you should see a couple of files, including the payload.bin.

- Copy the payload.bin file from the extracted firmware and move it to the folder where you have installed Python.
- Hence, this directory will now have the Payload Dumper Tool, the payload.bin file, and the Python software.
- Inside the same folder, type in CMD in the address bar and hit Enter. This will launch the Command Prompt.
- Type in the below command to install the necessary dependencies:
python -m pip install -r requirements.txt
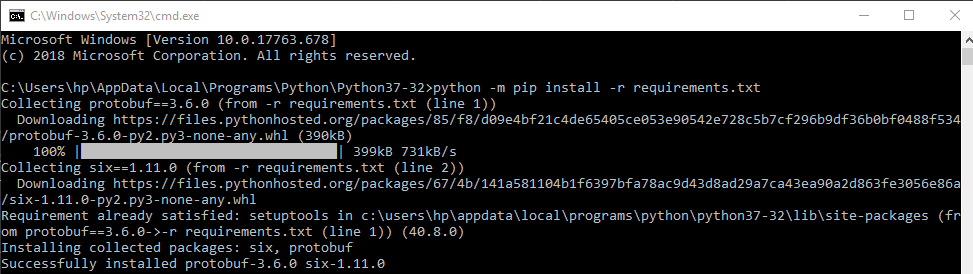
- Finally, execute the below command to extract all the contents of the payload.bin file. It will take some time, depending on the size of the package. [Facing issues? Check out our detailed guide: Fix: pip is not recognized as an internal or external command].
python payload_dumper.py payload.bin
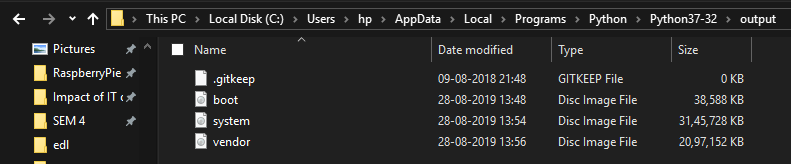
- In our case, the payload.bin file gave us three files: boot, system, and vendor. In some cases, you could also get dtbo, and a couple of other files as well.
- Once the process is complete, all the extracted files are placed inside a folder named Output. If you have installed python in the default directory, then the location of the output folder will be:
C:\Users\USER-NAME\AppData\Local\Programs\Python\Python<version-number>/Output


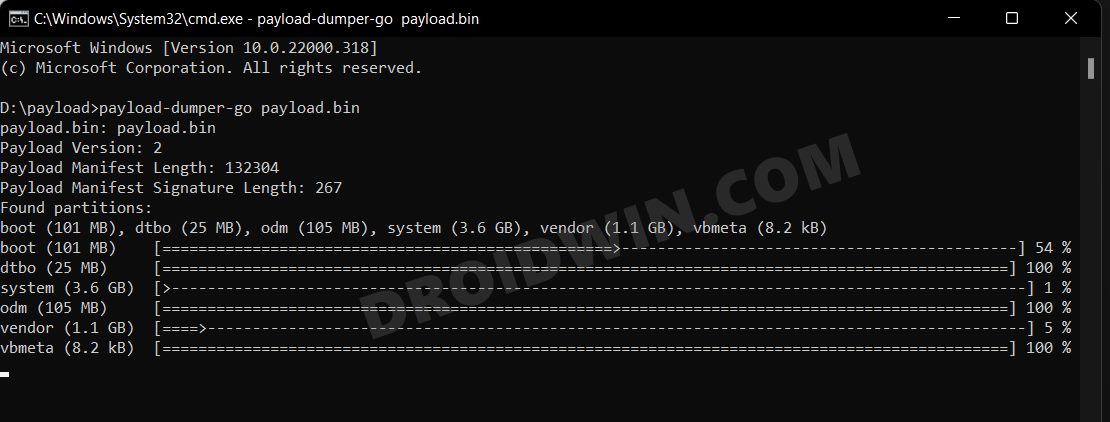
METHOD 2: Extract Payload.bin via Payload Dumper Go
- To begin with, download the payload-dumper-go 1.0.0 from Github [Credits: XDA Member ssssut].
- Then extract it to any convenient location on your PC. The name of the file will be something like payload-dumper-go_1.0.0_windows_amd64. Rename it to payload-dumper-go.
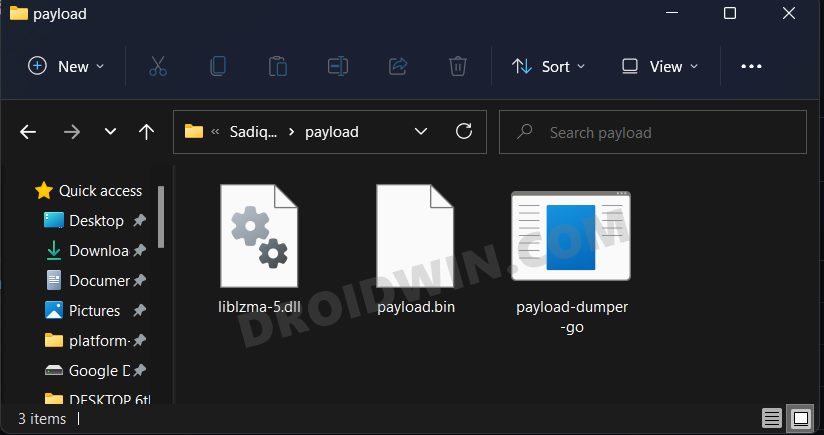
- Next up, download the liblzma-5.dll file and transfer it to the same folder where the payload-dumper-go.exe file is present.
- After that, transfer the payload.bin file to this folder as well.
- So as of now, you should have the payload-dumper-go.exe, payload.bin, and liblzma-5.dll files all under one folder.
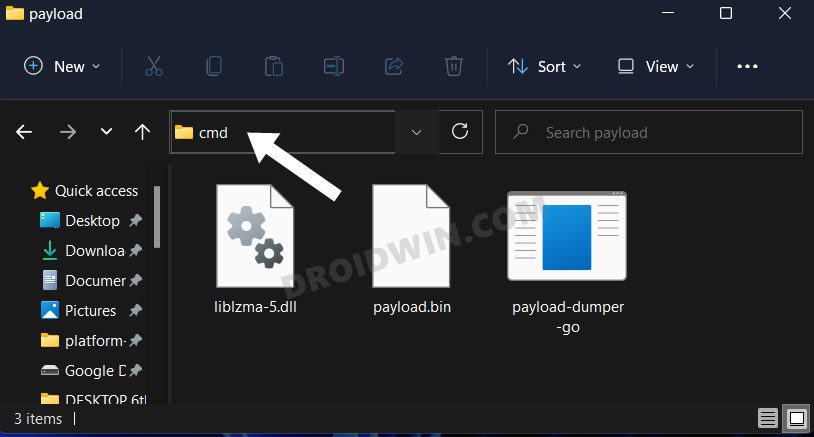
- Now head over to that folder’s address bar, type in CMD, and hit Enter. This shall launch the Command Prompt window.
- Type in the below command to extract the payload.bin file:
payload-dumper-go payload.bin
- The extraction process will now begin and would only take a few seconds.
- Once done, all the extracted files will be placed under a folder named extracted_date_time that is created inside that directory.

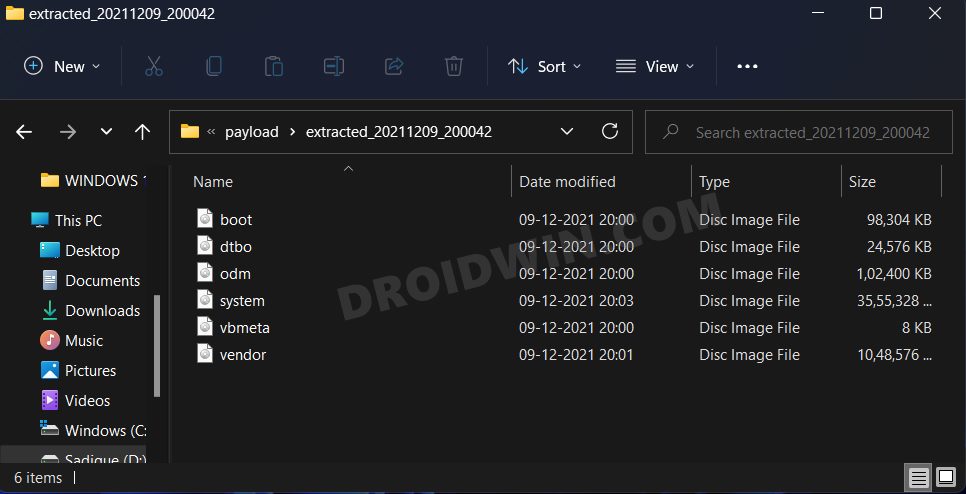
That is it. You could now make use of the boot.img file and proceed to root your device by patching via Magisk and flashing the patched boot image file via Fastboot. So with this, you have successfully extracted the payload.bin file and got the stock boot image file via the Payload dumper tool and Python. And this concludes our guide on how to extract the stock boot.img from the OnePlus device’s OxygenOS stock ROM. If you still have any queries, do let us know in the comments section below.


Antonio
Hey I get the same error
C:\Users\obaan\AppData\Local\Programs\Python\Python310>python payload_dumper.py payload.bin
Traceback (most recent call last):
File “C:\Users\obaan\AppData\Local\Programs\Python\Python310\payload_dumper.py”, line 12, in
import update_metadata_pb2 as um
File “C:\Users\obaan\AppData\Local\Programs\Python\Python310\update_metadata_pb2.py”, line 8, in
from google.protobuf import reflection as _reflection
File “C:\Users\obaan\AppData\Local\Programs\Python\Python310\lib\site-packages\google\protobuf\reflection.py”, line 58, in
from google.protobuf.internal import python_message as message_impl
File “C:\Users\obaan\AppData\Local\Programs\Python\Python310\lib\site-packages\google\protobuf\internal\python_message.py”, line 62, in
from google.protobuf.internal import containers
File “C:\Users\obaan\AppData\Local\Programs\Python\Python310\lib\site-packages\google\protobuf\internal\containers.py”, line 182, in
MutableMapping = collections.MutableMapping
AttributeError: module ‘collections’ has no attribute ‘MutableMapping’
I used the Stock ware for the oneplus nord:
https://www.oneplus.com/de/support/softwareupgrade/details?code=PM1596593883414
Tbia
2nd method is not working. After the extraction process the new folder remains empty. Downloaded the latest official build for my OP6 here: https://www.oneplus.com/global/support/softwareupgrade/details?code=PM1574156173727
newb
Dear friend,
your recommended Method 2 link is fail to open, “unauthorized to view draft” was redirect page, no error code.
I will search more your site, it was highly recommended in a forums post (xda) to come see this article, thank you for composing and sharing it. My goal is become google free, so horrible to privacy, and will find best custom rom to help in that regards.
I am first time making any changes to stock android and its on a new one+ 9 pro unlocked Americas version purchased direct from parent company. I do not have access to Windows computer to do these things, and although do have linux I fear I am very simple user and search everything beyond the basics on Debian or Mint. Prefer to not require second device like PC or laptop, can use second android phone or tablet though (if possible??)
Garrett
As of today it is still a dead link
Daniel
Hey I’m trying to use the payload dumper go, everything seems to be fine but the folder with the extracted files is empty.
Nicolas
Hi Sadique,
Thank’s for this helpfull tutorial ! I try to extract boot.img from onePlus Nord CE 5G 11.0.11.11 but unfortunately, same errors for me as the 2 messages bellow :
Traceback (most recent call last):
File “C:\Users\Nicolas\AppData\Local\Programs\Python\Python310\payload_dumper.py”, line 13, in
import update_metadata_pb2
File “C:\Users\Nicolas\AppData\Local\Programs\Python\Python310\update_metadata_pb2.py”, line 9, in
from google.protobuf import reflection as _reflection
File “C:\Users\Nicolas\AppData\Local\Programs\Python\Python310\lib\site-packages\google\protobuf\reflection.py”, line 58, in
from google.protobuf.internal import python_message as message_impl
File “C:\Users\Nicolas\AppData\Local\Programs\Python\Python310\lib\site-packages\google\protobuf\internal\python_message.py”, line 62, in
from google.protobuf.internal import containers
File “C:\Users\Nicolas\AppData\Local\Programs\Python\Python310\lib\site-packages\google\protobuf\internal\containers.py”, line 182, in
MutableMapping = collections.MutableMapping
AttributeError: module ‘collections’ has no attribute ‘MutableMapping’
I download the firmware EB13BA (Europe) – 11.0.11.11 from XDA thread : https://forum.xda-developers.com/t/oneplus-nord-ce-rom-ota-oxygen-os-repo-of-oxygen-os-builds.4326661/
Would it be possible for you to perform the payload.bin extraction process for me?
Sebastian
Hi,
Same as other I get no files in the output folder and getting the following
“C:\Users\Sebastian\AppData\Local\Programs\Python\Python310>python payload_dumper.py payload.bin
Traceback (most recent call last):
File “C:\Users\Sebastian\AppData\Local\Programs\Python\Python310\payload_dumper.py”, line 12, in
import update_metadata_pb2 as um
File “C:\Users\Sebastian\AppData\Local\Programs\Python\Python310\update_metadata_pb2.py”, line 8, in
from google.protobuf import reflection as _reflection
File “C:\Users\Sebastian\AppData\Local\Programs\Python\Python310\lib\site-packages\google\protobuf\reflection.py”, line 58, in
from google.protobuf.internal import python_message as message_impl
File “C:\Users\Sebastian\AppData\Local\Programs\Python\Python310\lib\site-packages\google\protobuf\internal\python_message.py”, line 62, in
from google.protobuf.internal import containers
File “C:\Users\Sebastian\AppData\Local\Programs\Python\Python310\lib\site-packages\google\protobuf\internal\containers.py”, line 182, in
MutableMapping = collections.MutableMapping
AttributeError: module ‘collections’ has no attribute ‘MutableMapping'”
Got my Zip file from here: https://www.oneplus.com/de/support/softwareupgrade/details?code=PM1587123976090
And downloaded the Open Beta 8
I appreciate your help
Roshan
Please help me,
It is not able to give out the files in the output folder. I am getting the following error:
C:\Users\rosha\AppData\Local\Programs\Python\Python310>python payload_dumper.py payload.bin
Traceback (most recent call last):
File “C:\Users\rosha\AppData\Local\Programs\Python\Python310\payload_dumper.py”, line 12, in
import update_metadata_pb2 as um
File “C:\Users\rosha\AppData\Local\Programs\Python\Python310\update_metadata_pb2.py”, line 8, in
from google.protobuf import reflection as _reflection
File “C:\Users\rosha\AppData\Local\Programs\Python\Python310\lib\site-packages\google\protobuf\reflection.py”, line 58, in
from google.protobuf.internal import python_message as message_impl
File “C:\Users\rosha\AppData\Local\Programs\Python\Python310\lib\site-packages\google\protobuf\internal\python_message.py”, line 62, in
from google.protobuf.internal import containers
File “C:\Users\rosha\AppData\Local\Programs\Python\Python310\lib\site-packages\google\protobuf\internal\containers.py”, line 182, in
MutableMapping = collections.MutableMapping
AttributeError: module ‘collections’ has no attribute ‘MutableMapping’
Mt Everest
Were you able to find the solution to this problem? I am facing the same problem as well.
Sadique Hassan
Let me know the device name and current build number, will carry out the extraction process and upload the file for you here.
Mt Everest
I got exactly same error, device is oneplus 6t, OnePlus6TOxygen_34.J.61_OTA_0610_all_2109171644_7a4bfad9b1f940d5
Any fix found yet?
david
Hi, I got a problem with oneplus 6 android 11.1.1.1 whille trying to extract the boot.img. Messages as below. No files in output folder.
C:\Users\sdssls69\AppData\Local\Programs\Python\Python310>python payload_dumper.py payload.bin
Traceback (most recent call last):
File “C:\Users\sdssls69\AppData\Local\Programs\Python\Python310\payload_dumper.py”, line 12, in
import update_metadata_pb2 as um
File “C:\Users\sdssls69\AppData\Local\Programs\Python\Python310\update_metadata_pb2.py”, line 8, in
from google.protobuf import reflection as _reflection
File “C:\Users\sdssls69\AppData\Local\Programs\Python\Python310\lib\site-packages\google\protobuf\reflection.py”, line 58, in
from google.protobuf.internal import python_message as message_impl
File “C:\Users\sdssls69\AppData\Local\Programs\Python\Python310\lib\site-packages\google\protobuf\internal\python_message.py”, line 62, in
from google.protobuf.internal import containers
File “C:\Users\sdssls69\AppData\Local\Programs\Python\Python310\lib\site-packages\google\protobuf\internal\containers.py”, line 182, in
MutableMapping = collections.MutableMapping
AttributeError: module ‘collections’ has no attribute ‘MutableMapping’
Sadique Hassan
Hi David, could you please share the direct download link of the stock firmware that you are currently using. I will download the ROM, extract the stock boot.img and will upload it here.
Phillip
❯ fastboot flash boot_a output/boot.img
fastboot: error: boot partition is smaller than boot image
Sadique Hassan
Just give me couple of days Phillip, I will try and recreate this issue on my end and will let you know the steps to fix it.
Riham Chowdhury
There is no requirements.txt in the mentioned folder
Sylwin
Bro ur Awesome. Learnt a lot.
Sadique Hassan
Thank you so much Sylwin for the appreciation
Jason Tran
Thanks for sharing this. Will it works for One+ 9 Pro Global / NA Model
11.2.2.2.LE15AA
https://www.oneplus.com/support/softwareupgrade/details?code=PM1617074857015
I retrieved the boot.img from the stock ROM. Not quite if patching it may brick the phone or not, and how to recover the phone if so
Sadique Hassan
Hi Jason. you could verify the device’s Build Number. For example, if Build Number/Software Version comes out to be 11.2.2.2.LE15AA, then yes, you could download that file. Otherwise, you would have to search the firmware that corresponds to the exact same version currently installed onto your device. As far as bricking is concerned, there’s always a risk involved in doing so. While there are a few fixes available (flashing stock firmware via Fastboot in soft brick) or flashing via MSM, but they require way too much technical knowledge. So if you aren’t sure about all this and this is your primary device, then I wouldn’t suggest rooting as of now. But if you have the knowledge, then patching and flashing doesn’t brick any device if done correctly.
Fahad
thankyou so much. keep up the awesome work. the world needs people like you 🙂
Sadique Hassan
Thank you so much Fahad for the appreciation, means a lot.
Vishnu
when i ran the second command it shows:
D:\oneplus 8 reset\platform-tools_r31.0.0-windows\platform-tools>fastboot flash aop aop.img
Sending ‘aop’ (200 KB) OKAY [ 0.016s]
Writing ‘aop’ FAILED (remote: ‘Flashing is not allowed for Critical Partitions
‘)
fastboot: error: Command failed
what should i do?
Sadique Hassan
Hi Vishnu, it seems you haven’t unlocked the device’s critical partition. It needs to be done via fastboot flashing unlock_critical. But it might also wipe off all the data, so take a backup beforehand
ankit
unable to find the requirement.txt error in cmd..
Stef
It will be in the subfolder created by the zip extractor.
James
Also have the same problem
Sadique Hassan
Hi James, let me know your device name and the current firmware version, I will try and upload it here itself.
Sadique Hassan
Hi Ankit, are you getting this error after executing the python -m pip install -r requirements.txt command? And make sure that you are connected to the internet as well.
Felix
Thanks for the detailed instructions – it was quite painless for me. But I would like to point out that I got much more than “a couple of files” – to be precise – 34 files from my OnePlus 8 Pro’s latest update file.
Sadique Hassan
Yes Felix, OnePlus does comes with quite a lot of partitions. Since this process is mostly used to get the stock boot.img file, I hit the Ctrl+C shortcut keys to terminate the command as soon as I get hold of this file. Guess I should mention that in the guide as well.
anshul
python paylod_dumper.py payload.bin >>python payload_dumper.py payload.bin
RocknR
Thanks to people like you that spread the knowledge. It’s becoming very few who do.
I hope that life gives you everything you need plus more.
Keep up the awesome work…you are greatly appreciated.
Sadique Hassan
Thanks Anshul for pointing out the error.