This tutorial contains a step by step instruction on how to Install the Xposed Framework on Android 9.0 Pie devices. Moreover, instructions regarding the installation of Xposed modules are also included. Likewise, this tutorial also contains a detailed video explaining the entire installation process.
Before Magisk bought a major landscape change in the rooting community, we had the Xposed Framework. It provided tons of modules that completely overhauled the device’s software. Along with SuperSu, it ruled the open-source environment, until Magisk arrived. What Magisk did was, apart from providing various modules it also added the rooting capabilities. Slowly but surely, it took away the limelight from Xposed.
But it seems that this entire notion was wrong, and in fact, Xposed is well alive and kicking. All thanks to the developer solohsu, we might once again be able to use the Xposed Framework on Android Pie devices. He was able to port it on the Riru Platform ( created by RikkaW). With this platform combination, Xposed has set foot in a new era.
So let’s begin with the process. Just make sure that your device is rooted and Magisk Manager APK is installed.
Table of Contents
How to Install Xposed Framework in Android 9.0 Pie
The best part about using this Xposed version? It could only be installed with the help of Magisk Modules.So the reason for the demise of Xposed is itself bringing it back from the verge of death! Quite amusing to say the least.
Now, let’s begin with the process. Note that the tutorial has been divided into various steps. The first step provides instruction on how to install the platform on which the Xposed Framework would be running. The next step discusses the steps needed to install the Riru platform for the Xposed Manager app.
The third step talks about installing the Xposed Manager through which you could manage all the modules. Finally, instructions regarding installing the preferred Xposed Module is provided. Apart from that, we would also be providing tips on how to completely uninstall the Xposed Framework, Xposed Modules and any of its related apps.
STEP 1: Install the Riru-Core Module

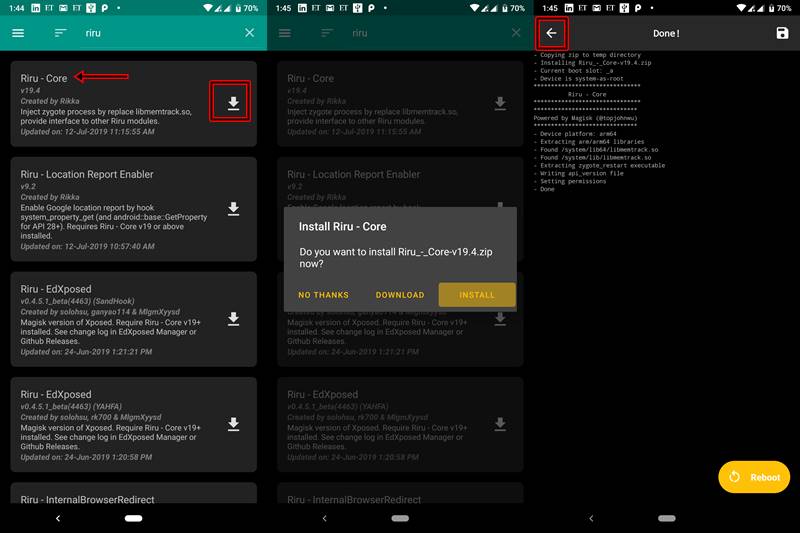
- Open the Magisk Manager app.
- Tap the menu on the left.
- Go to the ‘Downloads’ section.
- Search for ‘Riru – Core’ and tap on the download button next to it.
- Select install and wait for the process to finish. Don’t Reboot!
STEP 2: Install the Riru EdXposed Module

- Again go to the ‘Downloads’ section.
- Search for ‘Riru EdXposed’. You will notice that there would be two versions of ‘Riru EdXposed’- ‘Sandhook’ and ‘YAHFA’. You may try out the Sandhook version. But if you face stability issues then give the latter (YAHFA) a try.
- Select ‘Install’ and wait till it gets successfully installed.
- Now tap on the ‘Reboot’ button.
STEP 3: Install the EdXposed Installer APK
After you have downloaded and installed all the modules, now is the time to install the EdXposed Installer. This app provides a platform for managing all the available modules. You could download any module, enable or disable them or even uninstall them from this app. Download the app from the given link below.
- Download EdXposed Installer: EdXposedInstaller_v2.2.4-release.apk
STEP 4: Install Various Xposed Modules on Android 9.0 (Pie)
Enough of the geeky steps, now let’s come to the fun part. It’s time to check out some amazing Xposed Modules on your device. Follow the below instructions for the same:
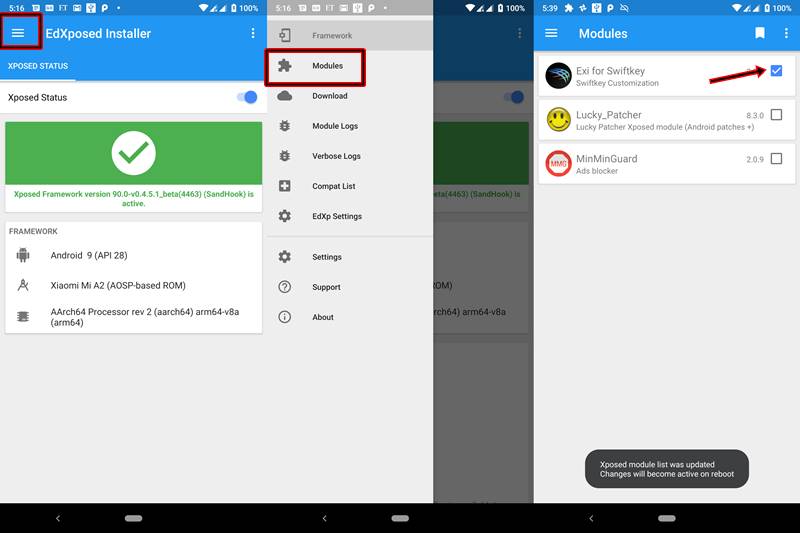
Open the EdXposed App (if it is successfully installed, you will see a big green tick).

- Tap on the Menu button on the top left.
- Go to ‘Downloads’.
- [IMPORTANT] Select the ‘Sort’ button present on the upper right corner and tap on ‘Sort by last update’. This is needed because some of the modules are present in the Xposed framework for ages and haven’t been updated. Installing them may cause bootloop (as they could be incompatible with the latest version of Android).
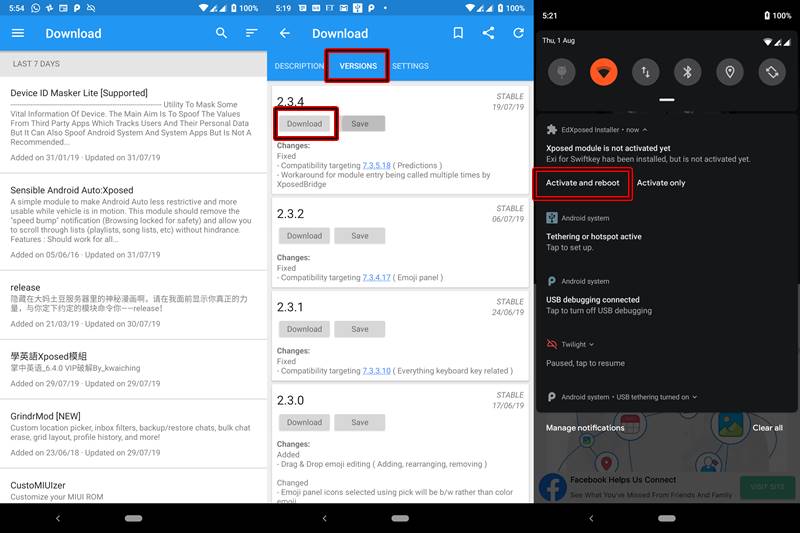
- Scroll through the long list of available modules and tap on the module of your choice.
- Next, go to the ‘Versions’ tab and click on the ‘Download’ button.
- After the installation is finished, you may open the app. But it wouldn’t perform any functions as such. This is because the said module hasn’t been enabled yet.
- So, go back to the EdXposed app and tap on the menu icon.
- Tap on ‘Modules’ and tick the box next to the module you want to activate. You may also activate the module from the Notification Bar.
- Finally, reboot the device. The module will now get activated. That’s it!
With this, you have successfully installed the Xposed Framework on your Android 9.0 Pie device. Go ahead and try tons of available modules. Do share let me know which of the modules you loved the most.
STEP 5: Uninstall or Disable any Xposed Module
Till now we discussed everything regarding the installation process. But what if any module isn’t performing as expected or having stability issues. In such cases, you may consider disabling or uninstalling them. Follow the below instructions for the same:
A) To disable any Module:
- Open the EdXposed app
- Tap the menu icon on the top left.
- Go to Modules
- Untick the checkbox next to the app you want to disable.
- Reboot your device. That’s it!
B) To completely Uninstall any Module
If disabling the module didn’t do any good, you might consider uninstalling them. Just uninstall the module as you would do for any normal APK file. Then reboot your device once.
Therefore, this was a detailed guide covering the steps required to Install the Xposed Framework on Android devices running Android 9.0 (Pie). Moreover, if you face any issues or having trouble with any module then let me know in the comments section below. Happy Downloading!
Video Tutorial: Install Xposed Framework and Modules on any Android 9.0 Pie Device


