In this comprehensive tutorial, we will show you the steps to install the TWRP Recovery and root your Samsung Galaxy M51 device. This mid-ranger from Samsung created quite a buzz right when it was announced. For the unaware, the device comes with a hefty 7000mAH battery which is probably the biggest battery capacity that any smartphone could boast of as of today. Along with that, the rest of the specs sheet was worth commendable too.
The newer Snapdragon 730G chipset coupled with up to 8 GB of RAM, quad rear, and a single selfie camera both of which could record 4K videos at 30FPS is worth commendable. Out of the box, the device came with OneUI 2.5 which is still based on Android 10 and is slated to receive Android 11 by April. However, that isn’t the only reason to cheer about. The device seems to be getting along quite well in custom development.
As a result, at the time of writing, two different XDA Developers have already ported two standalone TWRP Recovery for this device. And you could now easily install it onto your device right away. So without further ado, let’s check out the steps to install the TWRP Recovery and root your Samsung Galaxy M51 device. Follow along for the complete instructions.
- New Method to Boot to Recovery Mode on Samsung OneUI 3.0 Android 11
- How to Stop Samsung Find My Device Offline Finding Notifications
- Steps to Create Samsung Combination Firmware and Flash it via Odin
- How to Boot Rooted Samsung to Recovery Mode and Rooted OS
Table of Contents
Benefits and Risks of TWRP and Rooting Galaxy M51
Once you have installed the TWRP Recovery onto your device, you could then create and restore Nandroid backups, erase device partitions, mount external devices, execute Terminal Commands and even flash ZIP and IMG files. The last one comes in handy if you are looking to flash custom binaries or root the device via Magisk Installer. Once you do so, you get the access to system partition on your device. You could then install Magisk Modules, Xposed Framework, Substratum Themes, among others.
On the flip side though, there are a few negative consequences of these tweaks as well. The first prerequisite to TWRP/Root is you need to have an unlocked bootloader. Once you do so, the device’s warranty will become null and void. You will also lose all the data on your device and the KNOX counter will also be tripped.
This will result in your inability to use apps like Samsung Pay, Secure Folder, etc. The Widevine Certification will be degraded from L1 to L3 resulting in the inability to watch Netflix. Amazon Prime, etc in HD. So if that’s all well and good, then here are the steps to install the TWRP Recovery and root your Samsung Galaxy M51 device.
How to Install TWRP Recovery and Root Samsung Galaxy M51
The below instructions have been listed out in separate sections for ease of understanding. Make sure to follow the steps in the exact same sequence as mentioned. Furthermore, make sure to take a backup of all the data on your device. This is because we would have to decrypt the data partition via TWRP.
In other words, you need to delete all the data on your device via the Format Data option of TWRP, so that the recovery is able to access your internal storage. Droidwin and its members wouldn’t be held responsible in case of a thermonuclear war, your alarm doesn’t wake you up, or if anything happens to your device and data by performing the below steps.
- How to Root any Samsung device via Magisk and Odin
- How to Patch Samsung AP Firmware via Magisk
- Steps to Flash magisk_patched.tar (patched Samsung AP file) via Odin
- How to Patch Samsung AP Firmware via Magisk
STEP 1: Download the Required Files
To begin with this guide on how to install the TWRP Recovery and root your Samsung Galaxy M51 device, you will need to download a few files. Here are all of these files alongside their usage instructions:
- Disable DM Verity (to decrypt internal storage): Disable_Dm-Verity_ForceEncrypt_11.02.2020.zip
- Samsung Multi-Disabler: multidisabler-samsung-3.1.zip
- Magisk Files (ZIP to obtain root and APK to manage the root capabilities): Magisk Installer ZIP and Magisk Manager APK
- TWRP for Samsung Galaxy M51 (Credit goes to XDA Member bekirakil for this recovery): twrp.zip. Make sure to extract the ZIP file so that you get the required twrp.tar file (which will then be flashed via Odin).
STEP 2: Unlock Bootloader on Samsung Galaxy M51
The first prerequisite is that you need to unlock the bootloader on your Galaxy M51 device. For that, please refer to our comprehensive guide: How to Unlock Bootloader on any Samsung Device [New VaultKeeper Method]. If you don’t wish to check out that guide, then here are the instructions in short:
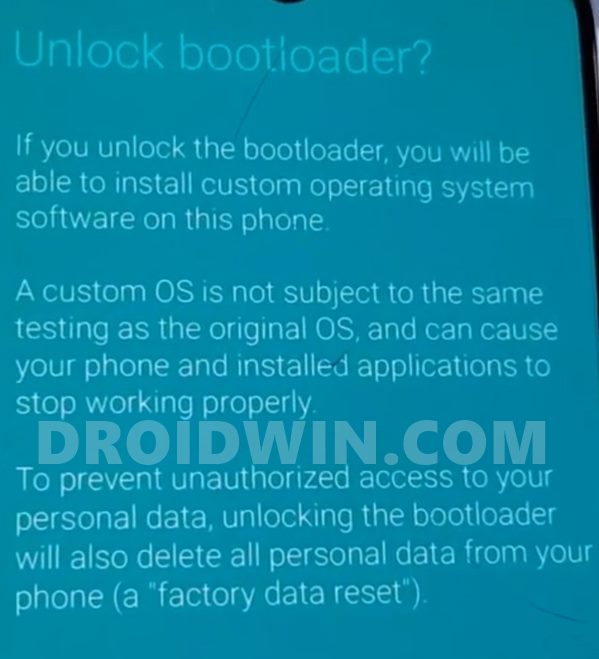
- Start off by Enabling USB Debugging and OEM Unlocking on your device.
- Then boot your device to Download Mode.
- Use the Volume keys to select the option to unlock the bootloader.
- Your device will then automatically boots up. Connect to the internet and go to Developer Options,
- Make sure that OEM Unlock is greyed out. That’s it, the bootloader stands unlocked. You may now move to the next step to install the TWRP Recovery and root your Samsung Galaxy M51 device.
STEP 3: Download Galaxy M51 Stock Firmware
Well, some of you might get a little bit surprised that why do you need to download the stock firmware when we just need to install TWRP and root? Well, the thing when you would be flashing the TWRP Recovery, it is always recommended to go for a clean install.
Hence rather than only flashing the TWRP via AP slot, you should also flash the other firmware files (BL, CP, and CSC). The second method is to flash the AP, BL, CP, and CSC files of the stock firmware and then flash the TWRP as a standalone file via Odin’s AP slot. And in this guide, we will be following this method only.
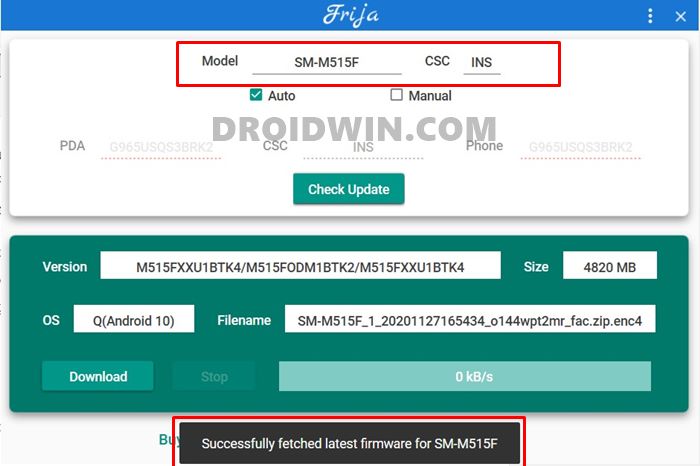
So head over to our detailed guide on How to Download Samsung Stock Firmware/ROM via Frija Tool and get hold of the firmware for your device. In short, launch the Frija Tool and type in the below details. (The given CSC is for India, you should select the one according to your region. If you don’t know the CSC for your region, then please refer to the guide the Frija guide we have linked.)
- Model: SM-M515F
- CSC: INS
On the other hand, if you are using the SamMobile website, then the below information will come in handy (these are for the Indian variant)
- Model number: SM-M515F
- Device Name: Samsung Galaxy M51
- PDA: M515FXXU1BTK4
- CSC: M515FODM1BTK2
- Android Version: 10
STEP 4: Install Odin on your PC
- Download the latest version of the Odin Tool: Odin3-v3.14.4.zip. This tool will be used to flash the TWRP TAR file to your device.
- Once downloaded, extract the contents to any convenient location on your PC.
- Finally, double-click on the Odin.exe file to launch the Tool.

- That’s it. Now that Odin is installed, let’s start off with the guide to install the TWRP Recovery and root your Samsung Galaxy M51.
STEP 5: Boot Samsung Galaxy M51 to Download Mode
It’s now time to boot your device to Download Mode. For that, refer to our comprehensive guide on How to Boot any Samsung Device to Download Mode. If you wish to save a click, then here are the instructions in short:
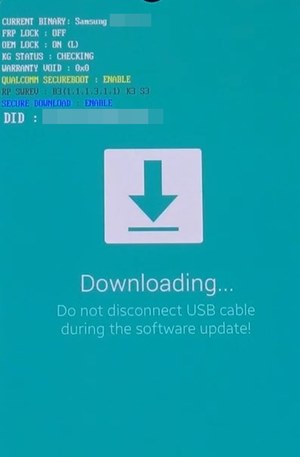
- To begin with, power off your device.
- Then press and hold Vol Up + Vol Down together and connect your device to the PC via USB cable.
- As soon as you see the Warning message on your device, release the pressed keys.
- Finally, hit the Volume Up key to boot your device to Download Mode.
STEP 6: Flash Galaxy M51 Stock Firmware via Odin
- Extract the downloaded firmware file for your device that you have downloaded to any convenient location on your PC,
- You should now get the following five files in .tar.md5 format:
AP, BL, CP, CSC, and HOME_CSC
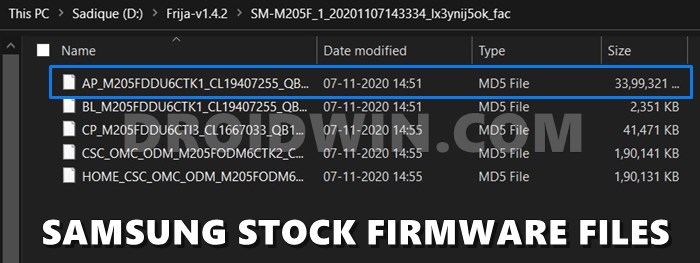
- As of now, you will need to flash the AP, BL, CP, and CSC files. You don’t have to flash the HOME_CSC file because if you do so, then TWRP wouldn’t be able to mount the data partition.
- With that said, now connect your device to the PC via USB Cable (make sure it is booted to Download Mode).
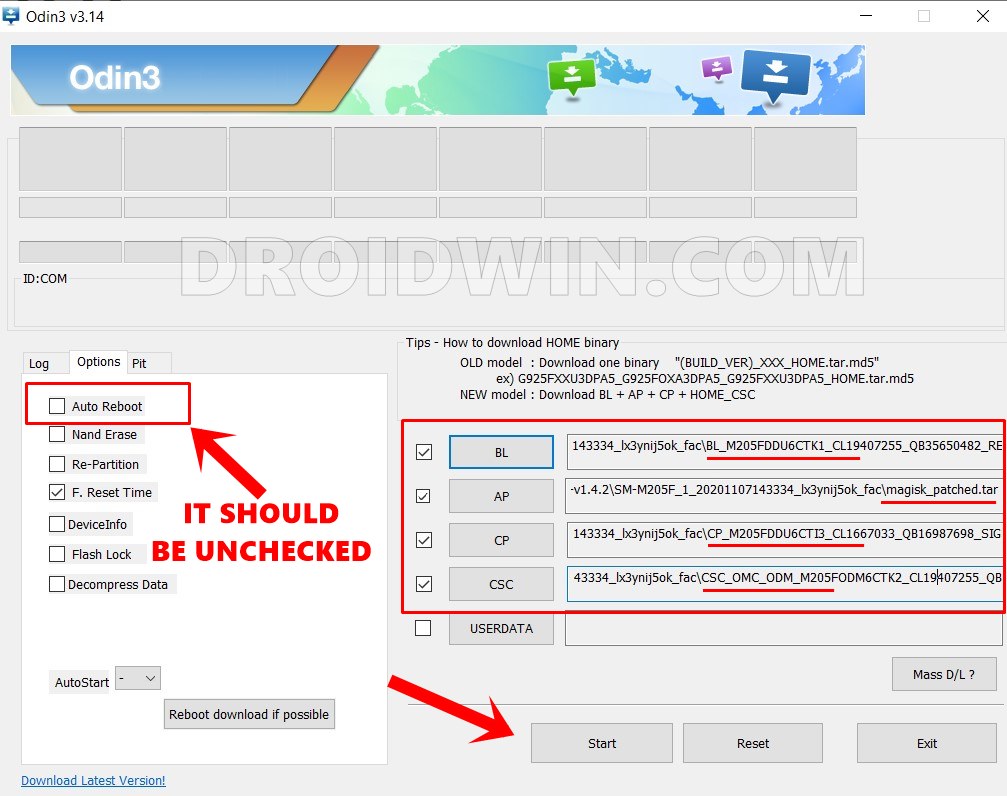
- After this, load the following files to the Odin tool:

- First off, click ‘BL‘ and load the BL firmware file.
- Then click ‘AP‘ and load the AP file.
- After this, click ‘CP‘ and load the CP firmware file.
- Then click ‘CSC‘ and load the CSC firmware file (the normal CSC file, not the Home CSC file).
- Leave the UserData field blank.
- Now go to the Options section of Odin and uncheck the Auto Reboot option.
- When that is done, hit the Start button and wait for the installation to complete.
- As soon as you get the Pass message on Odin, press and hold the Vol Up + Vol Down keys together for a few seconds until your device reboots to the Bootloader. Once that is done, hit the Volume Up key once to boot to Download Mode.

STEP 7: Install TWRP Recovery on Samsung Galaxy M51
Now that your device is booted to Download and connected to PC via USB, proceed to the below steps to install the TWRP Recovery and root your Samsung Galaxy M51.
- To begin with, launch the Odin Tool on your PC.
- Click on AP, navigate to the downloaded TWRP TAR file, and select it.
- Then make sure that Auto Reboot is disabled under the Options section of Odin.
- Now click on Start and wait for the process to complete.
- As soon as you get the Pass message on Odin, use the ‘hardware key combinations’ for your device (see below) to directly boot to TWRP. If you don’t do so, then TWRP wouldn’t be able to mount the data partition.

So what are the hardware key combinations? Well, you need to press and hold the Vol up+power keys for a few seconds until you see the Warning screen. Then press the Power button once and after press and hold the Volume Up key until the device is booted to TWRP. Phew! That required quite some effort. Anyways, now that the TWRP is installed on Samsung Galaxy M51., it’s time to decrypt the data partition and then root your device. Follow along.
- How to Install Android 11 (OneUI 3.0) on any Samsung Phone via Odin
- Downgrade Samsung from Android 11 to Android 10 (OneUI 3.0 to 2.0/2.5)
- Download Samsung Stock Firmware/ROM via Frija Tool
- How to Update Magisk ZIP and Magisk Manager (without TWRP)
STEP 8: Root Samsung Galaxy M51 via TWRP and Magisk
You will now have to transfer the Disable_Dm_verity.zip, Magisk.zip, and MultiDisabler.zip file to your device. To do so, you may either mount USB OTG/Pendrive or transfer the files via TWRP. Once you have transferred these three files to your device, proceed with the below instructions:
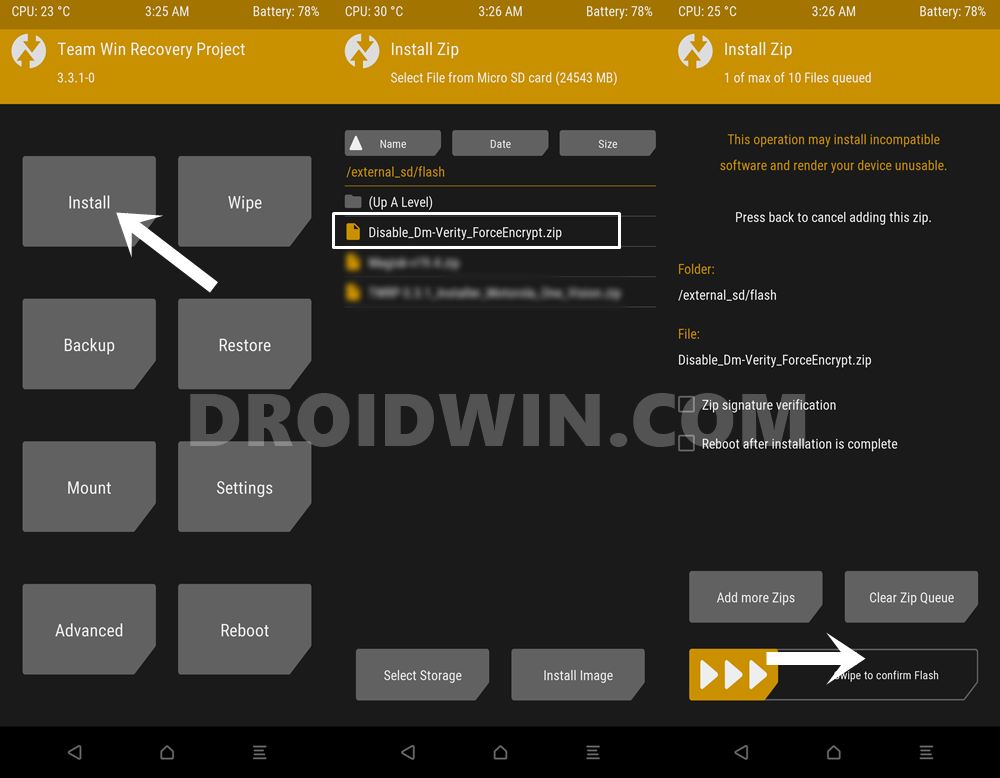
- Since your device is already booted to TWRP, go to Install, select the Disable_Dm_Verity.zip file and perform a right swipe to install it.
- After this, select the multidisabler.zip file and again perform a right swipe to install it.
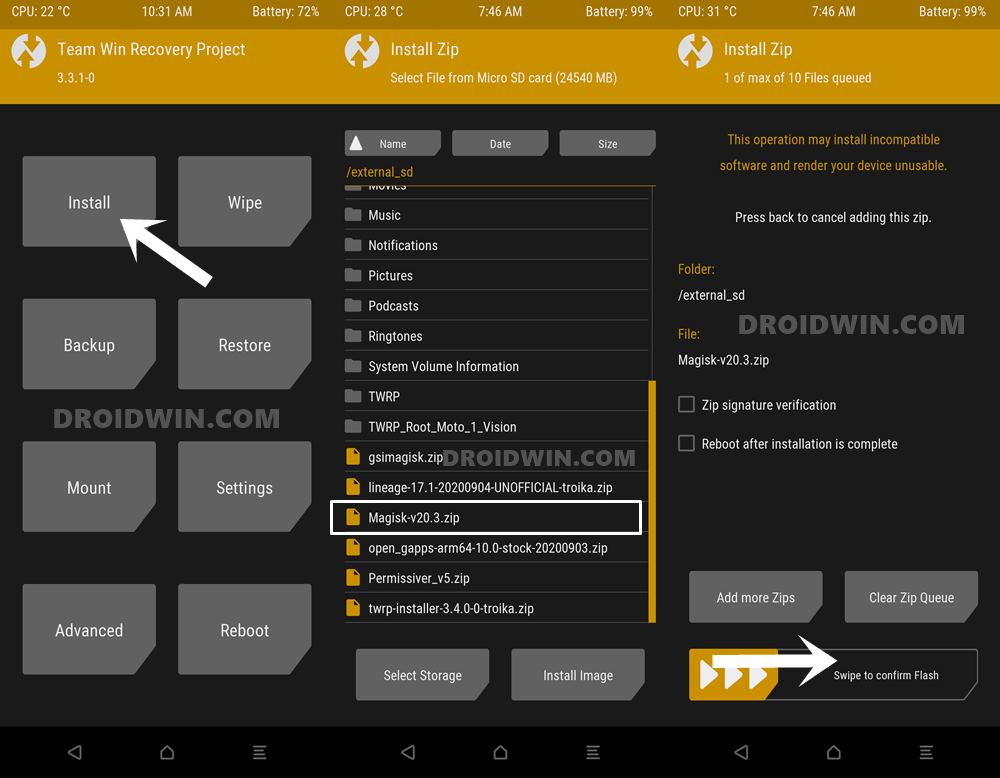
- Once both these files are installed, select the Magisk.zip file and then perform a right swipe to install it as well.
- Then you will once again have to install the Disable_Dm_verity.zip file.
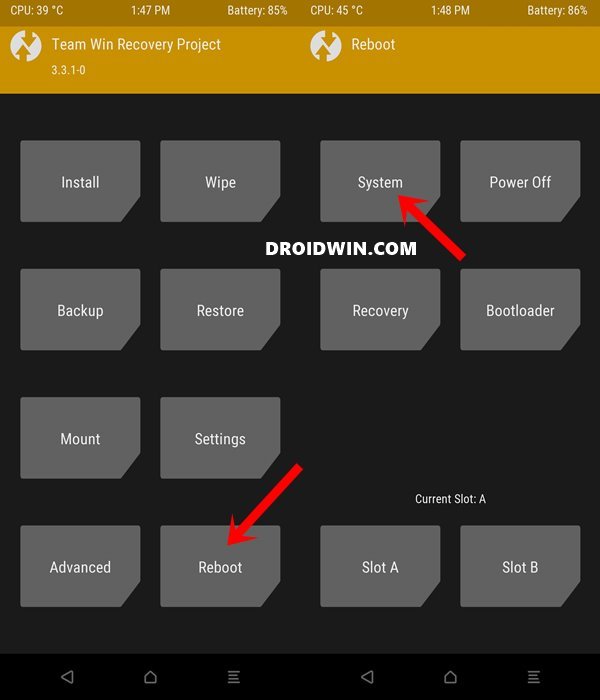
- Once all these files have been flashed, go to Reboot and select System.
- Your device will now boot to the OS. it might take some time, nothing to worry about.
- After it is booted to the system, install the Magisk Manager app on your device and then launch it once.
That’s it. With this, we conclude the guide on how to install the TWRP Recovery and root your Samsung Galaxy M51. If you have any queries, do let us know in the comments section below. We will get back to you with a solution at the earliest.


Rahmat
Has this method been tested?