In this comprehensive post, we will show you how to root the Sony Xperia 1 II device without using TWRP. We would be extracting the stock boot file, patching it via Magisk, and then flashing it onto your device via fastboot commands. The steps are slightly different from what other devices follow, so please give your full attention while going through the instructions.
This offering from Sony comes with a pretty strong specs sheet. To begin with, 6.5 inches screen has a 1644 x 3840 pixels and is protected by the latest Corning Gorilla Glass 6. Under the hood, you get a Qualcomm SM8250 Snapdragon 865 chipset with Adreno 650 as the GPU. Launched with Android 10 out of the box, the device comes in a single variant: 256GB storage and 8GB RAM.
The quad rear camera setup (12+12+12+0.3) and the single 8MP front-facing camera manages to take some pretty decent clicks. The 4000 mAh battery should be enough to make your device last an entire day, if not the 21W fast-charging will come to the rescue. While there is no denying the device’s capabilities, but these are just the tip of the iceberg.
You could further explore the device’s potential once you have unlocked its bootloader and then rooted it. And in this guide, we will help you do just that. So without further ado, here are the required instructions to root Sony Xperia 1 II without TWRP. As mentioned before, we would be patching your device boot file via Magisk and then flashing it via fastboot commands. Here is everything you need to know in this regard.
MAGISK GUIDES
- [GUIDE] Flash ROMs/Magisk/TWRP/Kernels on A/B Partition Devices
- Everything About Magisk- Manager, Modules and More
- Best Magisk Modules of 2020 [PART-1]
- [3 METHODS] Unroot any Android Device-Uninstall Magisk
Table of Contents
How to Root Sony Xperia 1 II without TWRP
Before you go ahead with the rooting steps, there are a few pretty important requirements that your device needs to qualify. Please go through them and make sure you follow all of them.
Prerequisites
- First off, create a complete device backup.
- Your device should have an unlocked bootloader as well. If you haven’t done so, then refer to our guide on How To Unlock Bootloader of Xperia 1 ll
- Download and install the Magisk Manager APK (Canary Build) onto your Sony Xperia 1 II device. As of now, only the Canary build is giving out the desired results. As and when other builds give out fruitful results, we will update the guide accordingly. The need for Magisk is two-fold here. It will help to patch the boot file and then give you the rooting UI to grant or revoke root access from the user and system apps.
- Furthermore, download and install the Android SDK Platform Tools onto your PC. This will be required so as to execute ADB and Fastboot Commands. The ADB commands will be needed to boot your device to Fastboot Mode. The latter will be needed to execute fastboot commands to flash the patched boot file.
- Enable USB Debugging onto your device. This is needed so that your PC successfully recognizes your device is successfully recognized in ADB Mode.
These were all the requirements. You may now proceed with the steps to root your Sony Xperia 1 II. As the saying goes “Droidwin or any of its members won’t be held responsible if your cat ends up damaging your device, there is a thermal nuclear war or you end up with a brIcked or boot looped device”. However, in the case of the latter, you may drop in your queries in the comments section below. We would definitely help you out.
STEP 1: Download Stock Firmware for your Device
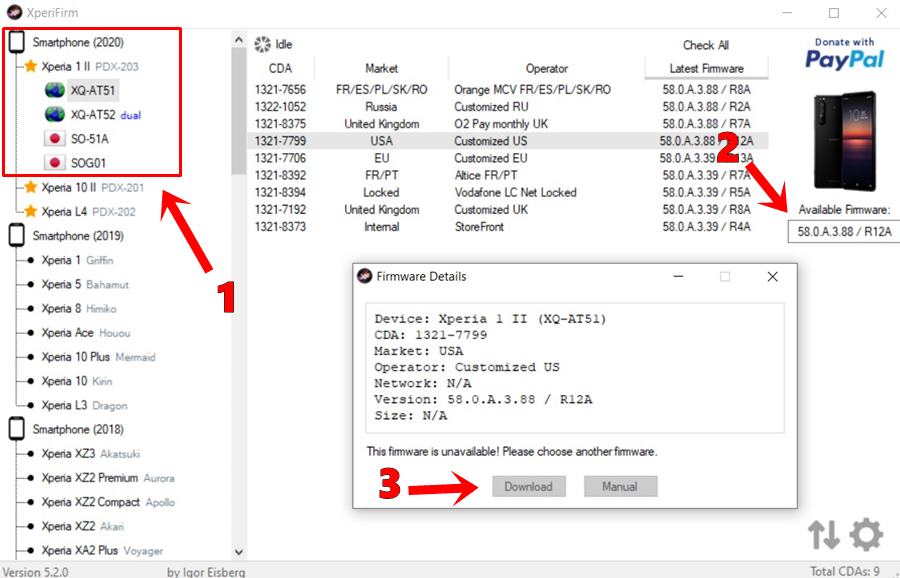
- The best place to download the stock firmware of any Sony device is using the XperiFirm Tool (thanks to XDA senior member IgorEisberg for this tool). Download the latest version onto your PC from the attached post.
- Then launch it and click on Xperia 1 II from the left menu bar. Now select the device variant and you should see all the information on the right-hand side.
- Select the firmware based on the Region and Carrier and then click on the firmware version box situated just beneath the device image on the right.
- A pop-up dialog box will then appear with all the necessary information. Hit the Download button to download the firmware onto your PC.
- Once that is done, extract the firmware and grab hold of the stock boot file.
TWRP GUIDES
- How to Install OTA Updates in Rooted Android Device
- How to Permanently Install TWRP without TWRP ZIP File (only using TWRP.img file)
- Root Android Devices Without TWRP Recovery
- How to Fix TWRP Error 7 (While Flashing Custom ROM via TWRP)
STEP 2: Patch the Stock Boot File
Do keep in mind that the below steps will be carried out via the Canary version of Magisk. There has been a completely new UI overhaul. So to help you out, we have attached all the necessary screenshots as well.
- Now that you have extracted the boot file, transfer it to your device.
- Next up, download and install the Magisk Manager (Canary build) onto your device.
- Launch the Magisk app and tap on the Install button next to the Magisk keyword.

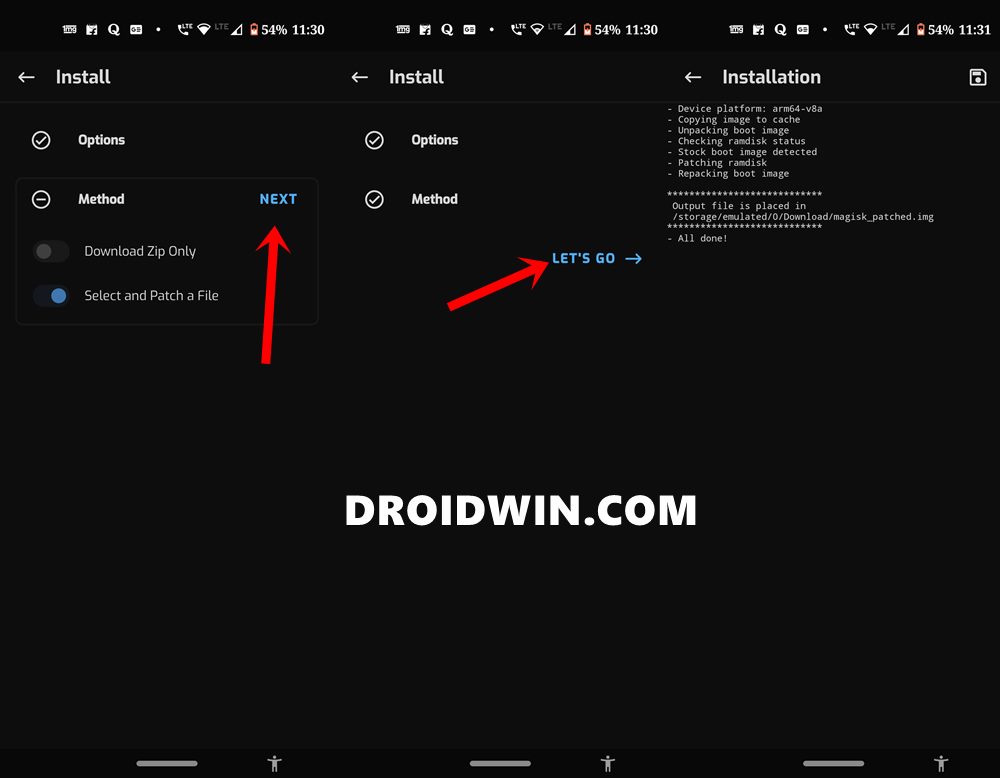
- In the next screen, tap on the Next option situated at the top right.
- From the Method menu, choose “Select and Patch a File”.
- Navigate to the stock boot file that you have placed on your device in the first step and select it.
- Then hit the Next button under the Method section followed by Let’s Go.
- Magisk will then begin with the patching process and the process should be completed within a few seconds. Once that is done, it will create a magisk_patched.img file in the Downloads folder of your Internal Storage.

We will now flash this file onto your device and this will then root your Sony Xperia 1 II device. Follow the below steps.
STEP 3: Flash Magisk_Patched.img File
- First of all, connect your device to PC via USB cable.
- Then head over to the Android SDK Platform Tools folder and place the magisk_patched.img file there. In other words, you will have to place this file inside the platform-tools folder.
- Now inside the same platform-tools folder, type in CMD in the address bar and hit Enter. This will launch the Command Prompt.
- Execute the below command to boot your device to the fastboot mode. Make sure USB Debugging has been enabled.
adb reboot bootloader
- Your Xperia 1 II should now reboot to Fastboot Mode. Type in the below command to flash the patched boot.img file onto your device:
fastboot flash boot magisk_patched.img
- It will only take a few seconds for the flashing to complete. Once that is done, use the below command to boot your device back to Android OS:
fastboot reboot

That is it. These were the steps to root your Sony Xperia 1 II without TWRP. Do keep in mind that the first boot might take up some time, it is completely normal. With that said, if you have any queries with respect to any of the aforementioned steps, do let us know in the comments below. We would get right back to you with a solution.
ANDROID TIPS AND TRICKS
- How to Disable Screenshot Captured Notification and Sound without Root
- How to Watch Netflix in HD on Rooted Devices ( Get Widevine L1 Support )
- Enable USB Debugging on a Broken Android Device’s Screen? Here’s a Workaround
- How to Go Back to Stock ROM from GSI ROM (All Android Devices)
All doubts are welcomed in the comments 🙂


Mario Viano
You’re a lifesaver, TWRP wasn’t working for me, so i was at a loss, this is the only way that worked! Well written article too!
Sadique Hassan
Glad that it worked out for you Mario.
Jaroslav Krupicovic
doesn’t work for me…
Titan
Is it possible to lock bootloader again, so I can back Widevine DRM Level 1?
Sadique Hassan
Hi Titan, it depends on individual OEMs. For example, on relocking the bootloader on OnePlus devices, you get back the Widevine DRM Level 1. For Sony, I wasn’t able to find any such resource. However, there is a tweak through which you could watch Netflix in HD with WideVine L1 in an unlocked bootloader and even rooted device. That requires using lucky patcher (which google flags as a potentially harmful app). However, if you wish to try it out, then this guide will help you: How to Watch Netflix in HD on Rooted Devices ( Get Widevine L1 Support )