In this tutorial, we will show you the steps to root your Poco X3 NFC device without TWRP Recovery using stock boot.img. We would be patching the stock boot.img file via Magisk and then flash it via Fastboot Commands. The latest addition to the Poco family has already created a buzz right since its announcement. And now that is available for the general public, one could only feel that the hype was justified.
Poco devices have always known to provide feature-rich devices without burning a hole in your pockets. And its latest offering is no different either. The 6.67-inch screen has a 1080 x 2400 pixel resolution and an impressive 120Hz refresh rate. Under the hood, there is an octa-core Qualcomm SM7150-AC Snapdragon 732G chipset with Adreno 618 GPU. The device comes in two different variants, 64GB 6GB RAM, 128GB 6GB RAM.
Talking about the camera, there is a quad rear setup with 64+13+2+2MP which could record videos at 4K@30fps. On the front, you get a single 20MP camera with 1080p@30fps video recording capabilities. Out of the box, the device comes with MIUI 12, based on Android 10. To support these features, you get a massive 5160 mAh battery with 33W fast charging capabilities. However, all these are just the tip of the iceberg.
Once you unlock the bootloader and get access to the system partition via root, you could carry out a plethora of tweaks. From installing Substratum Themes to trying out Xposed Framework and Magisk Modules, the possibilities stand endless. The only requirement is that your device needs to be rooted. And in this guide, we will help you with just that. So without further ado, here are the steps to root your Poco X3 NFC device without TWRP Recovery.
- How to Install OTA Updates in Rooted Android Device
- How to Permanently Install TWRP without TWRP ZIP File (only using TWRP.img file)
- Root Android Devices Without TWRP Recovery
- How to Fix TWRP Error 7 (While Flashing Custom ROM via TWRP)
Table of Contents
How to Root Poco X3 NFC without TWRP Recovery
Before we list out the instructions, there are a few requirements that your device needs to qualify. Make sure you tick mark all the requirements before proceeding with the rooting steps.
Install Android SDK Platform Tools
Download and install the Android SDK Platform Tools. This will provide you with the necessary ADB and Fastboot binary files.

Enable USB Debugging and OEM Unlock
Likewise, you also need to enable USB Debugging so that your device gets recognized by your PC in ADB Mode. But why would you need ADB command? Well, it would be used to boot your device to Fastboot/Bootloader mode. Likewise, OEM Unlock needs to be enabled so that you are able to unlock the bootloader.
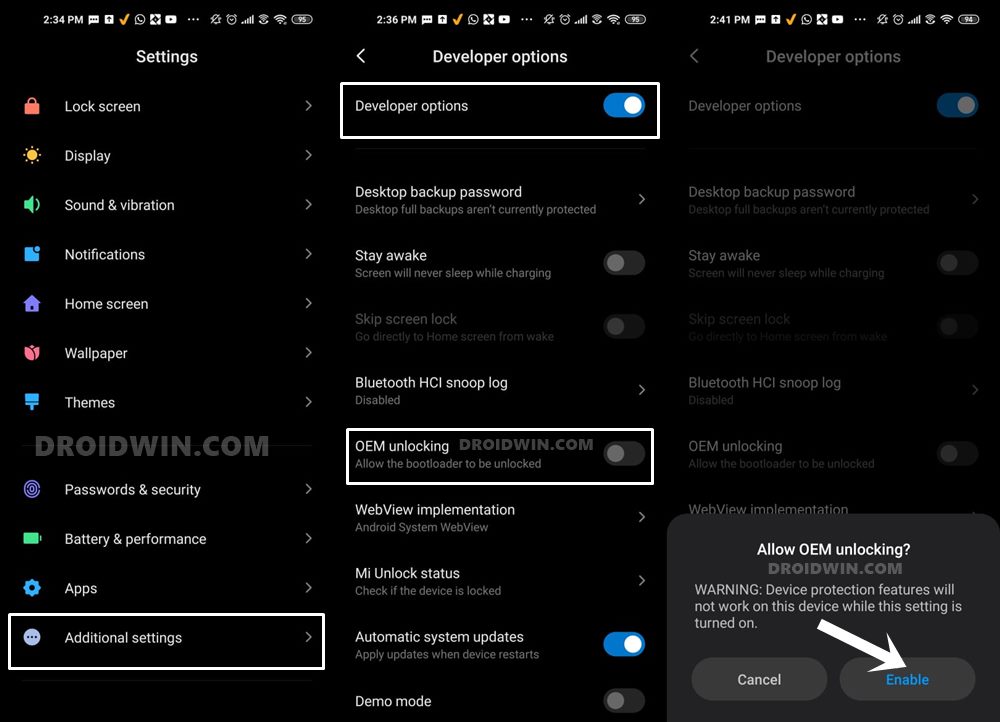
So head over to Settings > About Phone > Tap on MIUI Number 7 times > Go back to Settings > System > Advanced > Developer Options > Enable USB Debugging and OEM Unlock. [Don’t Miss: Enable USB Debugging on a Broken Android Device’s Screen? Here’s a Workaround].
Unlock Bootloader on Poco X3
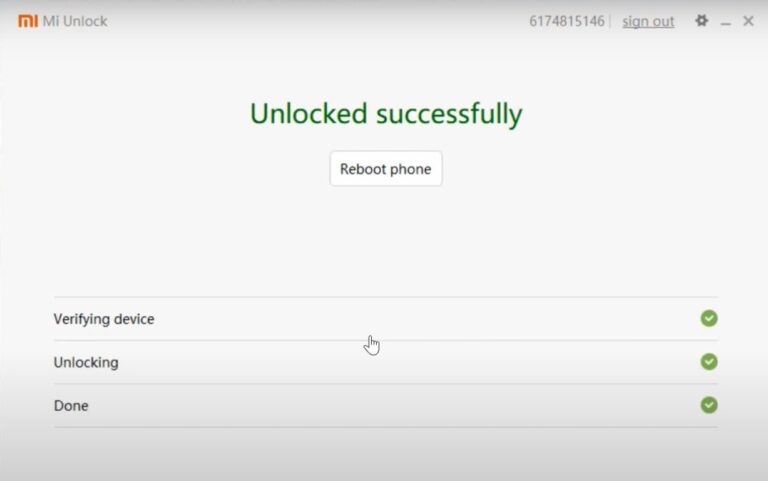
Next up, you need to unlock the bootloader on your Poco X3 device. Do keep in mind that this process will wipe off all the data on your device. So take a backup and then refer to our guide on How to Unlock the Bootloader on any Xiaomi Device.
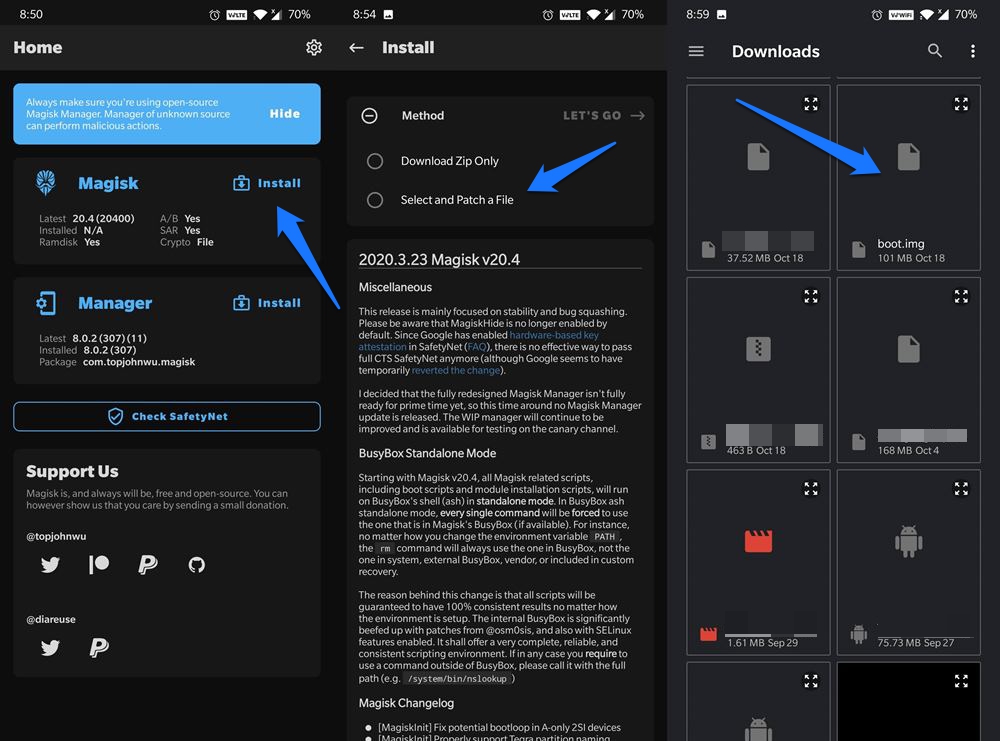
Download Magisk
Download the Magisk App File: This will be used to patch the stock boot.img file and get the resultant patched boot.img.
Download Poco X3 Fastboot ROM
- Latest Builds: Official Site | Third Party Site
- Global Stable ROM MIUI 12.0.2.0: Fastboot ROM | Recovery ROM
- Russia Stable ROM MIUI 12.0.2.0: Fastboot ROM | Recovery ROM
- India Stable ROM MIUI 12.0.2.0: Fastboot ROM | Recovery ROM
- Turkey Stable ROM MIUI 12.0.2.0: Fastboot ROM | Recovery ROM
- EEA Stable ROM MIUI 12.0.2.0: Fastboot ROM | Recovery ROM
Once you have downloaded the Fastboot ROM, proceed to the next step to root your Poco X3 NFC device without TWRP Recovery.
Extract Poco X3 NFC Stock Boot.img File
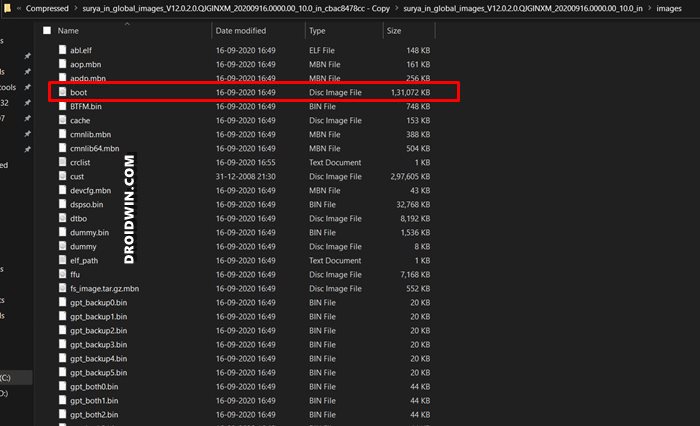
It’s now time to get hold of the stock boot.img file which will then help us to root your Poco X3 NFC. For that, get hold of the stock firmware of your Poco X3 from the above Downloads section. Once that is done, extract the firmware, copy the boot.img file from it and transfer this file to your device’s Internal Storage (Phone Memory).
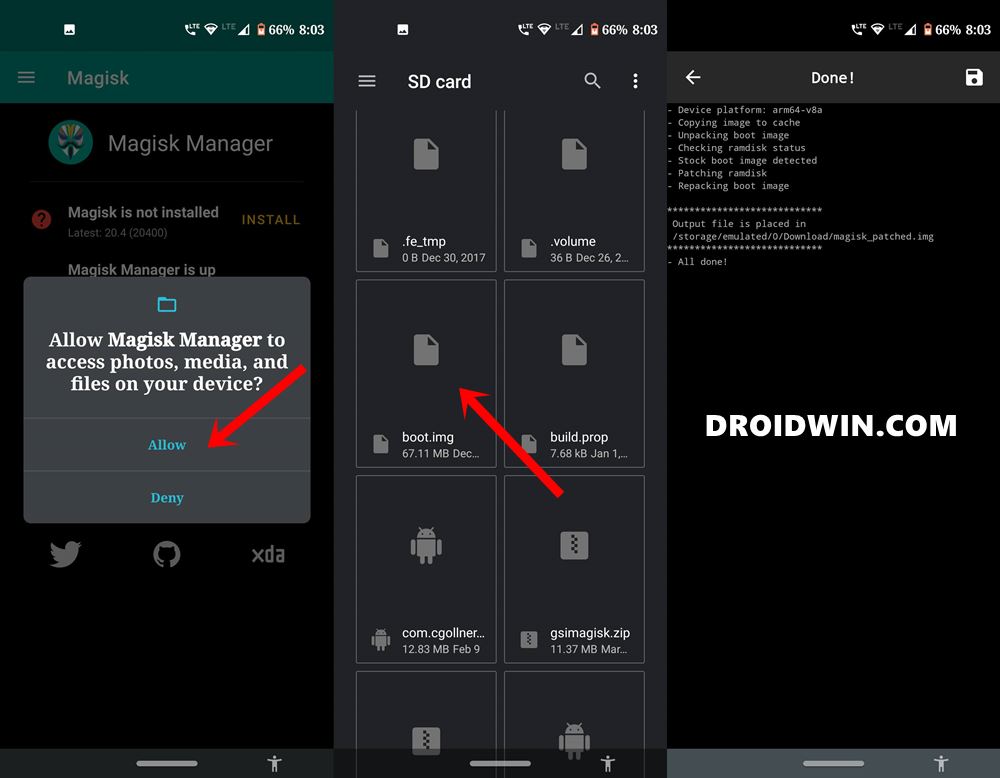
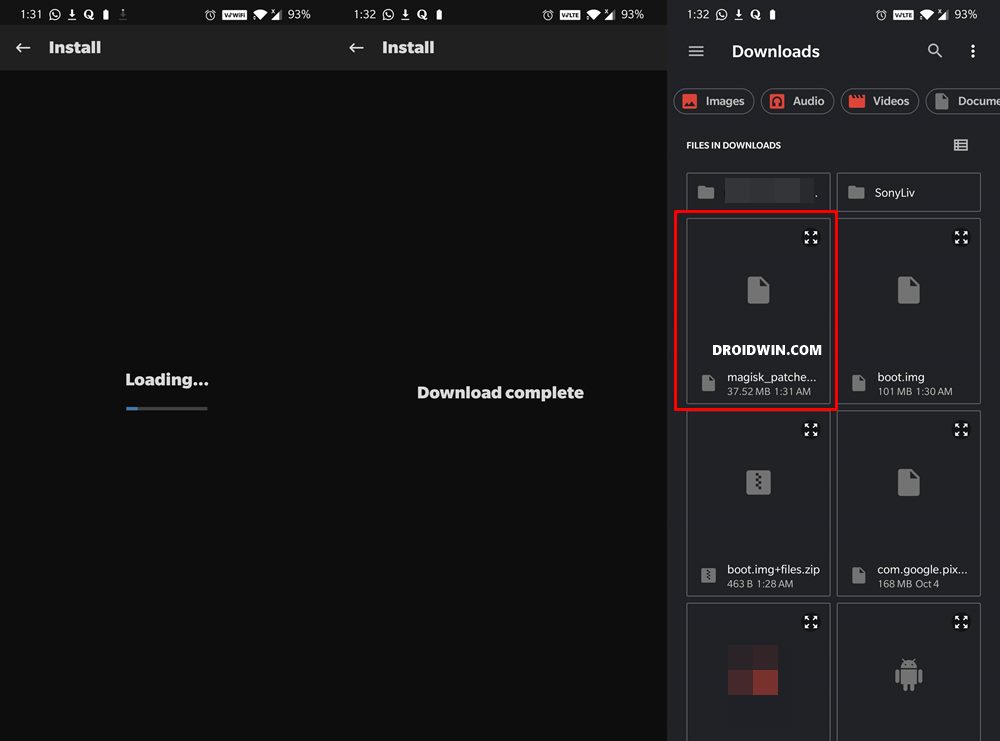
Patch the Stock Boot.Img File
Now that you have downloaded the stock boot.img, you will have to patch it via Magisk. Here are the steps for that:
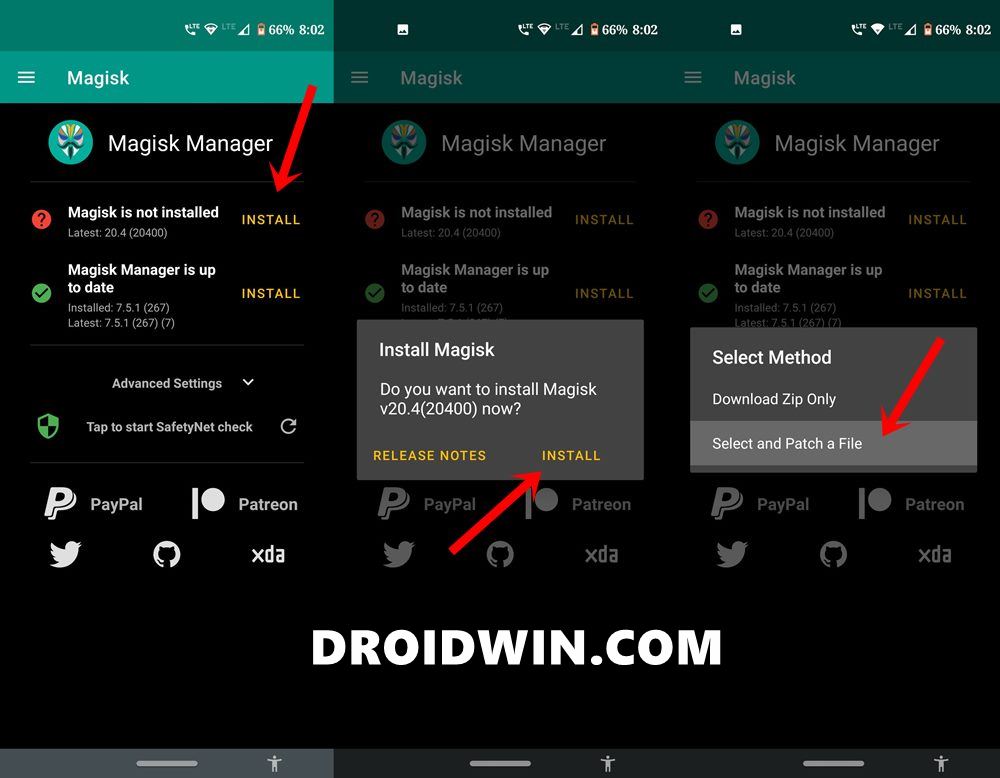
- Launch the Magisk Manager app on your device.
- If you are using the older Magisk, then tap on the Install message next to the ‘Magisk is not installed’ message. In the next pop-up that appears tap on Install.
- On the other hand, if you are using the newer Magisk, then tap on Install next to Magisk
- After this, tap on Select and Patch a file (common for both Magisk builds).

Older Magisk Newer Magisk - Navigate to the stock boot.img file that you have transferred it to your device and select it.
- Magisk will then patch this file and the entire process shall only take a few seconds.
Older Magisk Newer Magisk - Once done, head over to Internal Storage > Downloads folder and you will find the magisk_patched.img file there.
- Install Custom ROMs on any Android Device- Includes A/B Partition
- Flash Custom ROM After Wiping Internal Storage Without SD Card or OTG
- How to Go Back to Stock ROM from GSI ROM (All Android Devices)
- How to Flash Xiaomi Fastboot ROM without Mi Flash Tool
Flash Magisk Patched Boot Image via Fastboot
It’s now time to flash this patched boot.img file via Fastboot. Follow the below steps for that:
- To begin with, connect your device to PC via USB cable. Moreover, make sure USB Debugging is enabled.
- Transfer the magisk_patched.img file to the platform-tools folder (where the Android SDK is installed).
- Inside the same platform-tools folder, type in CMD in its address bar and hit Enter. This will launch the Command Prompt.
- Now type in the below command in the CMD window to boot your device to Fastboot Mode:
adb reboot bootloader
- Once your Poco X3 NFC boots to fastboot, execute the below command to flash the Magisk patched image file:
fastboot flash boot magisk_patched.img
- After that is flashed, you could now reboot your device to the rooted OS as follows:
fastboot reboot

That’s it. These were the steps to root your Poco X3 NFC via the stock boot.img file without using TWRP Recovery. As soon as there is a working custom recovery for this device (TWRP, Orange Fox, etc), we will add the method to root your device using the recovery as well. In the meantime, you could make full use of the without TWRP method. With that said, if you have any queries, do let us know in the comments section.


Sandeep
Pley send boot IMG poco X3