In this guide, we will show you the different methods to change the CSC Code on your Samsung device. We will also make you aware of the differences between CSC, Home CSC, and Multi-CSC firmware. Likewise, this guide will also let you know all the information that a CSC file beholds, why you need to change your device’s CSC code, and more importantly how to change it. At the end of this guide, we have given a complete list of all the Samsung CSC Codes, so don’t forget to check it out as well. So without further ado, let’s get started.
Table of Contents
What is Samsung CSC?
CSC stands for Country/Carrier Specific Product Code or Consumer Software Customization and is a part of the Samsung stock firmware file. When you extract the firmware, you get the AP, BL, CP, CSC, and Home CSC files. Out of these, the last two are the topic of discussion in this guide.
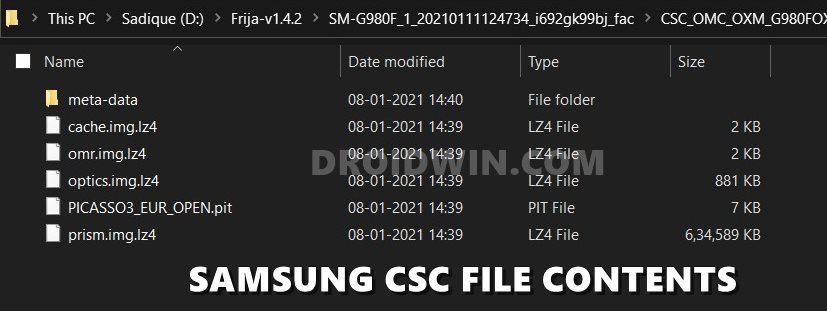
Majorly the CSC file beholds information related to your network carrier, location, device language settings, network settings, and Firmware Update Servers. Some examples of CSC include ATT (AT&T), TMB (T-Mobile) in the US, ATL (Vodafone) in Spain, and IND, INA, INS (unbranded) in India. We have attached the complete list of all the CSC codes at the end of this guide, do check it out.
- Extract PIT File from Samsung Firmware: Unbrick Guide
- How to Boot to Recovery Mode on Samsung OneUI 3.0 Android 11
- Extract boot.img from boot.img.lz4 and Root Samsung
- How to Fix Missing OEM Unlock in Samsung Devices
Samsung CSC vs Samsung Home CSC: Which One to Flash?
So this is one query that I have seen across countless online forums as to which CSC does one has to flash via Odin. Well in the simplest of terms, if you wish to perform a factory reset before flashing the stock firmware, then you would need to load the CSC file in Odin. On the other hand, if you wish to preserve all your data while flashing the stock firmware, then go for the Home CSC file.
What is OXM Multi-CSC Firmware?
OXM is a superset that beholds numerous sub-CSCs within itself. If your Samsung device has a multi CSC firmware then you could easily change the region. With that said, the OXM Multi CSC firmware has the following CSC (the below list might be incomplete, let me know the missing CSCs and I’ll expand this list):
ACR AFG AFR ARO ATO AUT BGL BNG BRI BTC BTU CAC CAM CHO COO DBT DKR ECT EGY EON ETL EUR GLB ILO INS ITV KSA LAO LUX LYS MID MM1 MWD MYM NEE NPL ORX OXM PAK PHE PHN ROM SEB SEE SEK SER SIN SKZ SLK SMA STH THL THR TMC TPA TPH TTT TUN TUR WTL XEF XEH XEO XEU XFE XME XSG XSP XTC XXV ZTO
On the other hand, the following are the single CSC firmware:
BTC BTU CPW EMP GLB LYS MAT MM1 MTL NZC OPS PAN PNG PRO SIN SMA SMP STH TEB TEL TMC TNZ VAU VFJ VNZ WTL XFA XNF XNX XNZ XSA
Let’s understand the usage of this firmware with an example. More often than not, the updates are rolled out by the OEM in batches, hence not everyone would receive it in one go. Some regions are the first in line to get the update and it might take a few days weeks or even months before the update goes live for your region.
But if your device is having the OXM Multi CSC firmware, then you could easily download and install that region’s firmware file where the update is live. And this wouldn’t affect your original CSC. Taking a real-life example, one of my friends has its Samsung device on ARO (Argentina) CSC running Android Pie 9.0. The Android 10 update was live in France but not in his country (Argentina).
So he downloaded and flashed XEF (France) Android 1o firmware onto his device. The result? Well, he is currently running Android 10 but is still on his original CSC (ARO Argentina). So how did it worked out? Well since both the XEF and ARO are part of the OXM multi-CSC firmware list, he was able to effectively carry out this task without any issue.
Why Should I Change CSC?
Changing CSC on a Samsung device is mostly done to unlock region-specific restrictions. The perfect example of the same is the call recording feature, which is not available in many countries. However, you could easily enable this feature simply by changing the CSC to one of the supported regions like INS, or any one of the following listed below:
EGY | Egypt
ILO | Israel
INS | India
LYS | Libya
NPB | Nepal (Nepal Telecom, NCELL)
SLK | Srilanka
THL | Thailand
TUN | Tunisia
XXV | Vietnam
Apart from that, you might be able to unlock numerous other features, including the likes of:
Call Recording
Spam Blocking
Google Wallet
Samsung Pay
ECG and Blood Pressure monitor on Galaxy Watch 6
VoLTE
WiFi Calling
However, do note that there doesn’t exist a single perfect CSC that unlocks all the aforementioned features. Each of them comes with its fair share of caveats as well, which brings us to the next question-
Are there any Downsides to Changing CSC?
While selecting a CSC will enable certain features, but on the flip side, you might have to bid adieu to a feature or two. For instance, choosing the ILO CSC will enable most of the aforementioned functionalities but it might take away your ability to use Samsung Pay. On the other hand, you could easily use Call Recording and Samsung Pay by switching over to the INS CSC. So it completely depends on the individual’s requirement and there’s no one size that fits all.
Which CSC Should You Choose?
As discussed above, it completely depends on what feature you are planning to unlock. But if you are unsure, then ILO is usually the best one because it has the least restrictions imposed [call recording, spam blocking, Google Wallet, ECG and Blood Pressure monitor on Galaxy Watch 6, VoLTE, WiFi calling, and timely update schedules, usually in sync with EU]. The only drawback with ILO is that it doesn’t support Samsung Pay. So if you use SPay, then you should consider using the INS CSC [which has very few restrictions].
- How to Create Samsung Combination Firmware and Flash it via Odin
- How to Install Android 11 (OneUI 3.0) on any Samsung Phone via Odin
- Downgrade Samsung from Android 11 to Android 10 (OneUI 3.0 to 2.0/2.5)
- How to Stop Samsung Find My Device Offline Finding Notifications
How to Check CSC on My Samsung Device?
There are quite a few methods of checking your Samsung device’s CSC code. Let’s check out three such methods (I prefer the third method, though it is a bit lengthy but it gives out all the required information):
Method 1: Check CSC via Dialer Code
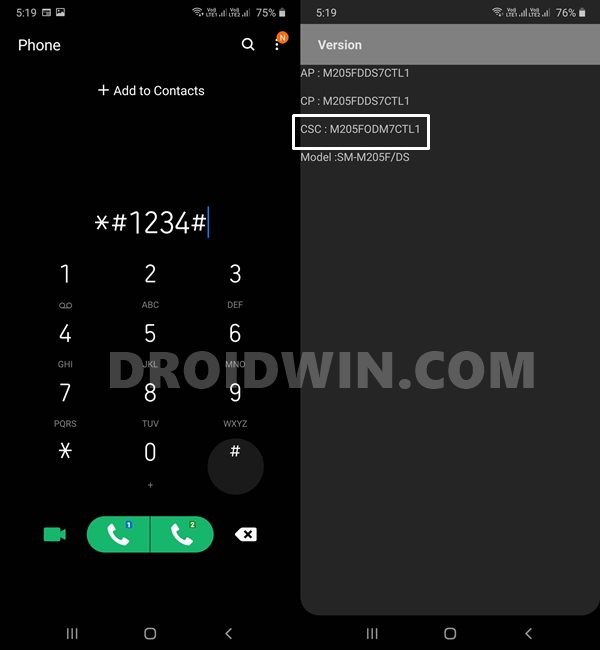
- Bring up the dial-pad on your device.
- Now type in *#1234# and it should bring up the Version page
- Refer to the CSC section and the first three numbers after your device model number is the CSC.
Method 2: Via Third-Party
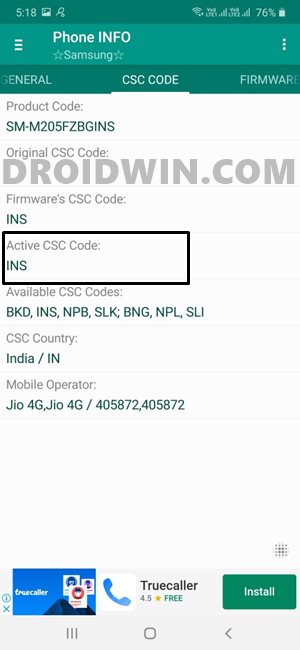
- Download and install the Phone Info app from the Play Store.
- Then go to its CSC Code tab.
- Check out the Active CSC section.
Method 3: From Phone’s Settings Menu
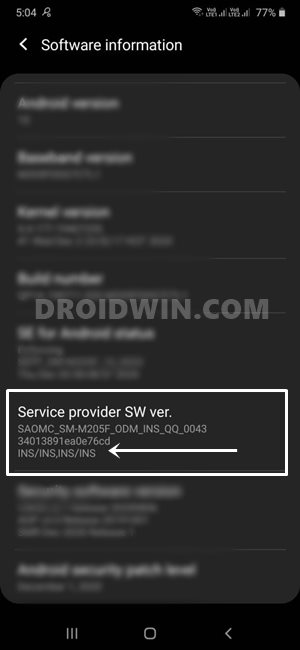
- To begin with, head over to Settings on your device
- Then go to About Phone and tap on Software Information
- Check out the last line of the Service Provider SW Ver. section and your CSC will be mentioned there.
- In my case, that turns out to be INS/INS, INS/INS. So why there are four INS, in other words, why it has been divided into three sections? Let’s understand this.
- The first section denotes the current active CSC, which in my case is INS
- The next section denotes whether you have a single SIM or dual SIM device. Since my device is a dual SIM variant, the CSC turns out to be INS, INS.
- Finally, the third section denotes the country where your device has been manufactured. This again is in India so the value is INS.
- Combining all these three sections and the value in my case turns out to INS INS/INS, INS/INS. So you could take this along the following syntax Current Active CSC/Single or Dual SIM/Manufactured Country CSC.
With this, you might have got a perfect idea regarding how could you identify the CSC. Let’s check out the instructions to change the CSC code on your Samsung device. Follow along.
- How to Root any Samsung device via Magisk and Odin
- Steps to Flash magisk_patched.tar (patched Samsung AP file) via Odin
- How to Boot Rooted Samsung to Recovery Mode and Rooted OS
- Root Samsung Galaxy S20, S20+, S20 Ultra via Magisk without TWRP
How to Change CSC Code in any Samsung Device
There are three different methods to change the CSC Code in Samsung devices. The first method is pretty simple and you only need to type in a single code in the dialer. However, users have reported that after the Android 11 update, this method isn’t working for some of them. On the other hand, the second method is carried out via a third-party app and is quite easy to execute as well.
Then if we turn our attention towards the third method, then it does come with an extremely high success rate, but the process requires an unlocked bootloader as well as an unlocked carrier network. With that said, go through each of these methods once and try out the one that is in sync with your requirement. Moreover, please take a backup of all the data on your device, irrespective of the method you are going to test.
Method 1: Change Samsung CSC Code using Dialer
- Bring up the dial-pad on your device.
- Type in *#06*. This should bring up the IMEI number. Copy it.
- Now type in *#272*IMEI# and replace IMEI accordingly.
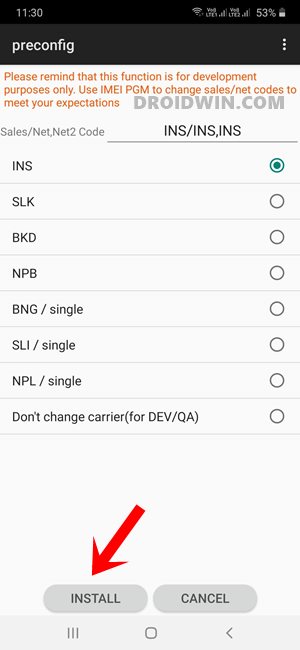
- It should bring up the Preconfig page where you would find the list of all the available CSC codes.
- If you’re running an OXM Multi-CSC Firmware, then there could be 70+ CSC options to choose from.
- With that said select the desired one from the list and tap Install.
- Once installed, your device will reboot with the newly installed CSC as the active one.
However, if you aren’t able to change the CSC code on your Samsung device running Android 11, then please refer to the next method given below.
Method 2: Change Samsung CSC via Third-Party App [Free]
In this method, we will be changing your device’s CSC using the free SamFW Tool. The process is quite easy to carry out and all that is required is just a click. Apart from this SamFW, there also exists the Samkey Tool that is capable of doing this job, however, it is paid. therefore, we have opted for SamFW. So on that note, let’s get started.
- To begin with, download and extract the latest version of SamFW [link] on your PC.
- Then remove the SIM card from your phone and then connect it to your PC via a USB cable.
- Now right-click on the SamFwFRPTool.exe file and select Run as administrator.
- Make sure that your phone is being detected. When that happens, switch over to the ADB tab.
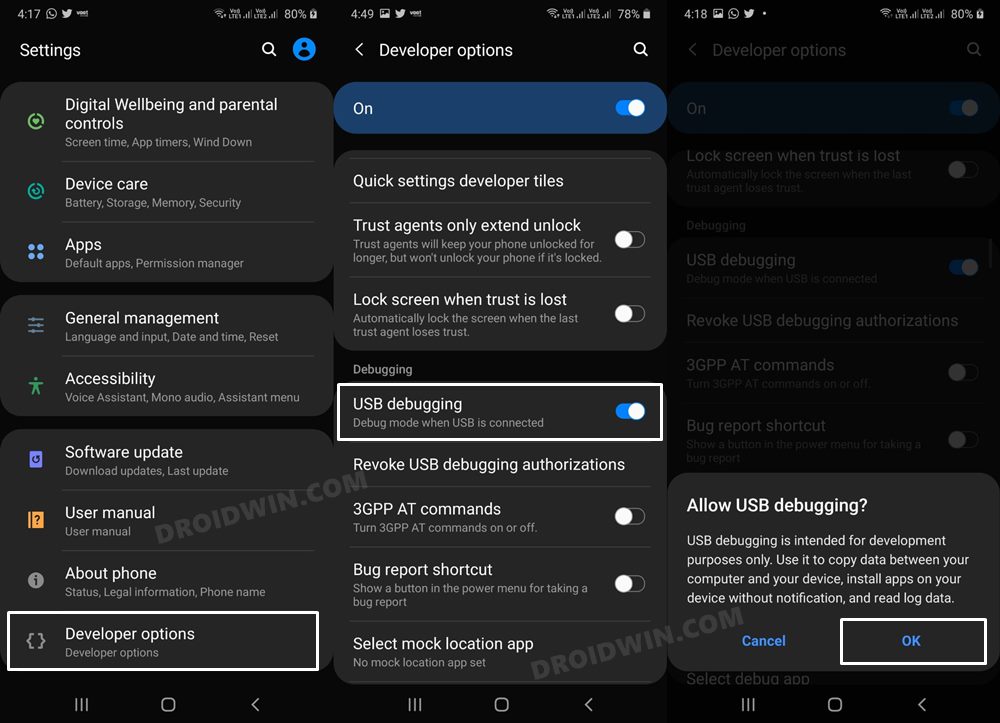
- Now enable Developer Options on your device and then enable USB Debugging from there.

- Then bring up the dialer and type in *#0*# to open the Test Mode.
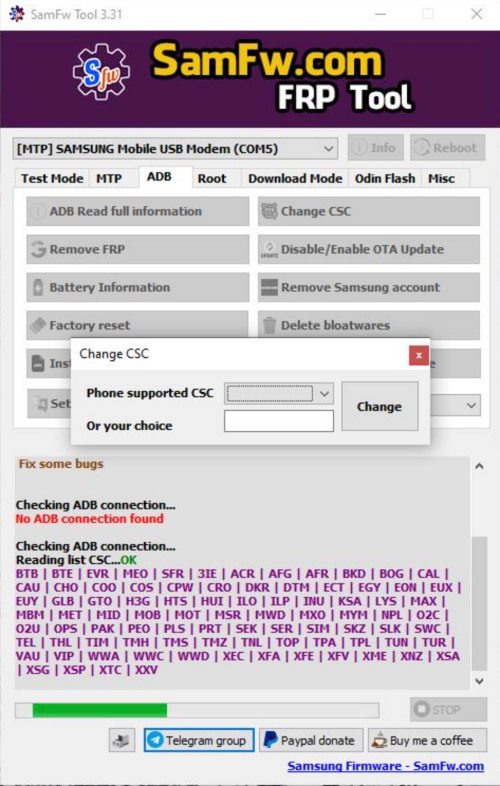
- Now click on the ‘Change CSC’ button in the ADB tab of the tool.
- It will bring up a list of all the supported CSCs. Select the desired new CSC from the list and hit OK.

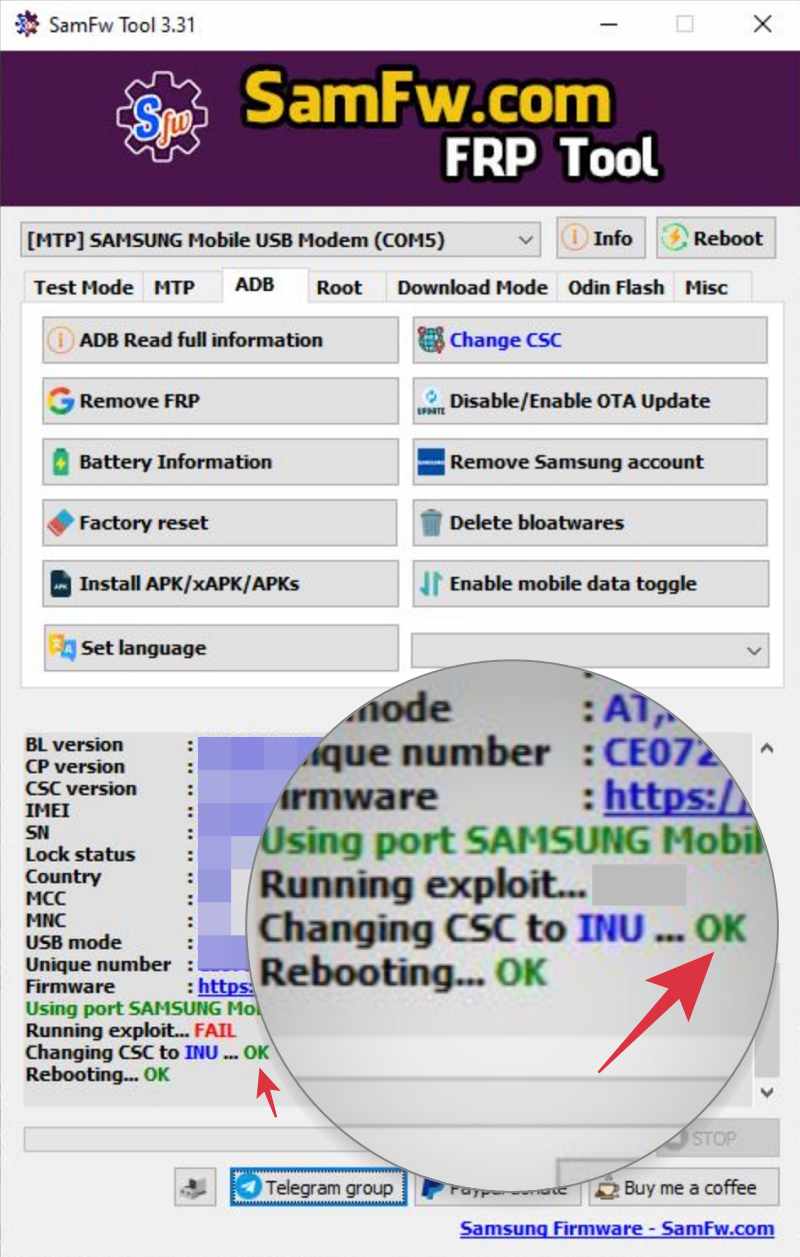
- The tool will now change the CSC and automatically restart the phone.
- Once that happens, you may put the SIM back in and check out the results.

That’s it. This was the second method to change the CSC on your Samsung device via a third-party tool. Let’s now make you aware of the third and final method to get this job done.
Method 3: Change Samsung CSC Code via Odin Tool
As mentioned before, this process requires an unlocked bootloader, which will wipe off all the data from your device, make its warranty null and void, and trip the Knox Counter. If that’s well and good, then refer to our guide to How to Unlock Bootloader on any Samsung Device [New VaultKeeper Method]. Once done, proceed with the below steps.
- First off, download the Multi-CSC (OXM) firmware for your Samsung device via Frija.
- Then extract its content to any convenient location on your PC.

- Download and install Odin onto your PC.
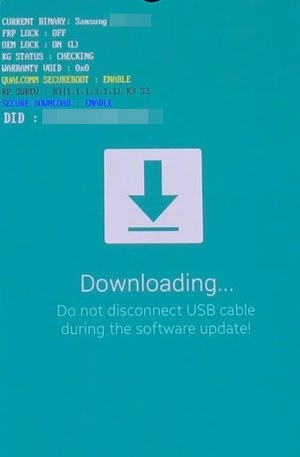
- Now boot your device to Download Mode and then connect it to PC via USB cable.

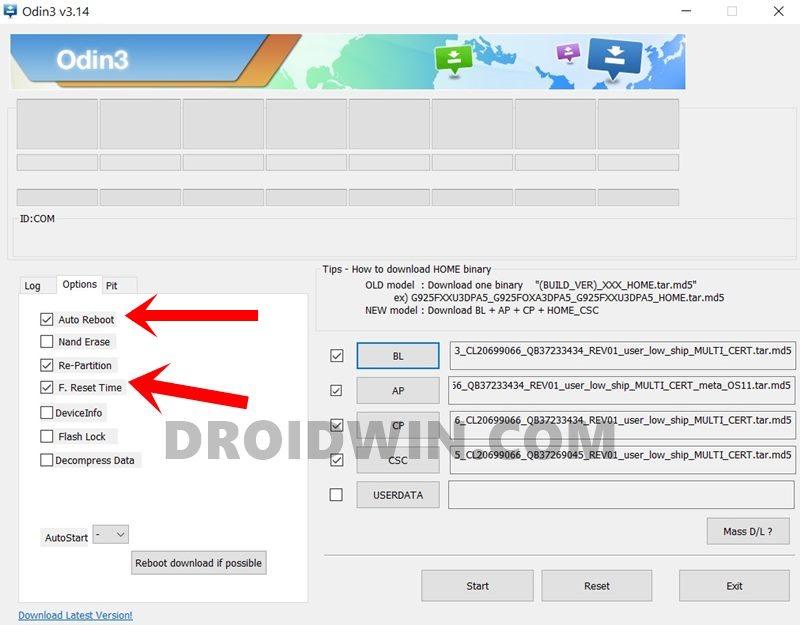
- Open Odin and load the BL, AP, CP, and CSC (the normal one, not the Home CSC) files to the Tool via its appropriate sections.

- Then go to the Options section of Odin and make sure to enable Auto-Reboot and F. Reset Time (if they aren’t done so automatically).
- Finally, hit the Start button and wait for the process to finish. Once done, you will get the Pass message.

- That’s it. You may now disconnect your device from the PC and close the tool as well.
- How to Pass Magisk SafetyNet on Rooted Android 11
- Pass SafetyNet test after installing Xposed or EdXposed
- How to use Core Only Mode in new Magisk Manager?
- How to Fix ctsProfile Mismatch Error on Rooted Android
List of all the Samsung CSC Codes
Given below is the complete list of all the CSC codes, their network as well as the regions to which they belong. We have listed them in alphabetical order.
| Country | Samsung CSC Codes |
| A | |
| Afghanistan | AFG |
| Algeria | TMC, ALG, ALR |
| Albania | AVF (Vodafone) |
| Argentina | ANC, ARO, CTI (Claro), UFN (Movistar), PSN (Personal) |
| Aruba | ARU |
| Australia | XSA, OPP, OPS (Optus), VAU (Vodafone), TEL (Telus), HUT (Three/Vodafone) |
| Austria | ATO (Open Austria) AOM, DRE (3 Hutchinson), MAX (T-Mobile), MOB (A1), MOK, ONE (Orange), TRG (Telering) |
| B | |
| Bahrain | ARB |
| Baltic | SEB |
| Belarus | MTB, VEL |
| Belgium | BSE, BAE, PRO (Proximus), XEB |
| Bangladesh | BNG, (unbranded), TML (unbranded), ETR |
| Bosnia-Herzegovina | ERO, BHO, BHT (BH Telecom), TEB |
| Brazil | ZTO (unbranded), BTA, BTM, TMR, ZTA (Claro), ZVV (Vivo), ZTM (TIM) |
| Bulgaria | BGL (unbranded), CMF, GBL, MTE, MTL (MTL), OMX, PLX, VVT (VVT) |
| C | |
| Cambodia | CAM (unbranded), RCG |
| Canada | BMC (Bell), RWC (Rogers), TLS (Telus), KDO (Koodo) |
| Chile | CHO (unbranded), CHB, CHE (Entel PCS), CHL (Claro), CHT (Telefonica) |
| China | CHN, CMC, CUH, INT, M00, TEC, TIY |
| Colombia | COO (unbranded), CGU, COB, COL, COM |
| Costa Rica | ICE |
| Croatia | CRO, TRA, TWO, VIP (VIP-Net) |
| Cyprus | CYV (Vodafone) |
| Czech Republic | ETL (unbranded), KBN, O2C, OSK, TMZ, VDC (Vodafone), XCS, XEZ |
| D | |
| Denmark | DTL |
| Dominican Rep. | CDR, TDR |
| Dominica | CST, DCN, DOR |
| E | |
| Ecuador | BBR |
| Egypt | EGY (unbranded) |
| El Salvador | DGC, TBS |
| F | |
| Finland | ELS, SAU |
| France | XEF (unbranded), AUC, BOG, COR, DIX, FTM, NRJ, OFR, ORC, ORF, OXA*, SFR, UNI, VGF |
| G | |
| Germany | DBT (unbranded), DTM (T-Mobile), DUT, EPL (E-Plus), MAN, MBC, OXA*, VD2 (Vodafone), VIA (O2), XEG |
| Ghana | SPN, ACR (unbranded) |
| Greece | EUR (unbranded), AOC, COS (Cosmote), CYO, GER, OXX*, TGR, VGR (Vodafone), ILO (HotMobile) |
| Guatemala | PCS |
| H | |
| Hong Kong | TGY |
| Hungary | XEH (unbranded), PAN (Telenor), VDH (Vodafone), WST, TMO, TMH (T-Mobile) |
| I | |
| India | INU (unbranded), IND, INA, INS (unbranded), IMS, REL |
| Indonesia | AXI, SAR, XSE |
| Iran | THR (unbranded) |
| Iraq | MID (unbranded) |
| Ireland | 3IE, VDI (Vodafone) |
| Israel | ILO (unbranded), CEL, PCL, PTR |
| Italy | ITV (unbranded), FWB, GOM, HUI, OMN (Vodafone), OXA*, TIM, VOM, WIN, XET |
| Ivory Coast | IRS, SIE |
| J | |
| Jamaica | JBS, JCN, JCW |
| Japan | DCM, SBM, VFK |
| Jordan | LEV |
| K | |
| Kazakhstan | EST, KCL, KMB, KZK, OXE*, SKZ (unbranded) |
| Kenya | KEN, KEL, AFR |
| Korea | SKT |
| L | |
| Latvia | SEB (unbranded) |
| Libyan Arab Rep. | MMC |
| Lithuania | TLT |
| Luxembourg | LUX (unbranded) |
| M | |
| Macao | VTN |
| Macedonia | TMC, MBM |
| Malaysia | CCM, FME, FMG, MXS, OLB*, XME (unbranded) |
| Mexico | SEM, TCE, TMM, UNE |
| Mongolia | MPC |
| Morocco | FWD, MAT, MED, MWD (unbranded), SNI, WAN |
| N | |
| Nepal | NPL (unbranded) |
| Netherlands | PHN (unbranded),BEN, KPN, MMO, ONL, QIC, TFT, TNL, VDF (Vodafone), VDP, XEN |
| New Zealand | VNZ |
| Nigeria | ECT (unbranded), GCR, MML |
| Nordic Countries | NEE (unbranded) |
| Norway | TEN |
| P | |
| Pakistan | PAK (unbranded), WDC |
| Panama | TPA (unbranded), BPC, PCW, PBS |
| Peru | PEB, PET, SAM |
| Philippines | FAM, GLB, OLB*, SMA, XTC (Open Line) , XTE |
| Poland | ERA, IDE, PLS, PRT, XEO (unbranded), OXA*, OXX* |
| Portugal | OPT, OXX*, TCL (Vodafone), TMN, TPH (unbranded), XEP |
| Puerto Rico | CEN, PCI, TPR |
| R | |
| Romania | ROM (unbranded), CNX (Vodafone), COA, HAT, ORO, OXX* |
| Russia | AZC, BLN, EMT, ERS, GEO, MTV, OXE*, SER (unbranded), SNT |
| S | |
| Saudi Arabia | KSA (unbranded), JED |
| Senegal | DKR (unbranded) |
| Serbia Montenegro | MSR, OXX*, PMN, SMO, TOP, TSR |
| Singapore | MM1, XSP (unbranded), SIN (Singtel), STH (Starhub), BGD, XSO |
| Slovenia | MOT, SIM (Si.mobile) |
| Slovakia | ORX (unbranded), GTL, IRD, ORS, OXX*, TMS |
| South Africa | XFA, XFE (unbranded), OXX*, XFC, XFM, XFV (Vodafone) |
| South-East Europe | SEE (unbranded) |
| South West Asia | SWA |
| Spain | PHE (unbranded), FOP, AMN (Orange), ATL (Vodafone), EUS, XEC (Movistar), YOG (Yoigo) |
| Sri Lanka | SLK (unbranded) |
| Sweden | BAU, BCN, BME, BSG, BTH, COV, HTS, SEN, TET, TLA, TNO, VDS, XEE |
| Switzerland | AUT (unbranded), MOZ, ORG, OXX*, SUN, SWC (Swisscom) |
| T | |
| Taiwan | BRI (unbranded), CWT, TCC, TCI, TWM |
| Temporary | TEM |
| Thailand | CAT, OLB*, THE, THL (unbranded), THO, THS, LAO, MYM |
| Tanzania | SOL |
| Trinidad and Tobago | EON (unbranded), TTT (unbranded) |
| Tunisia | TUN (unbranded), ABS, RNG |
| Turkey | TUR (unbranded), BAS, KVK, TLP, TRC |
| U | |
| Ukraine | KVR, SEK (unbranded), UMC |
| United Arab Emirates | ARB, ITO, MID, OXE*, XSG (unbranded) |
| United Kingdom | BTU (unbranded), EVR (EE), BTC, CPW (Carphone Warehouse), H3G, O2I, O2U (O2), ORA (Orange), OXA*, TMU (T-Mobile), TSC, VIR, VOD (Vodafone), XEU (EE & Three) |
| USA | ACG (Nextech/C), ATT (AT&T), BST, CCT (Comcast), GCF, LRA (Bluegrass Cellular), SPR (Sprint), TFN (Tracfone), TMB (T-Mobile), USC (US Cellular), VMU (Virgin Mobile USA), VZW (Verizon Wireless), XAA (unbranded/default), XAS |
| Uzbekistan | CAC (unbranded), UZB |
| V | |
| Venezuela | VMT (Movistar), DGT, MVL |
| Vietnam | DNA, FPT, OLB*, PHU, SPT, TLC, VTC, VTL, XEV, XXV (unbranded) |
Conclusion
So this was all from this guide on how to change Samsung CSC codes. We have also listed out detailed instructions regarding the differences between CSC, Home CSC, and Multi-CSC (OXM) firmware. Likewise, the importance of these firmware files, as well as the need to change CSC, are also discussed.
Furthermore, we have also shared three methods to check your current active CSC. Concluding this guide, we have shared a detailed list of all the Samsung CSC codes. With that said, if you have any queries concerning the aforementioned steps or if we have missed any information, do let us know in the comments. We will try and address all of your queries.




Kosta2302
hi, ovoid is the best explained post I’ve found so far on the net. I have samsung s22 snapdragon variant, south korea SM-S901N single sim. I would like to ask you if it is possible to install the firmware for another region on the samsung s22 in order to get the esim option?
Griff
I have a SGS21 5g with GCF CSC but I’m in Australia. S21 with SD888 wasn’t sold here. If I change CSC to XSA will there be any problems with updates or should I use another CSC?
Deviance
Thank you! work with SamFW.
rookie
Hi , is it also possible to swap imei code with one of these tools ? In some countries you need to register your imei code to be able to use local prrovider . And they charge you for this , is it possible to swap an imei code between lets say samsungx phone to samsungy phone ?
farhan
Hello, Your Site is very nice, and it’s very helping us this post is unique and interesting, thank you for sharing this awesome information. and visit our blog site also… Keep it up
SamFW FRP Tool
AlsaBahi Multi Tool
SamFW FRP Tool
Ali Usman
With the First Method to change CSC code Either phone will rest or not
Isaac Bee
Thank you very much.
I have S20 + 5G from Canada , Model :SM-G986W,
Service provider software version
XAC/XAC/XACITLS..
Single SIM , Snapdragon variant.
Which CSC can enable eSIM for me
Jed
This is a comprehensive guide! Kudos for well-written one! The process is reversible, correct? Like XTC switch to GLB and back (once warranty needs it). The error “security policy prevents use of the mobile data” is something I want to fix. Thanks.
Marcel
Hi, how can i keep my Data when i flash using Odin.
Marcel
How can i keep my Data when i flash Using Odin?
Michelle Walker
You forgot “OWO” for “MULTI CSC”
That is what mine has
Simerdeep Singh
whatever you do, it will wipe your data :@
mine wiped :@ coz believed it wont from this post
Miki
My device is Samsung Galaxy S20 FE 5G SM-G781B/DS
It came with Android 11 and CSC Region Code is INS\INS,INS\INS (India)
I have use Method 2, but When I flase ILO (Israel) Firmware the CSC Region Changed to XSG\XSG,XSG\INS (United Arab Emirates) instead of ILO?
what’s going on?
how to get the ILO CSC?
Dileep
Hi I am trying to change csc code on mobile model samsung A 32
When I type the code *#272*ime# not functioning
Also I tried *#*#27262826#*#* this also not functioning
MindVision
Same case with me. Both the codes are not working on A32
Abhinav
This is a super helpful guide and the top search result. Thanks!
I tried the code mentioned in Method 1 and got a long list, so i think i have a multi-CSC already. I have a question. Once you choose a CSC from the list and change to it, can you change to original/another CSC?
Is there a limit to the number of times you can change the CSC?
Asnake
Once I have change csc, in an other time it is not working through dialer
Evan
My phone is galaxy a12 with afr csc code does it support xsg csc code if i want to upgrade it…someone help!!
Raafet
Hi, thank you for this great guide !
i have an S20 FE 5G SM-G7181B/DS that i bought from france, i want to flash XEF fw to get rid of BOG (bouygues) bloatware and in the same time change my CSC to XEF.
How do i have to proceed? thank you !
benbugohit
samfw tool
Hemant Salwan
If i change CSC by dialing IMEI number, can i again change CSC back to original using the same method?
Sanjeev
Hello, Thanks for the detailed elaborate explanation, however there is a lack of clarity as to how the CSC code can be chosen to our preference in Method 2 using Odin.
To give a short background, I am from India and own a Note 10+ with a CSC – KSA, because of which I am not able to use features like Samsung Pay and Call recordings. These features are enabled in my friend’s phone which has a CSC – INS. I downloaded the latest Multi-CSC (OXM) firmware and flashed it via odin (Without Bootloader unlocking) and the end result was that it still has KSA CSC. I am skeptical to unlock bootloader as 1. it might trip Knox and I might as well be not able to use Samsung pay and Secure folder. 2. I did not get a clarity as to how we can select the CSC of our choice. Could you please clarify on these points
Sadique Hassan
Hi Sanjeeb, flashing the file via Odin does require an unlocked bootloader. The flashing wasn’t successful on a locked bootloader and hence there was no change in your device’s CSC number
Raazi Faisal
It does not require an unlocked bootloader. Flashing Samsung signed firmware does not trip know nor does it require the bootloader to be unlocked. Anything past this requires modification to the bootloader which will in turn trip KNOX.