In this guide, we will show you how to extract the boot.img.lz4 file and get the boot.img file which will then be used to root your Samsung device. Once you have rooted the device, it gives you the option to gain access to the system partition. In other words, you get administrative level privileges. This will then allow you to flash Magisk Modules, Xposed Framework, Substratum Themes. But on the other hand, carrying out these tweaks requires an unlocked bootloader.
Doing so will make your device warranty will become null and void. Knox will also be tripped and so Samsung Pay, Secure Folder, Google Pay, Pokemon Go and Netflix (WideVine L1 degraded to L3) might not function along the expected lines. Well, you might be aware of all these perks and risks of rooting, so let’s keep all these aside and get straight to the point. So here are the required instructions to extract boot.img from boot.img.lz4 file and then and root your Samsung device. Follow along.
- How to Install Android 11 (OneUI 3.0) on any Samsung Phone via Odin
- Downgrade Samsung from Android 11 to Android 10 (OneUI 3.0 to 2.0/2.5)
- Download Samsung Stock Firmware/ROM via Frija Tool
- How to Update Magisk ZIP and Magisk Manager (without TWRP)
Table of Contents
Why use the boot.img.lz4 extracted from boot.img to Root Samsung
Well, the general guidelines to root your Samsung device requires the following procedure. [Read: How to Root any Samsung device via Magisk and Odin]. First off, you will have to download the stock firmware file via the Frija Tool or sites like SamMobile. Yo then extract this firmware and get five files in .tar.md5 format. These include the AP, BL, CP, CSC, and Home CSC. Out of these, we pick up the AP file and patch it via Magisk. This then gives us the magisk_patched.tar file.
Finally, this patched AP file (magisk_patched.tar) is flashed via Odin to the AP slot (and yes, we untick the Auto Reboot option as well). Then we manually reboot the device to the rooted OS via the specific hardware key combinations. And your device stands rooted. This is how one carries out the task of rooting their Samsung device. However, some users have reported that their device got stuck in a bootloop after flashing the magisk_patched.tar file to their device via Odin’s AP slot.
Others complained that even after carrying out the aforementioned task, Magisk still showed as no installed, i.e. the device was still unrooted. Doing a little bit of investigation and I found out that both these methods could very easily be fixed by a handy workaround. And in his guide, we have shared jus that. So without further ado, here are the steps to extract boot.img from boot.img.lz4 file and then root your Samsung device. Follow along for the detailed instructions.
- New Method to Boot to Recovery Mode on Samsung OneUI 3.0 Android 11
- How to Stop Samsung Find My Device Offline Finding Notifications
- Steps to Create Samsung Combination Firmware and Flash it via Odin
- How to Boot Rooted Samsung to Recovery Mode and Rooted OS
How to Extract boot.img from boot.img.lz4 and Root Samsung
The entire instructions have been broken into separate sections for the ease of understanding. proceed in the exact same as mentioned.
STEP 1: Unlock Samsung Phone’s Bootloader
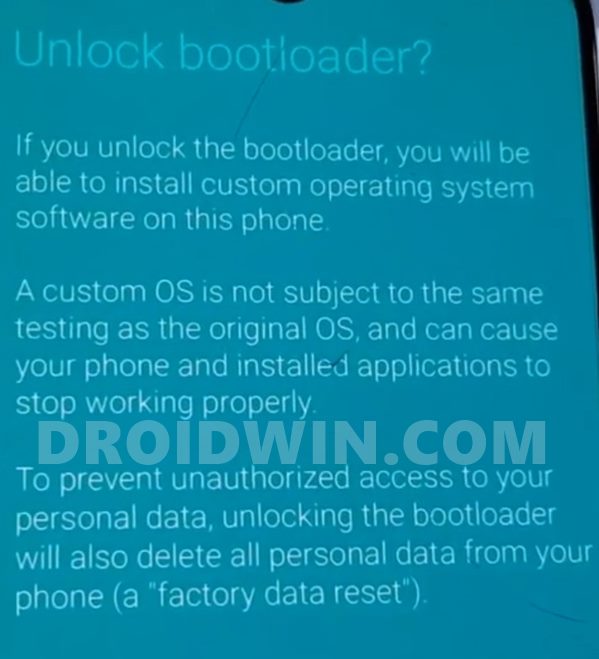
First and foremost, you will have to unlock the bootloader on your Samsung device. For that, please refer to our detailed guide: How to Unlock Bootloader on any Samsung Device [New VaultKeeper Method].
STEP 2: Download Samsung Stock Firmware
Next up, download the stock firmware for your device. For that, I usually prefer the Frija Tool, but you could also use the SamMobile site. For the Tool, here are the required instructions: How to Download Samsung Stock Firmware/ROM via Frija Tool. As for this guide, I am using the Samsung Galaxy A71, if by chance you are also using this device, then here are the information that might come in handy:
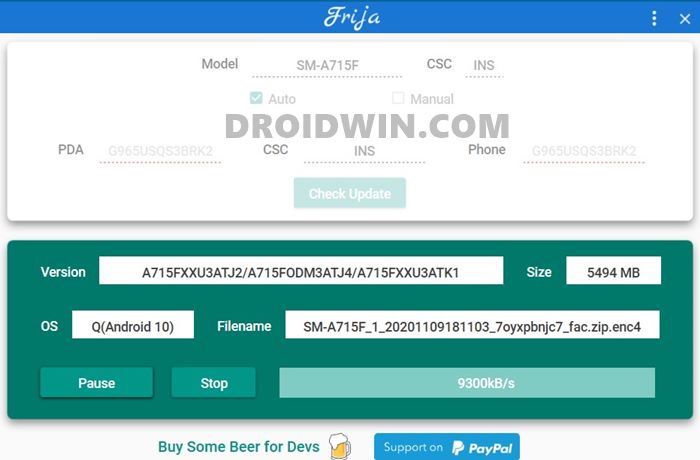
For Frija:
- Model: SM-A715F
- CSC: INS
For SamMobile
- Model: SM-A715F
- PDA: A715FXXU3ATJ2
- CSC: A715FODM3ATJ4
Anyways, once you have downloaded the firmware, extract it to any convenient location on your PC. You should then get the AP, BL, CP, CSC, and Home CSC files. Once you get these files, move over to the next step to extract the boot.img from boot.img.lz4 file and then root your Samsung device.
STEP 3: Patch AP firmware file via Magisk
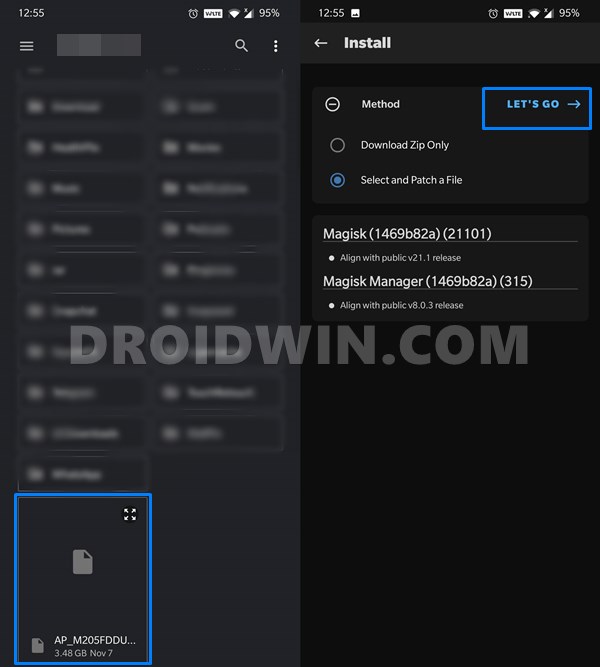
Now take the AP file that you got from the stock firmware and transfer it to your device. Then install the Magisk Manager app on your device and patch that AP file. To do so, you may refer to the instructions given in this guide: How to Patch Samsung AP Firmware via Magisk. This process will take some time. Once done, you should get the magisk_patched.tar file. Transfer this file to your PC.
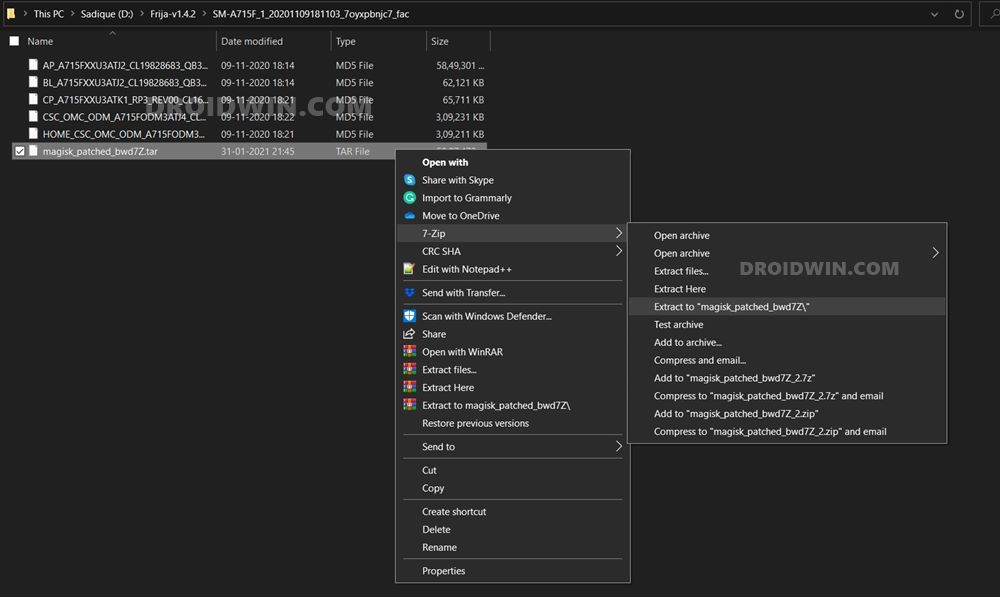
STEP 4: Extract magisk_patched.tar file
From this step onwards, we will be dealing quite a lot with the TAR file. So I would recommend downloading the 7ZIP software, in my test WinZIP and WinRAR wasn’t able to handle TAR quite efficiently. Hence download and install 7ZIP on your PC.
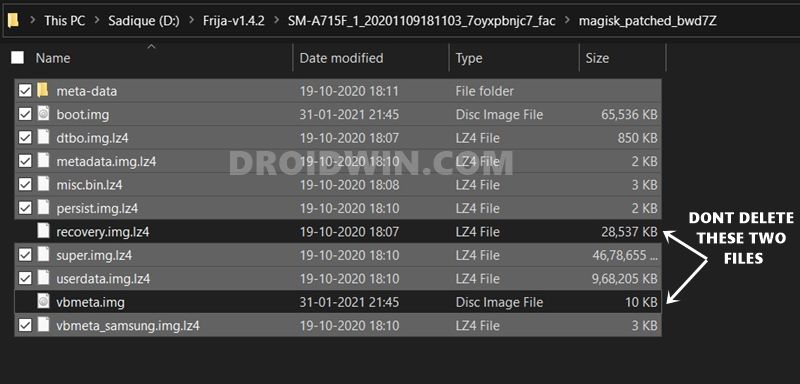
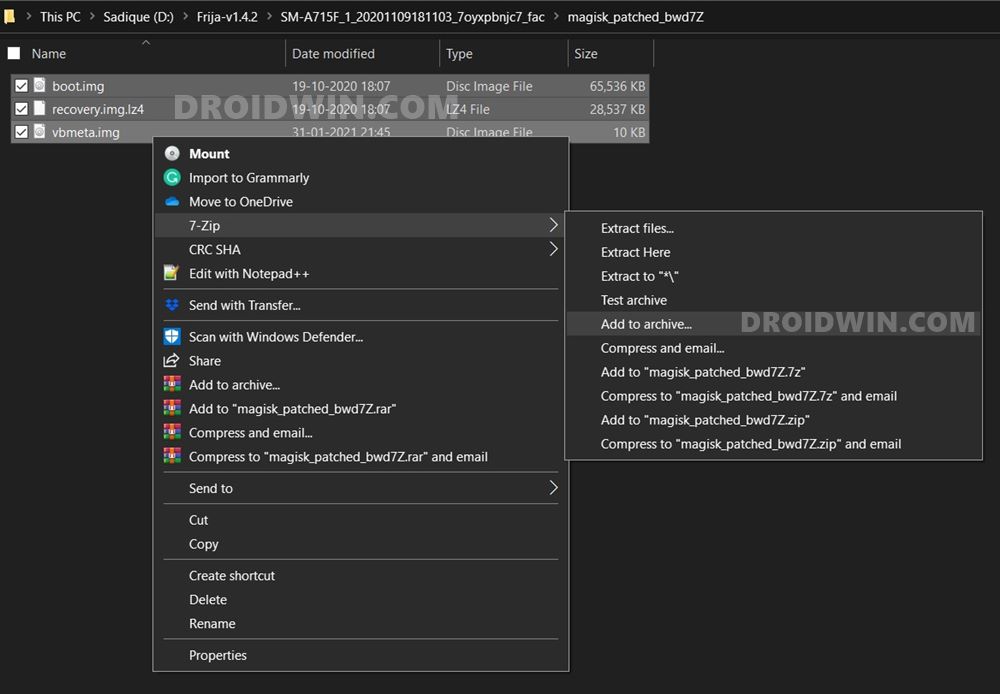
- When that is done, right-click on the magisk_patched.tar file and select 7ZIP > Extract to magisk_patched.
- A magisk_patched folder will be created with all the extracted contents of the magisk_patched.tar file.
- Delete all the files inside that folder except for recovery.img and vbmeta.img.
STEP 5: Extract AP firmware File
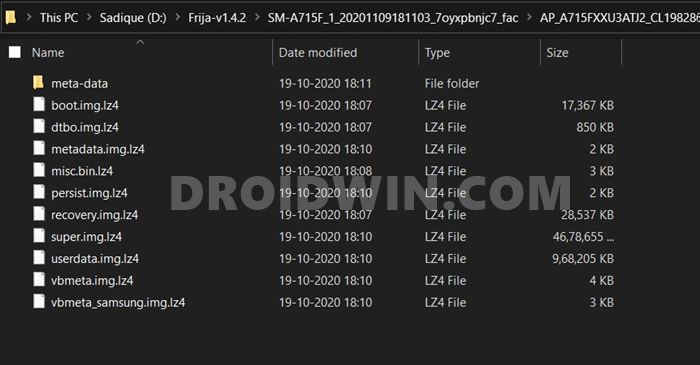
- Next up, head over to the original AP file that you got from the stock firmware.
- Then extract the AP file on your PC. The contents will be extracted inside the AP_version-number.tar folder.
- Pick up the boot.img.lz4 file from the extracted AP file and then move over to the next step to extract the boot.img from boot.img.lz4 file and then root your Samsung device.
STEP 6: Extract Samsung boot.img.lz4 file
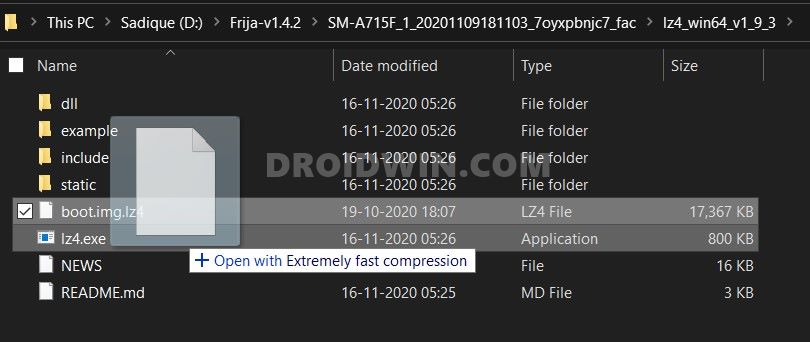
- Download the LZ4 extraction tool from the below link (Source: GitHub)
- lz4_win32_v1_9_3.zip : 32-Bit Windows
- lz4_win64_v1_9_3.zip: 64-Bit Windows
- Extract the tool and then transfer the boot.img.lz4 file to the tool’s lz4.exe file.
- As soon as the extraction is complete, you will get the boot.img file.
- Transfer this file to your device and patch it via Magisk. This will give you the magisk_patched.img file.
- If you need any help to patch this file via Magisk, refer to our detailed guide: Patch Stock Boot Image via Magisk. The linked guide also shows the steps to flash this file via Fastboot, ignore it as of now. Just refer to the patching steps via magisk and come back here.
- Once the boot.img file has been patched via Magisk, you will get the magisk_patched.img file inside the Downloads folder on your device.
- Transfer this file to your PC and rename it to boot.img. Now move over to the next step to extract the boot.img from boot.img.lz4 file and then root your Samsung device.
STEP 7: Create a new AP Patched File for your Samsung device
- As of now, you are having the magisk_patched.img file that you would have renamed to boot.img.
- So transfer this boot.img file to the magisk_patched folder that you got in STEP 4.
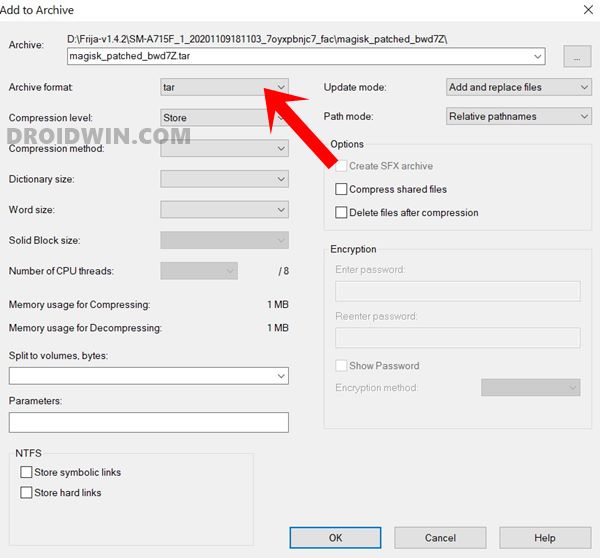
- Hence that folder will now have three files: boot.img, recovery.img, and vbmeta.img.
- Select All these three files, right-click on them, select 7-Zip > Add to Archive.
- Now change the Archive format to tar and click OK.
- You will get the newly created AP Patched firmware file. It’s time to flash it to your device via Odin’s AP slot. Follow along.
STEP 8: Boot Samsung device to Download Mode
Now we have all the required files at hand. So the next step is to flash it via Odin. However, for that, you will have to boot your device to Download Mode. This is because Odin could only interact with your device in the Download Mode. So refer to our detailed guide to carry out this task: How to Boot any Samsung Device to Download Mode.
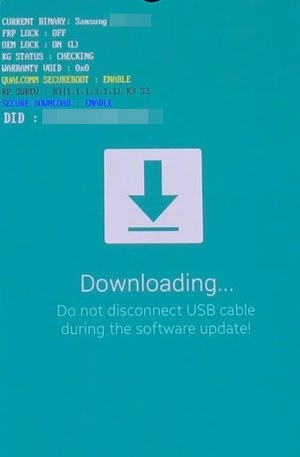
Once booted to Download Mode, connect your device to PC via USB cable and move to the next step to root your Samsung device via the extracted boot.img.lz4 file.
STEP 9: Root Samsung via boot.img.lz4 file
Now that you have extracted the boot.img from boot.img.lz4 file, it’s now time to root your Samsung device. Here are the required steps for the same:
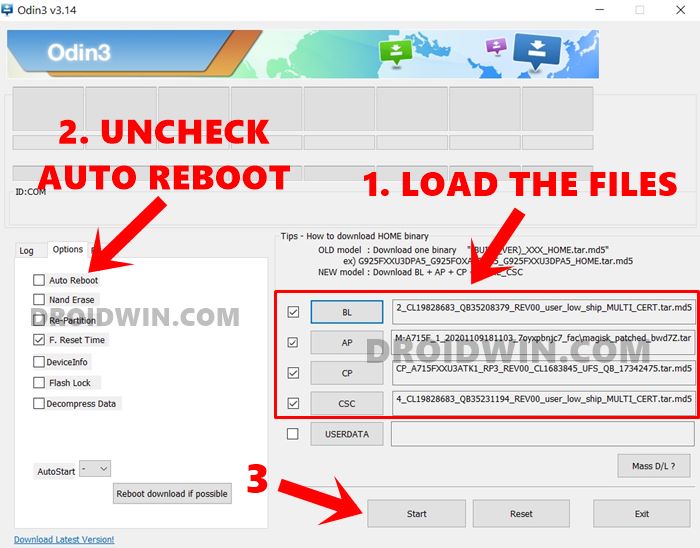
- To begin with, download the Odin Tool on your PC. Now launch it and load the following files:
- Click on BL and load the stock firmware’s BL file
- Then click on AP–> and load the newly created patched AP file.
- Click on CP–> and load the stock firmware’s CP file
- Lastly, click on CSC–> and load the stock firmware’s CSC file (not the Home CSC).
- Leave the userdata blank. Once the files have been loaded, go to the Options section of Odin and untick Auto-Reboot.
- Finally, hit the Start button and wait for the process to complete. Once done, you should get the Pass message in Odin.
- Remove the device from your PC and now refer to the below instructions to boot your device to the rooted OS.

STEP 10: Reboot Samsung Phone Rooted via boot.img.lz4 to OS
While the process of rooting your Samsung device via the extracted boot.img.lz4 file is completed, there is just one more thing left to do. You now have to boot your device to the rooted OS. To do so, please refer to our detailed guide on How to Boot Rooted Samsung to Recovery Mode and Rooted OS.
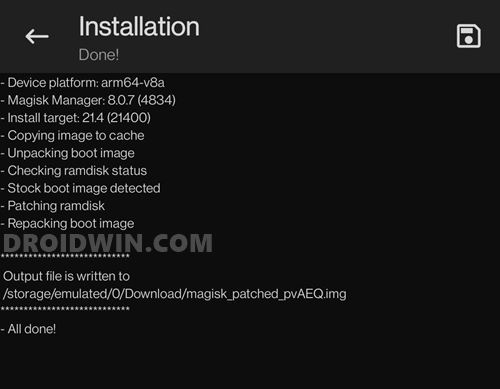
Once your device reboots to the OS, launch the Magisk Manager app. It may ask you to download a few additional files, reply OK (see above image). Magisk will then download a few configuration files. Once done, it will automatically reboot your device. And when the device reboots, the rooting process stands complete.
FAQ: Samsung Bootloop Fix after Root
If after carrying out the STEP 10, you still get stuck to bootloop or in a Fastboot mode, then here is what you need to do :
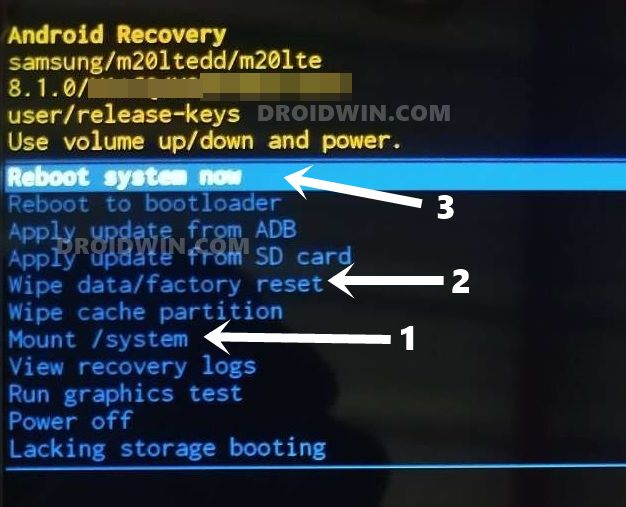
- Reboot your device to Recovery Mode via hardware key combinations
- Then Mount the system partition via the Mount /system option.
- After this, you will have to carry out the factory reset, use the Wipe Data /Factory reset option.
- Finally, select the Reboot system now option and wait for the device to boot up.
- Once it starts, launch the Magisk Manager app and carry out the rest of the setup, as explained above.
So with this, we conclude the guide on how to extract the boot.img from boot.img.lz4 file and then and root your Samsung device. While you should always try out the convention rooting method first. However, if that doesn’t work out, then this guide is always there to help you out. With that said, if you have any queries concerning the aforementioned steps, do let us know in the comments section below. We will get back to you with a solution at the earliest.


Andreas Pfeffer
Hello
I want to transfer boot.img to my XCOVER PRO. I downloaded the Lz4 tool, but i do not understand how its applied. If I click on it nothing happens. You put both files (boot.img.lz4 + lz4) next to each other – and then, what do you do ?
Thanlks a lot
andreras
Hanns Saxer
Hi,
I tried to root a Samsung Xcover 5 several times. But I did not succeed. After download with Odin the device did not reset and freezed. I think I have not understood right your Step 7.
I renamed the file magisk_patched.img to boot.img and dragged it into the file magisk_patched.tar file from step 4, so that this file contains the 3 components boot.img, recovery.img, and vbmeta.img.
But the next step “Select All these three files, right-click on them, select 7-Zip> Add to Archive” doesn’t work for me.
The 3 files are already contained in the magisk_patched.tar file from step 4. If I then flash this magisk_patched.tar file from step 4, the Xcover 5 no longer reboots. I then can load the factory reset only.
Can you please give me the right information?
Thank you very much.
John
1. Unlock bootloader (if OEM missing use the change time trick)
2. Download Firmware, Odin, Magisk, LZ4
3. Extract firmware, extract boot.img.lz4 from AP.tar.md5
4. Transfer AP.tar.md5, boot.img, Magisk to phone
5. Install Magisk, patch AP.tar.md5, patch boot.img (uncheck preserve option if exist)
6. Transfer magisk_patched.tar, magisk_patched.img to PC/Laptop
7. Extract magisk_patch.tar to magisk_patch folder
8. Rename magisk.patched.img to boot.img, transfer it to magisk_patch folder
9. Select boot.img + recovery.img.lz4 (my device don’t have vbmeta) compress to ap.tar
10. Open Odin to flash BL, CP, CSC, patched ap.tar
11. Enable developer, ensure OEM visible before install Magisk or you will waste more time
* I didn’t check the first time and i had to flash stock firmware -> unlock bootloader -> then flash patched
* The second time somehow OEM is still missing, i have to do the time trick, if the time trick doesn’t work use AHT PORT TOOL V2 tool to bypass KG/MDM
* Use TWRP if you don’t want to waste times!