In this guide, we will show you the steps to extract the PIT file from any Samsung firmware, flash it onto your device, and then unbrick it. Every major OEM has a slightly different approach when it comes to providing the stock firmware for their devices. For example, Google packs it inside the ZIP package. As a result, you just need to extract via WinZIP or WinRAR and you could get hold of the associated files.
On the other hand, OnePlus has all its partition files loaded inside the payload.bin file. To extract this BIN file and get hold of its files, you will need a standalone tool. Furthermore, Oppo and Realme have their firmware inside the OZIP package. This again requires a separate tool for extraction. But you might ask why do we need to extract the firmware package?
Well, it is mostly needed for two purposes, to root your device by patching the stock boot.img via Magisk and flashing it via Fastboot Commands. The other use of this is to unbrick your device, which is done by using partition files. Upon extracting the stock firmware, you will get these files belonging to different partitions of your device. These include the likes of system.img, recovery.img, vbmeta.img, boot.img among others.
We could then flash all these files individually via fastboot commands to their respective partitions and your device will be up and running. But when it comes to Samsung, everything goes out for a spin. This is because the South Korean giants treat the entire firmware process quite differently. But what is the issue and why is it leading to a few confusions? Let’s check it out! After this, we will list out the steps to extract the PIT file from the Samsung firmware, flash it and then unbrick your device.
Table of Contents
The Need to Extract PIT Files from Samsung Firmware
First off, Samsung doesn’t host their firmware on their official site. But you could still download the same from Frija Tool, SamMobile sites among others. But even after downloading and extracting the firmware, you wouldn’t directly find the partition IMG files. Rather, you would get the AP, BL, CP, CSC, and HOME_CSC files having the .tar.md5 extension. So could we flash these files via Fastboot?
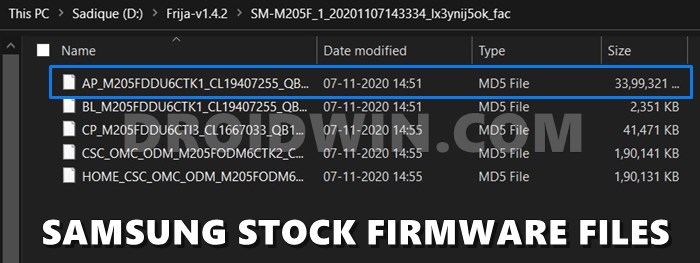
In general cases, we use the Fastboot Commands to flash the files to their respective partitions. For example, the command fastboot flash recovery recovery.img instructs the CMD to flash the recovery.img file to the recovery partition. But in the case of Samsung, the flashing is done via Odin. But since we don’ instruct Odin where the files need to be flashed, how does it decide the partition? Well, this is where the Samsung PIT file extracted from the firmware comes in handy.


PIT stands for Partition Information Table, and as is evident from its name, it beholds all the required instructions regarding which file needs to be flashed and in which partition. Odin picks up this file, reads all its associated information, and then carries out the flashing process. For example, I have extracted the PIT file of the Samsung Galaxy S20 device (SM-G980F) and managed to find out the following file names [to know more about their block sizes and partitions, refer to the ‘Samsung PIT File: What’s Inside it’ section at the end of this guide].
- ul_key.bin
- sec_efs.img
- up_param.bin
- keystorage.bin
- steady.bin
- recovery.img
- modem_debug.bin
- nad_refer.bin
- dqmdbg.img
- vbmeta.img
- vbmeta_samsung.img
- metadata.img
- optics.img
- userdata.img
Alongside these files, there were also a few encrypted information that laid down the instructions on which partition you need to flash these files. So Odin will pick up this PIT file and carry out its flashing process. However. if you end up loading the incorrect PIT file to Odin or even load the PIT file that doesn’t match with the current firmware version, then it would lead to bootloop or soft brick issues. Hence to unbrick your Samsung device, you need to extract the PIT file from the firmware and then flash it. Here are all the required instructions for the same.
- How to Install Android 11 (OneUI 3.0) on any Samsung Phone via Odin
- Downgrade Samsung from Android 11 to Android 10 (OneUI 3.0 to 2.0/2.5)
- How to Root any Samsung device via Magisk and Odin
- Guide to Patch Samsung AP Firmware via Magisk
How to Extract Samsung PIT File from Stock Firmware
We have listed the below instructions into separate sections for ease of understanding. Proceed ahead in the exact same sequence as mentioned below. Droidwin and its members wouldn’t be held responsible in case of a thermonuclear war, your alarm doesn’t wake you up, or if anything happens to your device and data by performing the below steps.
STEP 1: Download Stock Firmware
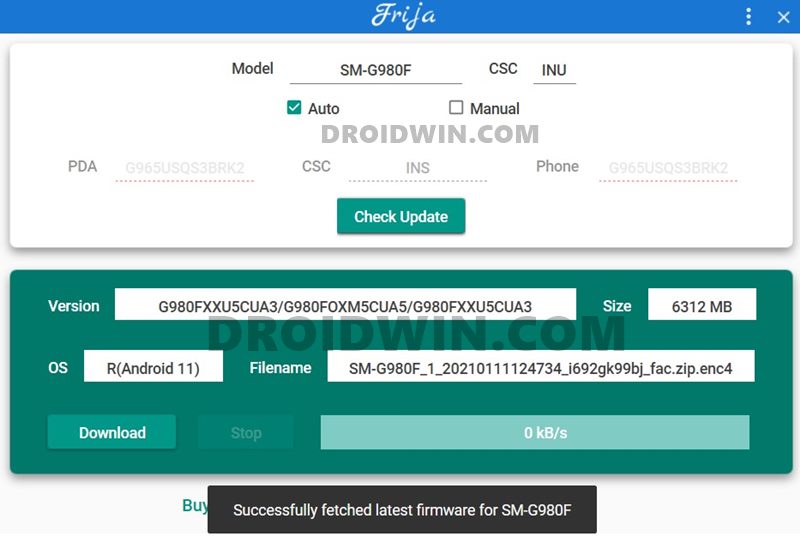

First and foremost, you will have to download the stock firmware for your Samsung device. While there are quite a few methods of doing so, however, I prefer the Frija Tool. If you also echo this thought, then refer to our detailed guide on How to Download Samsung Stock Firmware/ROM via Frija Tool.
STEP 2: Extract Samsung Firmware


Once the firmware is downloaded, extract it to any convenient location on your PC. You should then get the following five files: AP, BL, CP, CSC, and HOME_CSC. The PIT file is preserved inside the CSC file and hence we will need to extract the CSC file. Here’s how it could be done.
STEP 3: Extract CSC File and get Samsung PIT file
To extract the Samsung PIT file from the CSC firmware file, you will need the 7-ZIP Extraction software. WinZip and WinRAR weren’t able to handle the TAR and MD5 files, so I had to go for the aforementioned software.
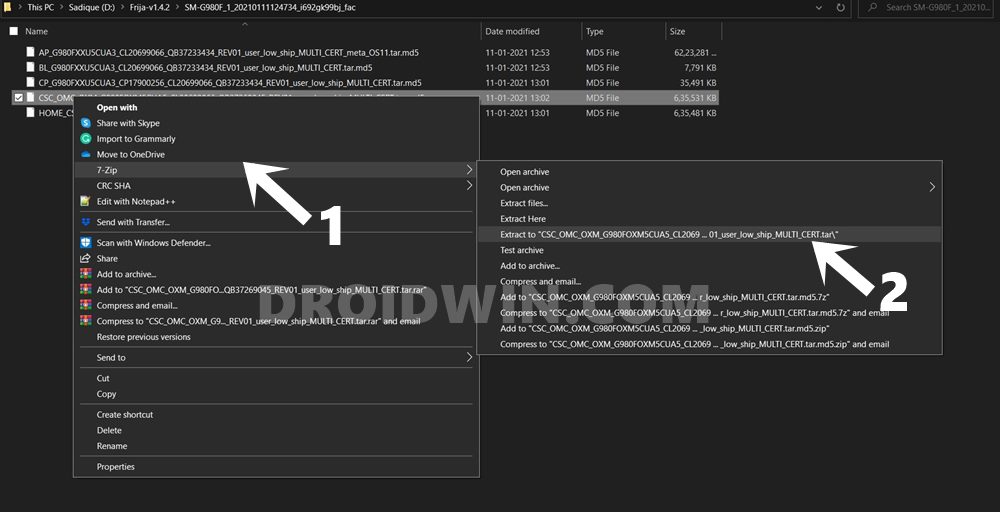

- So download and install 7-ZIP onto your PC.
- Then right-click on the CSC.tar.md5
- Select 7ZIP > Extract to CSC.tar
- The extraction process will now begin and would take a few minutes.


Once done, you will get a meta-data folder, some LZ4 files, and the required PIT file. So now that we have extracted the Samsung PIT file from the CSC firmware file, it’s time to flash it onto your device and unbrick it.
- New Method to Boot to Recovery Mode on Samsung OneUI 3.0 Android 11
- How to Stop Samsung Find My Device Offline Finding Notifications
- Steps to Create Samsung Combination Firmware and Flash it via Odin
- How to Boot Rooted Samsung to Recovery Mode and Rooted OS
How to Flash Samsung PIT File and Unbrick your Device
Here are the required instructions to flash the Samsung PIT file onto your device and then unbrick it. Follow along.
STEP 1: Install Odin
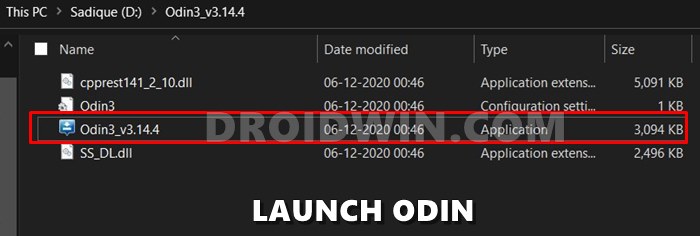

Well, there’s no points in guessing that we would use the Odin Tool to flash this PIT file. So download and install it onto your PC from the given link: Odin3-v3.14.4.zip. Once downloaded, extract it on your PC and double click on the Odin3_v3.14.4.exe file to launch the tool.
STEP 2: Boot your Samsung device to Download Mode
Next up, you will have to boot your device to the Download Mode so that Odin is able to interact with your device. You may refer to this guide to do so: How to Boot any Samsung Device to Download Mode. Here are the shorter instructions for the same:
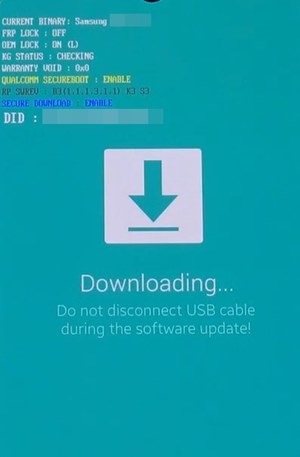

- Power off your device. Then press and hold the Volume Up and Volume Down keys together.
- While pressing both these keys connect your device to the PC via USB cable.
- Finally, leave both these buttons and hit the Volum Up key to boot to Download Mode.
STEP 3: Flash Samsung PIT File via Odin
- Connect your device to the PC via USB cable (make sure it is booted to Download Mode).
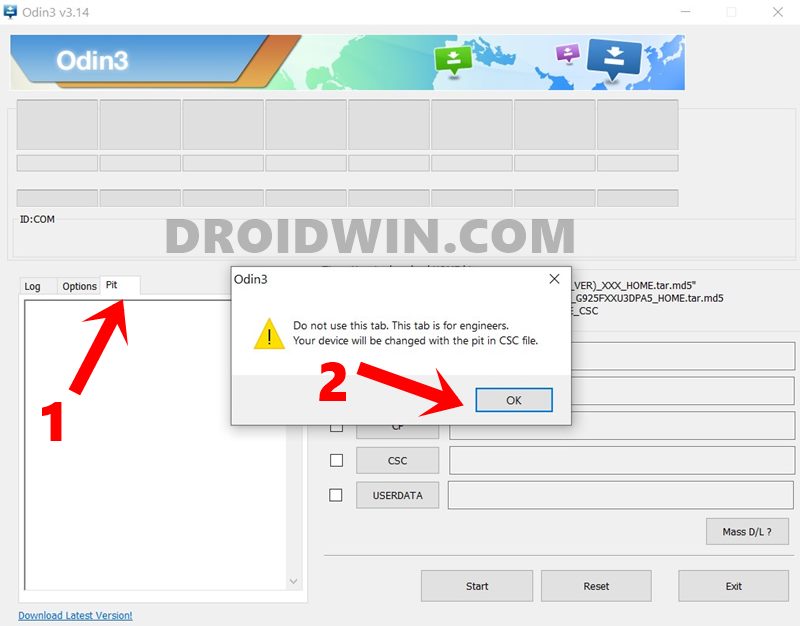
- Now launch the Odin Tool on your PC and go to the PIT section. You will get a warning, click OK.

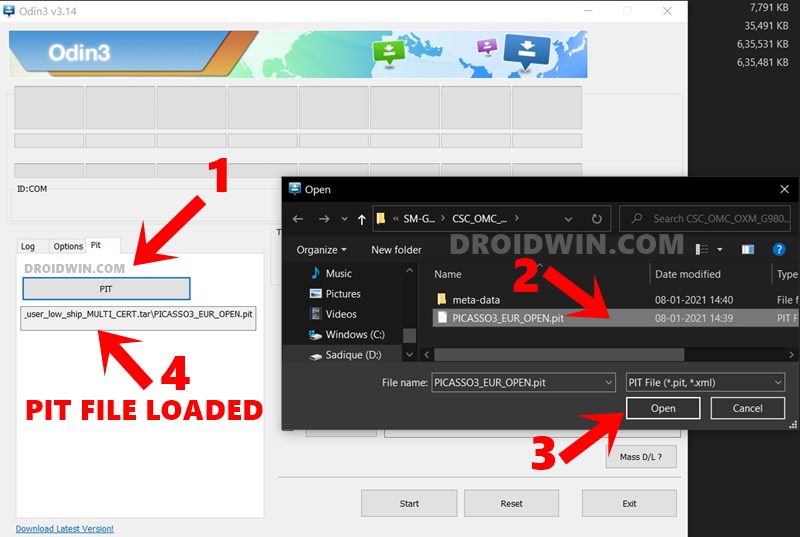
- Click on the PIT button, navigate to the extracted PIT file, select it, and hit the Open button to load the file.

- Once that is done, you will have to load the other firmware files as well. This is because the PIT file is never flashed alone, but with its associated files. So load the BL, AP, CP, and CSC (the normal CAS file, not the HOME CSC) files to the tool.

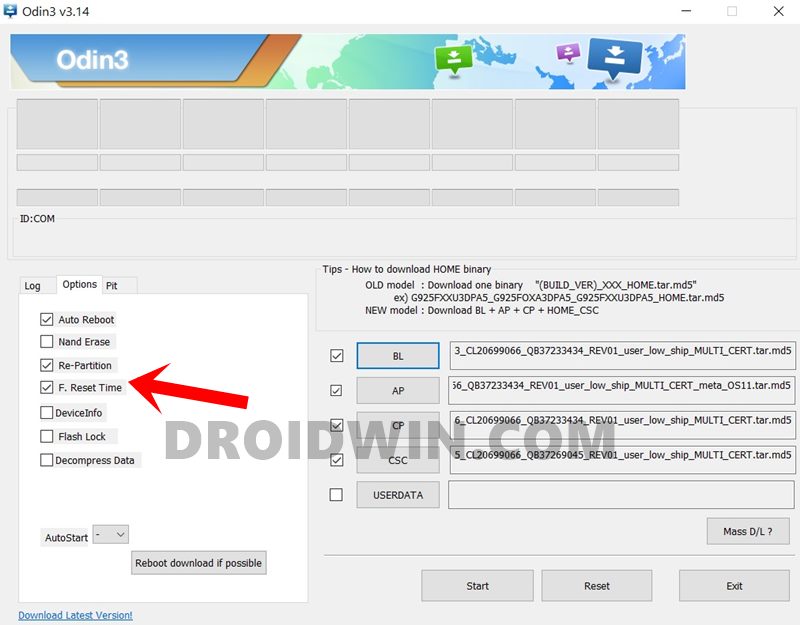
- Then go to the Options section of Odin and enable the Re-Partition option.
- Finally, hit the Start button and wait for the process to complete. Once the flashing of the PIT file is finished, you should get the Pass message.


With this, we conclude the guide on how to extract a PIT file from the Samsung firmware file, flash it onto your device via Odin and then unbrick it. If you have any queries concerning the aforementioned steps, do let us know in the comments. We will get back to you with a solution at the earliest.
- How to Pass SafetyNet test after installing Xposed or EdXposed
- How to Pass Magisk SafetyNet on Rooted Android 11
- Fix No WiFi, Calls, Network after Root or Custom ROM
- How to Fix ctsProfile Mismatch Error on Rooted Android
Samsung PIT File: What’s Inside it
The normal extraction of the PIT file (after removing the binary value) gives out the following information.


On the other hand, if you are looking for the complete information, including the binary value, then here’s what I got.
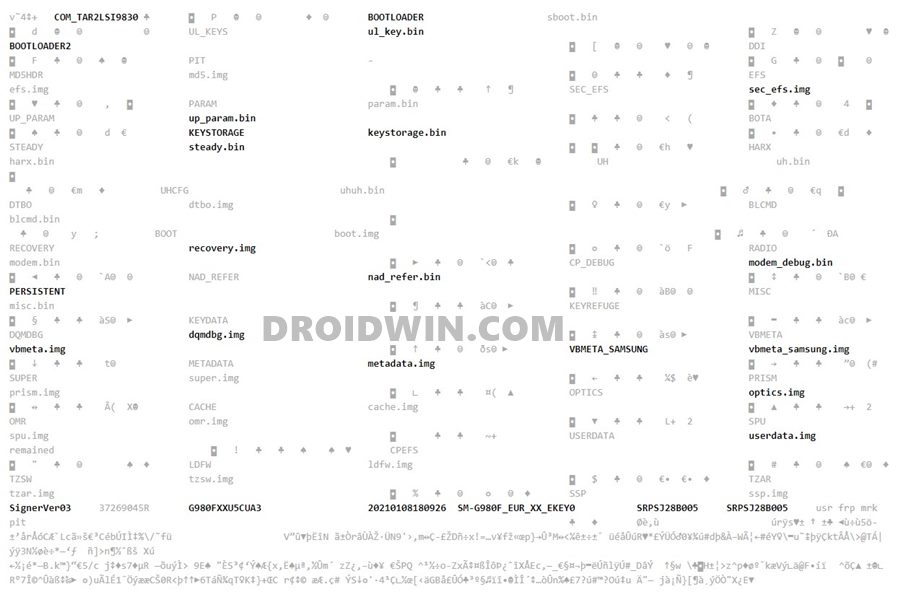

Furthermore, the conversion of the PIT file to an XML file was able to give out some useful information. Here’s just a little snippet of the same:
<?xml version="1.0" encoding="UTF-8"?>
<root>
  <partition Name="ipl+recovery" FileName="ipl-recovery.bin" DeltaName="" BlockSize="256" BlockLength="2"/>
  <partition Name="pit" FileName="pit" DeltaName="" ID="1" BlockSize="256" BlockLength="2"/>
  <partition Name="csa" FileName="csa" DeltaName="" ID="2" BlockSize="256" BlockLength="32"/>
  <partition Name="u-boot" FileName="u-boot-whdr.bin" DeltaName="" ID="3" BlockSize="256" BlockLength="4"/>
  <partition Name="u-boot_bak" FileName="u-boot-whdr.bin" DeltaName="" ID="4" BlockSize="256" BlockLength="4"/>
  <partition Name="params" FileName="params" DeltaName="" ID="5" BlockSize="256" BlockLength="4"/>
  <partition Name="config" FileName="config" DeltaName="" ID="6" BlockSize="256" BlockLength="8"/>
  <partition Name="kernel" FileName="uImage" DeltaName="" ID="7" BlockSize="256" BlockLength="28"/>
  <partition Name="kernel_bak" FileName="uImage" DeltaName="" ID="8" BlockSize="256" BlockLength="28"/>
  <partition Name="log" FileName="log" DeltaName="" ID="9" BlockSize="256" BlockLength="5"/>
  <partition Name="modem" FileName="modem.img" DeltaName="" BinType="1" ID="10" BlockSize="256" BlockLength="64"/>
  <partition Name="qboot" FileName="qboot" DeltaName="" ID="11" BlockSize="256" BlockLength="240"/>
  <partition Name="UBI" FileName="ubi.img" DeltaName="" ID="12" Attribute="1" BlockSize="256" BlockLength="1627"/>
  <partition Name="movinand" FileName="movinand.bin" DeltaName="" DevType="2" Attribute="1"/>
  <partition Name="csc" FileName="rfs_part4.csc" DeltaName="" DevType="2" ID="4" Attribute="1"/>
</root>
In some instances, you might also get the Values in HEX format, as shown below (Here the columns corresponds to <Flags1> <Partition No.> <Flags2> <Flags3> <Partition Start Offset> <Partition Length> <Partition Label> <Image File Name>)
2000000 D000000 5000000 1000000 900300 180000 MODEMST1 nvrebuild1.bin
2000000 E000000 5000000 1000000 A80300 180000 MODEMST2 nvrebuild2.bin
2000000 F000000 5000000 1000000 C00300 680000 BOOT boot.img
2000000 10000000 5000000 1000000 280400 780000 RECOVERY recovery.img
2000000 11000000 5000000 1000000 A00400 680000 FOTA
2000000 12000000 5000000 1000000 80500 EE370000 BACKUP
2000000 13000000 5000000 1000000 EE3F0500 2000000 FSC
2000000 14000000 5000000 1000000 F03F0500 10000000 SSD
2000000 15000000 5000000 5000000 400500 400000 PERSIST persist.img.ext4
2000000 16000000 5000000 5000000 800500 480000 PERSDATA persdata.img.ext4
2000000 17000000 5000000 5000000 C80500 684D00 SYSTEM system.img.ext4
2000000 18000000 5000000 5000000 305300 A00F00 CACHE cache.img.ext4
2000000 19000000 5000000 5000000 D06200 USERDATA userdata.img.ext4
So these were all the technical details that I could accrue from my own testing as well as from trusted developer sources from XDA. If you have further insights into all these, do share your valuable information with us it the comments.


grumpyotaku
I used that Frija tool and downloaded the file that it matched to my tablet. There is *****NO***** CSC.tar file (in fact, no tar files AT ALL). And therefore no .PIT file either. Since the tablet isstill working, how do I retrieve the .pit *from the tablet*?
The internet is full of useless pages that in the end do nothing but waste hours and hours of my time.
Justin
Very well put instructions. You should teach courses online honestly. Very clear and detailed instructions. Perfectly so even. Much appreciated. Thank you
Ian Wright
Superb guide. Thank you. I think there is a type (I might be wrong)
(the normal CAS file, not the HOME CSC
should that be
(the normal CSC file, not the HOME CSC
Sadique Hassan
Yes Ian, thanks for pointing it out, will rectify it. And thanks for the appreciation