In this guide, we will show you the steps to uninstall the TWRP Recovery and restore to stock recovery on your Android device. When it comes to custom development, there is only one requirement that you need to qualify. And that is to unlock the device’s bootloader. Once that is done, you have literally opened the floodgates to the plethora of customizations.
But before you really step into the flashing domain, it is recommended to get hold of the TWRP Recovery. It is not a compulsory requirement but rather a recommended one. As result, it has now become a custom to install a custom recovery like onto your device [or you could create and port TWRP Recovery for your device as well!].
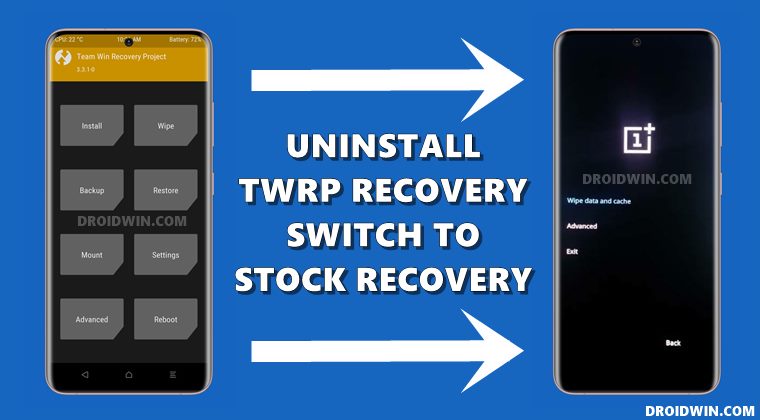
While the official TWRP recovery takes some time to be built, the enthusiasts are even ready to try out the unofficial versions during the wait time. However, what if you no longer need this recovery and wish to revert to stock? Well, then you have come to the right place. Today, we will show you detailed steps to uninstall the TWRP Recovery and restore to stock recovery on your Android device.
- How to Pass Magisk SafetyNet on Rooted Android 11
- Root Android 11 via Magisk Patched boot.img (without TWRP)
- Fix Magisk patched boot.img issue while Rooting Android 11
- How to Fix Android Device stuck in Fastboot Mode
Table of Contents
Why To Uninstall TWRP Recovery?
Just now I had listed a couple of benefits of this custom recovery inside the article that instructs you to remove it from your device. So am I contradicting myself? Well, not really! Here are the various reasons why you may still want to bid adieu to TWRP in spite of such goodies that it has to offer. First off, many users are still using the unofficial builds of this recovery. As a result, they have to occasionally go through quite a few issues.
These include data encryption, unable to mount data, Internal Storage showing 0MB among others. In some instances, some of these issues might even be present on the official builds as well. Another important reason why you would like to uninstall TWRP and restore it to stock recovery is that all the functions of TWRP could still be carried out without using it. Here is how I could justify this statement.
- You could flash custom ROM without TWRP.
- Likewise, you could flash stock firmware directly via Fastboot Commands.
- Along the same lines, you could fix Magisk Bootloop without TWRP.
- You could even uninstall Magisk Modules without using TWRP.
- Then when it comes to flashing files, there is already the ADB Sideload option, and the list goes on…
This might have given you a decent idea as to how it is possible to ‘survive’ in custom development without TWRP. So if you also echo these thoughts, then this guide shall come in handy. Follow along for the steps to uninstall TWRP and restore to stock recovery on your Android device.
How to Uninstall TWRP and Restore Stock Recovery on Android
The below instructions are broken down into separate sections for ease of understanding. Follow along in the exact same sequence as mentioned.
STEP 1: Install Android SDK Platform Tool
To begin with, you will have to install the Android SDK Platform Tools on your PC. This will provide you with the necessary binaries.
STEP 2: Enable USB Debugging
Next up, enable the USB Debugging on your device. This is needed so that the PC is able to interact with your device in ADB Mode. But why do we need ADB Mode? Well, it would be used to boot your device to Fastboot Mode. [Don’t Miss: How to Execute Android ADB Fastboot Commands Wirelessly].
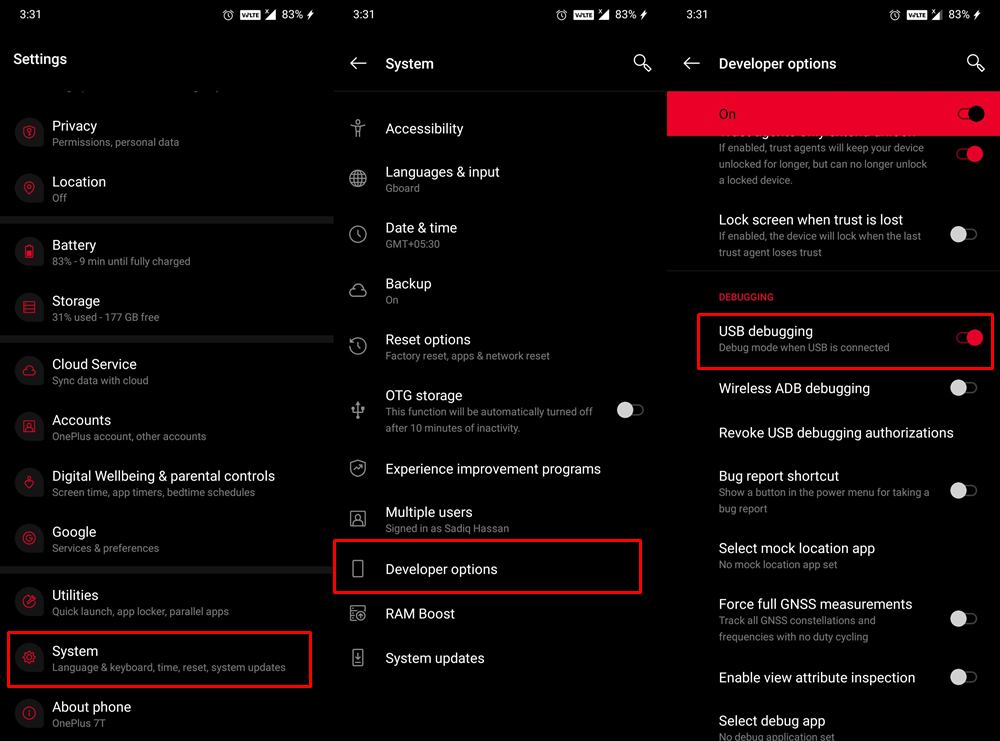
So head over to Settings > About Phone > Tap on Build Number 7 times > Go back to Settings > System > Advanced > Developer Options > Enable USB Debugging. Once that is done, move over to the next step to uninstall TWRP and restore to stock recovery on your Android device. [Don’t Miss: How to Enable USB Debugging on a Broken Android Devic’s Screen?]
STEP 3: Download Stock Recovery
Now comes the most important part of this guide. You will have to get hold of the stock recovery for your device. For that, you need to download the stock firmware of your device and then extract the same. Near about every major OEM uploads the firmware on their official site. So go to their site and download the firmware.
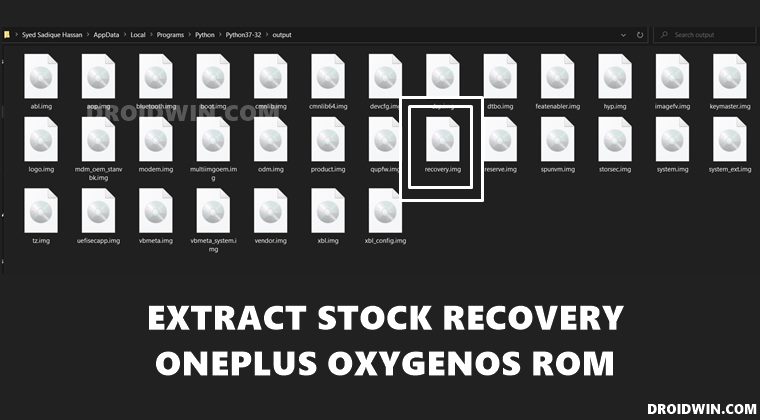
But keep this in mind: you should download that version of firmware that is currently installed on your device. You could check the current OS version of your device by going to Settings > About Phone. Now download the firmware having the exact same firmware version. Flashing an older or even newer stock recovery onto your device will result in a bootloop or bricked device. With that said, now extract the firmware file and get the stock recovery.img file.
If you have an OnePlus device, then the stock recovery file is placed in payload.bin. So refer to this guide: How to Extract Stock Recovery from OnePlus OxygenOS Stock ROM. On the other hand, Realme has its files inside the OZIP package. In that case, you may refer to this guide: How to Extract OZIP Realme Stock ROM (Firmware). Once you get the stock recovery.img file, proceed to the next step to uninstall TWRP and restore to stock recovery on your Android device.
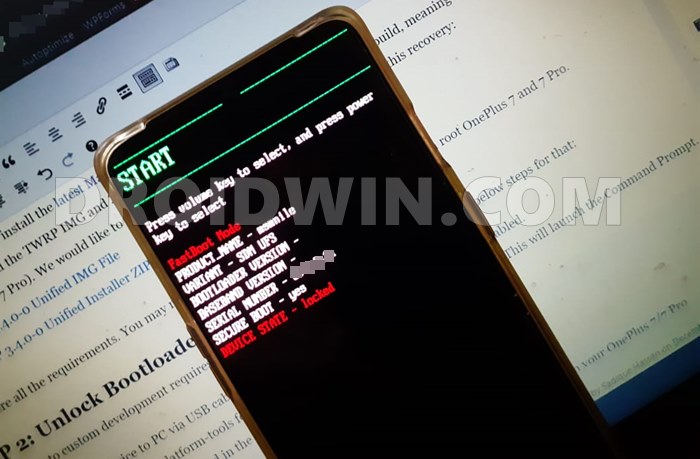
STEP 4: Boot Device to Fastboot Mode
- It’s now time to boot your device to Fastboot/Bootloader Mode.
- Hence connect your device to the PC via USB cable. Make sure USB Debugging is enabled.
- Then head over to the platform-tools folder, type in CMD in the address bar, and hit Enter. This will launch the Command Prompt.

- Type in the following command in the CMD window to boot your device to Fastboot Mode
adb reboot bootloader
- That’s it. Your device is now booted to Fastboot. You may proceed to the next section to uninstall TWRP and restore to stock recovery on your Android device.

STEP 5: Uninstall TWRP Recovery on Android
- First and foremost, transfer the stock recovery to the platform-tools folder. Likewise, make sure that the complete name of the file is recovery.img. If that is not the case, then rename it accordingly.
Here .img is the format of the file and you don’t need to change that. Just make sure that the name of the file is recovery, the complete name will then automatically become recovery.img.
- Now type in the below command in the CMD window (that you have opened inside the platform-tools folder) to flash the stock recovery:
fastboot flash recovery recovery.img
- Once the file has been flashed, you may now reboot your device to the OS via the following command:
fastboot reboot
That’s it. Your device now has the stock recovery installed. On that note, we round off this guide on how to uninstall TWRP and restore to stock recovery on your Android device. If you have any queries concerning the aforementioned steps, do let us know in the comments section. We will get back to you with a solution at the earliest.


