In this comprehensive guide, we will show you the steps to create and port TWRP Recovery to any Android device. When it comes to custom development, the involvement of a custom recovery becomes among the most important prerequisites. This is because your stock recovery isn’t designed to carry out advanced functionalities. Hence right after a user unlock the device’s bootloader, flashing the TWRP Recovery is probably the first step that they usually do.
The benefits of this recovery stand aplenty. For example, you could easily flash ZIP and IMG files, create and restore Nandroid backups, mount external devices, and carry out other advanced functionalities. While some of these functionalities could be carried out without TWRP Recovery as well, but that requires way too much effort. Hence getting hold of the TWRP Recovery for your device is the top-most requirement,
However, this recovery isn’t yet available for every Android device. All the official TWRP builds are hosted on their servers whereas the unofficial ones could be found from XDA. Even then, there are quite a few devices that don’t belong to any of these two lists. And for them, this guide shall come in handy. Given here are the detailed steps to create and port TWRP Recovery to any Android device.
As of now, it is limited to Android devices running the Qualcomm chipset. With MediaTek devices, there are quite a few issues, majorly with the recovery’s recovery.fstab file. As and when I am able to rectify that issue, will create a separate guide for MTK devices as well. With that said, here are the detailed instructions to create and port TWRP Recovery to Android devices with Qualcomm as the underlying chip. Follow along.
- How to Fix Soft brick/Bootloop after installing TWRP Recovery
- Copy Move Rename Delete Files and Folders via TWRP Recovery
- How to Fix TWRP 0MB Internal Memory Issue
- Update TWRP Recovery on any Android Device
Table of Contents
How to Create and Port TWRP to any Android Device

The below instructions have been segregated into separate sections for ease of understanding. Follow along in the exact same sequence as mentioned. Warning! The below process is quite risky and could brick your device and make it unusable. Droidwin and its members wouldn’t be held responsible in case of a thermonuclear war, your alarm doesn’t wake you up, or if anything happens to your device or your data by performing the below steps.
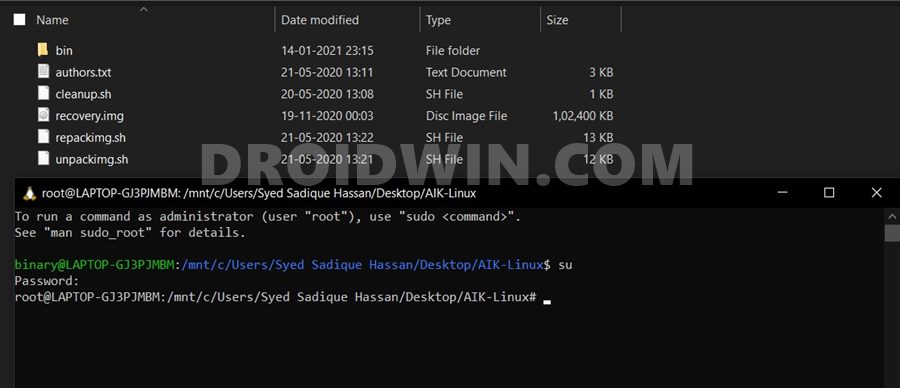
STEP 1: Enable Linux Shell on Windows 10
To carry out all such Android related tweaks, Linux is the go-to choice. However, I didn’t wish to leave my Windows OS at the same time. So I enabled the Linux Bash Shell Command inside Windows 10 only. It is a Developer Mode feature present inside Windows 10 for a few years, but not many seem to have an idea of this. The biggest advantage of this feature is the fact that you don’t have to use any Virtual Machine or a third-party app like Cygwin.
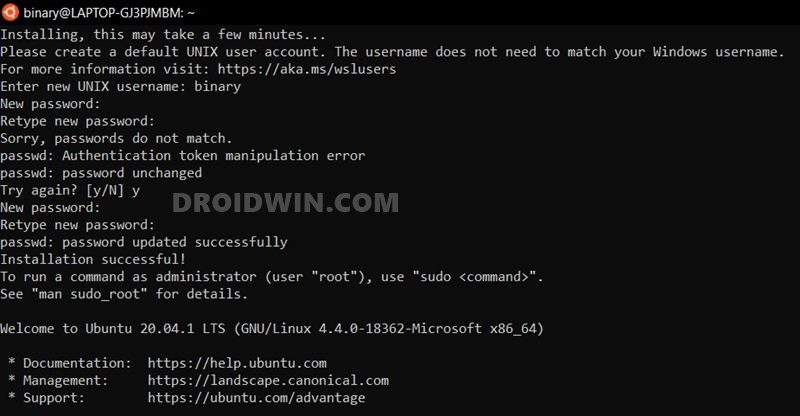
Everything is taken care of by the Windows OS itself. And I have tried out the entire instructions to create and port TWRP Recovery on Android using this Shell Command on Windows 10, so there is no reason why it shouldn’t work for you. With that said, refer to this guide to use Linux on your Windows 10 PC: How to Run Linux Commands in Windows 10 [without Virtual Machine].
STEP 2: Install Android Image Kitchen
Once you have enabled Linux Shell Command on your Windows 10, the next step is to install the Android Image Kitchen. This is where we would be cooking the TWRP Recovery for your device. So download the AIK-Linux-v3.7-ALL.tar.gz. Credits: goes to XDA Senior Recognized Developer / Recognized Contributor osm0sis. Do keep in mind that this is a Linux build as we would be working inside the Linux ecosystem (on a Windows 10 OS!).
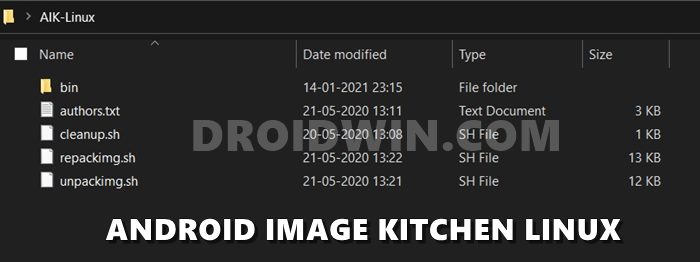
Moving on, once you have downloaded it, use an extracting software such as WinRAR to open it. Then extract its contents to any convenient location on your PC. While downloading or extracting it, Windows Defender will identify it as a Trojan. So you might have to temporarily disable it while downloading and extracting Android Kitchen. Once the download/extraction is complete, then make sure to re-enable the Defender again. Then move to the next step to create and port TWRP Recovery to any Android device.
- How to Root Android Devices via TWRP Recovery
- TWRP: fastboot flash vs fastboot boot: Which command to use
- How to use USB OTG or Pen Drive to Flash File via TWRP Recovery
- How to Fix Soft brick/Bootloop after installing TWRP Recovery
STEP 3: Download TWRP for Screen Resolution
You will now have to download the required TWRP recovery in accordance with the desired screen resolution. Thanks to XDA Senior Member Augustoandro for the below piece of valuable information.
- If your screen resolution is 480 x 850 or 480 x 854; then download LG Nexus 4 TWRP.
- Likewise, if your screen resolution is 720 x 1280, or 800 x 1280 or 720 x ‘something’; then download Asus Nexus 7 TWRP
- On the other hand, if your screen resolution is 1080×1920, then download the Motorola Nexus 6 TWRP. As for this guide, I have downloaded this one only.
Once you have downloaded the required recovery file, move to the next step to create and port TWRP Recovery to any Android device.
STEP 4: Get the Stock Recovery.img File
Now you will have to get a hold of the stock recovery.img file. This would be present inside the stock firmware itself. So download the firmware for your device and region (corresponding to your current build number). Once downloaded, extract it. Now if you have a Pixel device, then its partition files are present in ZIP format. So just extract it and get the stock recovery.img file.
On the other hand, OnePlus and a bunch of other OEMs have all its partition files under the payload.bin file. Realme on the other hand has its firmware files under OZIP format. So to extract these files, please refer to our detailed reference guides:
- How to Extract payload.bin and get stock boot image file
- Extract Stock Boot.img from OnePlus OxygenOS Stock ROM
- How to Extract OZIP Realme Stock ROM (Firmware)
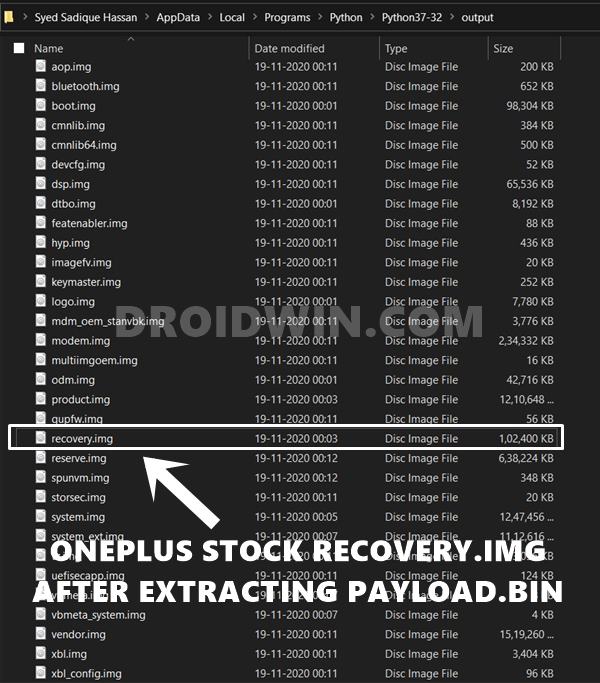
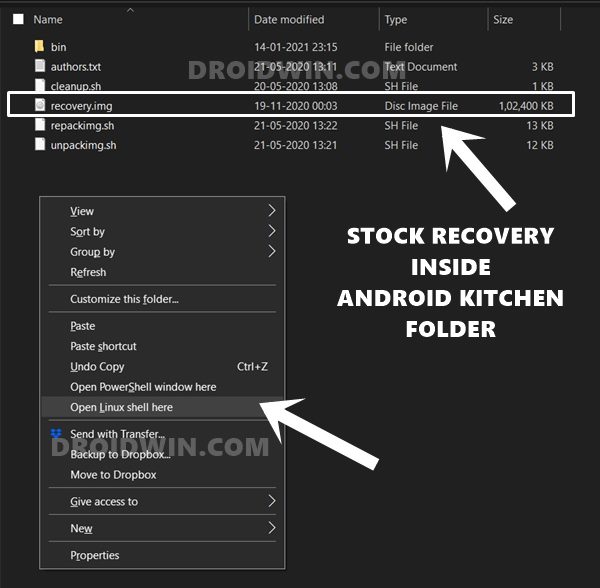
While these guides focus on stock boot.img file, the process is exactly similar for recovery.img file. Just follow the guide as it is and you will get the desired file. Once you get this stock recovery.img file, move it inside the Android Image kitchen folder on your PC (see the below image in STEP 5). Then proceed to the next step to create and port TWRP Recovery to any Android device.
STEP 5: Get Root Privileges in Linux Shell on Windows 10
It’s now time to go to SuperUser Mode and get root access on Linux! For that, you will have to open Ubuntu inside the same directory where you have extracted the Android Image Kitchen (AIK).
- So go to the AIK folder, and while pressing the Shift key, right-click in an empty location and select Open Linux Shell here.

- By doing so, Ubuntu will automatically pick up the directory of AIK.
- Now type in the below code and hit Enter:
su
- It will now ask you to enter the password. Enter the same password that you had input in STEP 1 while setting up Linux for the first time.
- That’s it. You have now got the Root Privileges. Move over to the next step to create and port TWRP Recovery to any Android device.
STEP 6: Creating TWRP Recovery
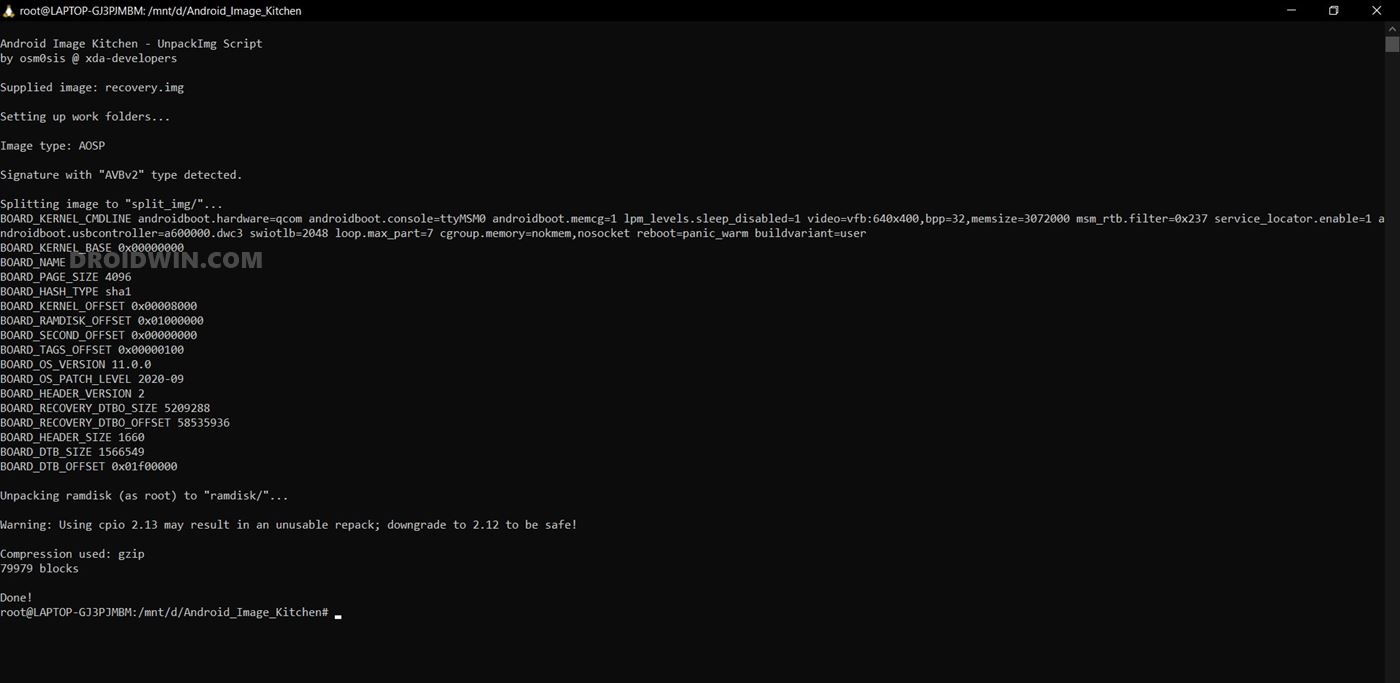
- First off, start by unpacking the stock recovery.img file via the following command:
./unpackimg.sh
- You will now get two 2 folders: ramdisk and split_img. Move them outside the Android Image Kitchen (AIK) folder. Likewise, also move the stock recovery.img file outside the AIK folder.
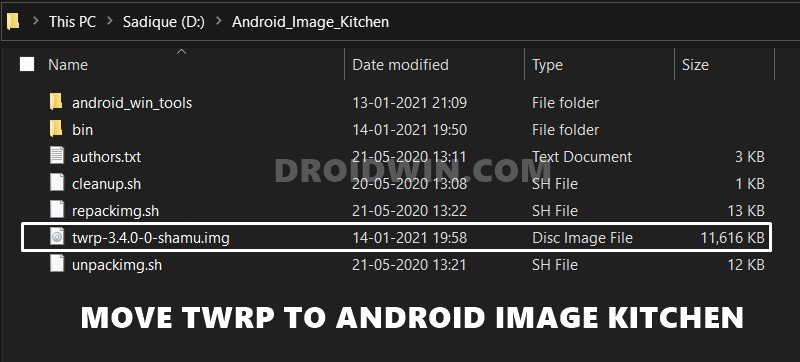
- Now move the downloaded TWRP Recovery (from STEP 3) to this AIK folder.
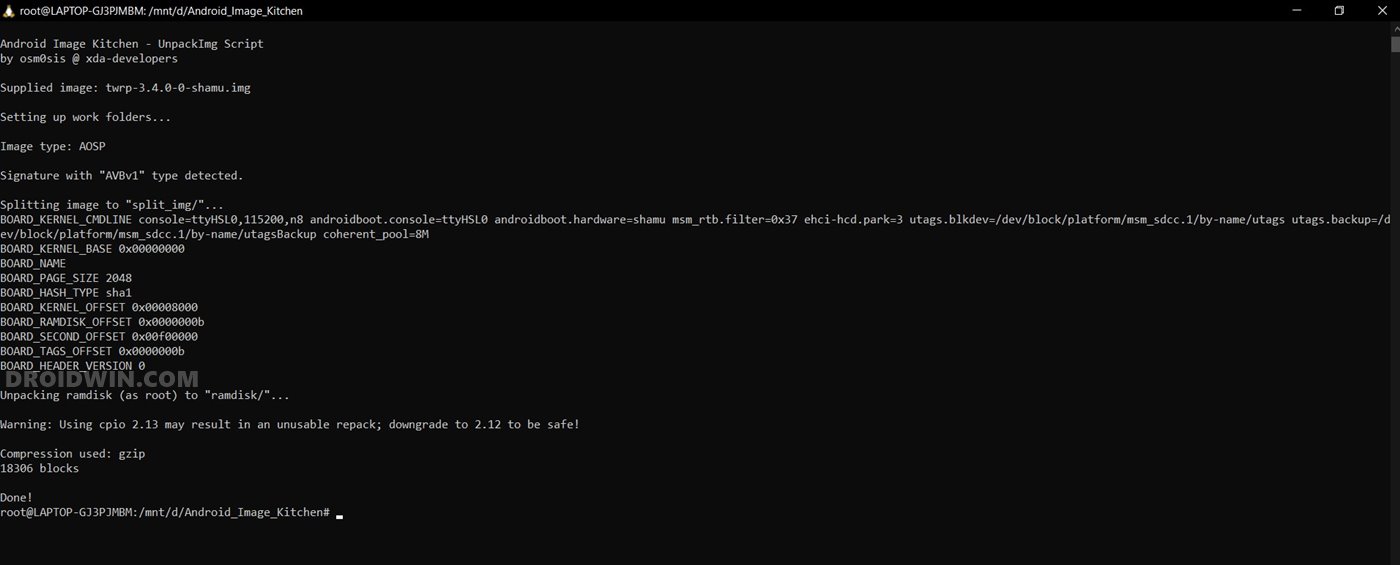
- Use the below command to unpack this TWRP Recovery (earlier we had unpacked stock recovery, this time we are unpacking TWRP):
./unpackimg.sh
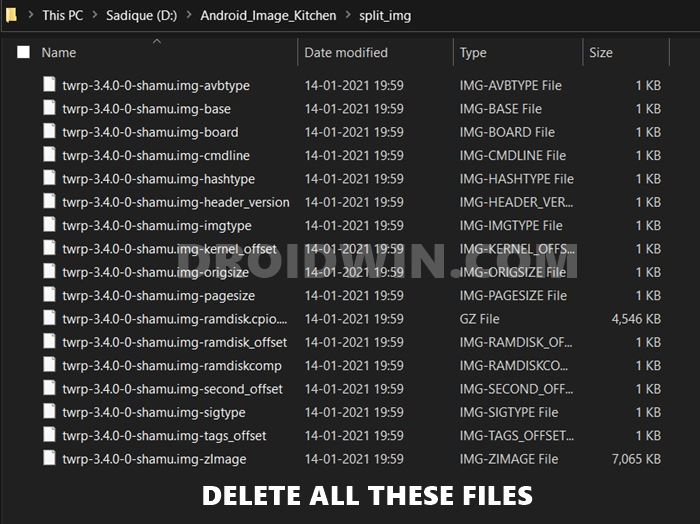
- As soon as the unpacking is completed, go to the split_img folder. You will see a few TWRP files, delete all those files.
- Now copy all the files from the stock recovery split_img folder (that you have moved outside the AIK folder) to the new empty split_img folder (from where you have just deleted the twrp files).
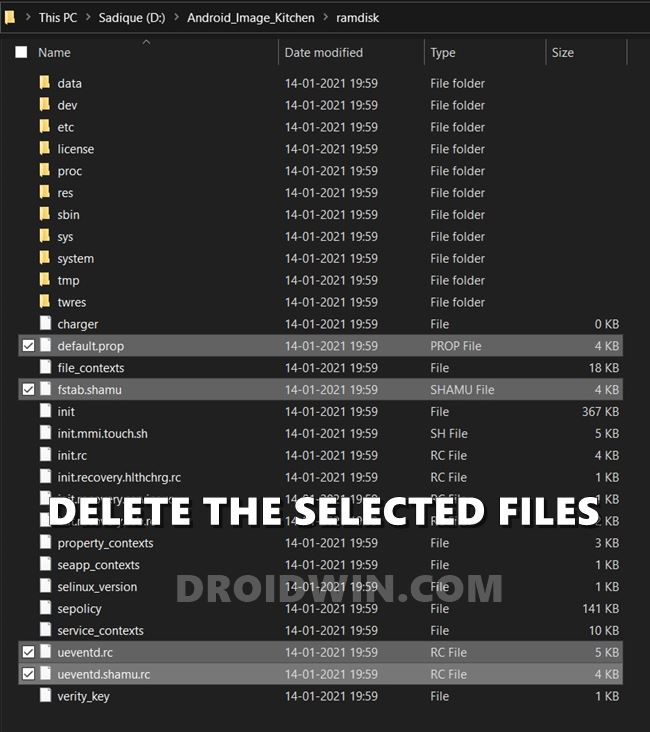
- When that is done, delete the following files from the new ramdisk folder (that is created by TWRP Recovery):
- default.prop
- fstab.devicename_or_chipsetname
- ueventd.rc
- Any other file like ueventd.devicename.rc
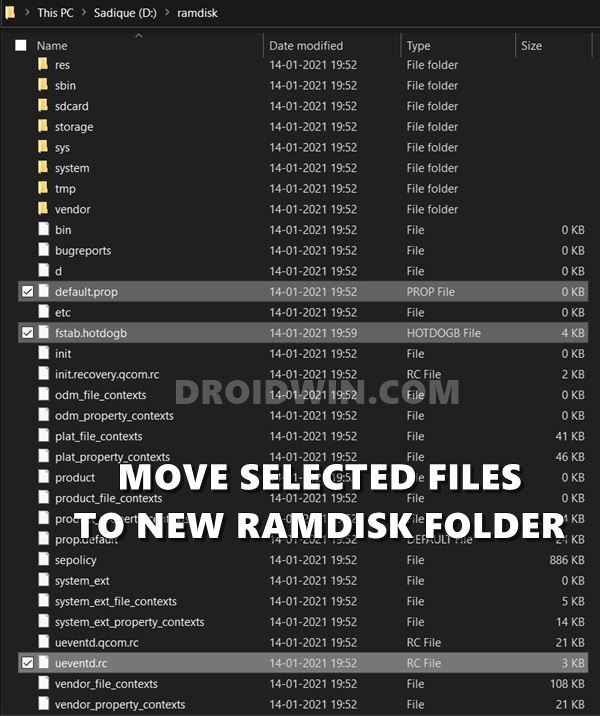
- Now copy and paste these files from the stock ramdisk folder (that we got from stock recovery) to the new ramdisk folder (that we got from TWRP):
- default.prop
- fstab.devicename [if you can’t find this file, don’t forget to check out the /vendor/etc folder as well].
- ueventd.rc [you may check the ramdisk > system > etc folder for this file].
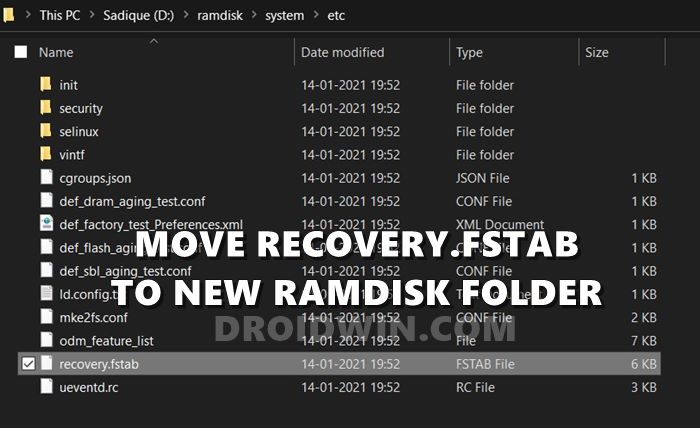
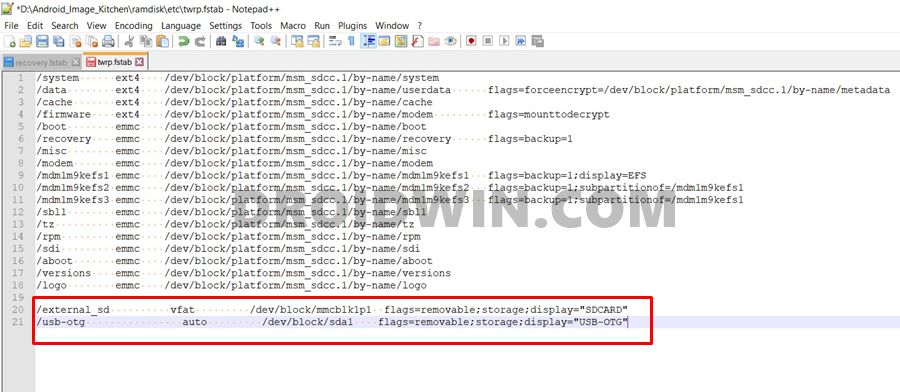
- Now copy the recovery.fstab file from stock ramdisk > system > etc folder and move it to new ramdisk > etc folder. Again, stock ramdisk is the folder that you got via stock recovery whereas the new ramdisk is linked to the TWRP recovery.
- Open both the recovery.fstab and twrp.fstab via Notepad++. Then edit the twrp.fstab file according to the newly pasted recovery.fstab.
- Make sure to replace”/sdcard” with “/external_sd” and “/usb” with “/usb-otg”. However, if you don’t find these partitions inside the fstab files, then manually add these lines:
/external_sd          vfat         /dev/block/mmcblk1p1  flags=removable;storage;display="SDCARD"
/usb-otg                auto         /dev/block/sda1    flags=removable;storage;display="USB-OTG"
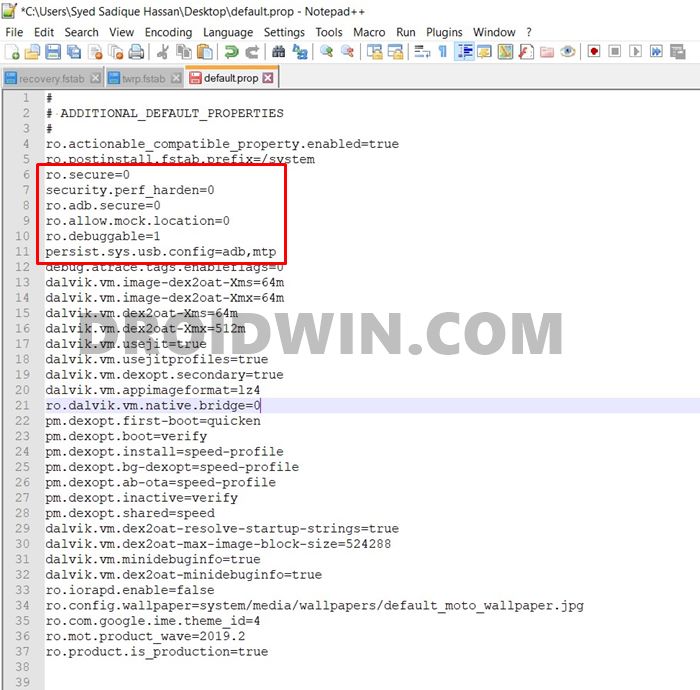
- Finally, open the default.prop file via Notepad++ and make the following changes:
ro.secure=0
ro.adb.secure=0
security.perf_harden=0
ro.debuggable=1
persist.sys.usb.config=adb,mtp
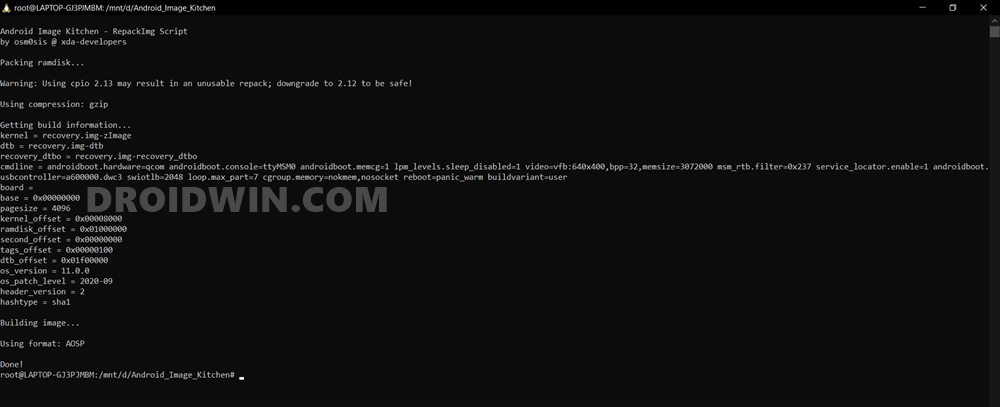
- Finally, it’s time to repack all these pieces of stuff. So come out of the ramdisk folder and inside the main Android Image Kitchen folder, open the Linux shell window (if you already have the previously opened one, continue in that only). Now type in the below command to repack all the files:
./repackimg.sh
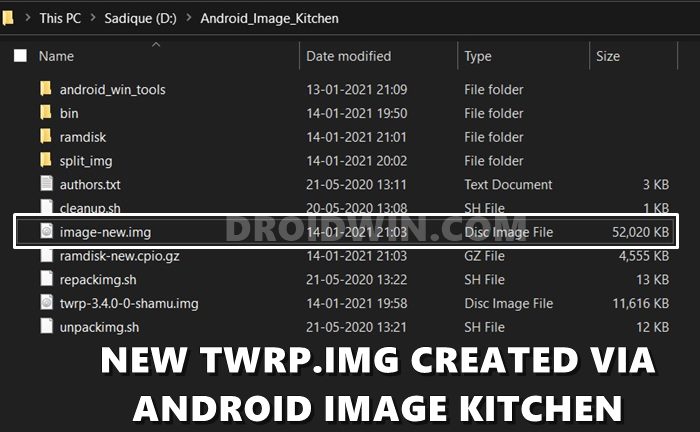
- The new TWRP will now be created inside the Android Image Kitchen folder and will be named as image-new.img.

That’s it. These were the steps to create and port TWRP Recovery for any Android device. You may flash it onto your device and reap the rewards. With that said, if you have any queries, do let us know in the comments section below. I will try my best to address all your queries in as much detail as possible.
- How to Replace LineageOS Recovery with TWRP
- Root Android 11 via Magisk Patched boot.img (without TWRP)
- How to Root Android Devices via TWRP Recovery
- How to Pass Magisk SafetyNet on Rooted Android 11
Other Useful TWRP Resources
- Now that you have created the TWRP Recovery for yourself, it’s time to flash it onto your device. For that, you may refer to our comprehensive guide: TWRP: fastboot flash vs fastboot boot: Which command to use.
- Then upon flashing the TWRP, if you end up in a bootloop, then refer to our guide: How to Fix Soft brick/Bootloop after installing TWRP Recovery
- Likewise, if you get unable to mount data partition error, or internal storage shows 0MB, then this guide will help you out: How to Fix TWRP 0MB Internal Memory Issue.


Mike
Will you make a guide for this process for Android 11 or Treble devices in which there is no separate recovery partition? My recovery partition is in the ramdisk of boot.img
guest4766
got stuck at step 4. So download the firmware for your device and region (corresponding to your current build number). ok…. from where?
Angelo
There is no recovery.img. But, there is only boot.img. They said that some phones put the recovery.img inside the boot.img. So, instead of unpacking my missing recovery.img, I unpack boot.img. This resulted to a ramdisk folder which is very different from the ramdisk folder of the twrp.img that I unpacked. How can i move on from this? Thank you.
Franklin Kelechi
It has a super partition scheme, so you need to unpack super.img before you get your recovery.img and system.img.
fortune
is it the recovery.fstab file? i cannot see .fstab file in system/etc
Gary
@Sadique Hassan
Thanks for this realy helpful article!
Have you had a chance to look into the requirements for adapting this tutorial for VAB devices?
Ethan
How do i get hold of the recovery.img? All the MIUI downloads ive tried do not have the image file in them. I cant find the file for the Redmi Note 10S.
next
hello sir can you make a guide for realme gt master edition A/B cuz i cant find the recovery.img anywhere ^^;
Adriaan Seunke
First of all: thank you so much for this tutorial. Actually, all your tutorials are written very clear.
Unfortunately I ran into a problem with Ubuntu root access in the AIK Linux folder.
The password i enter is correct but I get a message: “su: Authentication failure”
First time for me working with Ubuntu
Could you help me with this?
Ayush
im Stuck AT 10 Point ABove,
__Open both the recovery.fstab and twrp.fstab via Notepad++. Then edit the twrp.fstab file according to the newly pasted recovery.fstab.
Do i need to copy all data from recovery* to twrp*
🙏Thaenks FOr POST Thou!!!
JS
Hi,
Thanks for publishing this!
Compared to compiling TWRP from scratch this is very simple. So simple in fact I can’t believe it. Will this work for any device? For any Android version? More specifically: will this work for a Galaxy Xcover 5?
Regards,
JS
Nexus
Hello. First of all, thank you for posting a useful comment. You’ve been a great help.
I am trying to port TWRP to the Xiaomi Mi 11 Pro device. By the way, due to its built-in Android 11 and VAB Partition structure, the device requires more complex port processes than described in this article. If possible, it would be very helpful if you could leave a porting guide that can be applied to the latest model(with android 11 and VAB such as Mi 11). Thank you so much.
Sadique Hassan
Thank you so much Nexus for the encouraging words. As soon as I get time, will surely look into it. Unfortunately, I cannot promise you the timline for the same.
Amal
Thanks a lot !
Altough i know a bit about sorting custom roms i was having trouble with porting twrp but now works flawlessly. Thank you so much luv you❤️
Sadique Hassan
Thanks a lot mate for the appreciation.
Amal
Porting , not sorting (blame auto correct)
Rifqi
So is this for Qualcomn device only? does MTK device have different way?
Lester
my device is android 4.3 msm8610 and 1024×768 screen resolution and it doesn’t work for me i already tried this method multiple times with different versions of twrp for nexus 7 2013 old and new and other devices with msm8610 chip but when i boot the ported twrp.img on fastboot it just flashes white for a split second and the screen goes black but adb somehow detects it as device but only reboot command works
Yadav K
Hi can you create new post for creating recovery for VAB partitions, it will be really helpful
Sadique Hassan
Yup, Virtual A/B is in my mind for quite some time. Will definitely look into it.
Akshay Shinde
so how about porting pe recovery from lineage os recovery they must be very identical .coz its just a skin on top so what factor should i consider similar display resolution pe recovery or same processor recovery made for other devices by pe .can i use sd 675 pe recovery to port from sd660 lineage os recovery
Akshay Shinde
Hello I want to port pixel experience recovery for redmi note 7 lavender .so porting twrp seems easy but i have no clue how to port pe recovery . i asked in pe community and they said start from scratch ie .download all source codes and binaries etc .and im just a beginner so no clue .i even dont know how to use make command in linux . so how can i port into pe recovery
Sadique Hassan
Hi Akshay, as of now, I haven’t got into the LineageOS Recovery source code and all that stuffs. Anyways, why aren’t you using TWRP, is there something that Lineage Recovery could do for your device that TWRP isn’t able to do?
shadirvan
hi there i couldn’t find the fstap file . i searched everywhere. i am porting twrp for samsung galaxy A9 2018
Sadique Hassan
Hi Shadirvan, did you mean the fstab file?
thomas
yes at least for me, I can find some of the files like fstab..it is not created
Semaxien
Hello, for me the .fstab file was not created in the ramdisk > system > etc folder but in ramdisk > etc. I think your fstab file is also created there