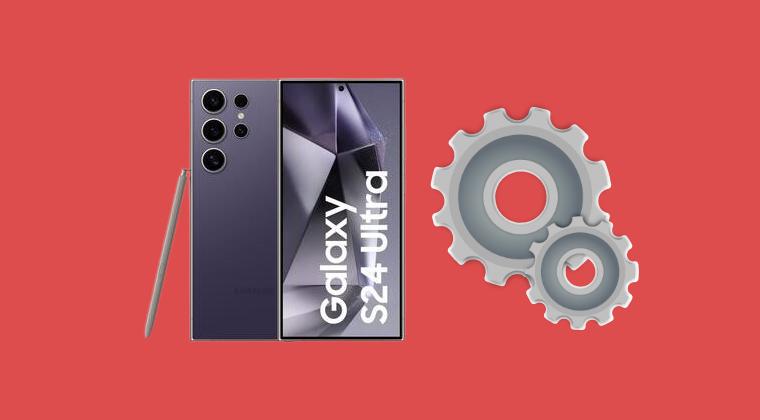
In this guide, we will show you the steps to unlock the bootloader on Galaxy S24/Plus/Ultra devices. The three new additions to the Galaxy series bring in a slew of noteworthy goodies, a power-packed specs sheet, an impressive camera, and tons of nifty AI features. While these may be enough for the generic users, but for the tech enthusiasts, there’s an entire domain left to be explored.
From gaining administrative privileges to welcoming abode tons of mods, from flashing custom kernels to installing a custom recovery, or trying out popular custom ROMs like Dr Ketan, the possibilities stand endless. However, before you can carry out any of these tasks, there’s an important prerequisite that you need to checkmark off the list- the bootloader on your Galaxy S24/Plus/Ultra needs to be unlocked. And in this guide, we will show you how to do just that. Follow along.
Table of Contents
Benefits and Risks of Unlock Bootloader
Unlocking the bootloader is the gateway to extracting the maximum benefits of Android’s open-source ecosystem. For example, you will be able to install a custom ROM or flash a custom recovery like TWRP. Likewise, you will also be able to get access to the system partition as well as administrative privileges by rooting your device via Magisk. This will then allow you to flash Magisk Modules, Xposed Framework, Substratum Themes, Viper4Android, etc.
However, carrying out these tweaks brings in a few uninvited risks as well. To begin with, it will wipe off all the data and could nullify the device’s warranty. Along the same lines, it will trip the Knox counter, thereby apps like Samsung Pay and Secure Folder might not function. The SafetyNet and Play will be triggered [FIXED], and Play Integrity will fail [FIXED] thereby preventing you from using banking apps [FIXED]. So if that’s well and good then let’s get started with the steps to unlock the bootloader on Galaxy S24/Plus/Ultra.
How to Unlock Bootloader on Samsung Galaxy S24/Plus/Ultra
The below process will wipe off all the data, so take a complete device backup beforehand. Droidwin and its members wouldn’t be held responsible in case of a thermonuclear war, your alarm doesn’t wake you up, or if anything happens to your device and data by performing the below steps.
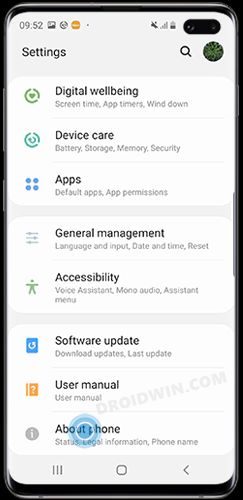
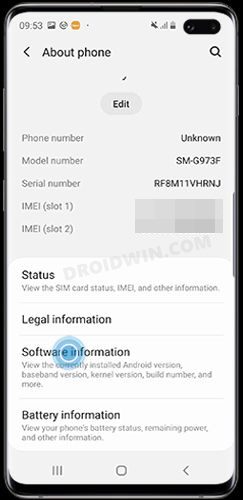
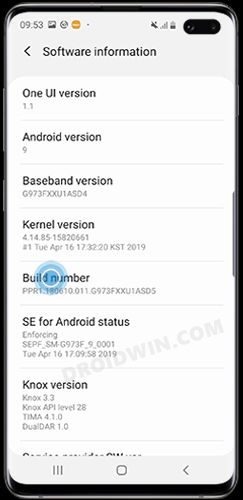
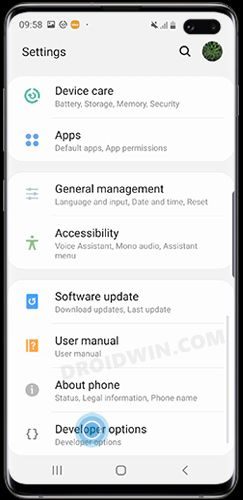
STEP 1: Enable Developer Options on Galaxy S24/Plus/Ultra
- Head over to Settings > About Phone.

- Then go to Software information.
- Now tap on Build Number 7 times.
- You will get a toast message “You’re now a developer”.
- This signifies that the Developer Option has been enabled.
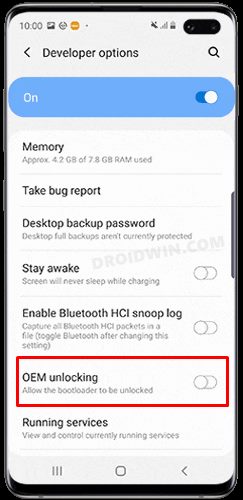
STEP 2: Enable OEM Unlock on Galaxy S24/Plus/Ultra
- Head over to Settings >Developer options.
- Then enable the toggle next to OEM Unlocking.
- Tap YES/Turn On in the confirmation dialog box.
STEP 3: Boot S24/Plus/Ultra to Download Mode
- Start by powering off your device,
- Then press and hold Vol Up + Vol Down together and connect your device to the PC via a USB cable.
- As soon as you see the Warning message on your device, release the pressed keys.
- Finally, press the Volume Up key once and your device will be booted to Download Mode.

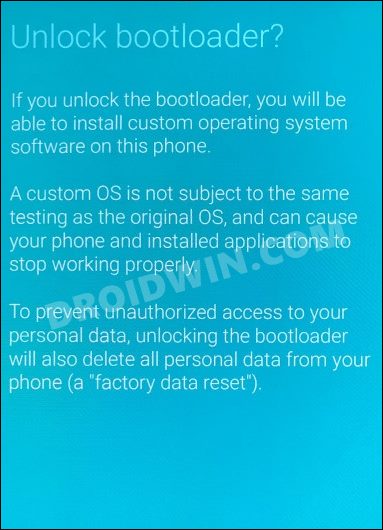
STEP 4: Unlock Bootloader on S24/Plus/Ultra
- As of now, your device will be booted to Download Mode.
- So press and hold the Volume Up key for a few seconds.
- This will take you to the Device unlock mode.
- You will now get a confirmation message whether you are sure to proceed ahead.
- So use the Volume Up button to reply to the affirmation.
- It will now wipe all the data on your device and subsequently unlock the bootloader.
- Once that is done, your device should then automatically boot up to the OS.
STEP 5: Bypass VaultKeeper on Galaxy S24/Plus/Ultra
- You will now have to notify the Vaultkeeper that you unlocked the device’s bootloader.
- To do so, connect your device to the internet.
- Then go to Settings and enable Developer Options as mentioned in STEP 1.
- Likewise, make sure that the OEM unlocking toggle is turned on as well.
That’s it. These were the steps to unlock the bootloader on Galaxy S24/Plus/Ultra. If you have any queries concerning the aforementioned steps, do let us know in the comments. We will get back to you with a solution at the earliest.


Jay
I’m missing the oem unlocking setting, I’m in north America and I got my s24 plus yesterday pls help