In this tutorial, we will show you how to root your OnePlus Nord device using TWRP Recovery. The Chinese OEM is always known to provide feature-rich devices at an affordable price. However, with its recent flagships, doubts were beginning to creep in as to whether the OEM is slowly moving away from its USP. But the Nord variant has put all such doubts to rest. There are quite a few reasons through which we could justify this claim.
OTHER ONEPLUS NORD ARTICLES
- Install TWRP Recovery on OnePlus Nord
- How to Root OnePlus Nord without TWRP (using Patched Boot file)
- How to Unlock the Bootloader on OnePlus Nord
To begin with, the 6.44 inches screen has a 1080 x 2400 pixel resolution and a 90Hz refresh rate. Under the hood, you get an octa-core Qualcomm SDM765 Snapdragon 765G chipset with Adreno 620 as the GPU. Out of the box you get OnePlus’ own customized skin dubbed as OxygenOS10, based on Android 10. The quad rear camera setup (48+8+5+2) manages to take some pretty decent clicks and the dual front camera (32+8) also does complete justice to this device. To support all these, you get a 4115 mAh battery that will be sufficient to make the device last an entire day, if not the 30W fast charging will come in handy.
However, these are just the beginning. There is a large area of uncharted territory that you could explore. All that is needed is an unlocked bootloader and the ability to gain administrative privilege aka root. Here, in this guide, we will help you achieve just that. For that unaware, you could root your device either via TWRP or without TWRP (using patched boot.img file). Let’s check out the need and advantages associated with the rooting method via TWRP. After this, we will list out the steps to root your device via TWRP. Follow along.
Table of Contents
Why Root OnePlus Nord via TWRP Recovery?
To put it in simplest terms, rooting via TWRP only requires a couple of steps at max. On the other hand, if you prefer to root your device without TWRP, then you will have to first off all get your hands on stock boot.img.
This is no easy task in itself, considering that all the major files now come pre-bundled in the payload.bin. So first of all, you will have to extract the payload.bin file (READ: How to Extract payload.bin and get stock boot image file), then get hold of the stock boot.img file, then patch it via Magisk and finally flash it via Fastboot commands.
Phew! That requires way too many steps and efforts as well. This is the reason why many users prefer to root their devices via TWRP Recovery. The only requirement is a working TWRP Recovery, and the good news in OnePlus Nord already has one. So with that said, here are the required instructions to root your device via TWRP Recovery.
How to Root OnePlus Nord using TWRP Recovery
To begin with, we would like to give credits to XDA Recognized Developer mauronofrio for the TWRP build for OnePlus Nord. On that note, here are all the feature list and the bugs list associated with this TWRP build.
What’s Working
– TWRP boots normally
– Decryption works
– Rom flashing should workNot Working
– Format data is broken
– Still in Testing Phase, so you might face some stability issues. Anyways, it still quite a commendable job on the part of the developer to release the TWRP at such an early stage.Also, don’t forget to check out the Concluding Remarks section at the end. It holds some pretty important notes related to TWRP, root and OnePlus Nord.
With that said, here are the required instruction steps to root OnePlus Nord using TWRP Recovery. The steps are broken down into separate sections, for the ease of understanding.
TWRP GUIDES
- How to Install OTA Updates in Rooted Android Device
- How to Permanently Install TWRP without TWRP ZIP File (only using TWRP.img file)
- Root Android Devices Without TWRP Recovery
- How to Fix TWRP Error 7 (While Flashing Custom ROM via TWRP)
STEP 1: Download the Required Files
There are a few files that you need to download onto your PC.
- The first one is the Android SDK Platform Tool. Download and install onto your PC as it will supply it with necessary ADB and Fastboot binaries.
- Next up, download the Unofficial TWRP for OnePlus Nord [RECOVERY][3.4.0-0][avicii]: Download Link.
- Download the Magisk Installer ZIP file and transfer it to your device.
STEP 2: Unlock Bootloader
You will also have to unlock your device’s bootloader. For that, refer to our guide on How to Unlock the Bootloader on OnePlus Nord
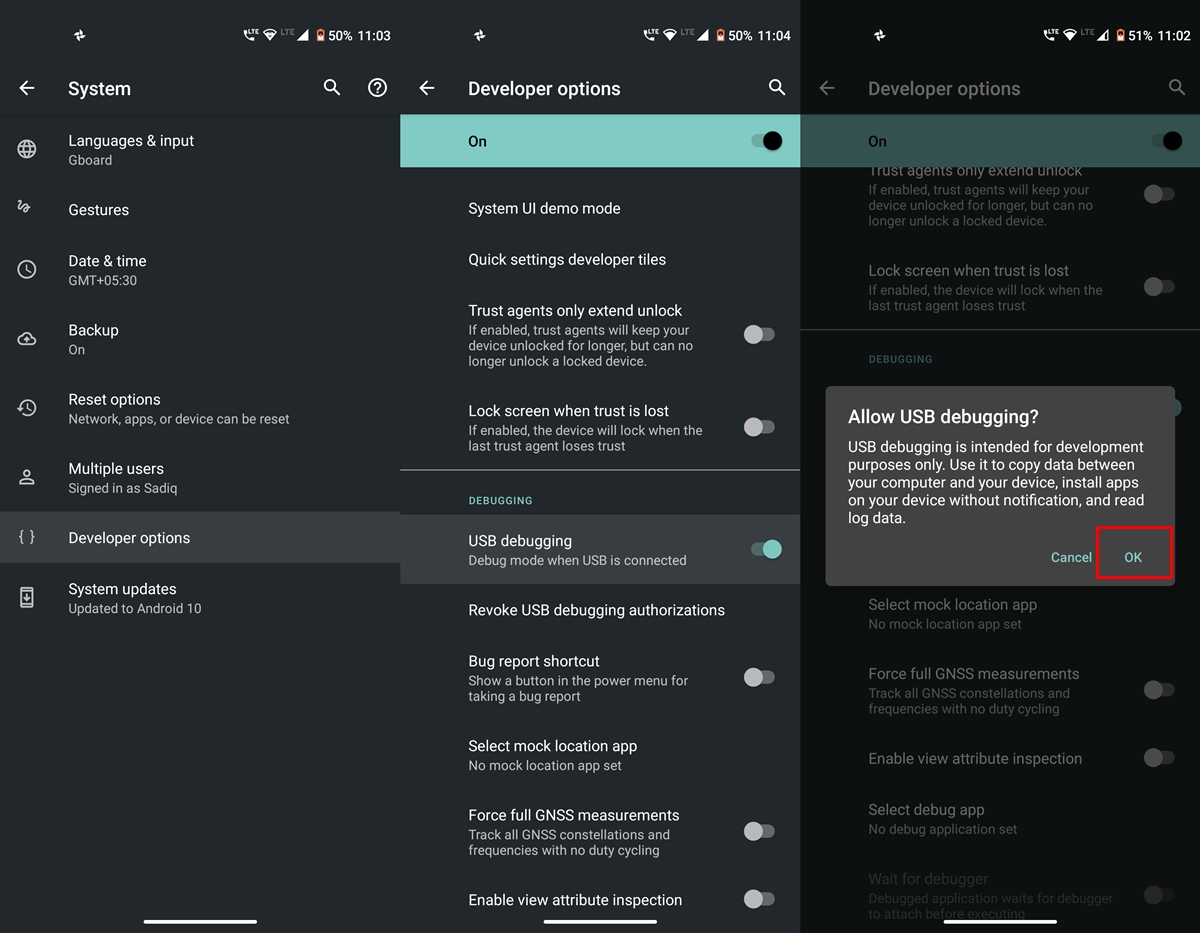
STEP 3: Enable USB Debugging
Next up, you will have to enable USB Debugging on your Nord device. For that, head over to Settings > About Phone > Tap on Build Number 7 times > Go back to Settings > System > Advanced > Developer Options > Enable USB Debugging. This is needed so that your device gets recognized in the ADB mode, which in turn will be needed to boot your device to Fastboot or Bootloader Mode.
STEP 4: Rename and Transfer TWRP
Once you have downloaded the recovery, rename it to twrp. Since it is an image file, the complete name will hence be twrp.img. Now transfer this file inside the ADB folder, i.e. platform-tools folder.
STEP 5: Boot your OnePlus Nord to TWRP Recovery
- Connect your device to PC via USB Cable. Make sure USB Debugging has been enabled
- Head over to the platform-tools folder and type in CMD in the address bar. This will launch the Command Prompt.

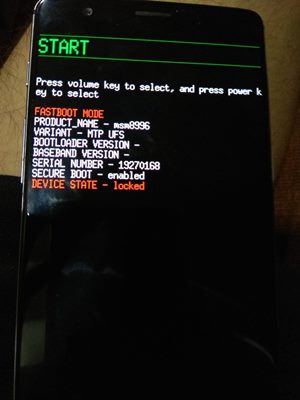
- Inside this CMD window, execute the below command to boot your device to Fastboot Mode:
adb reboot bootloader
Fastboot Mode on OnePlus. Credits: OnePlus Forum - Once that is done, type in the below command to boot your device to TWRP. Make sure that you have renamed the recovery to twrp (complete name- twrp.img):
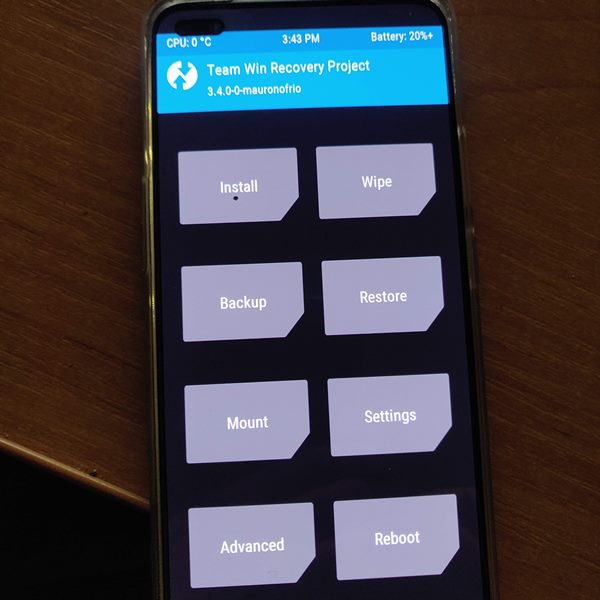
fastboot boot twrp.img
- Your device will now boot to TWRP Recovery. Move over to the below instructions to flash Magisk and hence root your OnePlus Nord via TWRP Recovery.
Featured Image’s TWRP pic and this Image Credits: Tracker31 (XDA)

MAGISK GUIDES
- [GUIDE] Flash ROMs/Magisk/TWRP/Kernels on A/B Partition Devices
- Everything About Magisk- Manager, Modules and More
- Best Magisk Modules of 2020 [PART-1]
- [3 METHODS] Unroot any Android Device-Uninstall Magisk
STEP 6: Flash Magisk and Root OnePlus Nord via TWRP
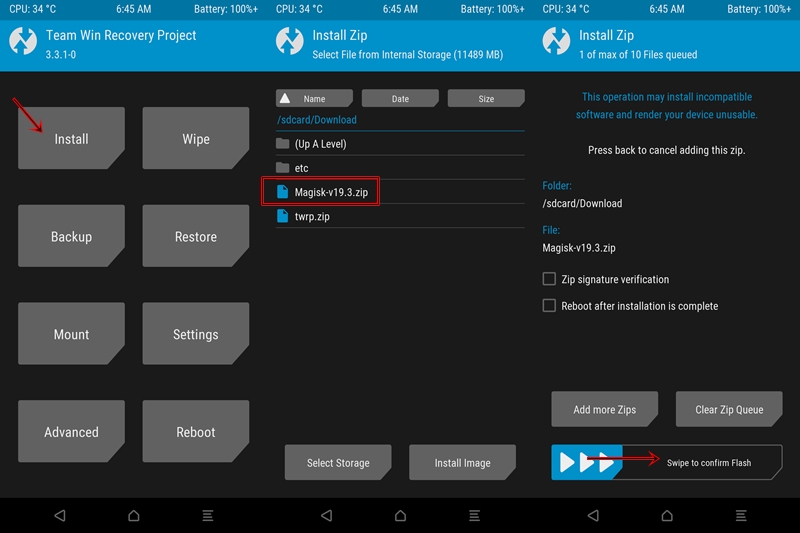
- Head over to Install and select the Magisk ZIP file that you have transferred onto your device in STEP 1.
- Perform a right swipe to flash this file. The entire process should only take a few seconds.
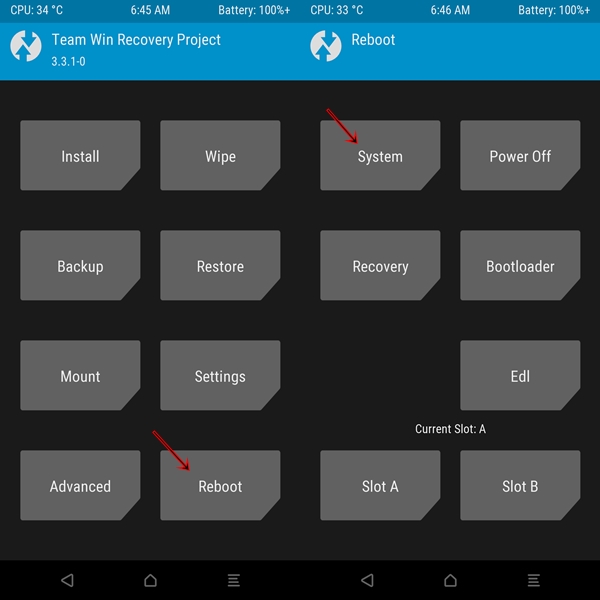
Sample Screenshot - After this, you may head back to the TWRP home screen, go to Reboot and select System. This will boot your device to the Android OS, with root!
Concluding Remarks
So this was all from this guide on how to root OnePlus Nord using TWRP Recovery. If you have any issues with respect to any of the aforementioned steps, do let us know in the comments section below. Furthermore, the TWRP could only temporarily booted to your device as of now.
The permanent flashing isn’t possible at the time of writing. By this, we mean at the next boot, the TWRP Recovery will be replaced with stock recovery (but you wouldn’t lose root). Talking about its workaround, the first and obvious one involves booting your device to TWRP from the platform-tools folder every time you require this custom recovery. However, for that, you will require your PC, which isn’t an ideal scenario every time for many of us.
The second route involves using apps like Flashify through which you could easily flash all the ZIP, Recovery, and Boot image file. This is an easier route and you should go for this option as of now. The requirement with this app is of a rooted device and since you have already obtained root on your Nord device, so there should be no issues as such. Rounding off, we will update this guide as and when there are updates to this recovery. or the TWRP.ZIP file becomes available.
ANDROID TIPS AND TRICKS
- How to Disable Screenshot Captured Notification and Sound without Root
- How to Watch Netflix in HD on Rooted Devices ( Get Widevine L1 Support )
- Enable USB Debugging on a Broken Android Device’s Screen? Here’s a Workaround
- How to Go Back to Stock ROM from GSI ROM (All Android Devices)


