In this guide, we will show you the steps to unlock the bootloader on your Nothing Phone 2. Making yourself stand out from the crowd of popular OEMs is no easy task, however, Nothing managed to do just that with relative ease, thanks to its underlying software skin and the back LED lights which beholds a slew of intriguing features. And that’s not it. The first iteration of this device was among the most active players in custom development.
And we expect the second one to be no different either. So sooner than later, you would be able to welcome a plethora of custom ROMs, install a custom recovery and even gain administrative access by rooting your device. However, before you could carry out any of these tasks, you’ll have to unlock the bootloader on your Nothing Phone 2. And in this guide, we will show you how to do just that.
Table of Contents
Benefits and Risks of Bootloader Unlocking
Unlocking the bootloader is the gateway to extracting the maximum benefits of Android’s open-source ecosystem. For example, you will be able to install a custom ROM or flash a custom recovery like TWRP. Likewise, you will also be able to get access to the system partition as well as administrative privileges by rooting your device via Magisk. This will then allow you to flash Magisk Modules, LSPosed Framework, Substratum Themes, and Viper4Android, etc.
However, carrying out these tweaks brings in a few uninvited risks as well. To begin with, it will wipe off all the data and could nullify the device’s warranty as well. Along the same lines, it will degrade the Widevine L1 certification to L3, thereby preventing you from streaming content in HD [FIXED]. The SafetyNet will be triggered as well [FIXED], thereby preventing you from using banking apps [FIXED]. So if that’s well and good then let’s get started with the steps.
How to Unlock Bootloader on Nothing Phone 2
The below process will wipe off all the data from your device and “might” nullify its warranty. So please take a complete device backup beforehand. Droidwin and its members wouldn’t be held responsible in case of a thermonuclear war, your alarm doesn’t wake you up, or if anything happens to your device and data by performing the below steps.
STEP 1: Install Android SDK

First and foremost, you will have to install the Android SDK Platform Tools on your PC. This is the official ADB and Fastboot binary provided by Google and is the only recommended one. So download it and then extract it to any convenient location on your PC. Doing so will give you the platform-tools folder, which will be used throughout this guide.
STEP 2: Enable USB Debugging and OEM Unlocking
Next up, you will have to enable USB Debugging and OEM Unlocking on your device. The former will make your device recognizable by the PC in ADB mode. This will then allow you to boot your device to Fastboot Mode. On the other hand, OEM Unlocking is required to carry out the bootloader unlocking process.
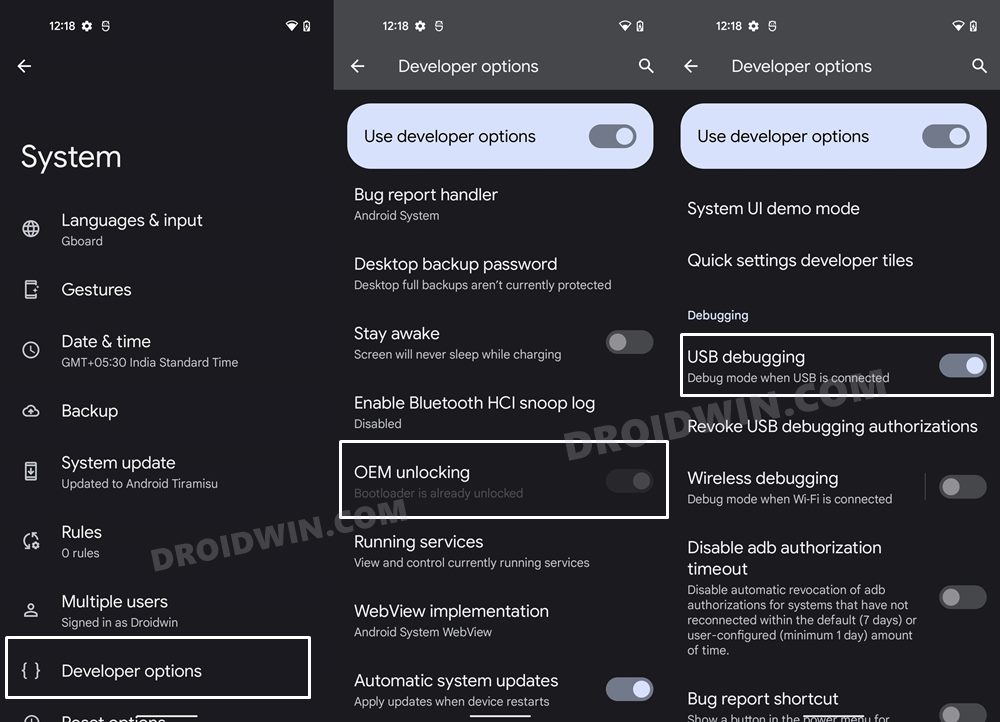
So head over to Settings > About Phone > Tap on Build Number 7 times > Go back to Settings > System > Advanced > Developer Options > Enable USB Debugging and OEM Unlocking.
STEP 3: Boot Nothing Phone 2 to Fastboot Mode
- Connect your device to the PC via USB cable. Make sure USB Debugging is enabled.
- Then head over to the platform-tools folder, type in CMD in the address bar, and hit Enter. This will launch the Command Prompt.

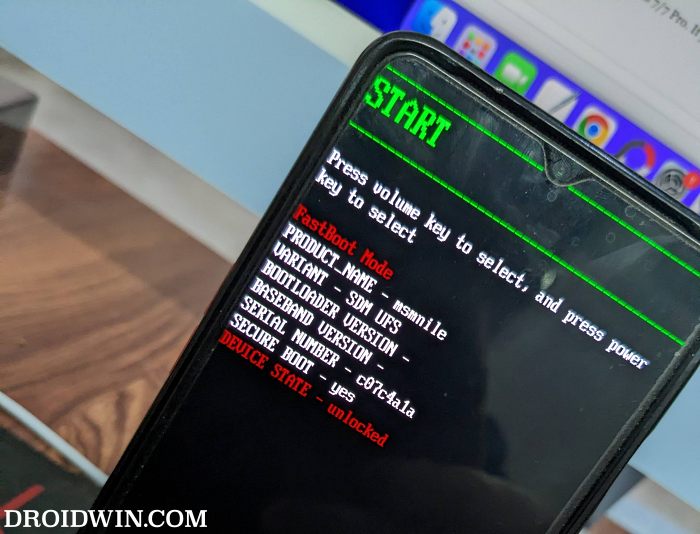
- Type in the following command in the CMD window to boot your device to Fastboot Mode
adb reboot bootloader

Reference Image - Now type in the below command to verify the Fastboot Connection
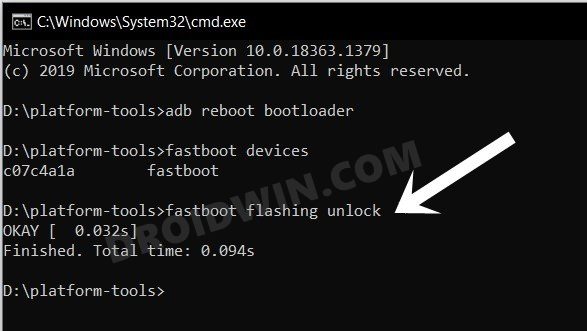
fastboot devices

- If you get a device ID followed by the fastboot keyword, then the connection stands successful.
- If that is not the case, then please install Fastboot Drivers onto your PC.
STEP 4: Unlock the Bootloader on Nothing Phone 2
- Type in the below command in the CMD window that is opened inside the platform-tools
fastboot flashing unlock

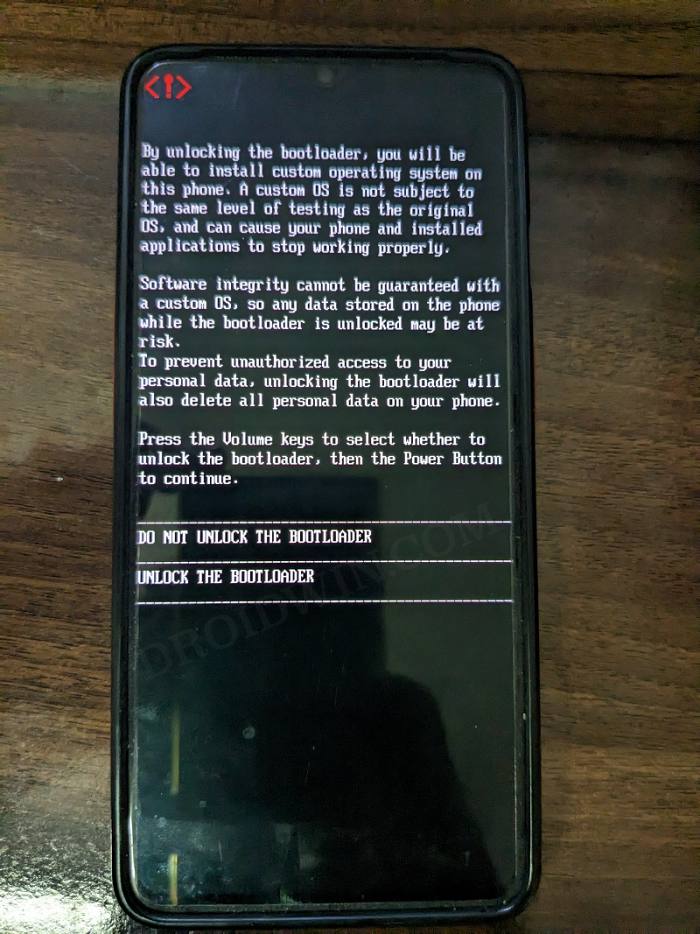
- At this point in time, you will get a confirmation message on your device. Use the Volume keys to select the Unlock the Bootloader option and hit the Power key to confirm it.

- The device will undergo a reset and then the bootloader will be unlocked. Do keep in mind that the first boot might take up to a minute, this is completely normal.
- Furthermore, you will have to log in to Google ID and set up your device from scratch, since a wipe has taken place.
That’s it. These were the steps to unlock the bootloader on Nothing Phone 2. If you have any queries concerning the aforementioned steps, do let us know in the comments. We will get back to you with a solution at the earliest.
How to Unlock Critical Partitions in Nothing Phone 2
While unlocking the bootloader will open the gateway for flashing custom ROMs, however, if you ever plan on flashing individual partition files via Fastboot Commands [such as flashing the boot.img], then you will have to unlock the device’s critical partition as well. As before, the process will reset your device and might nullify the warranty, so exercise caution.
- To begin with, boot your device to Fastboot Mode, as explained above.
- Then execute the below command to unlock the critical partitions on your device
fastboot flashing unlock_critical
- You might now get a confirmation message on your device.
- Use the Volume keys to select the Unlock the Bootloader option and hit the Power key to confirm it.
- Finally, execute the below command to boot your device to the OS
fastboot reboot
- That’s it. The bootloader as well as the critical partitions on your Nothing Phone 2 is now unlocked.






Ash
Hello, thanks for the article . But even after unlocking the boot loader and when the mobile restarts it again asks for Indian sim authentication. And only after I’m done with this I’m able to insert any country sim .. how to completely unlock this option .
Thanks again