In this guide, we will show you various methods to enable Call Recording on your OnePlus 12. The newest addition to the OnePlus family brings a slew of noteworthy goodies, a power-packed specs sheet, and tons of intriguing features to the fore. If we talk about the software side, then it beholds the latest ColorOS 14 based on Android 14 in China and OxygenOS 14 in the rest of the world. And this region’s bifurcation has quite a few implications.
Apart from the region lock issue that many are facing, you might have to bid adieu to certain features depending on the country in which you are currently living. Among them, the Call Recording is one such feature that users crave for the most. If you are also in the same boat, then this guide will make you aware of numerous workarounds through which you could enable Call Recording on your OnePlus 12. So without further ado, let’s check them out.
Table of Contents
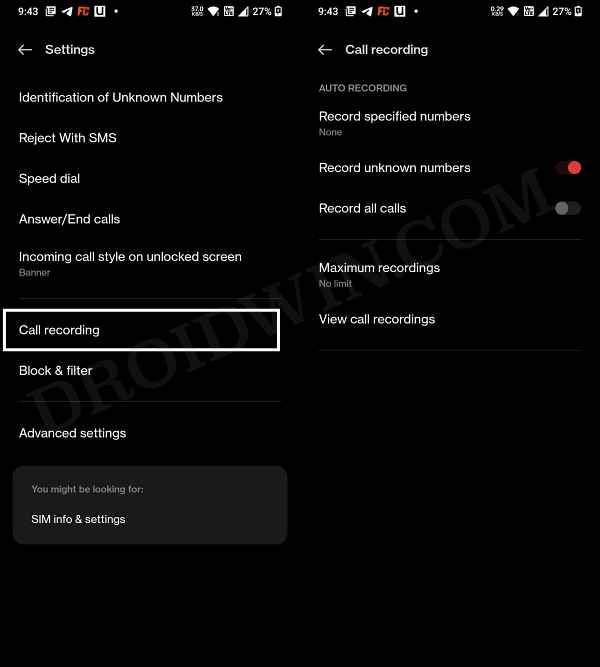
How to Enable Call Recording on OnePlus 12
There are eight different methods of carrying out the aforementioned task, some require root whereas others are non-root [method 2 comes with the highest success rate]. Check for the legality of this feature in your region and proceed ahead only if you are authorized to do so. Droidwin and its members wouldn’t be held responsible in case of a thermonuclear war, your alarm doesn’t wake you up, or if anything happens to your device and data by performing the below steps.
Method 1: Enable Call Recording on OnePlus 12 via ADB Command (Non-Root)
- To begin with, download and install the Android SDK Platform Tools on your PC.
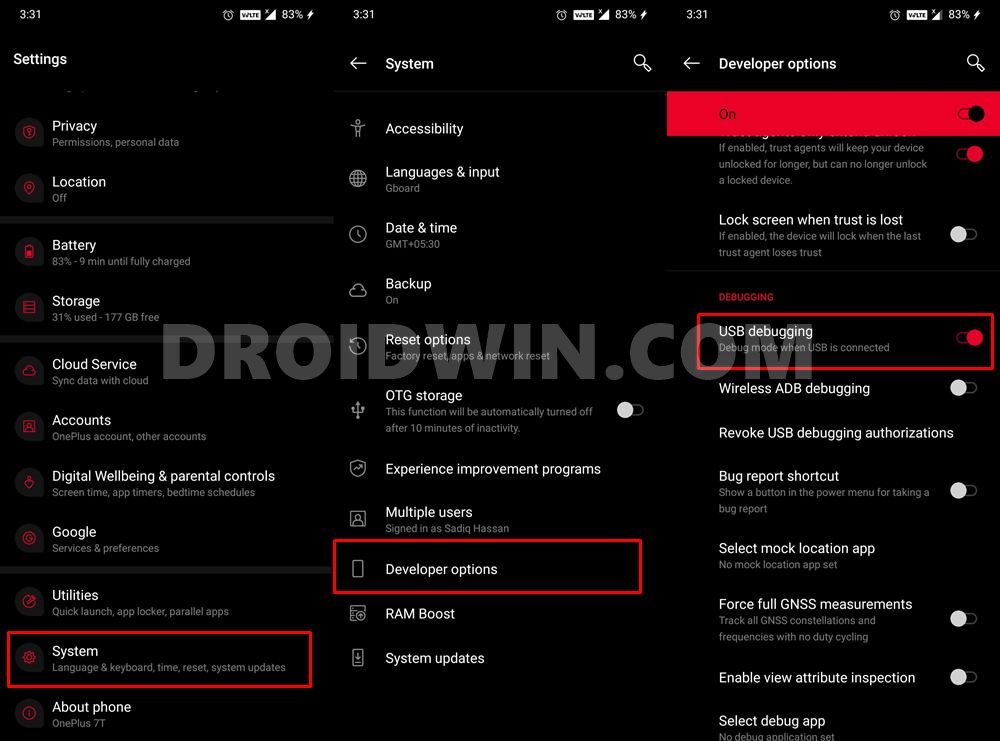
- Then enable USB Debugging on your device as well. For that, go to Settings > About Phone > Tap on Build Number 7 times > Go back to Settings > System > Developer Options > Enable USB Debugging and OEM Unlocking.

- Now connect your device to the PC via USB cable.
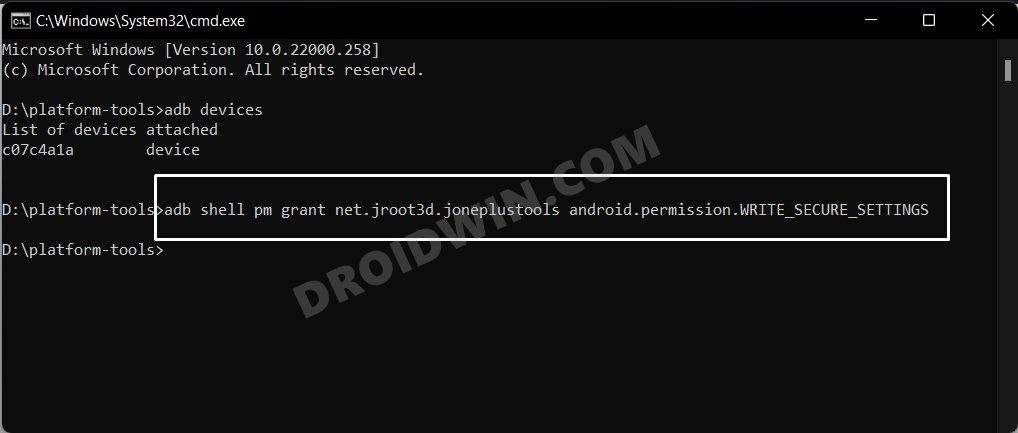
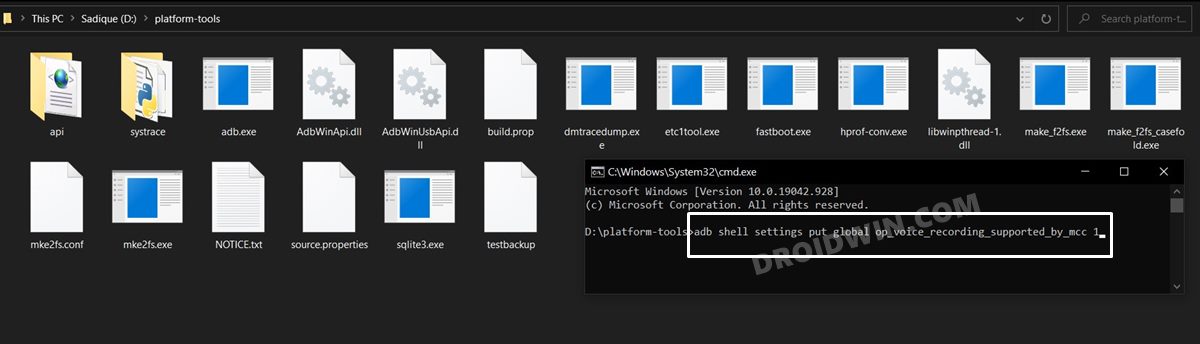
- Head over to the platform-tools folder, type in CMD in the address bar, and hit Enter. This will launch the Command Prompt.
- Finally, execute the ADB below command to enable the call recorder on your OnePlus device:
adb shell settings put global op_voice_recording_supported_by_mcc 1
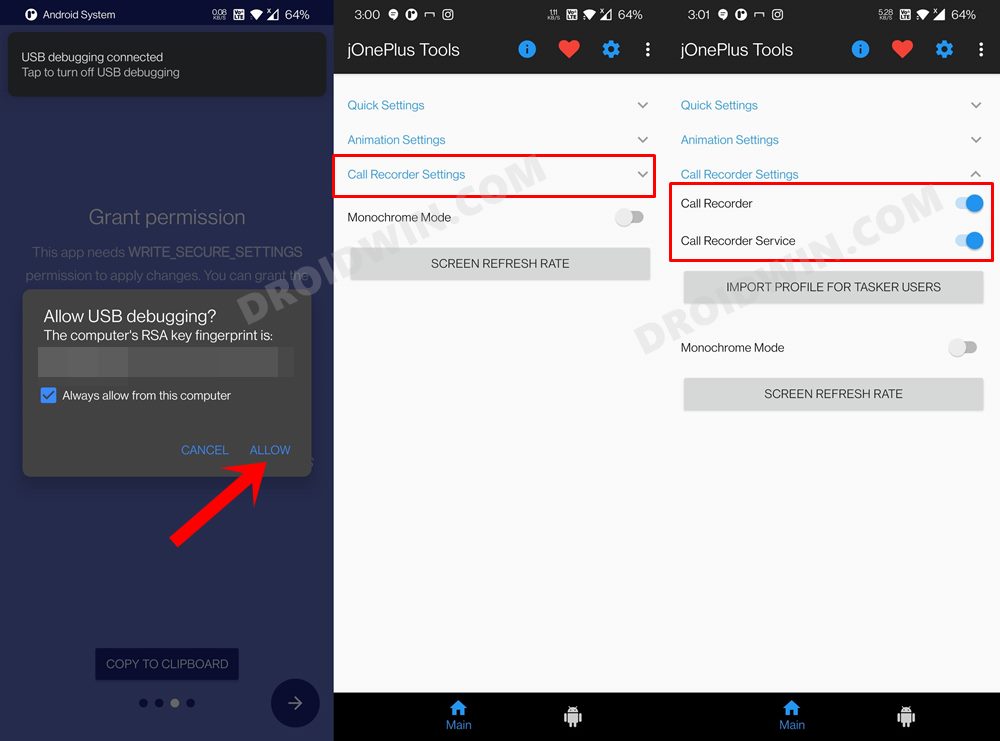
- If you get a prompt on your device, make sure to tap Allow. With this, the call recording has been enabled, but at this stage, it is still temporary and wouldn’t be able to survive a reboot.
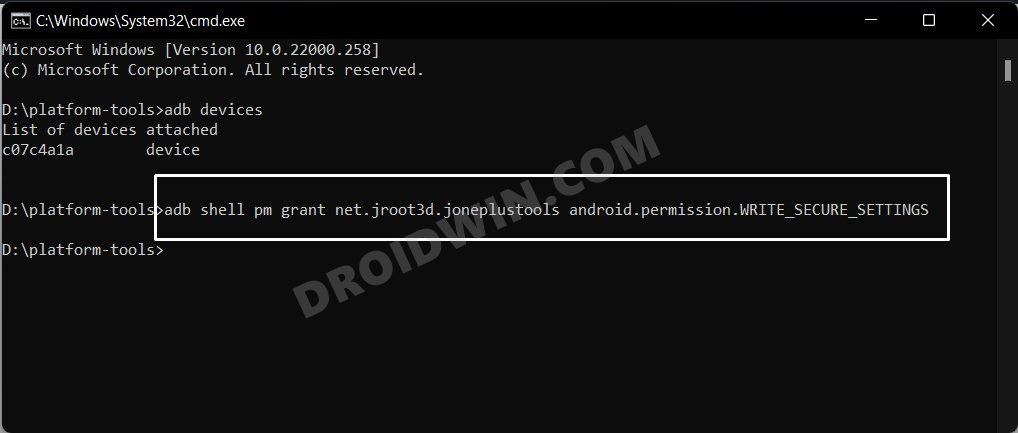
- So to make the Call Recording a permanent feature on your device, head over to the Play Store and install the jOnePlus Tools app.
- Then execute the below commands in the CMD window to give the app the required permission to force start the call recording feature:
adb shell pm grant net.jroot3d.joneplustools android.permission.WRITE_SECURE_SETTINGS
- On Android 12+/OxygenOS 12+ versions, you might get the “Exception occurred while executing grant” error after executing the above command. So refer to this guide to fix it.
- Moving on, now launch the app, expand the Call Recorder Settings and enable the Call Recorder and the Call Recorder Service toggles.
- That’s it. You have now successfully enabled the Call Recorder feature on your OnePlus 12 which shall survive after a reboot as well.


Method 2: Enable Call Recording on OnePlus 12 using Google Dialer Mod [Root]
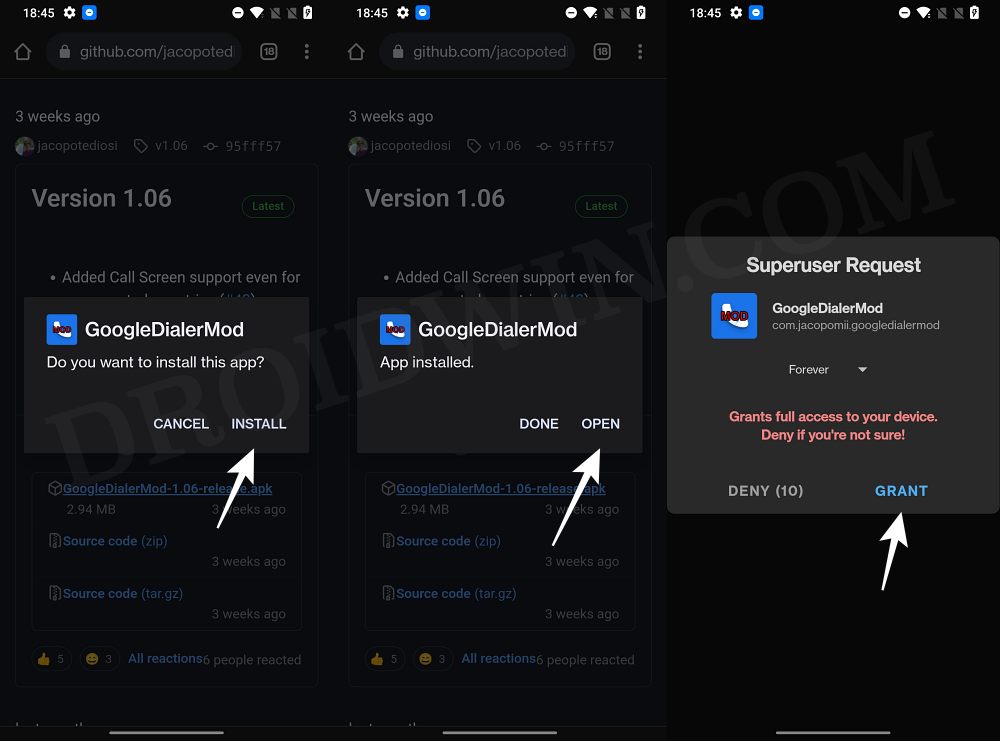
- Download and install the Phone by Google App from Play Store.
- Then download and install the Google Dialer Mod from GitHub.
- Now launch the mod and tap on Grant in the Magisk pop-up.
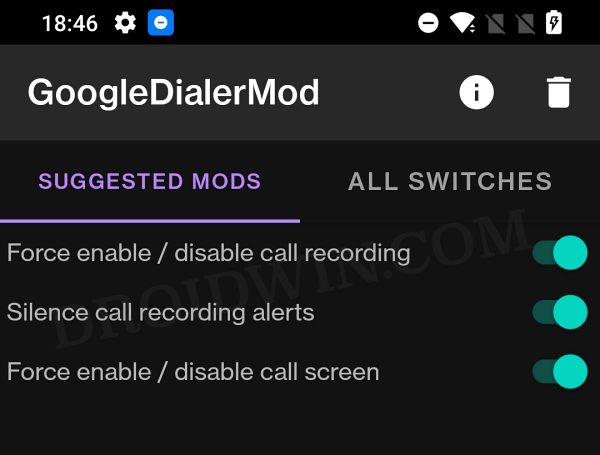
- After that, enable the toggle next to the following two mods:
Force enable/disable call recording
Silence Call Recordings Alerts
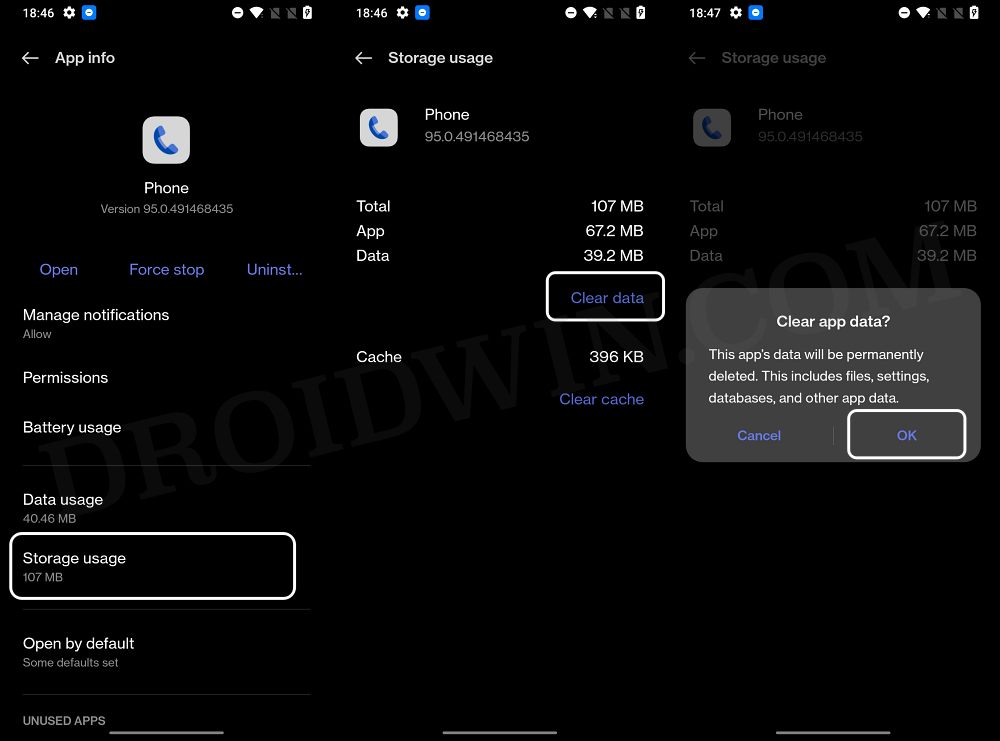
- Once done go to Settings > Apps and select Google Phone.
- Then go to it Storage section and tap on Delete Data > OK.
- Once done, hit Force Stop > OK.
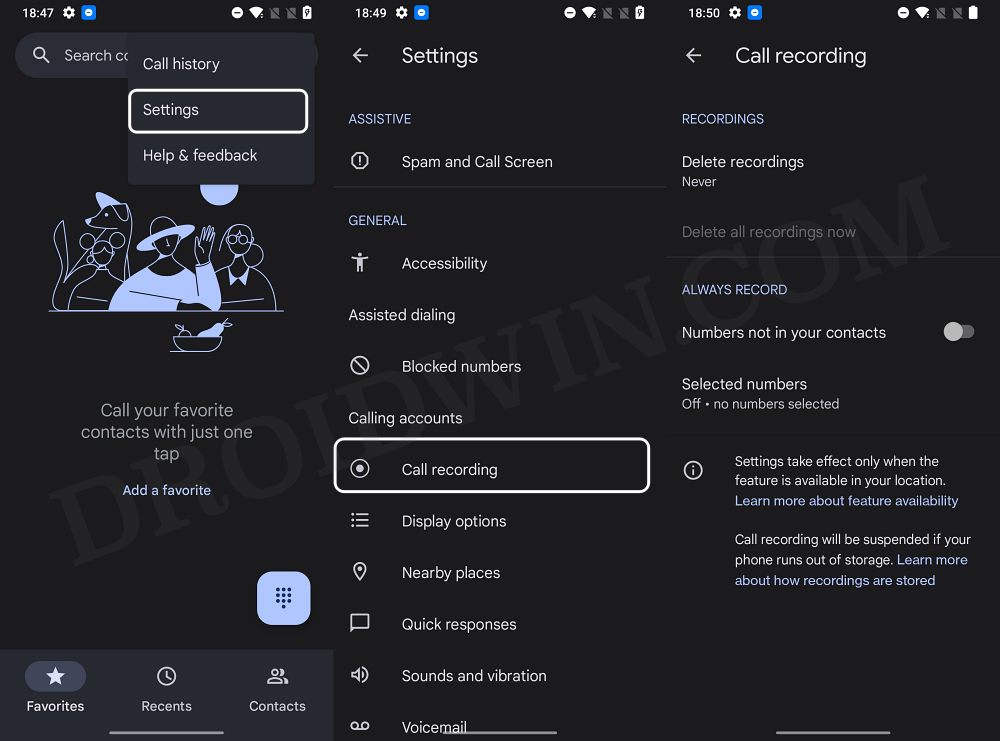
- Now launch Google Phone, tap on the overflow icon, and select Settings.
- You should now see Call Recording under Calling Features!
- If the Call Recording feature is still absent, then Delete Data > Force Stop > launch Google Phone [do this around 3-4 times] and you should see the record option [refer to the video above for more details on this subject].

Method 3: Enable Call Recording on OnePlus 12 Using OnePlus Dialer APK [Non-Root]
[This workaround only works on Indian firmware]
- Download and install this OnePlus Dialer APK onto your device.
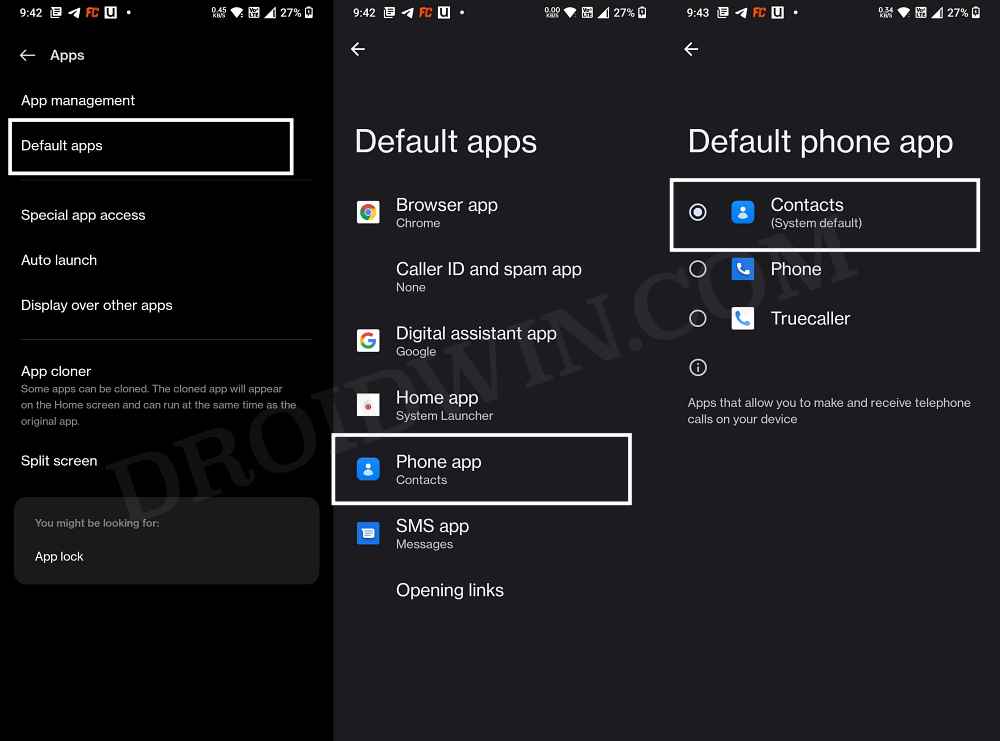
- Then go to Settings > Apps > Default Apps > Phone app.
- Now select the Contacts app that you have just installed.
- Once done, launch the OnePlus Dialer app and go to Settings.
- Then go to Call recording and customize the settings accordingly.
- After that, download and exract the Android SDK Platform Tools on your PC.
- Then enable USB Debugging on your device and connect it to PC via USB cable.
- Then Command Prompt inside the platform-tools folder.
- Finally, execute the ADB below command to enable the call recorder on your OnePlus device:
adb shell settings put global op_voice_recording_supported_by_mcc 1
- If you get a prompt on your device, make sure to tap Allow. That’s it. Call Recording is now enabled on your OnePlus 12.

Method 4: Enable Call Recording on OnePlus 12 Using Phone_InCallUI.apk
- To begin with, download and install this Phone Dialer app: Phone_InCallUI.apk.
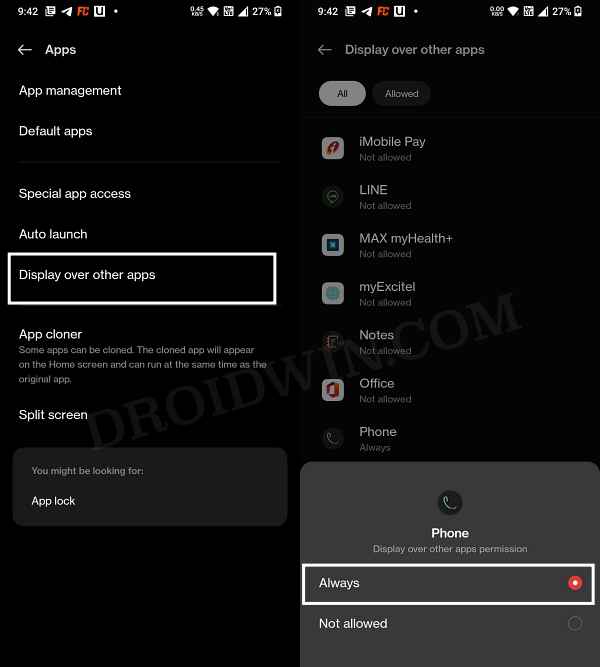
- After that, go to Settings > Apps > Display over other apps.
- Then select the Phone app from the list and select Always.
- Now carry out the entire steps listed in Method 1 [ADB Commands].
- Once done, call anyone and you might see the OnePlus Dialer app being replaced by Google Dialer.
- In that case, bring up the Notification Panel from the top and then select the OnePlus Dialer app.
- Your call will now switch to the OnePlus Dialer app and you could then easily record the call.
Method 5: Enable Call Recording on OnePlus 12 via Magisk Module (Root)
- To begin with, root your device via Magisk patched boot: How to Root OnePlus 12 via Magisk Patched Boot
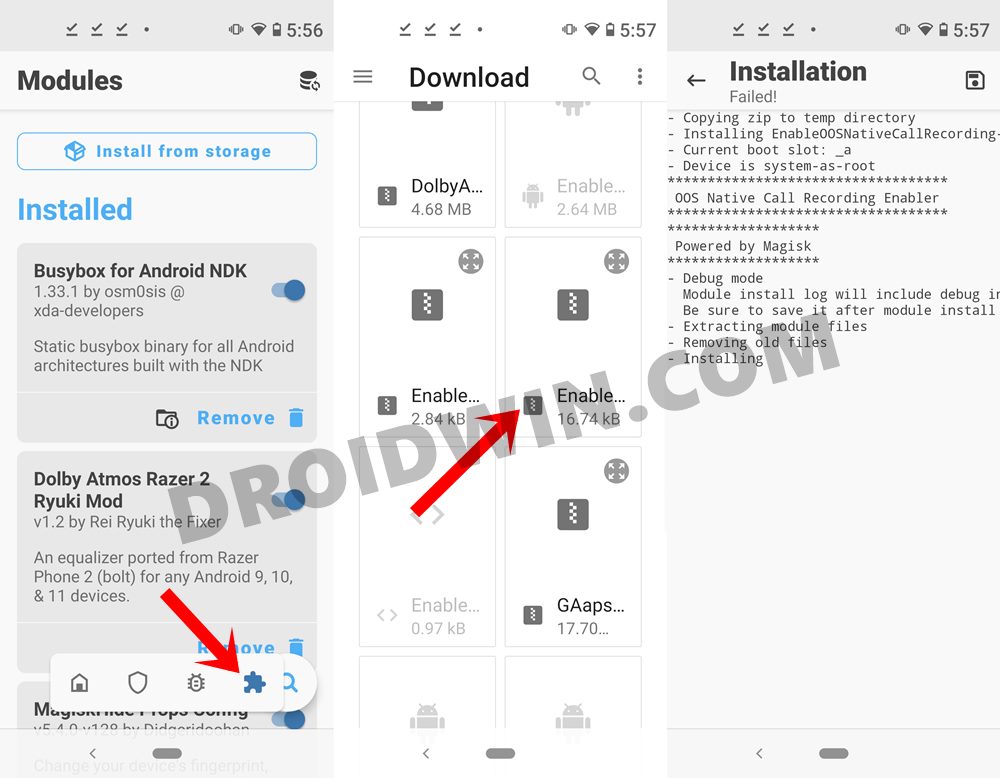
- Then download the given Magisk Module and send it to your device: EnableOOSNativeCallRecording-Magisk.ZIP
- Then launch the Magisk App and tap on the Modules icon situated at the bottom right.
- After that, tap on the Install from Storage button situated at the top.
- Browse to the downloaded Magisk ZIP file and select it.
- The flashing will now begin and could take a few seconds.
- Once done, tap on the Restart button that appears at the bottom right.
- Once your device reboots, the module will be active and you could now easily record calls.
So these were the steps to enable the call recorder on your OnePlus 12 using a Magisk module. While it requires a rooted device, but it is able to survive every reboot.
Method 6: Enable Call Recording on OnePlus 12 via TWRP (Non-Root)
NOTE: This method is not yet applicable for the OnePlus 12 as the device doesn’t have a working custom recovery. Once the recovery is available, you may come back and try out this method.
This method doesn’t require a rooted device, but it does require you to have the TWRP Recovery installed. So if you haven’t yet installed it, then please check out our guide on How to Install TWRP Recovery on Android
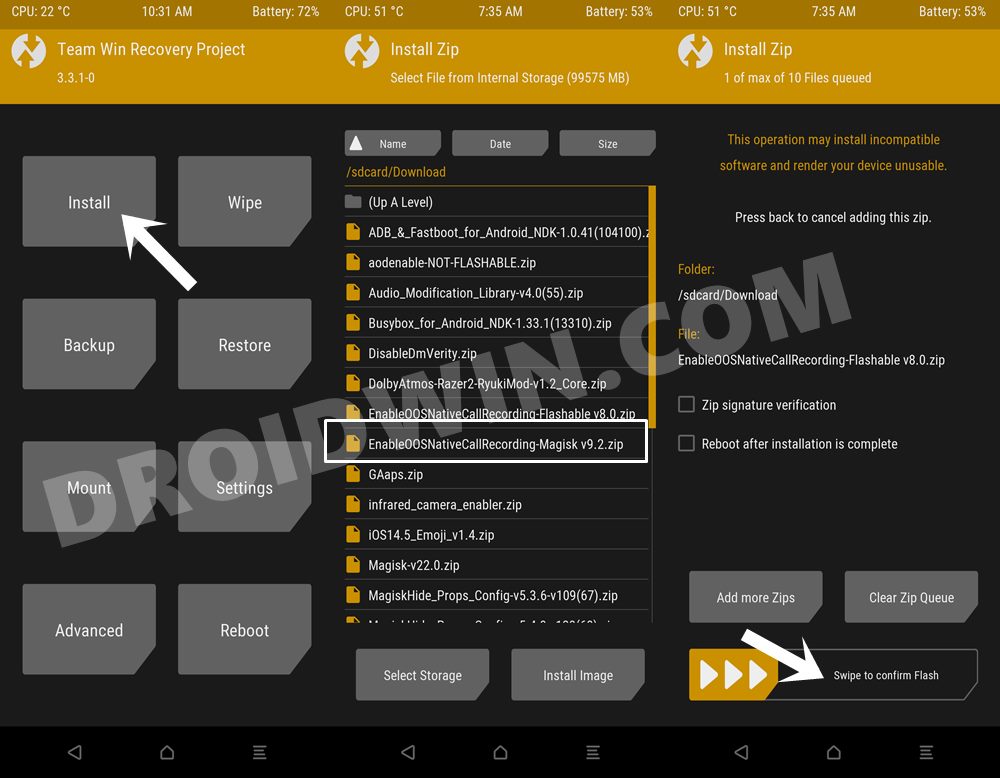
- So if you checkmark this requirement, then download the flashable ZIP module and transfer it to your device: Enable-OOS-Native-Call-Recording-Flashable.zip
- Now boot your device to TWRP. You may do so via hardware key combination or using the below command (inside the CMD window that is opened in the platform-tools folder).
adb reboot recovery
- Once your device reboots to TWRP, go to Install, select the flashable ZIP file and perform a right swipe to flash it.
- You may now reboot the device to the OS. For that, go to Reboot and select System.
With this, you have successfully enabled Call Recording on your OnePlus 12. While it does require an unlocked bootloader and a custom recovery installed, but it is also able to survive a reboot.
Method 7: Enable Call Recording on OnePlus 12 via Tasker (Root)
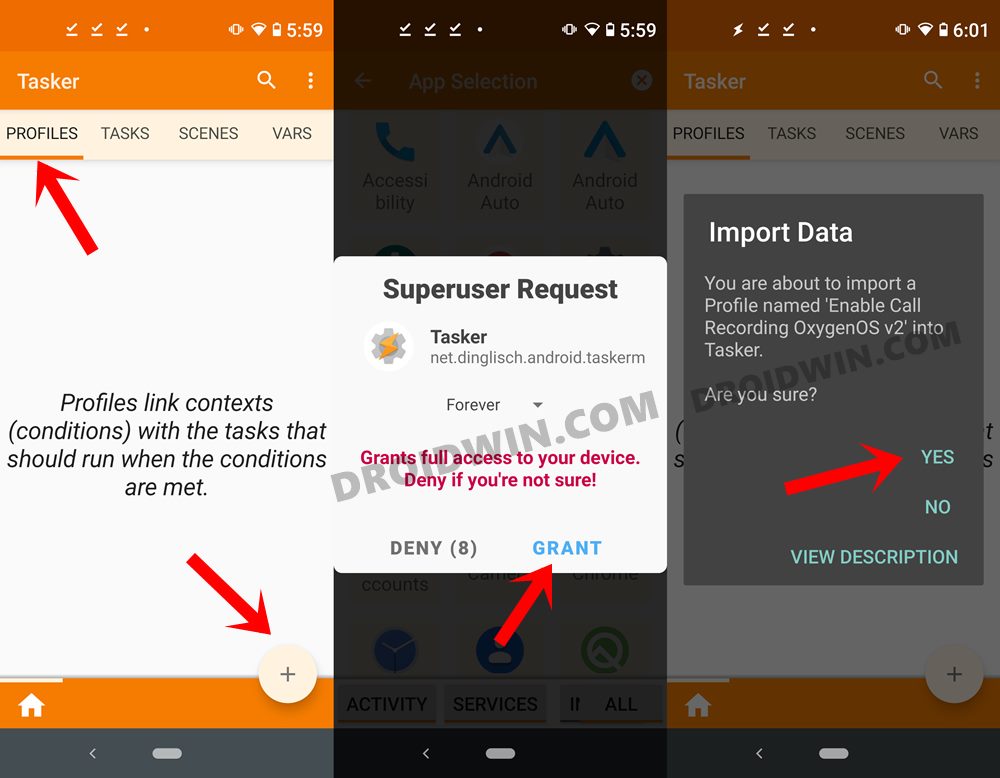
- To begin with, download and install the Tasker app on your device.
- Then download the required XML profile: EnableOOSNativeCallRecordingv2.prf.xml
- Now launch the Tasker, give it the required SuperUser permission.
- Finally, import the above XML files as a profile. If you are unable to do so, then go to your File Explorer app, select the XML file and open it via the Tasker app. Then just follow the instructions and the profile will be imported.
- This method does require a rooted device, but it is able to survive a reboot without any issues.
Method 8: Enable Call Recording on OnePlus 12 via APK (Root)
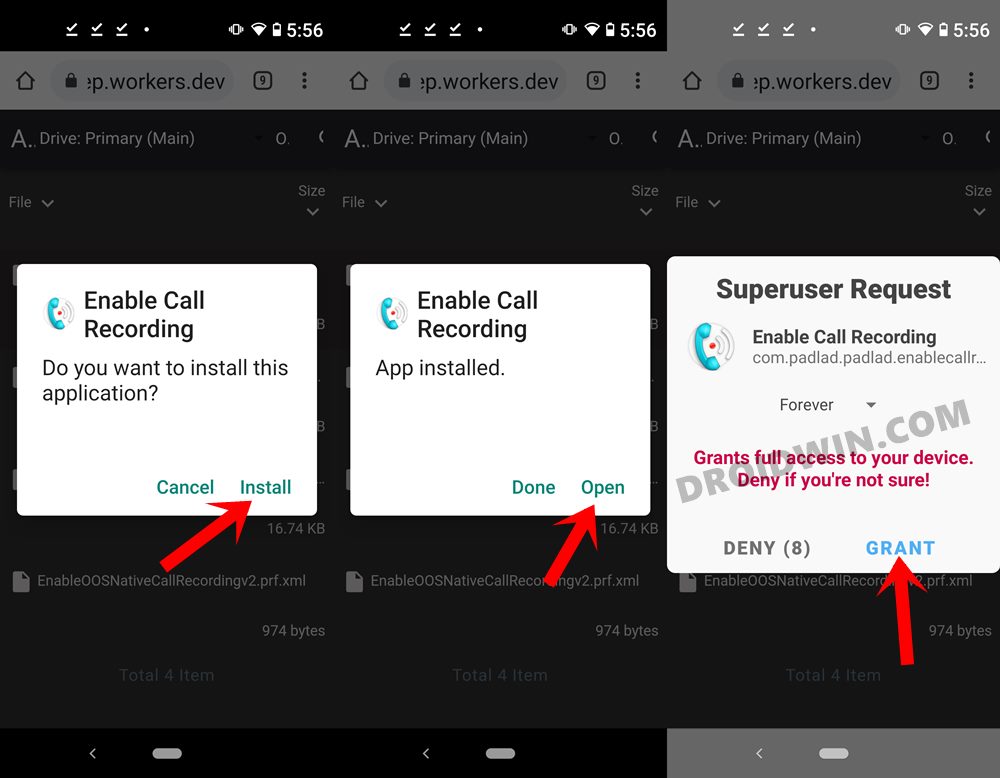
- Download and install the given APK: EnableOOSNativeCallRecording v2.0.apk.
- Now launch the app and grant it the Magisk request.
- That’s it, the task stands complete. While this is perhaps the easiest method and it survives a reboot as well, but sometimes it just refuses to work.
So this was all from this guide on how to enable the call recorder on your OnePlus 12. We have shared seven different methods for the same, do let us know in the comments which one spelled out success for you. Likewise, if you have any queries concerning the aforementioned steps, do let us know in the comments. We will get back to you with a solution at the earliest.


Beefey
Method 1 worked terrific on OP8Pro but on OP12 I can’t get it to work…
On the first ADB command it returns “Exception occurred while executing ‘put’:”
And then a bunch of “at com. *******”
I have confirmed the device is connected with USB debugging enabled.
Is this an easy fix?
Sadique Hassan
Enable the toggle next to “Disable Permission Monitoring” under Developer Options and then retry executing the command. Let me know if it works or not.