In this guide, we will show you the steps to install and run 32-bit apps on your Android device. While most of today’s apps have adopted the newer 64-bit architecture, there are still a few apps from yesteryears that house a 32-bit arch. These apps are no longer being maintained by the developer but the nostalgia factor associated with them compels the users to have it onto their device. However, that is proving to be easier said than done for many.
Whenever they tried sideloading apps, they were instead greeted with the “You can’t install the app on your device” error message. The reason for the same is the fact that the OS now ships with a 64-bit build of the OS and it seems Google has changed ro.zygote to zygote64. With that said, there does exist a nifty workaround using which you might still be able to install and run 32-bit apps on your Android device. So without further ado, let’s check it out.
Table of Contents
How to Install and Run 32-Bit Apps on Android
The below process will wipe off all the data on your device. When a device is first booted with only Zygote64 it can’t be switched over to use Zygote64_32. As a result, the 32-bit libraries inside APEXs are not discovered and loaded by Zygote32. henceforth, you will have to do a factory data reset to get this job done.
Droidwin and its members wouldn’t be held responsible in case of a thermonuclear war, your alarm doesn’t wake you up, or if anything happens to your device and data by performing the below steps.
STEP 1: Download Firmware
Next up, you’ll have to get hold of the stock firmware for your device. Make sure to download the same version that is currently installed on your device [you could verify the same from your device’s build number]. Make sure to download the entire firmware/factory image/Fastboot ROM instead of OTA/Recovery ROM.
STEP 2: Extract Stock Boot/Init_boot
You’ll now have to extract the firmware and get hold of the stock boot.img/init_boot.img file. [If your device was launched with Android 12 or older versions, then use boot,img, otherwise, use init_boot.img]. Here’s how to extract the firmware corresponding to different OEMs:

- Pixel: Use the built-in Windows Extractor to extract ZIP.
- Xiaomi: Use 7 ZIP to extract TGZ and TAR.
- OnePlus and Nothing: Use the Fastboot Enhance Tool to extract payload.bin.
- Realme and Oppo: Use Oppo Decrypt Tool to extract OZIP/OFP.
STEP 3: Download Magisk Zygote
Magisk Zygote64_32 is a modification of Magisk and is primarily designed as a root solution for multilib Android devices that are Zygote64-only, such as the Pixel 7/8 series. [Credits: XDA Senior Member Namelesswonder].
DIRECT DOWNLOAD | GITHUB PAGE | DOWNLOAD PAGE
STEP 4: Unroot Device [For Rooted Users]
If you are using a rooted device, then you’ll first have to unroot it before proceeding ahead. On the other hand, if your device is already non-rooted, then you could skip this section and move over to the next one].
- First off, uninstall the Magisk app from your device [do NOT use Magisk’s Uninstall option, instead uninstall the app from the Settings menu as you do so for any other app].
- Then enable USB Debugging on your device and connect it to PC via USB.

- Now download and extract Android SDK Platform Tools on your PC.
- Then type in cmd in the folder’s address bar and hit Enter. This will launch the Command Prompt.
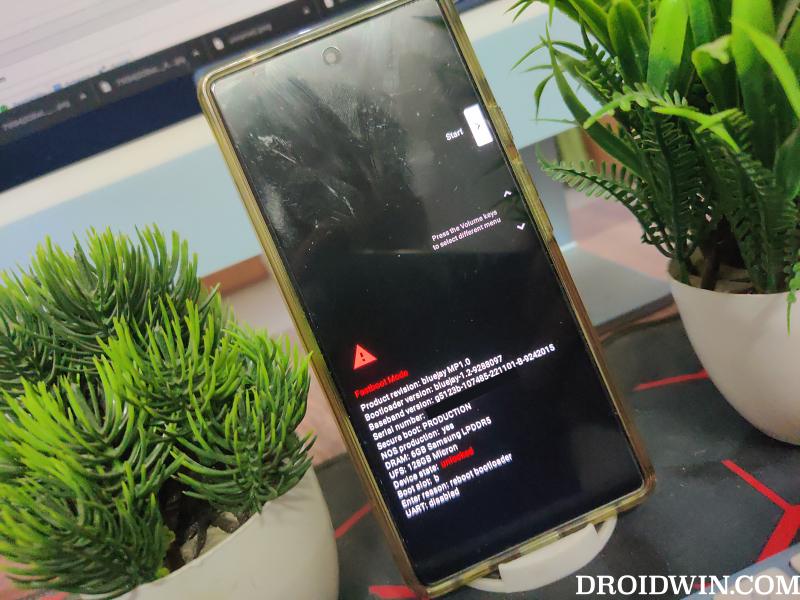
- Now type in the below command to boot your device to Fastboot Mode:
adb reboot bootloader
- Then flash the stock boot.img or init_boot.img using the below command:
fastboot flash boot boot.img
OR
fastboot flash init_boot init_boot.img
- Now reboot your device to the OS via the below command
fastboot reboot

STEP 5: Patched Boot/Init_Boot via Magisk Zygote
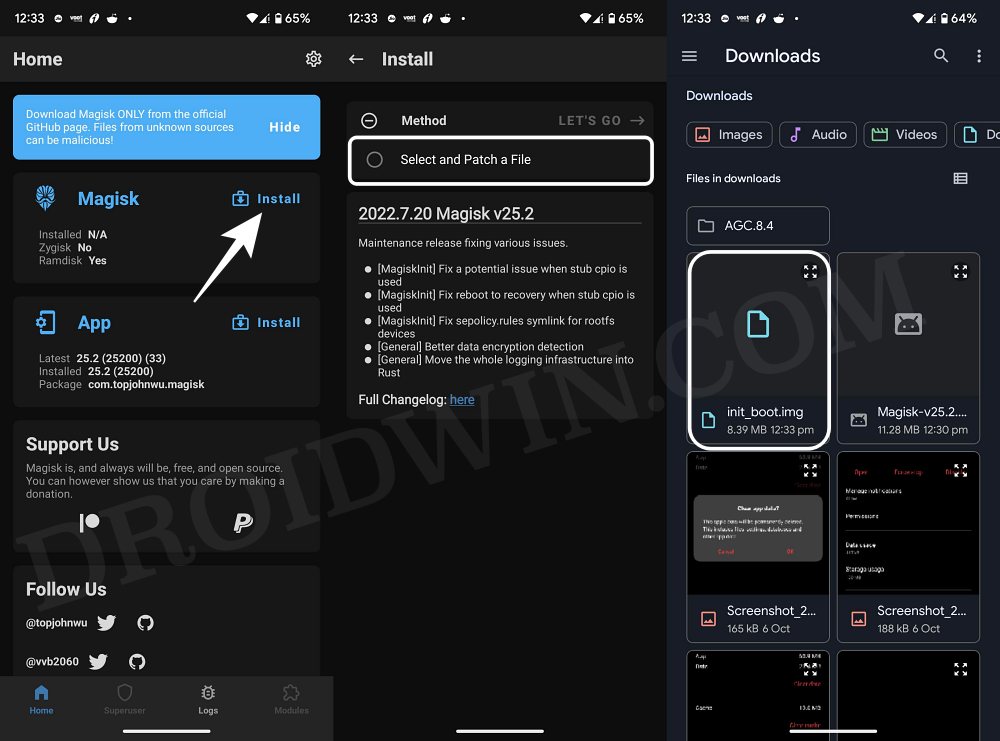
- First off, install the Magisk Zygote64_32 app on your device.
- Then launch it and tap on the Install button next to Magisk.
- Now choose‘ Select and Patch a File’, navigate to the stock init_boot.img file, and select it.
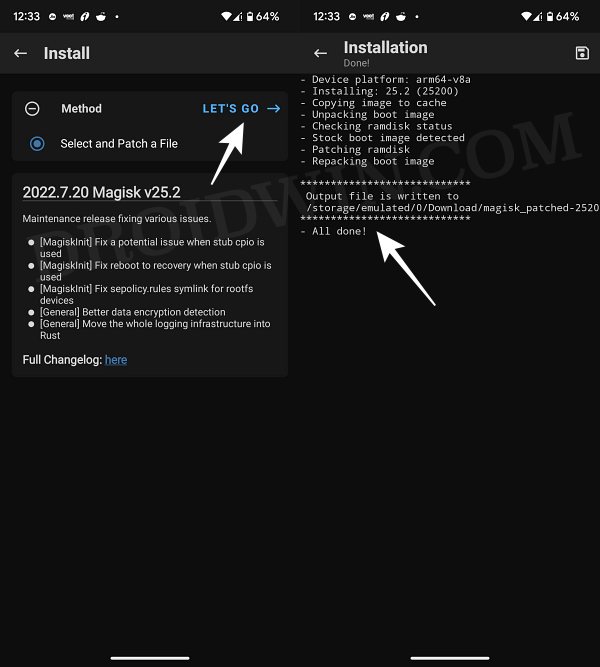
- Then tap on the Let’s Go button situated at the top right.
- The init_boot.img file will now be patched and placed under the Downloads folder on your device.
- You should transfer this file to the platform-tools folder on your PC.
- Likewise, rename it to patched_init_boot.img or patched_boot.img.
STEP 6: Boot to Fastboot Mode
- Enable USB Debugging and connect your device to the PC via a USB cable.
- Then head over to the platform-tools folder, type in CMD in the address bar, and hit Enter. This will launch the Command Prompt.

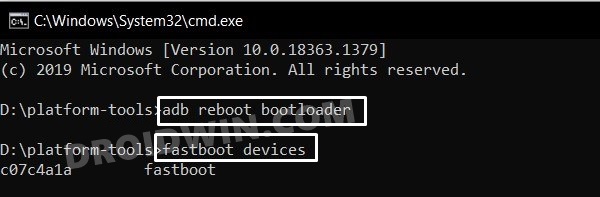
- Type in the following command in the CMD window to boot your device to Fastboot Mode
adb reboot bootloader
- To verify the Fastboot connection, type in the below command and you should get back the device ID.
fastboot devices
- If you’re not getting any ID, then install Fastboot Drivers on your PC.
STEP 7: Root via Magisk Zygote
- First off, transfer the patched init_boot.img/boot.img to the platform-tools folder.
- Then flash this file and do a format data along with it via the below command:
fastboot -w flash init_boot patched_init_boot.img
fastboot -w flash boot patched_boot.img
- Now reboot your device to the rooted OS via the below command:
fastboot reboot
- Since your device has undergone a reset, the first boot will take some time.
- Once it boots up, again install the Magisk Zygote64_32 app and launch it.
- Finally, open Magisk Zygote64_32 and finish the remaining setup, if any.
STEP 8: Test out the Result
- Download and install any 32-bit app on your device. Then launch it and check if it is working or not.
- If you wish to perform this check via a more technical route, then execute the below command:
getprop ro.zygote; getprop ro.vendor.product.cpu.abilist; getprop ro.vendor.product.cpu.abilist32 - If you get the output as shown above, then it signifies your device can now run 32-bit apps:
zygote64_32
arm64-v8a,armeabi-v7a,armeabi
armeabi-v7a,armeabi

That’s it. These were the steps to install and run 32-bit apps on your Android device. If you have any queries concerning the aforementioned steps, do let us know in the comments. We will get back to you with a solution at the earliest.


