In this guide, we will show you four different methods to change the priority of an app in Windows 11. Not all apps are created equal. Their requirements in terms of CPU, Memory, Graphics, and Disk Usages vary considerably, depending on its functionality as well as the domain to which it belongs. For example, video processing software would usually ask for more system resources in comparison with, say, a browser app (though Chrome could be an exception any day of the week!).
In this regard, Windows does a decent job of efficiently allocating resources to the apps running on your PC. But sometimes, it might not be in sync with your requirement as you may want to append some additional CPU prowess to an app. And in the process take away the extra processing power from the other app that might no longer require it. Fortunately, that could easily be done by changing the priority of an app in Windows 11. And in this guide, we will show you how to do just that. Follow along.
Table of Contents
How to Change Priority of an App in Windows 11

There exist four different methods to carry out the said task. We have listed all four of them below. You may refer to the one that is in sync with your requirment.
Method 1: Change Priority of an App via Task Manager
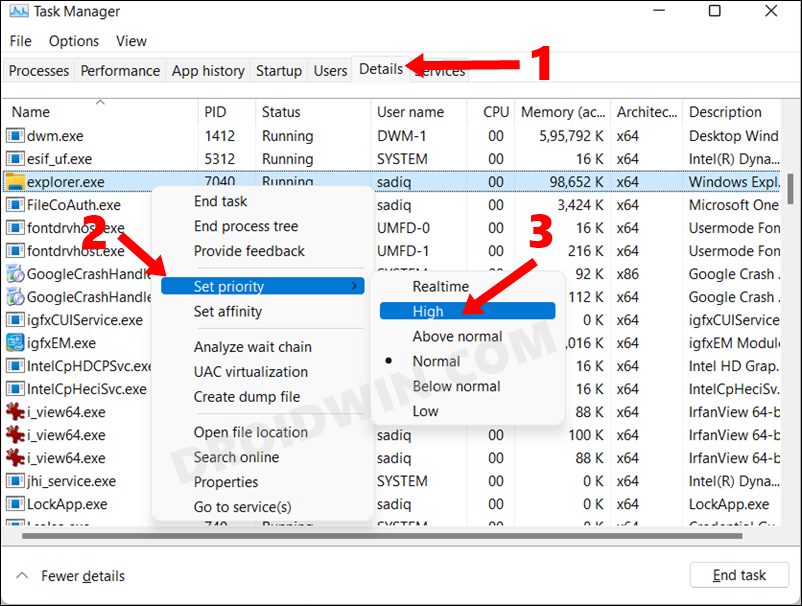
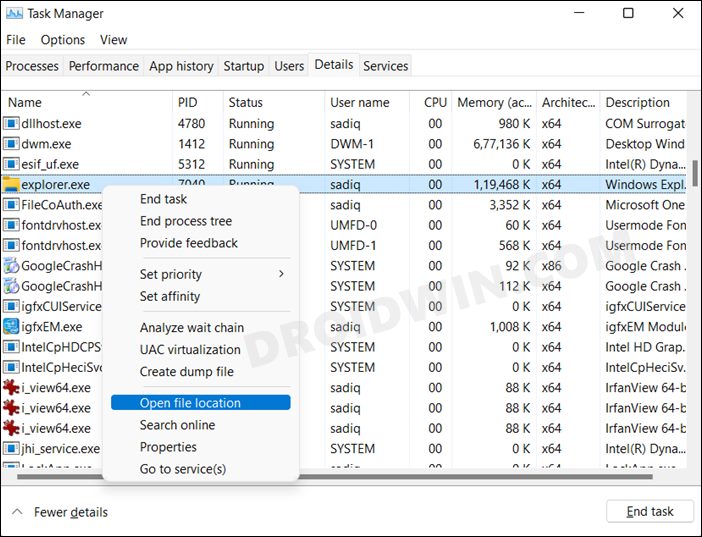
- To begin with, use the Ctrl+shift+Esc shortcut keys to open the Task Manager.
- Then go to the Details tab and select the app whose priority you need to change in Windows 11.

- Now right-click on it, select Set Priority, and choose the desired option.
- Finally, click on the Change Priority button in the confirmation dialog box that appears.
Method 2: Change the Priority of an App via Command Prompt
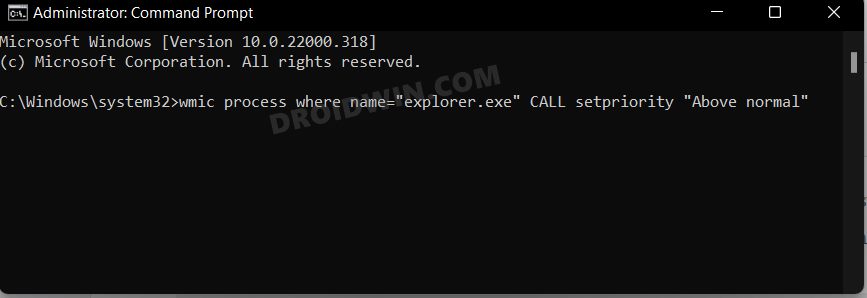
First off, refer to the below table and get yourself acquainted with the Priority Name and their Values
| Realtime | High | Above normal | Normal | Below normal | Low |
|---|---|---|---|---|---|
| 256 | 128 | 32768 | 32 | 16384 | 64 |
- Now head over to the Start Menu and launch Command Prompt as an administrator.
- After that, execute the below command to change the priority of an app in Windows 11. Make sure to change the name of the app and its priority accordingly
wmic process where name="explorer.exe" CALL setpriority "Above normal"
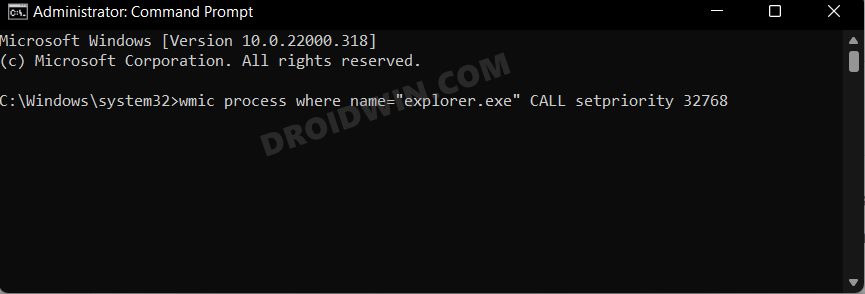
- Or if you prefer to play with numbers, then you could also replace the priority name with its numerical value using the data given in the table. As an example, our above command will now transform to:
wmic process where name="explorer.exe" CALL setpriority 32768
- The only difference between both these commands is that the priority name is written in double inverted commas, whereas the values aren’t.
Method 3: Change the Priority of an App via PowerShell
As before, get yourself acquainted with the priority names and their values using the data given below:
| Realtime | High | Above normal | Normal | Below normal | Low |
|---|---|---|---|---|---|
| 256 | 128 | 32768 | 32 | 16384 | 64 |
- Now head over to the Start Menu and launch PowerShell as an administrator.
- Then, execute the below command to change the priority of an app in Windows 11. Make sure to change the name of the app and its priority accordingly:
Get-WmiObject Win32_process -filter 'name = "explorer.exe"' | foreach-object { $_.SetPriority(32768) } - As an example, we have used the explorer.exe process and assigned it the Above Normal Priority using its numerical value.

Method 4: Start an App with a Specific Priority in Windows 11
All the three above methods that we have discussed require you to have the app running in the background. However, that might not always prove to be the best-case scenario. So in those cases, you could directly launch an app by assigning it a specific priority beforehand. Here’s how:
- To begin with, head over to the Start Menu, search CMD, and launch it as an administrator.
- Then copy-paste the below command in the CMD window and hit Enter.
start "" /AboveNormal "C:\Windows\explorer.exe"
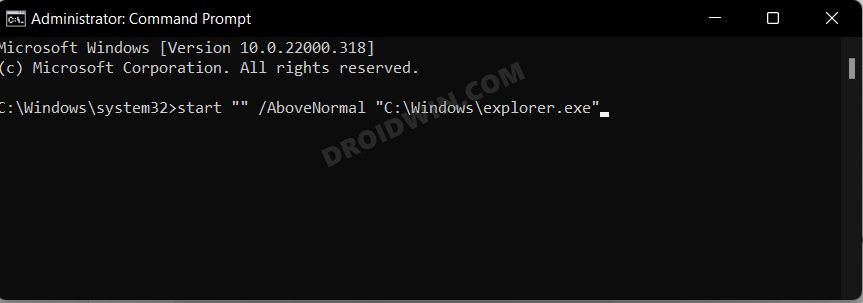
Make sure to change the priority name and the location of your app’s EXE file accordingly. To find the app’s EXE file location, open Task Manager, go to the Details tab, right-click on the desired EXE file, and select Open File Location. You will now be taken to that EXE’s file location, whose address you could copy from the File Explorer’s address bar.
So these were the four different methods through which you could change the priority of an app in Windows 11. If you have any queries concerning the aforementioned steps, do let us know in the comments. We will get back to you with a solution at the earliest.