In this guide, we will show you the steps to fix the issue of Desktop Window Manager dwm.exe consuming high CPU and memory on your Windows 10/11 PC. There are a plethora of apps, services, frameworks, and processes that are constantly running in the background. They are needed for the efficient functioning of their associated apps or software and in turn for bringing the overall stability to the OS as a whole.
However, the more the number of background processes running simultaneously, the more will be the load on your system. This would result in a higher probability of your PC being slowed down or not performing along the expected lines. And this is what my PC was going through in the last few weeks. Upon doing further inspection, I found out that it was the dwm.exe that more often than not was consuming an exorbitant amount of system resources.
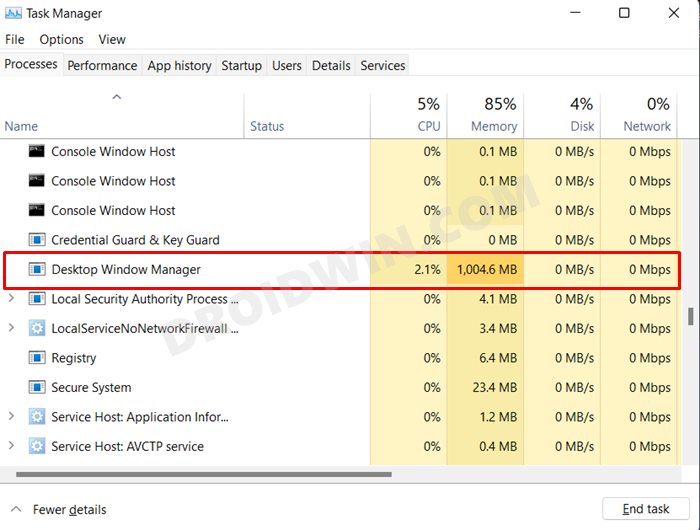
For the unware, Desktop Window manager is a process in Windows OS that is responsible for managing visual elements, animations, transparency effects, live taskbar thumbnails, among others. Coming back to the point, one fix that straight away came to my mind was to simply End Task this dwm.exe process via the Task Manager. While it did work out but only for a short while. After every reboot, this process would be up and running again and so would be the issues of high memory consumption.
So what else could be done to rectify this ever-lasting problem? Well, there do exist a couple of workarounds that have managed to fix the issue of Desktop Window Manager dwm.exe consuming high CPU and memory on Windows 10/11. And in this guide, we will make you aware of just that. So without any further ado, let’s get started.
Table of Contents
FIX Desktop Window Manager dwm.exe Consumes High CPU/Memory

Do note that there’s no universal fix as such. You will have to try out each of the below-mentioned workarounds and then check which one spells out success. Droidwin and its members wouldn’t be held responsible in case of a thermonuclear war, your alarm doesn’t wake you up, or if anything happens to your PC by performing the below steps.
FIX 1: Downgrade Intel Display Drivers
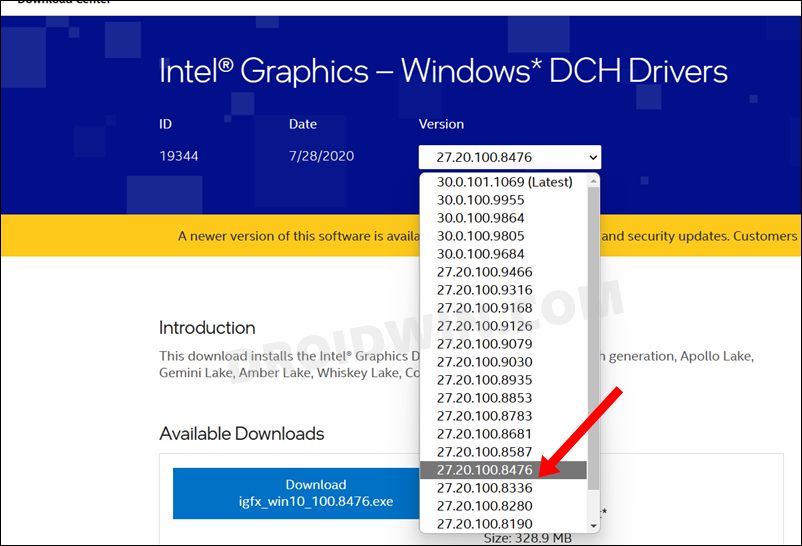
The fix that comes with the highest success rate requires you to downgrade your Intel Graphics drivers to an older build. At the time of writing, it might be something along the lines of v30.x.xxx.xxxx. However, you will have to downgrade it to build number 27.20.100.8476.
This precise build number has been verified to spell out success, we can’t say for version number before it (26, 25, etc) but for sure you shouldn’t be using a higher version number than the 27th build. So with that in mind, let’s start off with the downgrade process.
- To begin with, you will have to disable automatic driver updates. Otherwise, Windows will automatically update it to the latest build as soon as you perform a downgrade. So refer to our guide on How to Stop Automatic Driver Updates in Windows.
[Note: You may take an alternate route and first verify if the below steps work out or not. If it works out, then straightaway come back and stop the driver’s auto-updates. The choice is all yours].
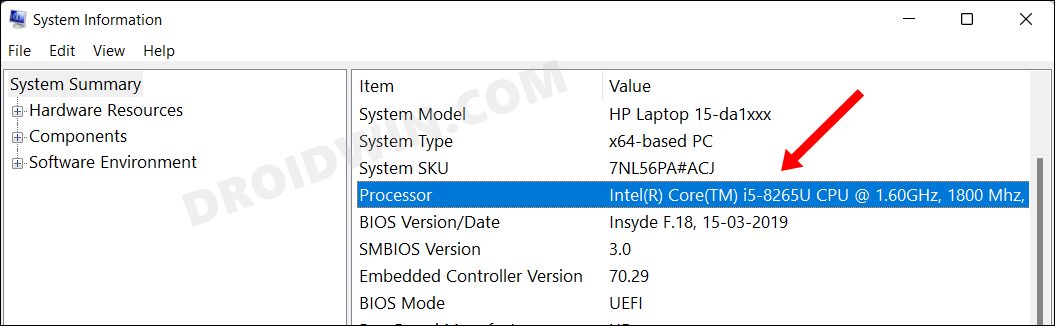
- Next up, you will have to get a hold of your processor name. For that, head over to Start Menu and open System Information. Now check out the Processor section and copy the name, something along the lines i5-8265U.

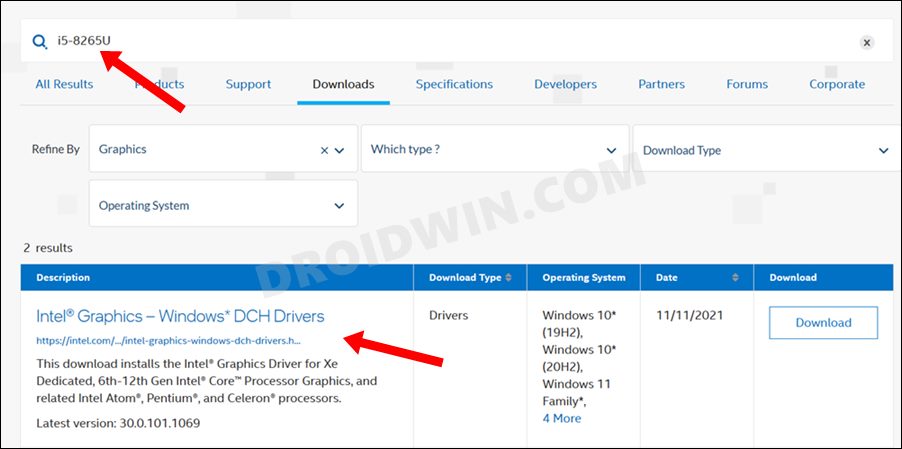
- Now head over to the Intel Drivers download page and type in the processor number at the Search box situated at the top.
- Then select the graphics drivers from the list. After that, go to the top of the page and select 27.20.100.8476 from the Version drop-down menu.
- After that, hit the blue Download button to download these drivers. Once done, launch it and proceed with the on-screen instructions to install it.
- Finally, restart your PC and check if the issue of Desktop Window Manager dwm.exe consuming high CPU and memory on Windows 10/11 has been fixed or not.
FIX 2: Disable Sleep and Hibernate in Windows 11
Some users were able to rectify this issue after disabling Sleep and Hibernate functionalities on their PC. So follow along with the below instruction steps to try it out.
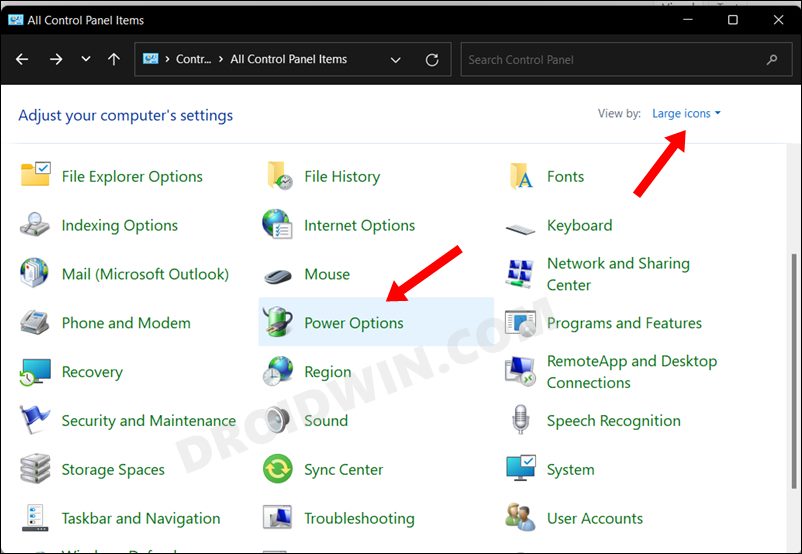
- Open Control Panel, change the View By to Large Icons (from the top right), and select Power Options.
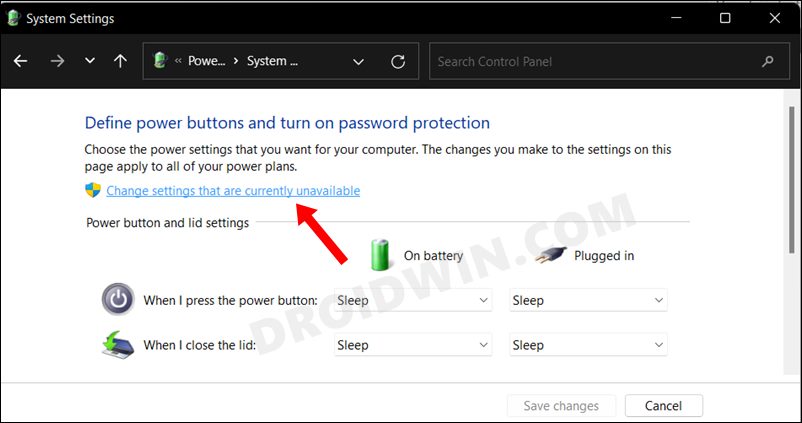
- Then click on Choose what the Power button does from the left menu bar.
- After that, click on Change Settings that are currently unavailable.
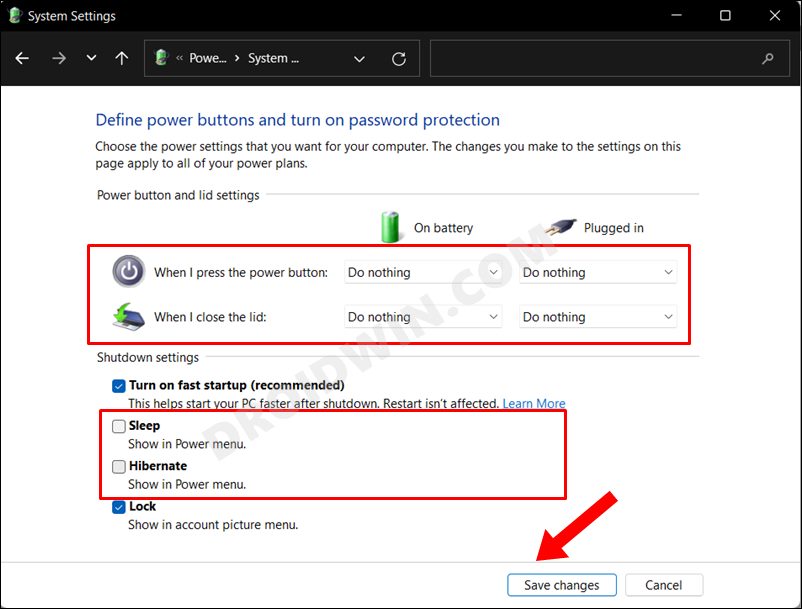
- Now change the setting next to When I close the Power button and When I close the lid to Never from the current Sleep (under both the On Battery and Plugged-in state ). Likewise, uncheck the Sleep and Hibernate options under Shutdown settings.
- Finally, restart the PC and verify if it fixes the Desktop Window Manager dwm.exe consuming high CPU and memory issues on Windows 10/11.

FIX 3: Using the Registry Editor Tweak
In this method, we will be explicitly creating a ForceEffectMode registry key and then disable it by assigning the False (0) value. Here’s how:
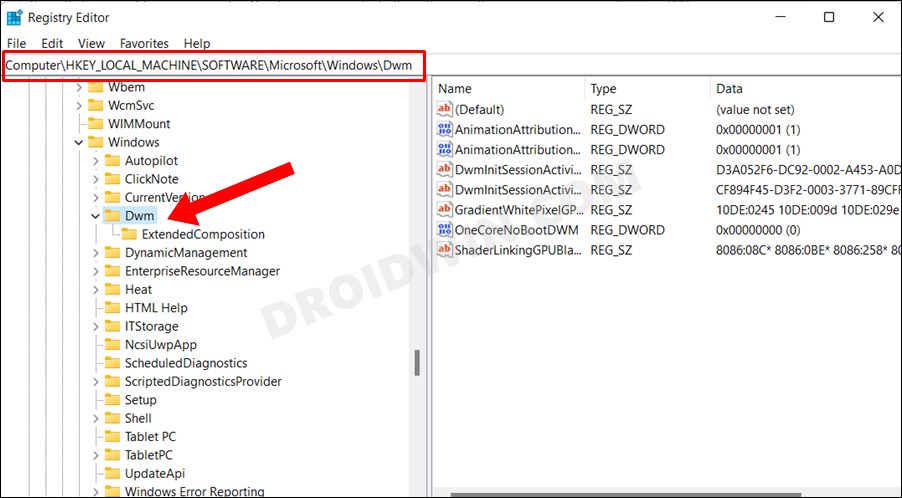
- To begin with, open Registry Editor from the Start Menu.
- Then copy-paste the below location in its address bar and hit Enter:
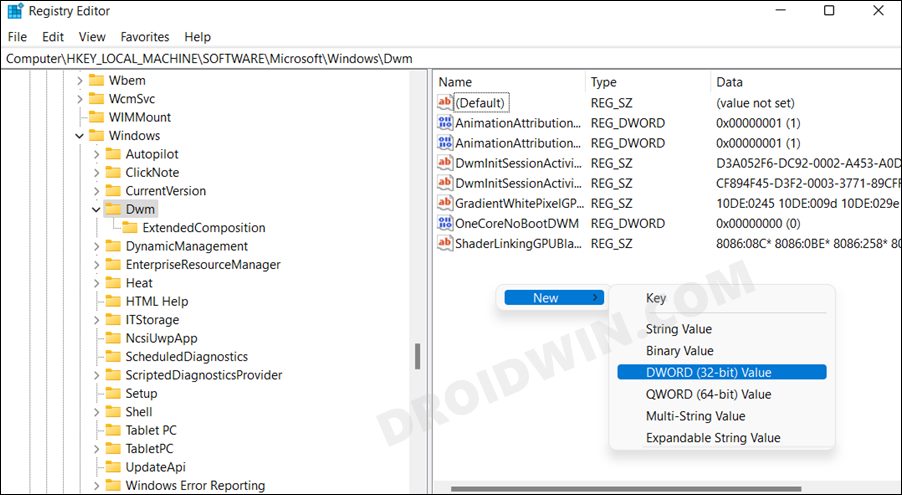
Computer\HKEY_LOCAL_MACHINE\SOFTWARE\Microsoft\Windows\Dwm
- Now go to the right-hand side, right-click in an empty location, and select New > DWord (32-bit) Value.
- Name it ForceEffectMode and double-click to open it. Then type in 0 under the Value Data field and hit OK to save it.
- Finally, restart your PC for the changes to take place. Once it boots up, verify if the underlying issue stands fixed or not.

With this, we round off the guide on how you could fix the issue of Desktop Window Manager dwm.exe consuming high CPU and memory issues on Windows 10/11. We have shared three different methods for the same. In my case, the first method of downgrading Intel drivers to an earlier build did the trick. Do let us know in the comments section which one worked out in your favor.


dave
Hey man will installing intel graphic uninstall or overwrite my nvidia 1050 it gpu