In this guide, we will show you the steps to check your Windows 11 PC’s battery health and subsequently generate its report. Ever since I upgraded my PC to the latest iteration of the OS, I had witnessed a considerable rise in battery consumption. The usage case scenario is similar to the one as it was before in Windows 10, with no resource-hogging applications running in the background. To find the culprit, I tried all the basic troubleshooting steps.

These included running the Windows Defender Scan, using the CheckDisk and System File Checker command, among others. However, none of them manage to spell out success. So upon further digging around, I got hold of a nifty method that proved to be of great help in diagnosing the battery life. And in this guide, we will help you with just that. Given here are the detailed steps to check your Windows 11 PC’s battery health and then generate its report.
Table of Contents
How to Generate Your Windows 11 PC Battery Report
- To begin with, head over to the Start Menu, search CMD, and launch Command Prompt as an administrator.
- Then execute the below command:
powercfg/energy

- It will now analyze the system behavior and diagnose the battery’s working status for a minute.
- Once the analysis is complete, it shall list out all the errors, warnings, and some additional information related to your battery.
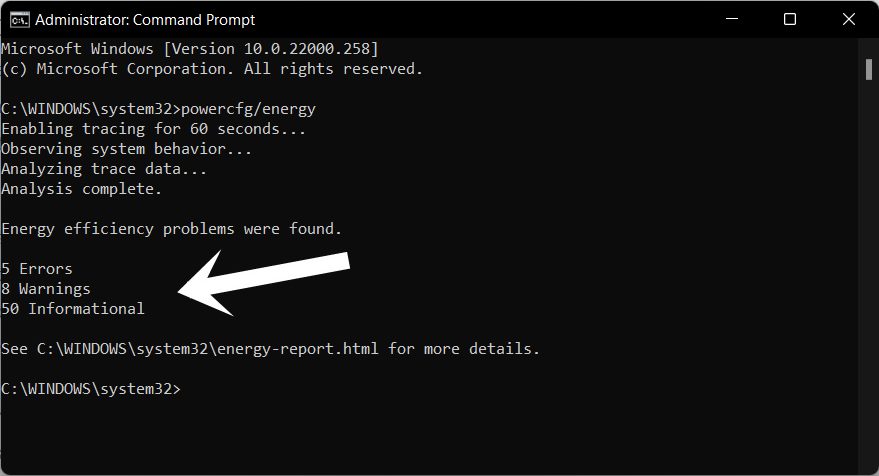
All these details are saved in an HTML Report. So let’s start analyzing this report and fix all the underlying battery issues.
How to Access My Windows 11 PC Battery Health Report
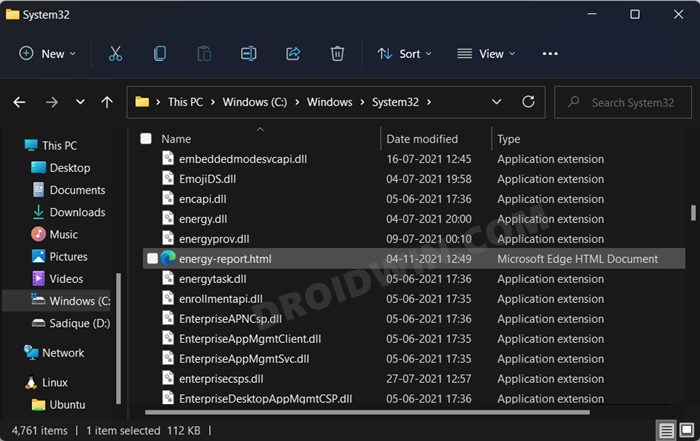
- Launch File Explorer via Windows+E shortcut keys.
- Then copy-paste the below location in the address bar:
C:\WINDOWS\system32\
- There you should find the Energy Report file, double click to open it.
- You could also copy-paste the following location to directly open the report:
C:\WINDOWS\system32\energy-report.html
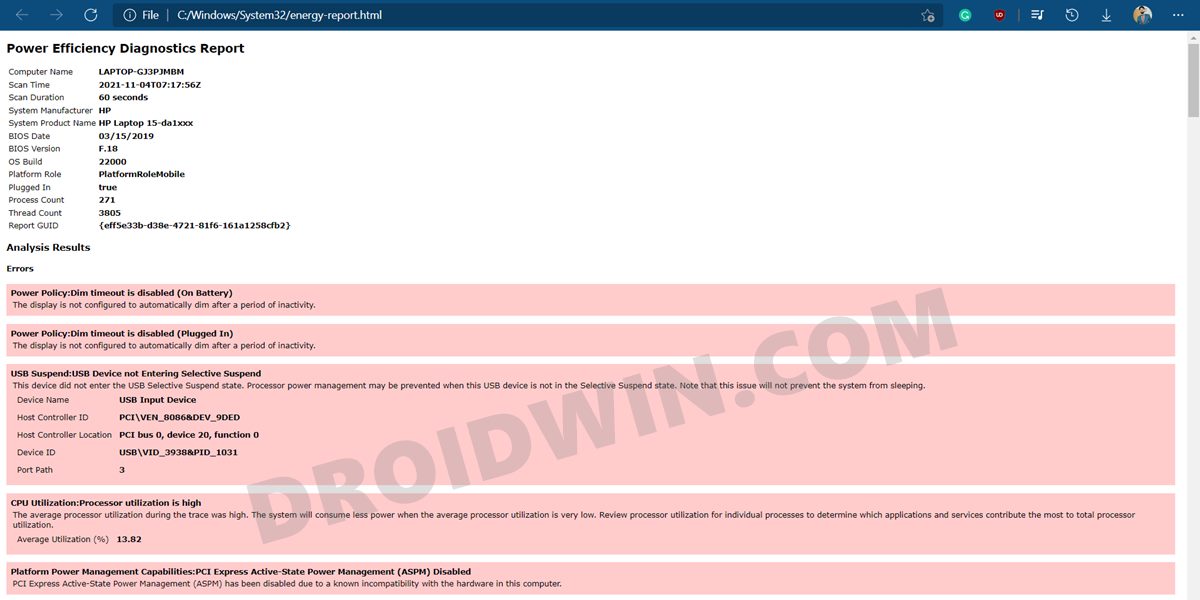
How to Analyze the Windows 11 Battery Report
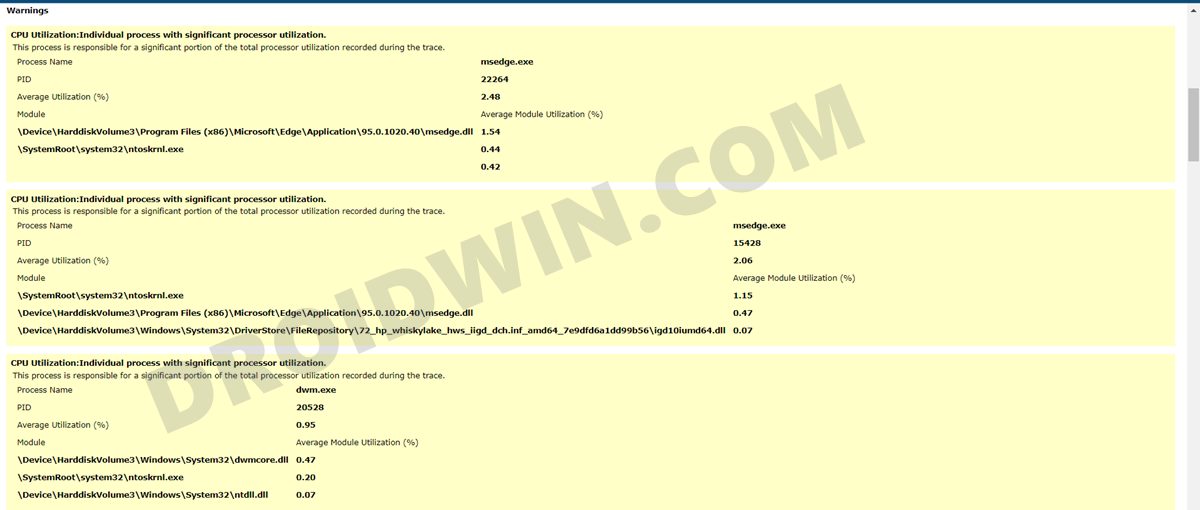
After you open the report, you should see some system-related information. Scroll down a little and go to the Analysis Results. It will be broken down into three different sections- Errors (highlighted in red), Warnings (highlighted in yellow), and then a few informational data related to the battery. When it comes to fixing these issues, near about all of them could be rectified from the Power Options themselves.
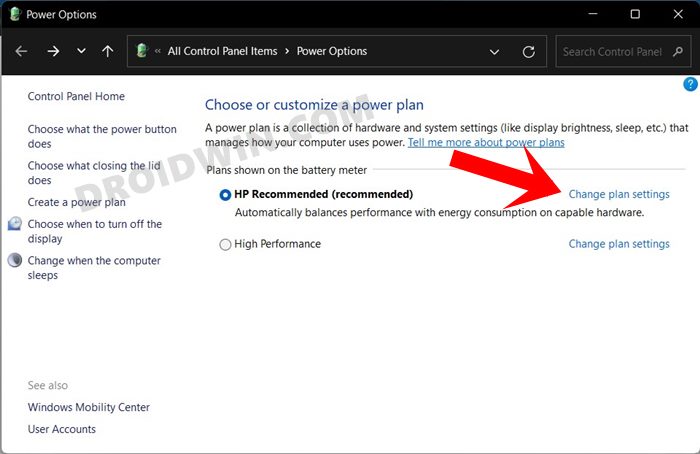
- So head over to the Start Menu, search Power Plan, and click on Choose a Power Plan.
- After that, click on Change Plan Settings next to your current plan.
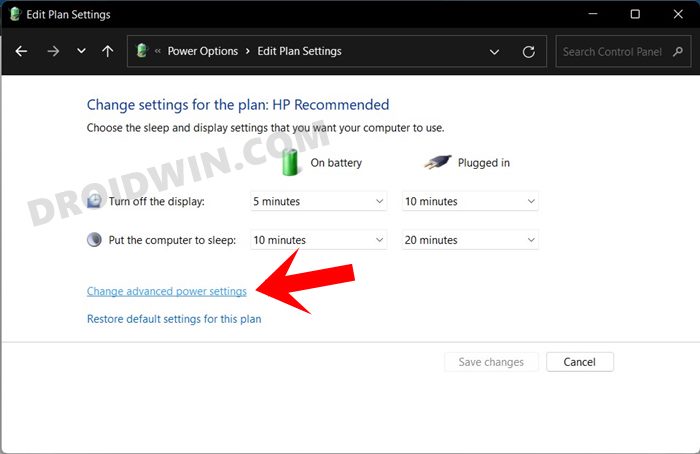
- Then click on Change Advanced Power Settings. It shall now open the Power Options dialog box.
- Now refer to the errors mentioned in the report and carry out the associated tweak in this Power Options menu to rectify them.
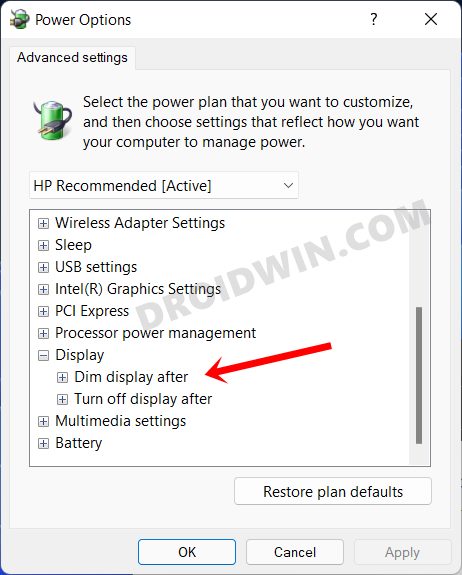
One of the errors that caught my attention was the “Power Policy:Dim timeout is disabled”. To fix it, all that was needed to do is to expand the Display tab under Power Options and then enable Power Policy:Dim timeout, both for On Battery and Plugged In State. However, it was easier said than done, as the option was nowhere to be found. But there’s a fix for this issue and you could easily enable it. Here’s how:
Where is the Power Policy:Dim timeout Feature
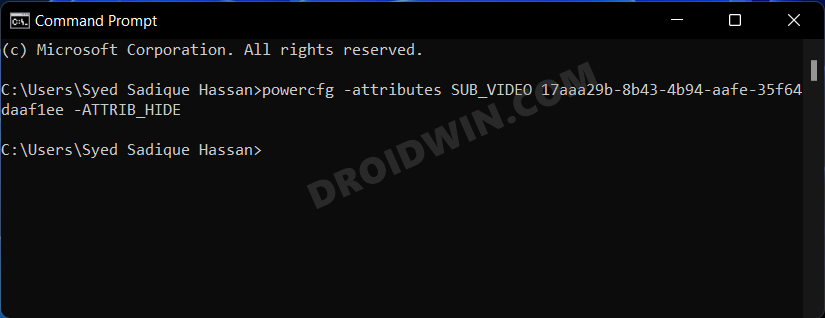
- Head over to the Start menu, search CMD, and launch Command Prompt as an administrator.
- Then copy-paste the below command and hit Enter:
powercfg -attributes SUB_VIDEO 17aaa29b-8b43-4b94-aafe-35f64daaf1ee -ATTRIB_HIDE
- The Power Policy:Dim timeout option should now be enabled.
- To access it, open the Power Options dialog box as before and then expand the Display section.
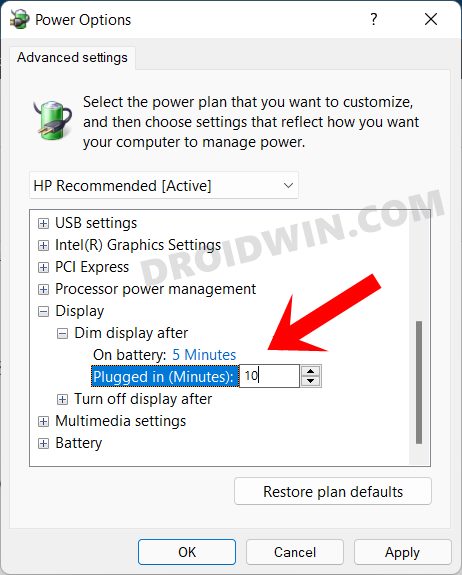
- This time you shall see the Dim Display After option. Expand it and assign it the desired time frame under the On Battery and Plugged in states.
- Finally, hit OK to save the changes. With this, you should have successfully fixed the “Power Policy:Dim timeout is disabled” error.
- However, if at any point in time, you wish to revert the changes and remove the Power Policy:Dim timeout option, then just execute the below command:
powercfg -attributes SUB_VIDEO 17aaa29b-8b43-4b94-aafe-35f64daaf1ee +ATTRIB_HIDE
Verify if Battery Errors Has been Fixed or not
Let’s now check if we were able to successfully rectify Windows 11 Battery related issue or not.
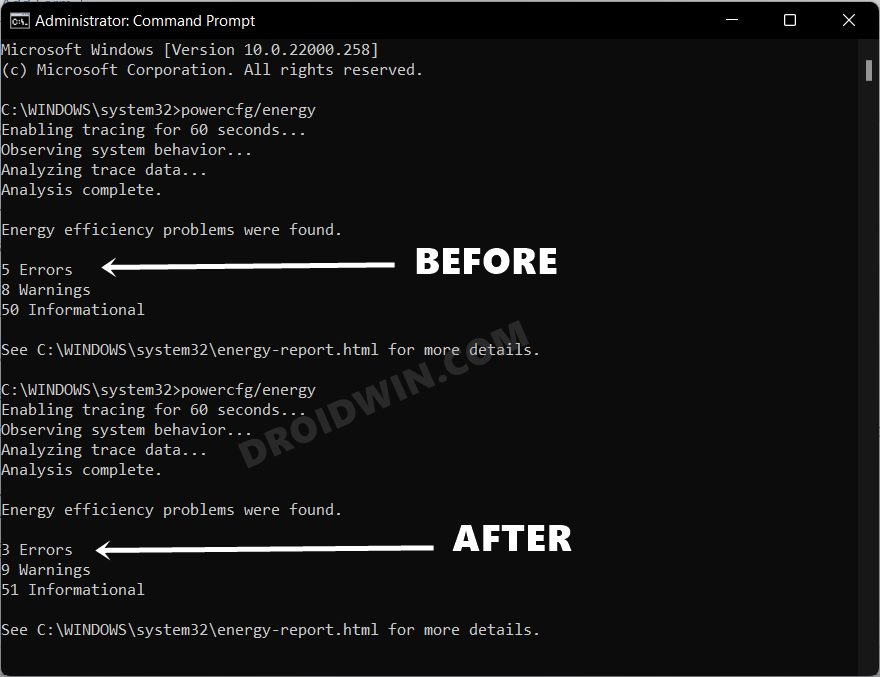
- Launch CMD and re-run the Battery Test via the following command (as explained in the first section above)
powercfg/energy
- The first hint is right in front of us, we did manage to lower down the errors from 5 to 3. Let’s check it inside the battery report as well.
- So copy-paste the below location in the address bar and it shall open the newly generated battery report
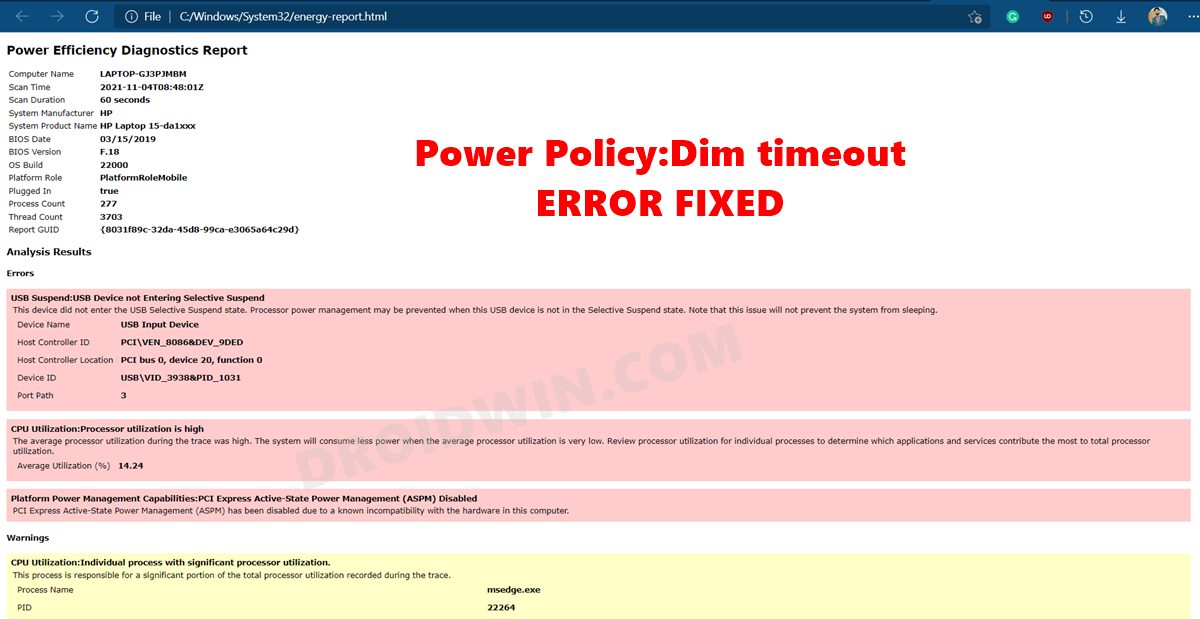
C:\WINDOWS\system32\energy-report.html
- You could now verify from the reports as well that the “Power Policy:Dim timeout is disabled” error has been rectified as well.
So with this, we round off the guide on how you could check your Windows 11 PC’s battery health, generate its report, and fix the “Power Policy:Dim timeout is disabled” error. Along the same lines, you could rectify other battery-related issues listed in the report from the Power Options dialog box. And if you have any queries regarding the same, do let us know in the comments section below.


serge
bonjour
powercfg /batteryreport
C:\WINDOWS\system32\battery-report.html.
powercfg /energy
ça ne fonctionne pas pour moi j ai un rapport pour la batterie sans motif d anomalie ,j ai essayer” energy” il ne me donne aucun résultât aucun meme au bout de 5 minutes programme ouvert