In this guide, we will show you various methods to fix the high CPU or memory usage for Antimalware Service Executable. There are quite a few services running in the background that are responsible for the proper functioning of the Windows built-in Defender and Firewall apps. However, the Antimalware Service Executable (ASE) is probably the most important one. It gets up and running as soon as you manually launch the Defender or if it is invoked automatically via its schedule scan.
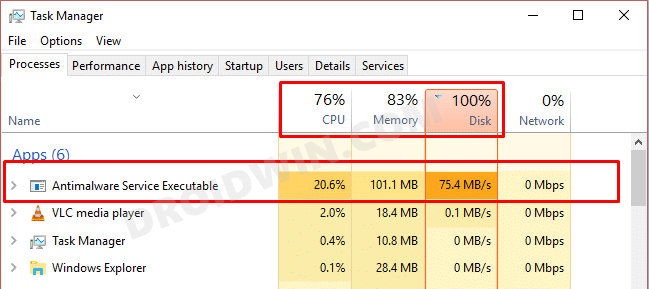
However, keeping its importance aside, it is notoriously infamous for consuming quite a lot of memory which ultimately leads to the slow-down of the entire system. Be it the CPU, Memory, or Disk Usage, it could negatively impact either of three or in some cases, even all these three components. So how to rectify this issue? Well, there exist a few handy workarounds that have been known to fix the Antimalware Service Executable High CPU or Memory usage. And in this guide, we will make you aware of just that. Follow along.
Table of Contents
How to Fix Antimalware Service Executable High CPU/Memory Usage

Do note that there isn’t any universal fix as such. You will have to try out each of the below-mentioned tweaks and then verify which one works out best. So with that in mind, let’s get started.
FIX 1: Tweak Defender’s Scheduled Scan
To begin with, we will be changing the Windows Defender Scheduled scan and taking away some unwanted privileges from it as well. This will result in less consumption of the system resources by the Defender and in turn by the ASE. So proceed ahead with the instructions:
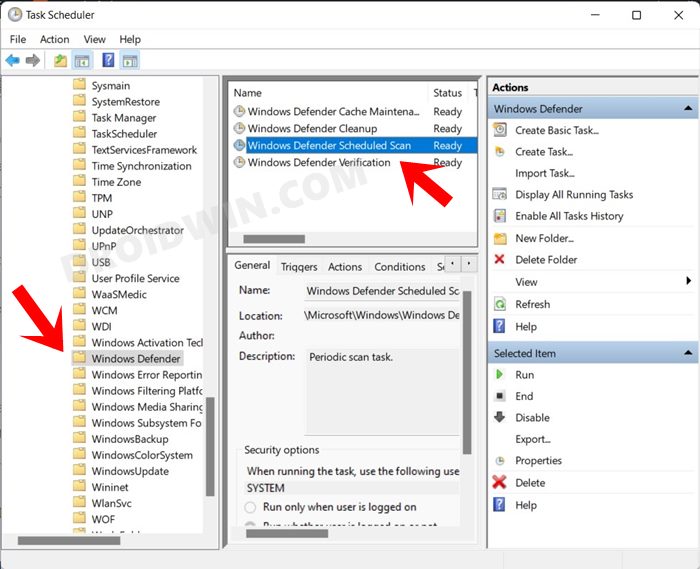
- Head over to the Start Menu and open Task Scheduler.
- Then go to the following location from the left menu bar:
Library > Microsoft > Windows > Windows Defender
- Now open the Windows Defender Scheduled Scan from the right-hand side.

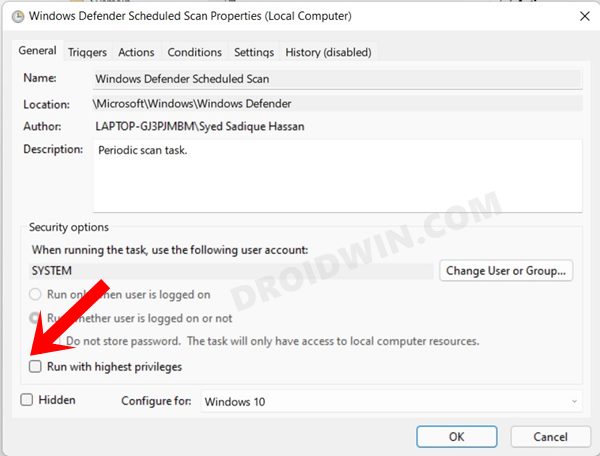
- Then go to the General tab and uncheck ‘Run with highest privileges’.
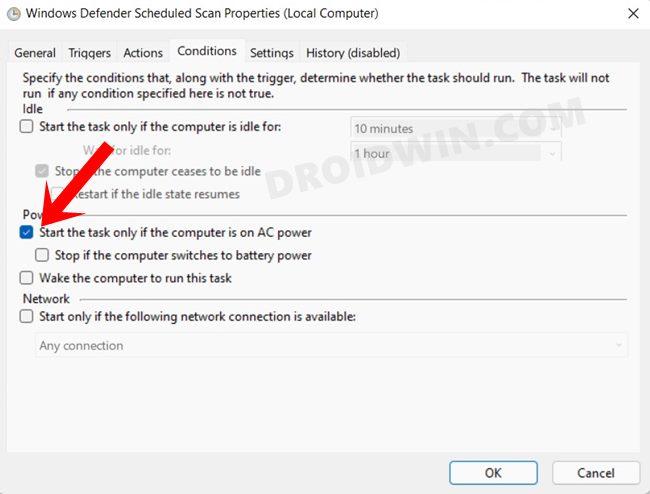
- Next up, go to the Condition tab and uncheck ‘Start the task only if the computer is on AC Power’.
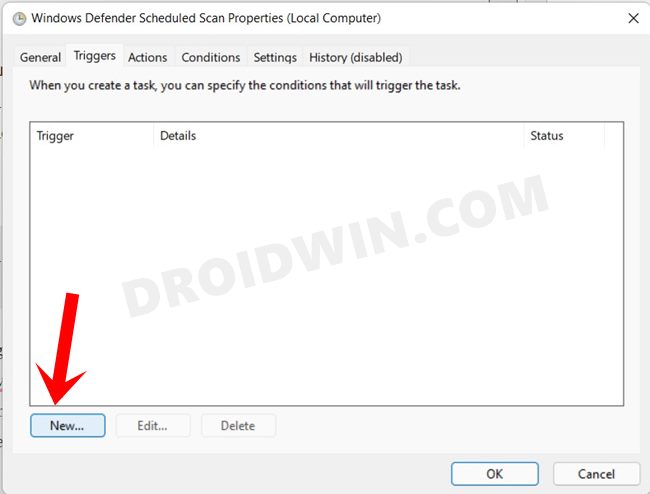
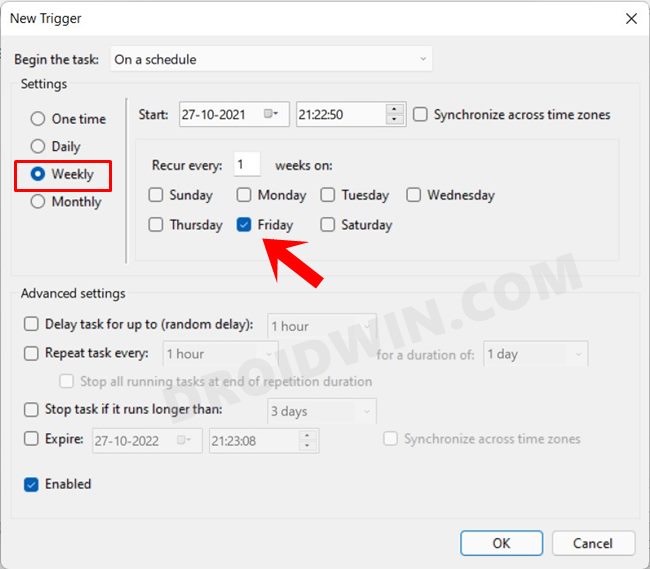
- Now go to the Triggers tab and click on the New button situated at the bottom left.
- Select Weekly from the menu, select a particular day, and click OK to save the changes.
- Now verify if it manages to fix the Antimalware Service Executable High CPU or Memory usage issue.
FIX 2: Remove Corrupt Windows Update Files
Microsoft releases cumulative updates that comes with a few enhancement for the Defender, along with the usual stability improvement and security enhancement to the OS. However, if the update is buggy or corrupt or gets disrupted during the download process, then it could spell out trouble for the Defender. Therefore, the best route forward is to delete these files. Here’s how it could be done:
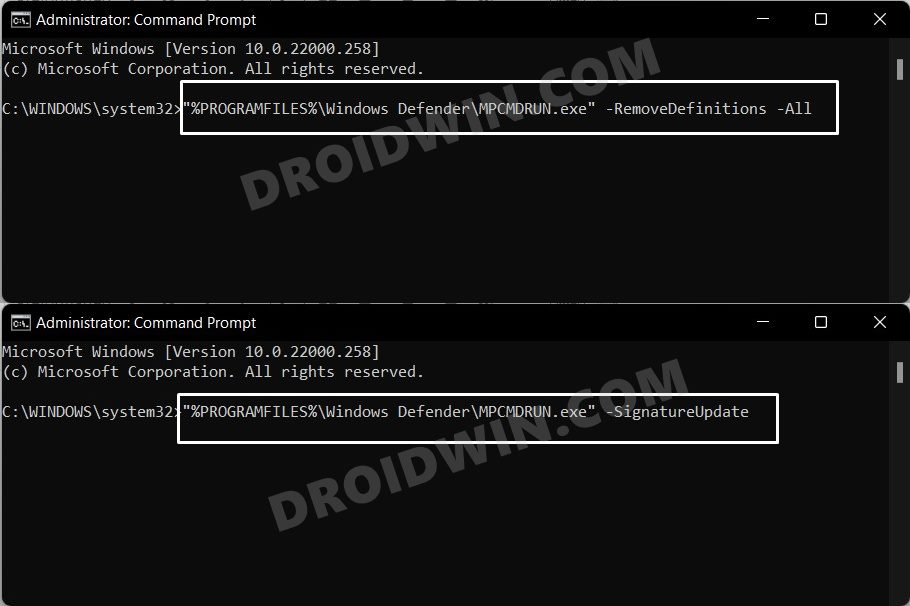
- Head over to the Start Menu, search Command Prompt, and launch it as an administrator.
- After that, execute the below two commands, one at a time:
"%PROGRAMFILES%\Windows Defender\MPCMDRUN.exe" -RemoveDefinitions -All
"%PROGRAMFILES%\Windows Defender\MPCMDRUN.exe" -SignatureUpdate
- Once done, restart your PC and then check if the Antimalware Service Executable High CPU/Memory usage issue is fixed or not.
FIX 3: Turn off Process Mitigation
Process Mitigation is in control of the Exploit Protection Service which turns is the major reason for the Windows Defender Bootloop issue. This happens when the Defender is trying to disable the activities of a particular app or folder but isn’t able to do so due to some restrictions being imposed on that content.
So the Exploit Protection Service will force the Defender to retry disabling this activity, and this process will keep on going on in the backend. As a result, the Defender will end up in a bootloop, and in turn, will end consuming a considerable amount of system resources.
To prevent this from happening, you will have to disable the Exploit Protection Service which could be carried out by turning off the Process Mitigation. So head over to the Start Menu and launch Command Prompt as an admin. Then execute the following command in that CMD window:
powershell “ForEach($v in (Get-Command -Name \”Set-ProcessMitigation\”).Parameters[\”Disable\”].Attributes.ValidValues){Set-ProcessMitigation -System -Disable $v.ToString().Replace(\” \”, \”\”).Replace(\”`n\”, \”\”) -ErrorAction SilentlyContinue}”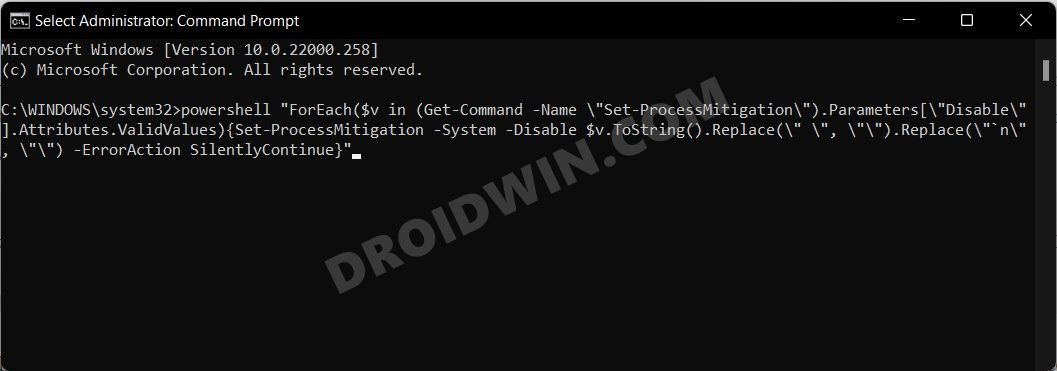
Once the command has been executed, it is recommended to restart your PC. Once it boots up, verify if the Antimalware Service Executable High CPU/Memory usage issue has been fixed or not.
FIX 4: Add Antimalware Service Executable to Defender Exclusion List
The next fix requires you to add the Antimalware Service Executable to Windows Defender’s whitelist. As a result, the Defender will no longer scan this service file, thereby reducing the load on the CPU.
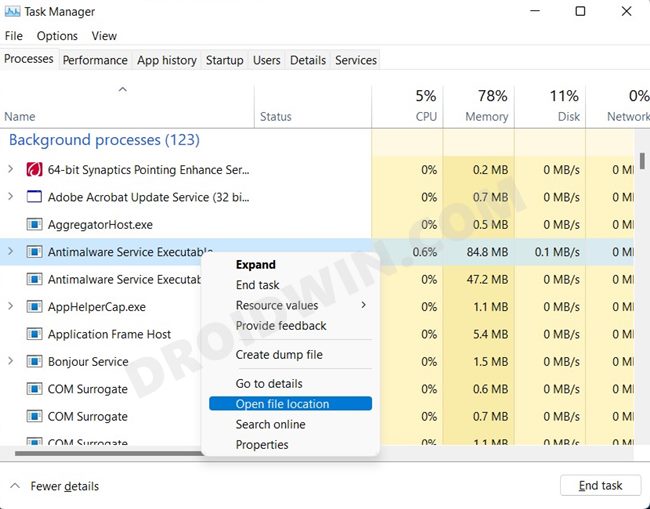
- To begin with, bring up the Task Manager via Ctrl+Shift+Esc shortcut key combinations.
- Then select Antimalware Service Executable under the Background Processes section, right-click on it and select Open File Location.
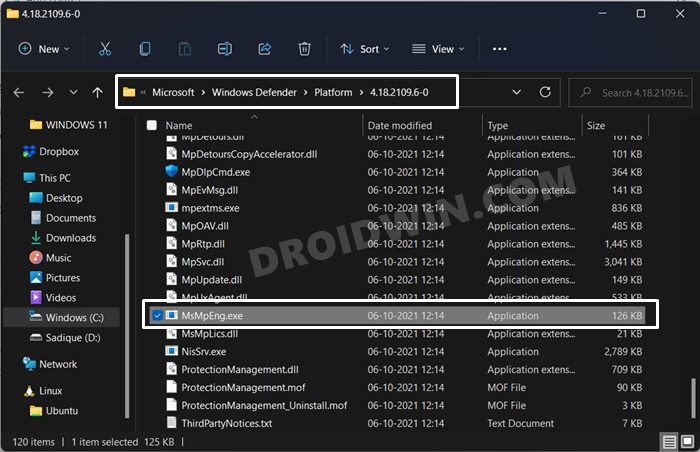
- It shall open the File Explorer and take you to its EXE file named MsMpEng.exe.
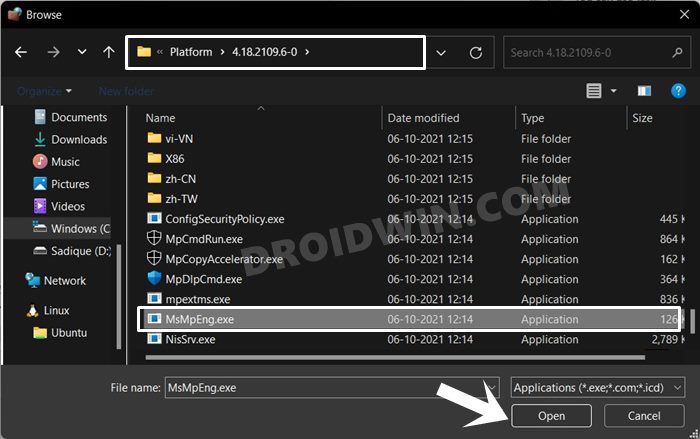
- So go to the address bar and copy that location. It should be something along the lines of:
C:\ProgramData\Microsoft\Windows Defender\Platform\4.18.2109.6-0
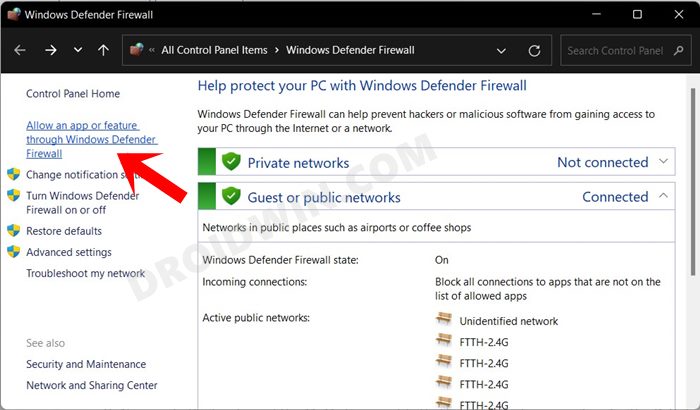
- Now head over to the Start Menu and launch Windows Defender Firewall.
- Then click on Allow an App or Feature through Windows Defender Firewall from the left menu bar.
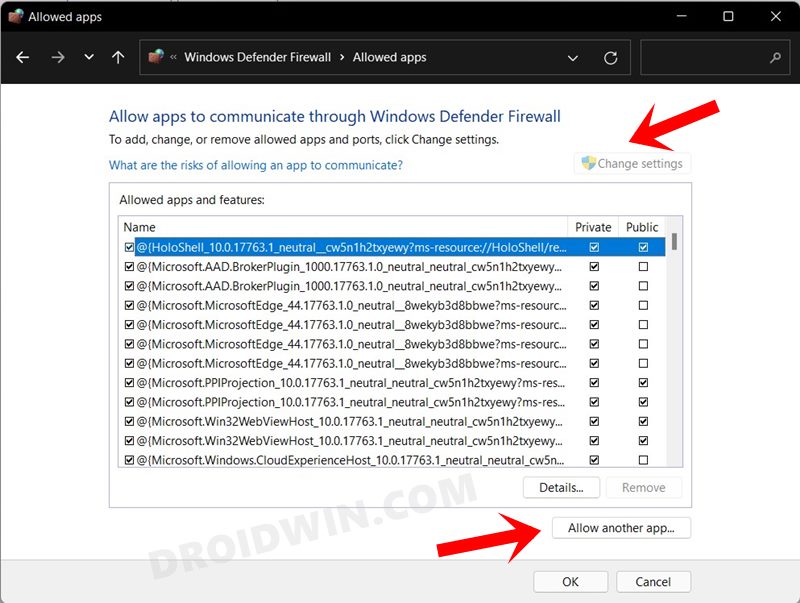
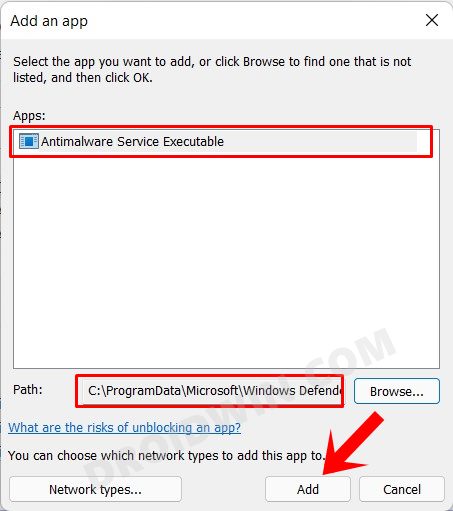
- After that, click on the Change Settings button followed by Allow Another App.
- Now click on the Browse button next to Path and paste the location in the File Explorer that appears.
- Then select the MsMpEng.exe file from that folder and click Open.
- The location will now be loaded to the Path field (and the app section should show the Antimalware Service Executable file). So click on the Add button to add it to the whitelist.
- Once done, restart your PC and then check if it was able to fix the Antimalware Service Executable High CPU/Memory usage issue.
FIX 5: Kill Antimalware Service Executable Process
Some users took this aggressive route of killing the Antimalware Service Executable Process and they did manage to rectify the underlying issue using this trick. Stopping this process would stop most of the associated Defender processes and upon a restart of your PC, they should be up and running again, this time with their fresh instances. So if you wish to try it out, then here’s what you need to do:
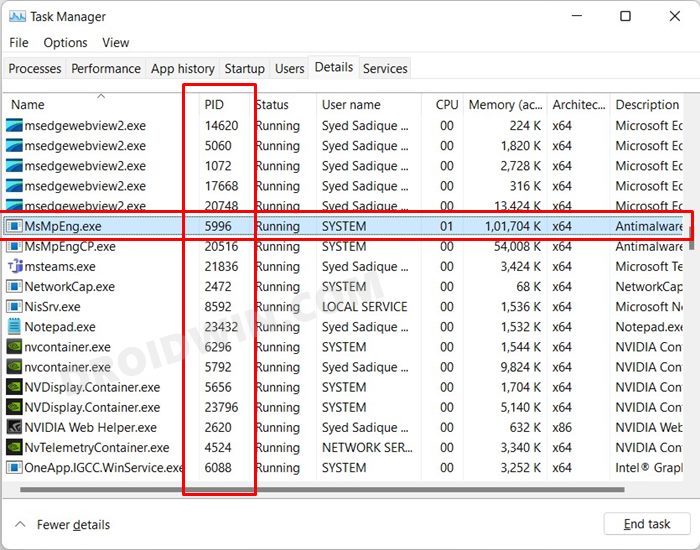
- To begin with, launch Task Manager via Ctrl+Shift+Esc shortcut keys.
- Then go to the Details tab, scroll to the MsMPEng.exe file and copy its PID number (which in my case is 5996).
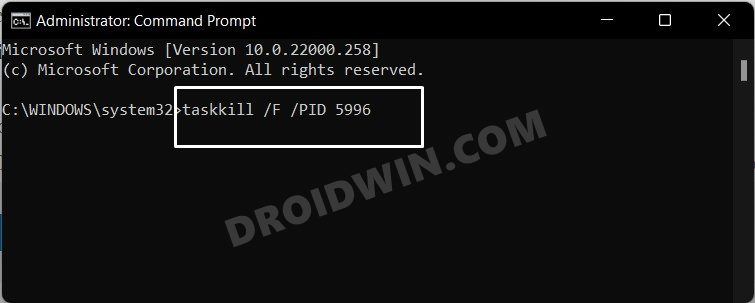
- After that, launch Command Prompt as an admin from the Start Menu.
- Then execute the below command (make sure to replace pid_number with the number that you have copied)
taskkill /F /PID pid_number
- Once done, reboot your PC and then check if the Antimalware Service Executable High CPU/Memory usage issue has been fixed or not.
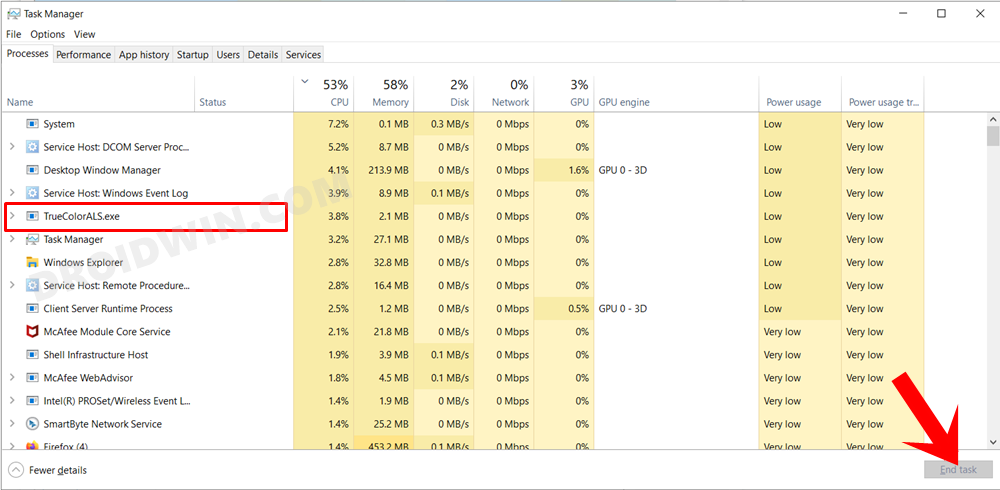
FIX 6: Disable True Color Service (For Dell users)
Some Dell users had found an interlink between the True Color (one of Dell’s bloatware apps) and the Antimalware services. Upon disabling the former, it turned out that the CPU load considerably decreased, even though the Antimalware service was still running. So it is recommended that the Dell users do give this tweak a try.
- To do so, launch Task Manager via Ctrl+Shift+esc shortcut key combinations.
- Then go to the Background Processes section and select TrueColorALS.exe.
- Finally, hit the End Task button situated at the bottom right.
- Now check if the fixes the Antimalware Service Executable High CPU/Memory usage issue.
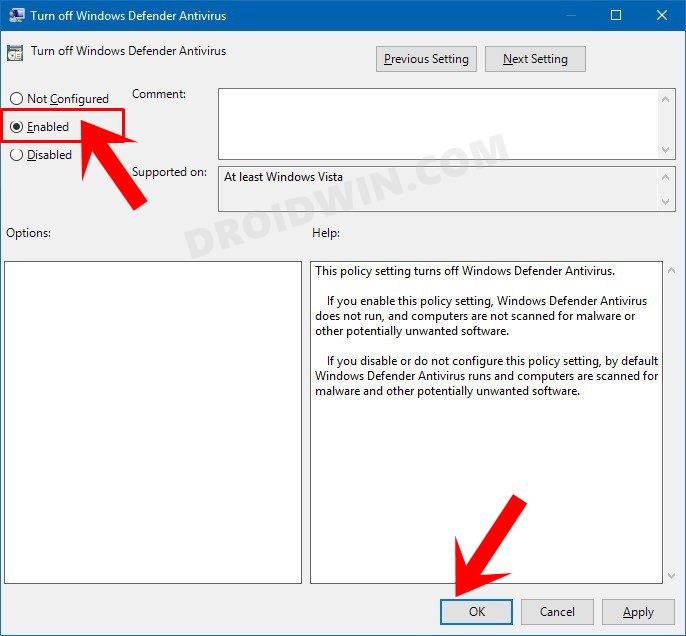
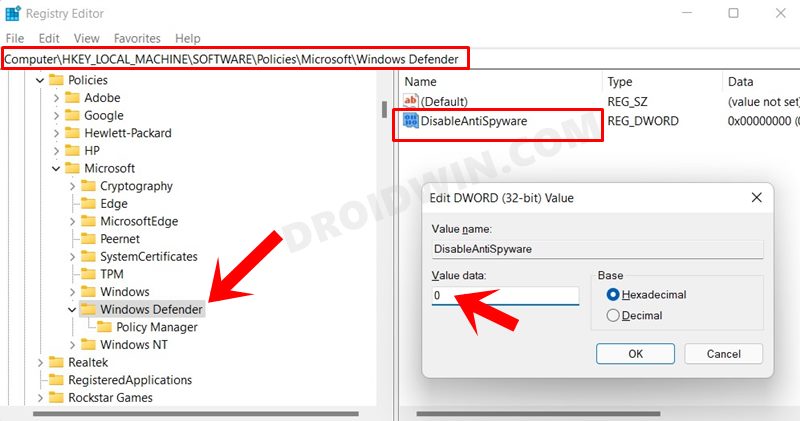
FIX 7: Disable Windows Defender
If none of the aforementioned methods managed to spell out success, then you should take the nuclear route and temporarily disable the Windows Defender app. There are two different methods through which this could be done: via Registry Editor and through Group Policy Editor. We have explained both these methods in-depth in this guide, do check it out: Shorter instructions are given below:
- Group Policy: Launch the Group Policy Editor > Go to Computer Configuration > Administrative Templates > Windows Components > Windows Defender from the left menu bar > Now open the “Turn off Windows Defender” policy from the right-hand side and change its State to Enabled.
- Registry Editor: Launch Registry Editor > Go to HKEY_LOCAL_MACHINE\SOFTWARE\Policies\Microsoft\Windows Defender > Create DWORD (32-bit) Value inside the Windows Defender folder> Name it DisableAntiSpyware and enter 0 under Value Data. That’s it.
So with this, we round off the guide on how you could fix the Antimalware Service Executable High CPU/Memory usage issue. We have listed seven different methods for the same. Do let us know in the comments section which one worked out in your favor. Likewise, all your queries are welcomed in the comments below.


Chris Marks
TrueColor was the culprit for me