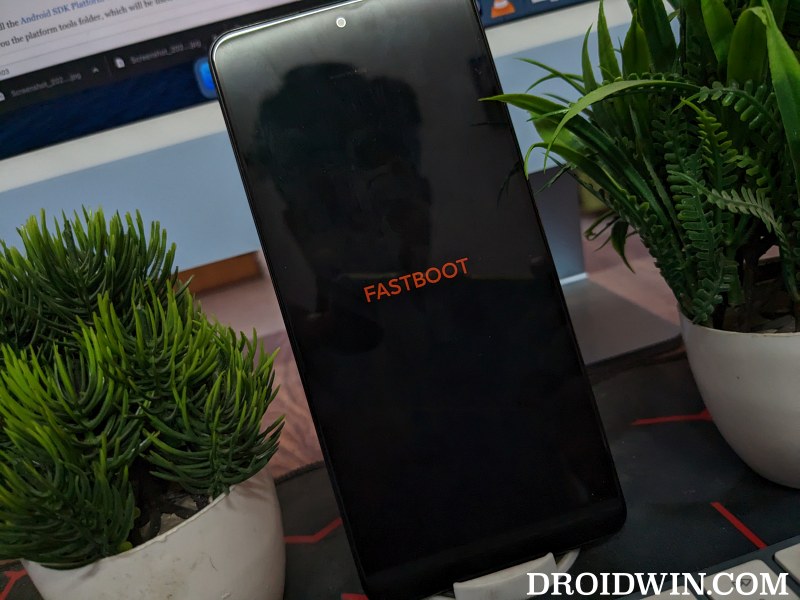
In this guide, we will show you the steps to install the latest Android 14 ROM on your Poco F5/Redmi Note 12 Turbo. The fourteenth iteration of the OS brings a slew of noteworthy features to the fore. Some of the intriguing ones include the likes of new photo pickers, lock screen customizations, Notification Flash, Auto-Confirm Lock Screen, and Predictive Back Gesture.
While it usually takes a while for the custom ROMs to be ported on the latest OS build, however, Xiaomi devices have always been known to be among the actively supported players in custom development. And the proof is right there in front of our eyes- the Poco F5/Redmi Note 12 Turbo has already been blessed with a couple of custom ROMs running the latest Android 14. So without any further ado, let’s make you aware of the steps to install them onto your device right away.
Table of Contents
How to Install Android 14 ROMs on Poco F5/Redmi Note 12 Turbo

The below process will wipe off all the data from your device, so take a complete device backup beforehand. Droidwin and its members wouldn’t be held responsible in case of a thermonuclear war, your alarm doesn’t wake you up, or if anything happens to your device and data by performing the below steps.
STEP 1: Install Android SDK

First and foremost, you will have to install the Android SDK Platform Tools on your PC. This is the official ADB and Fastboot binary provided by Google and is the only recommended one. So download it and then extract it to any convenient location on your PC. Doing so will give you the platform-tools folder, which will be used in this guide to install custom ROMs on Poco F5/Pro/Redmi Note 12 Turbo/K60
STEP 2: Enable USB Debugging and OEM Unlocking
Next up, you will also have to enable USB Debugging and OEM Unlocking on your device. The former will make your device recognizable by the PC in ADB mode. This will then allow you to boot your device to Fastboot Mode. On the other hand, OEM Unlocking is required to carry out the bootloader unlocking.
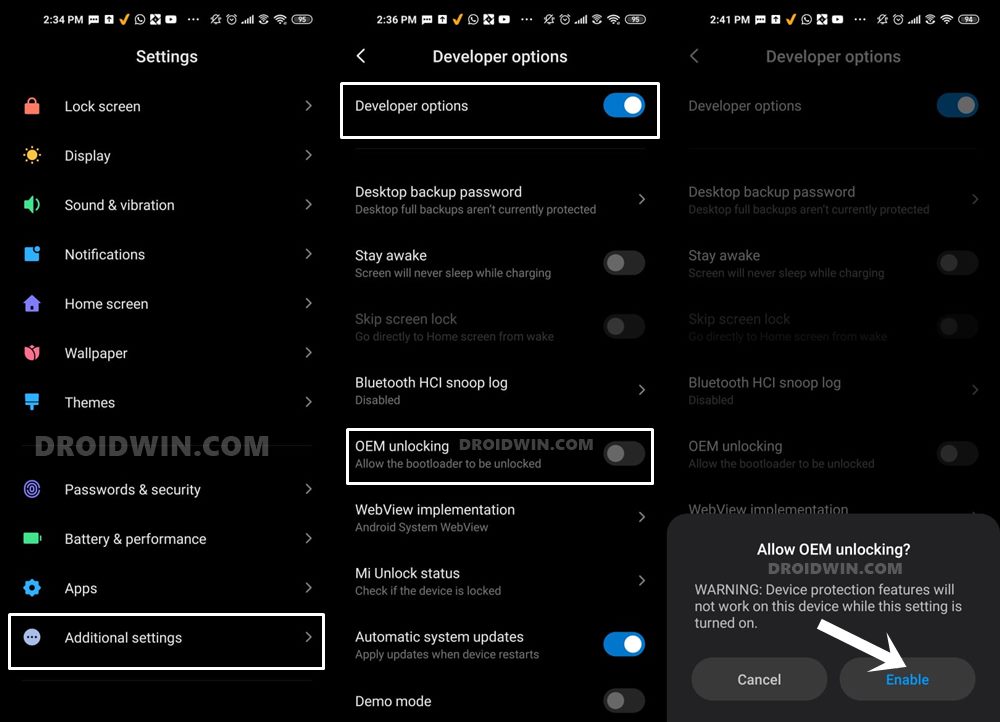
So head over to Settings > About Phone > Tap on Build Number 7 times > Go back to Settings > System > Advanced > Developer Options > Enable USB Debugging and OEM Unlocking.
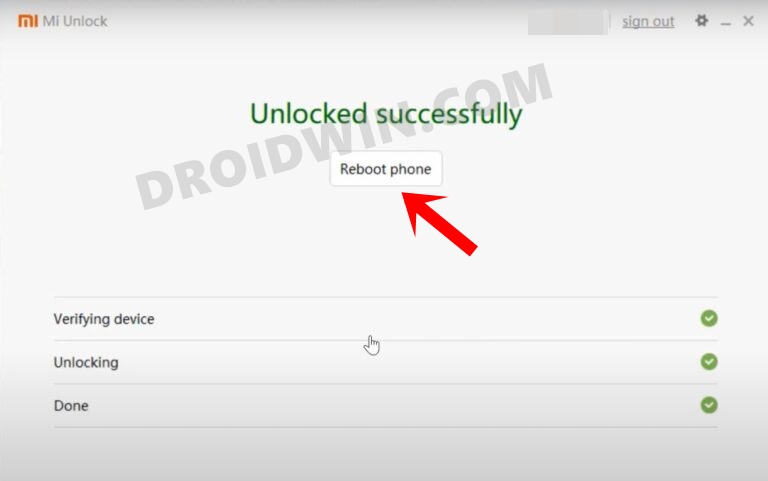
STEP 3: Unlock Bootloader on Poco F5/Redmi Note 12 Turbo
Next up, you will also have to unlock the device’s bootloader. Do keep in mind that doing so will wipe off all the data from your device and could nullify its warranty as well. So if that’s all well and good, then please refer to our detailed guide on How to Unlock Bootloader on any Xiaomi Device.
STEP 4: Download Android 14 ROM for Poco F5/Redmi Note 12 Turbo
- You may now grab hold of the ROM file from the below link:
AOSP ROM: DOWNLOAD LINK
Evolution X:DOWNLOAD LINK
PixelOS: ROM | RECOVERY
SK AOSP: DOWNLOAD LINK
XIAOMI EU ROM: MIUI-WEEKLY-RELEASES | MIUI-STABLE-RELEASES
LineageOS 21 [Unofficial]: DOWNLOAD LINK
crDroid: DOWNLOAD LINK
Elite ROM: DOWNLOAD LINK
AlphaDroid ROM: DOWNLOAD LINK
DerpFest ROM: DOWNLOAD LINK
Paranoid Android: DOWNLOAD ROM | FLASHING KIT
Project Matrixx: DOWNLOAD ROM
HorizonDroid: DOWNLOAD LINK
SuperiorOS: DOWNLOAD LINK
EdithOS: DOWNLOAD LINK
Pixel Star: DOWNLOAD LINK
Bliss OS: DOWNLOAD LINK
EliteROM: DOWNLOAD LINK
Firmware: DOWNLOAD LINK
TWRP: DOWNLOAD LINK + INSTALLATION STEPS
- Rename the ROM file to rom.zip and transfer it to platform-tools..
STEP 5: Boot to Fastboot Mode
- Connect your device to the PC via a USB cable. Make sure USB Debugging is enabled.
- Then head over to the platform-tools folder, type in CMD in the address bar, and hit Enter. This will launch the Command Prompt.

- Type in the following command in the CMD window to boot your device to Fastboot Mode
adb reboot bootloader

- To verify the Fastboot connection, type in the below command and you should get back the device ID.
fastboot devices

- If you are not getting any serial ID, then please install the Fastboot Drivers on your PC.
How to Install Elite Android 14 ROM on Poco F5
- First off, download and install TWRP Recovery on your device.
- Then boot your device to the TWRP Recovery via the below command:
adb reboot recovery
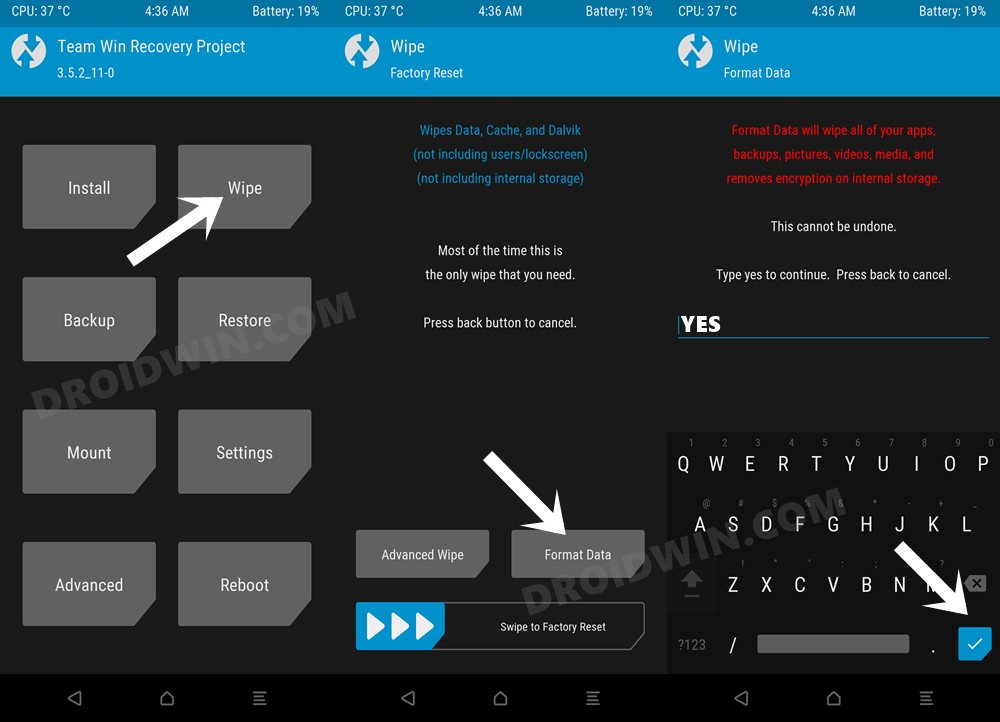
- Now from the recovery, go to Wipe and select Format Data.
- Then type YES in the space provided and hit the checkmark.

- Download the latest firmware for your region from here
- Now transfer the ROM and firmware files to your device.
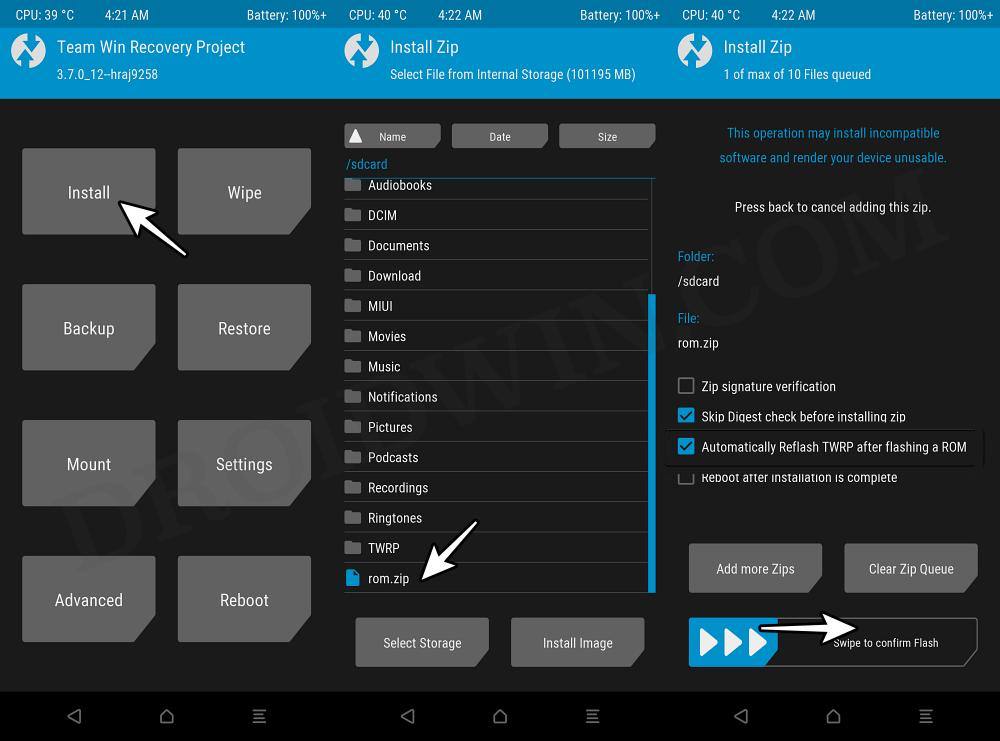
- Now go to Install, select the firmware ZIP file, and flash it.
- Then go to Install, select the ROM ZIP file, and flash it.


- Now go to Wipe and do a Format Data.


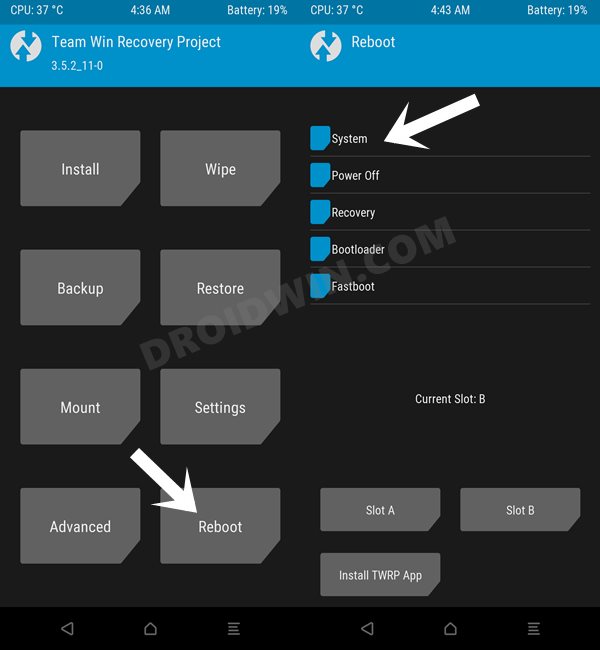
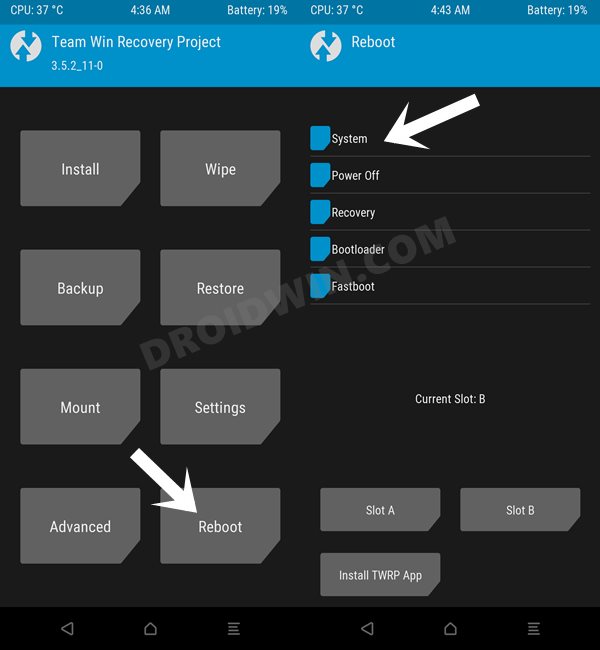
- Finally, go to Reboot and select System. Your device will now reboot to the newly installed OS.
That’s it. These were the steps to flash the Elite Android 14 ROM on your Poco F5. If you have any queries, drop them in the comments section below
How to Install Bliss OS Android 14 on Poco F5
- Download and install TWRP Recovery on your device.
- Then boot your device to TWRP via the below command:
adb reboot recovery
- From TWRP Recovery, go to Wipe and select Format Data.
- Then type YES in the space provided and hit the checkmark.


- Download the latest firmware for your region from here
- Now transfer the ROM and firmware files to your device.
- Now go to Install, select the firmware ZIP file, and flash it.
- Then go to Install, select the ROM ZIP file, and flash it.


- [Optional] If you want to flash GApps, then Reboot to Recovery and flash it.
- Moving on, now go to Wipe and do a Format Data.


- Finally, go to Reboot and select System. Your device will now reboot to the newly installed OS.

That’s it. These were the steps to flash the Bliss Android 14 ROM on your Poco F5. If you have any queries, drop them in the comments section below.
Install Pixel Star ROM on Poco F5
- Download and install TWRP Recovery on your device.
- Then boot your device to TWRP via the below command:
adb reboot recovery
- From TWRP Recovery, go to Wipe and select Format Data.
- Then type YES in the space provided and hit the checkmark.


- Download the latest firmware for your region from here
- Now transfer the ROM and firmware files to your device.
- Now go to Install, select the firmware ZIP file, and flash it.
- Then go to Install, select the ROM ZIP file, and flash it.


- [Optional] If you want to flash GApps, then Reboot to Recovery and flash it.
- Moving on, now go to Wipe and do a Format Data.


- Finally, go to Reboot and select System. Your device will now reboot to the newly installed OS.

That’s it. These were the steps to flash the Pixel Star ROM on your Poco F5. If you have any queries, drop them in the comments section below.
Install crDroid ROM on Poco F5
- First off, download and install TWRP Recovery on your device.
- Then boot your device to TWRP via the below command:
adb reboot recovery
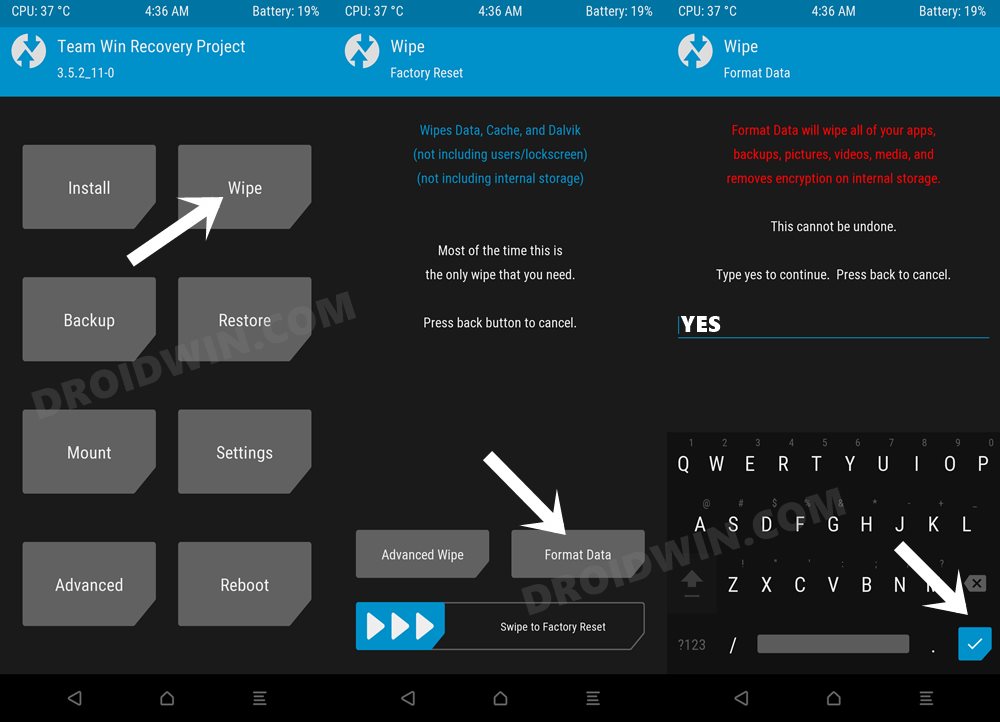
- Now, from TWRP Recovery, go to Wipe and select Format Data.
- Then type YES in the space provided and hit the checkmark.
- Now transfer the ROM file to your device via TWRP.
- For that, execute the below command in the CMD window:
adb push crdroid.zip /sdcard

- Next up, download the latest firmware for your region from here and transfer it to your device as well.
- Now go to Install, select the firmware ZIP file, and flash it.
- Then go to Install, select the ROM ZIP file, and flash it.
- [Optional] if you want to flash GApps, then reboot to recovery and flash it.
- Once done, go to Reboot and select System.
- Your device will now reboot to the newly installed OS.

Install HorizonDroid ROM on Poco F5
- Download and install TWRP Recovery on your device.
- From TWRP Recovery, go to Wipe and select Format Data.
- Then type YES in the space provided and hit the checkmark.


- Download the latest firmware for your region from here
- Now transfer the ROM and firmware files to your device via TWRP.
- Now go to Install, select the firmware ZIP file, and flash it.
- Then go to Install, select the ROM ZIP file, and flash it.


- [Optional] If you want to flash GApps, then Reboot to Recovery and flash it.
- Movin gon, now go to Wipe and do a Format Data.


- Finally, go to Reboot and select System. Your device will now reboot to the newly installed OS.

That’s it. These were the steps to flash the HorizonDroid ROM on your Poco F5. If you have any queries, drop them in the comments section below.
Install Project Matrixx Android 14 on Poco F5
NOTE for STEP 7: To retain TWRP Recovery after ROM flash, make sure to checkmark “Automatically Reflash TWRP after flashing a rom” in the recovery. Otherwise, TWRP will be replaced by the AOSP Recovery from the ROM.
- To begin with, download and install TWRP on your device.
- Now download the firmware ZIP and transfer it to your device.
- Download the ROM ZIP and transfer it to your device as well.
- Then boot your device to TWRP via the below command:
adb reboot recovery
- Now go to Wipe and erase Dalvik/Art Cache, Cache, and Data.
- Once done, go to Install, select the firmware ZIP, and flash it.
- Then go to Install, select the ROM ZP file, and flash it as well.

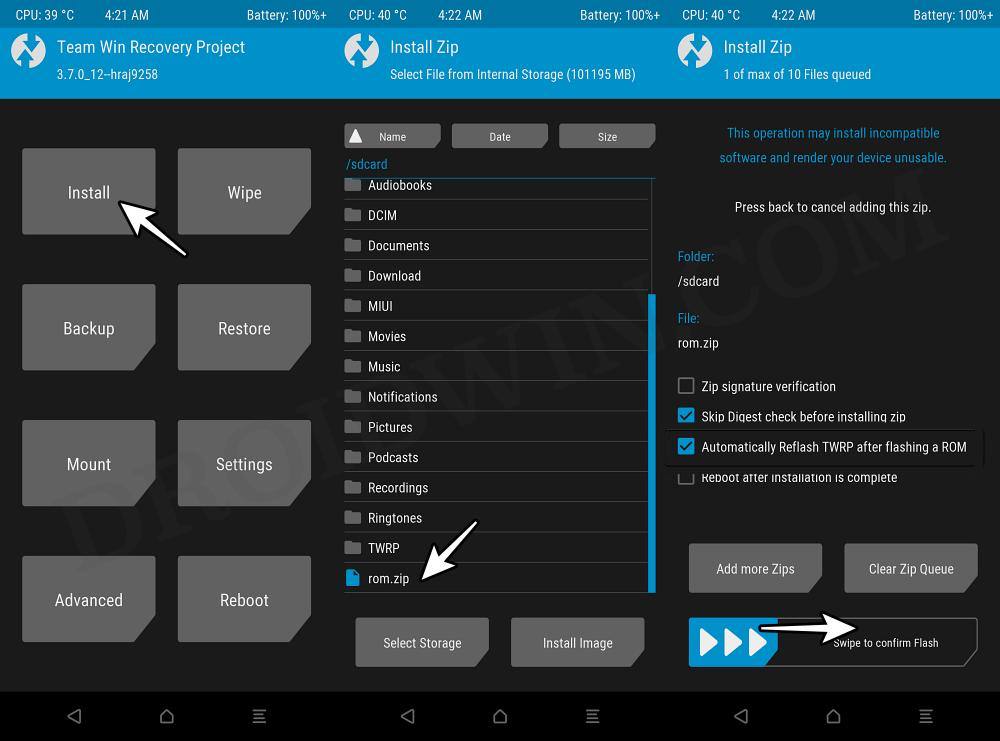
- Once done, go to Wipe > Format Data > type in YES > hit Enter.

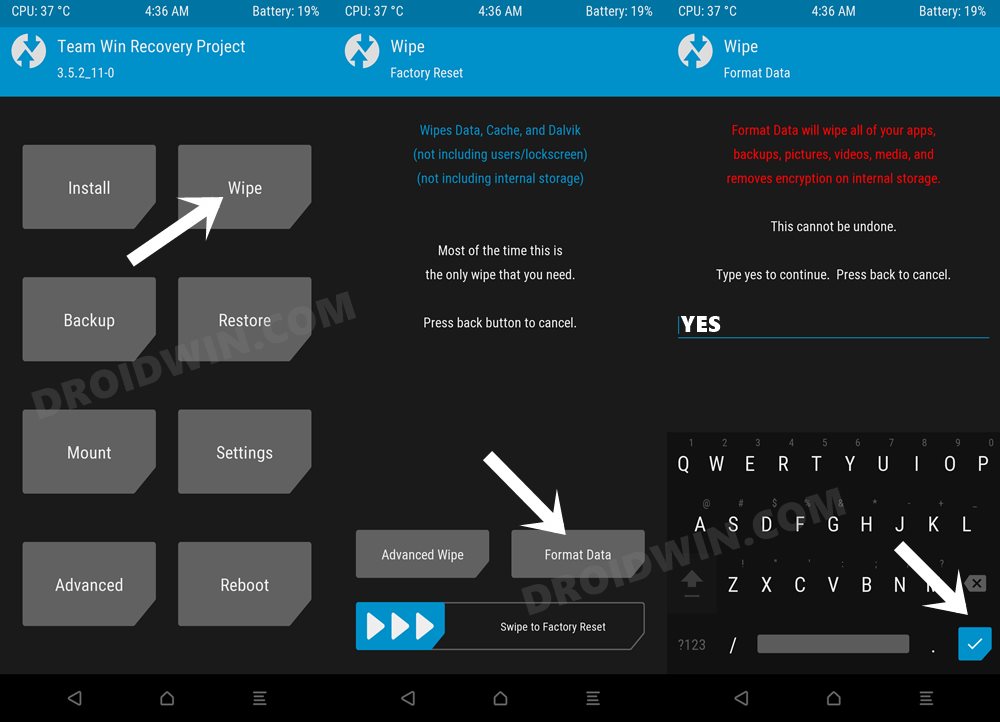
- Finally, select Reboot > System. Your device will boot to the OS.

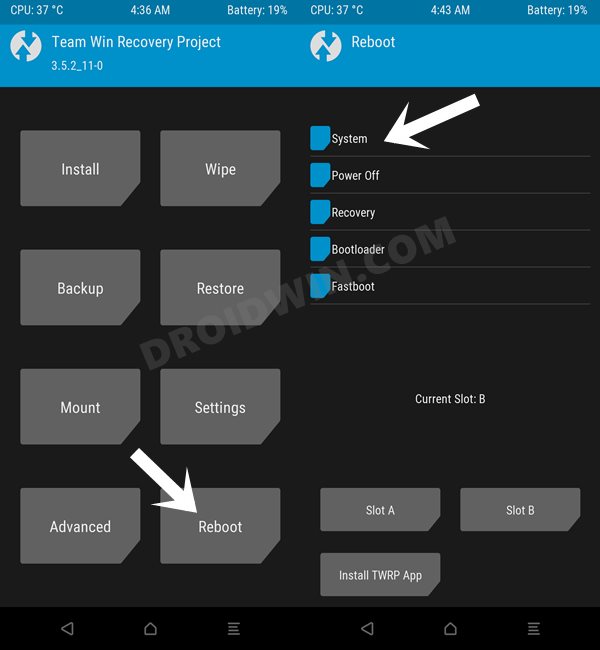
That’s it. These were the steps to flash project Matrixx ROM based on Android 14 onto Poco F5/Redmi Note 12 Turbo.
Flash SuperiorOS on Poco F5
- First off, download and install TWRP Recovery on your device.
- Now from TWRP Recovery, go to Wipe and select Format Data.
- Then type YES in the space provided and hit the checkmark.


- Download the latest firmware for your region from here
- Now transfer the ROM and firmware files to your device via TWRP.
- Now go to Install, select the firmware ZIP file, and flash it.
- Then go to Install, select the ROM ZIP file, and flash it.


- [Optional] If you want to flash GApps, then Reboot to Recovery and flash it.
- Movin gon, now go to Wipe and do a Format Data.


- Finally, go to Reboot and select System. Your device will now reboot to the newly installed OS.

That’s it. These were the steps to flash the SuperiorOS ROM on your Poco F5. if you have any queries, drop them in the comments section below.
Flash Paranoid Android 14 Poco F5
Via Fastboot Method
- To begin with, download and extract the flashing kit.
- Then transfer the ROM file to this flashing kit folder.
- Likewise, rename the ROM to aospa.zip.
- Now transfer the firmware to this flashing kit folder.
- Likewise, rename the firmware to firmware.zip.
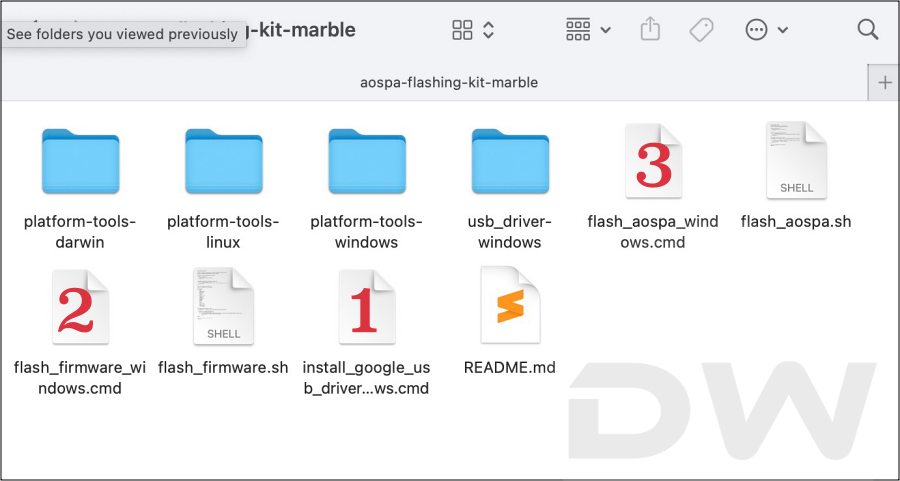
- Now open the following three batch files, one after another:
install_google_usb_driver
flash_firmware
flash_aospa

- Then type in the below command to reboot to recovery
fastboot reboot recovery
- Now do a format data/factory reset from recovery.
- Finally, you may now reboot to the newly flashed OS.
Via Recovery Method
This is the lengthier of the two methods and is NOT the recommended approach. Still, if you wish to take a risk, then here’s what you need to do:
- First off, carry out STEPS 1 to 5 listed above.
- Then download the Paranoid Android Recovery ROM and transfer it to the platform-tools folder.
- After that, download the latest firmware and transfer it to the platform-tools folder as well.
- Now install the TWRP Recovery [Android 14 build] on your device.
- Then boot your device to TWRP Recovery via the below command:
adb reboot recovery
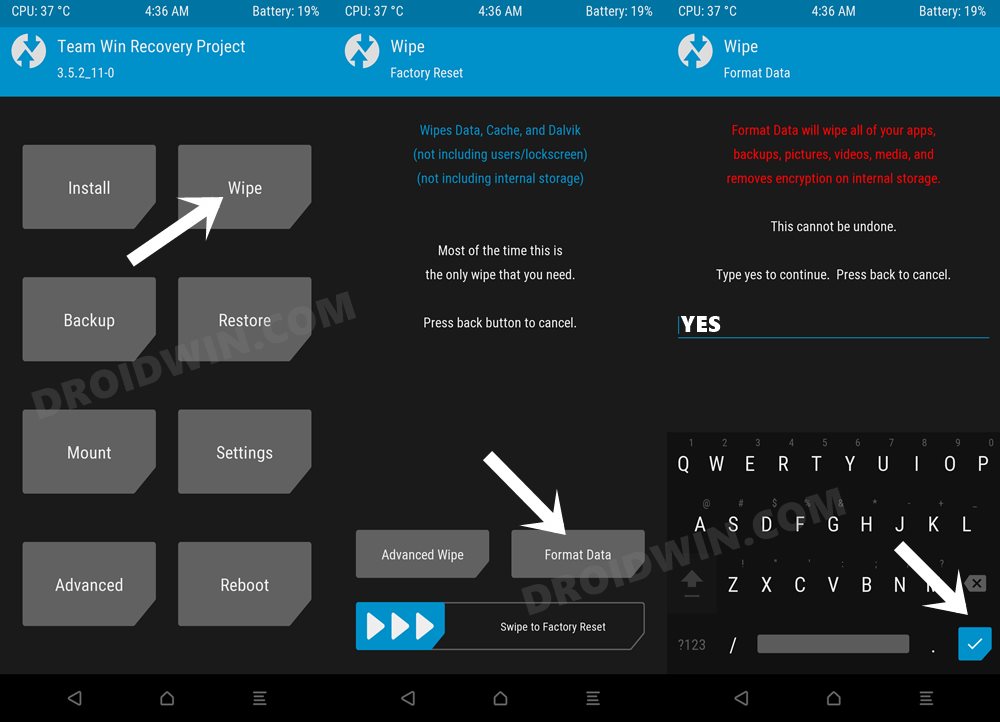
- Now go to Wipe > Format Data > Type in YES > hit the blue check.

- Then, transfer both the firmware and ROM files to your device.
- Once done, go to Install, select the firmware.zip file and flash it.
- Again, go to Install, this time select the ROM.zip file and flash it.

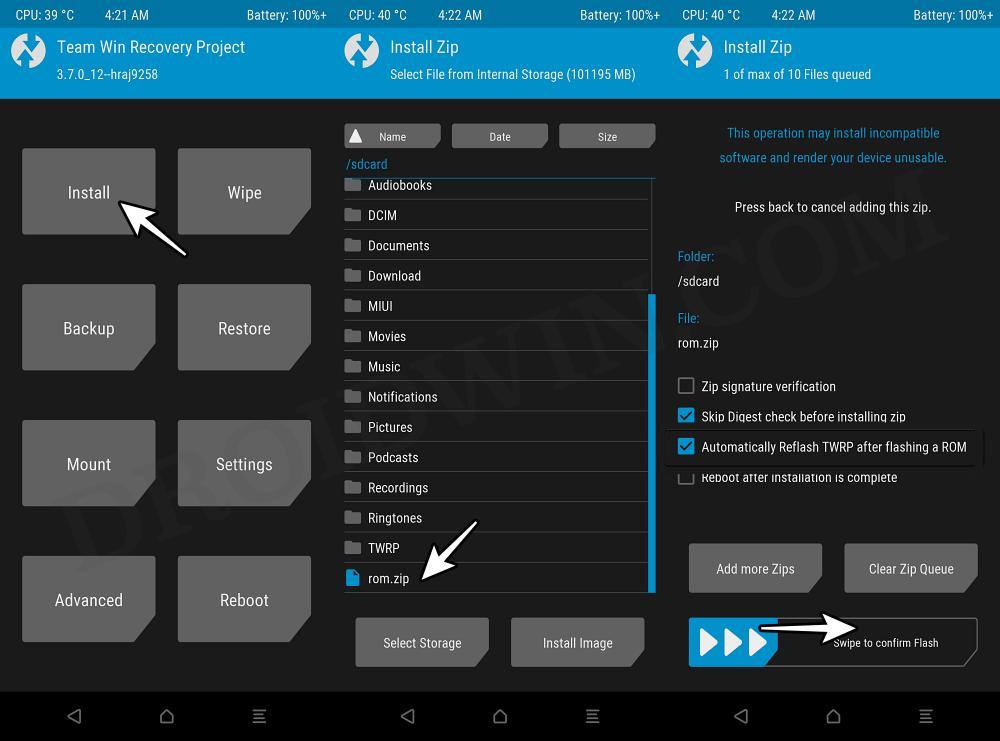
- Once done, again do format data just to be on the safer side.
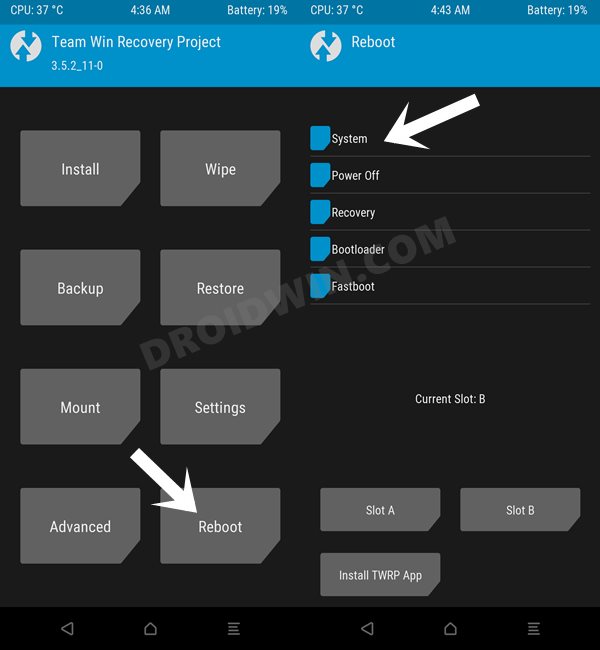
- Finally, select Reboot > System. Your device will boot to the newly flashed OS.

Flash Derpfest ROM on Poco F5
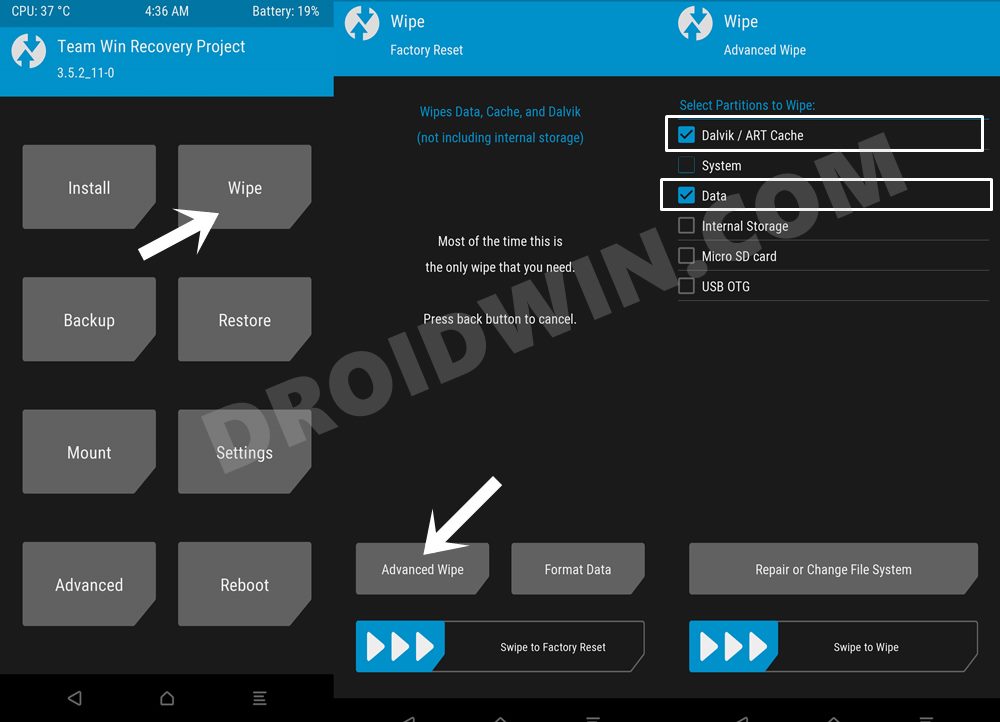
- From TWRP, go to Wipe and select Data, Cache, and Dalvik.
- Then go to Install, select the ROM ZIP file, and perform a right swipe to flash it.
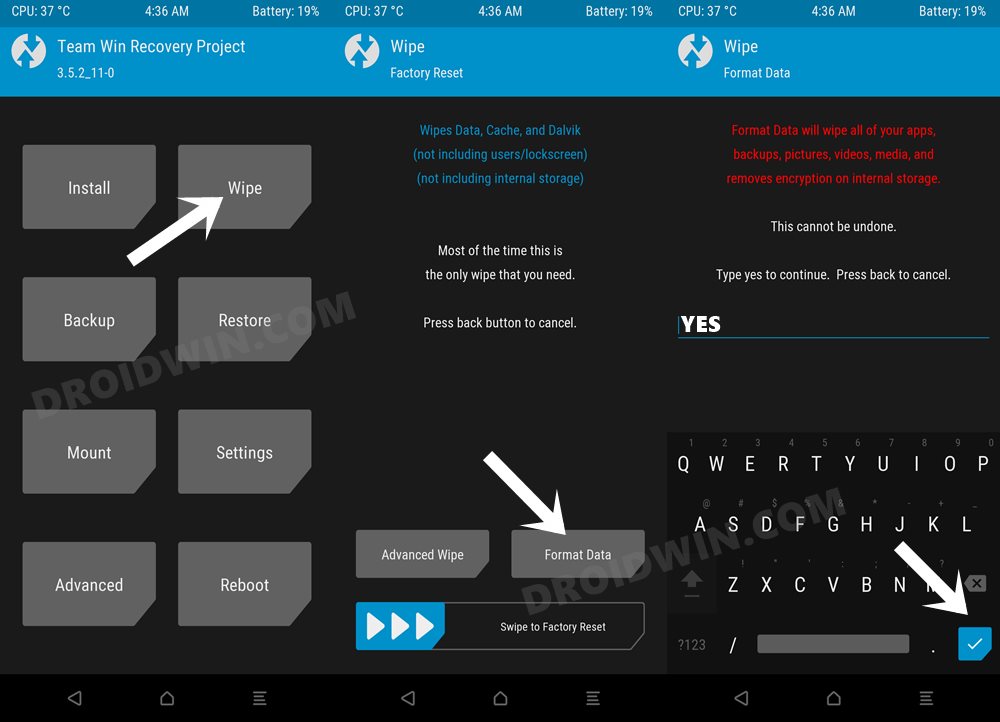
- Once done, go to Wipe and select Format Data. Then type YES in the space provided and hit the checkmark.
- Once done, go to Reboot and select System. Your device will now boot to the newly installed OS.
Flash AlphaDroid on Poco F5
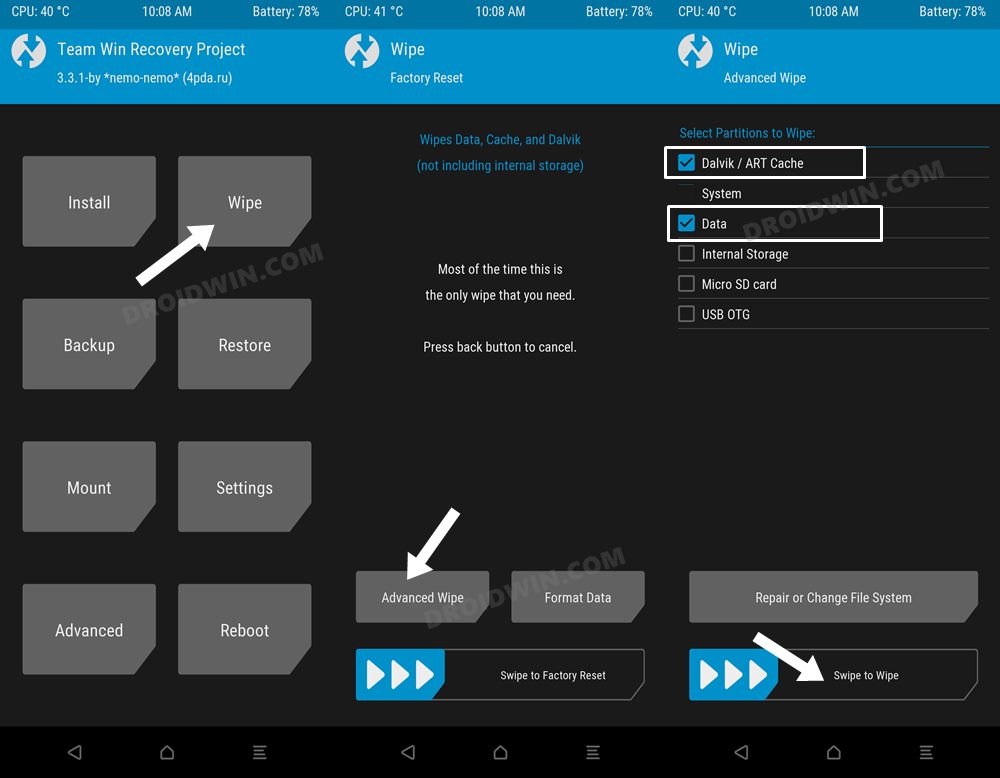
- From TWRP, go to Wipe and checkmark Dalvik Cache, Cache, and Data.
- Then perform a right swipe to wipe these partitions.
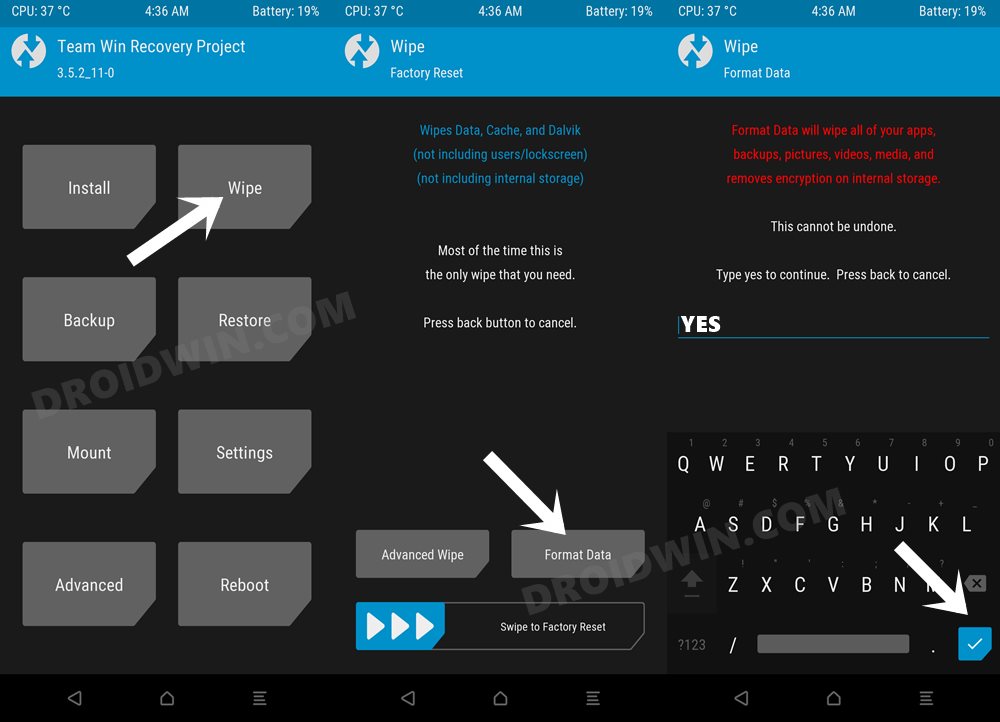
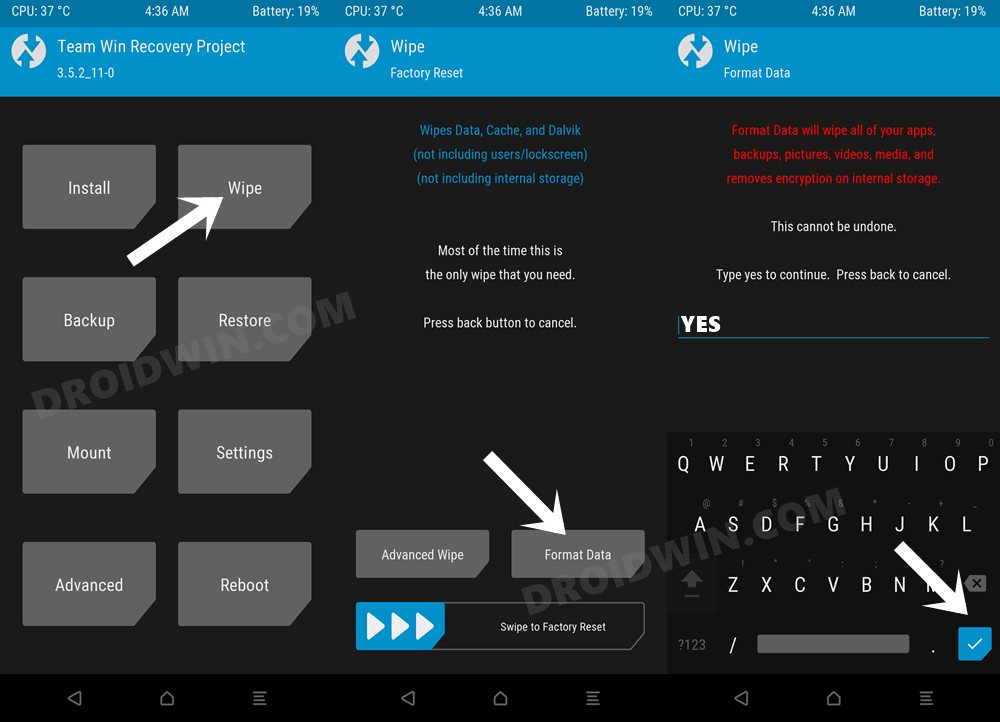
- Then go to Wipe > select Format Data > type YES in the space provided and hit the checkmark.
- Then transfer the firmware.zip and rom.zip onto your device.
- Now go to Install, select the firmware.zip, and perform a right swipe to flash it.
- Once done, go to Install, select the rom.zip file, and perform a right swipe to flash it.
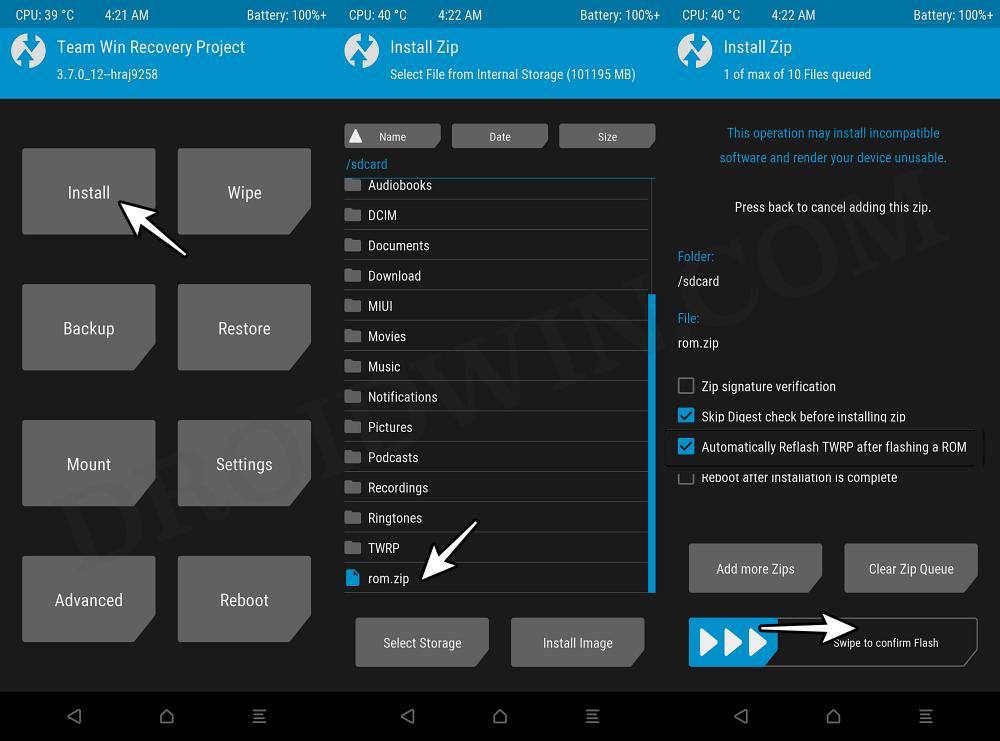
- Once flashed, again do a format data via the TWRP Recovery.
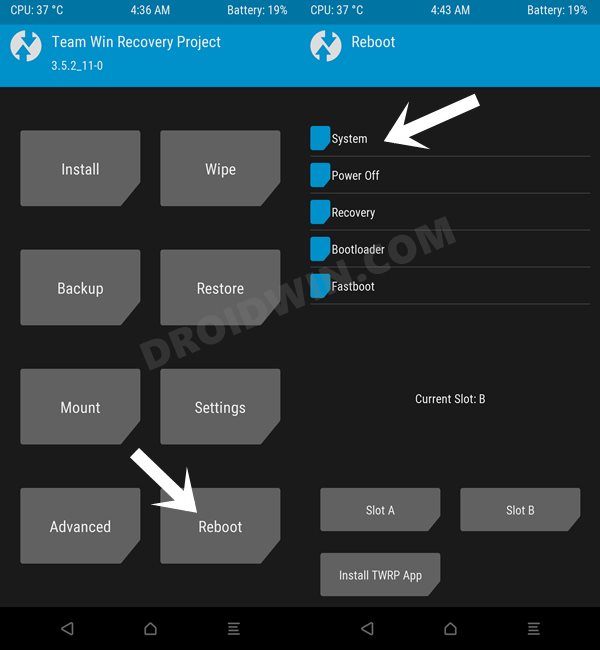
- Finally, go to Reboot and select System. Your device will boot to the newly flashed OS.
How to Flash EdithOS Android 14 ROM on Poco F5
- Download and install TWRP Recovery on your device.
- From TWRP Recovery, go to Wipe and select Format Data.
- Then type YES in the space provided and hit the checkmark.


- Download the latest firmware for your region from here
- Now transfer the ROM and firmware files to your device via TWRP.
- Now go to Install, select the firmware ZIP file, and flash it.
- Then go to Install, select the ROM ZIP file, and flash it.


- [Optional] If you want to flash any ZIP file, then Reboot to Recovery and flash it.
- Moving on, now go to Wipe and do a Format Data.


- Finally, go to Reboot and select System. Your device will now reboot to the newly installed OS.

That’s it. These were the steps to flash the Edith ROM on your Poco F5. If you have any queries, drop them in the comments section below.
Install SK AOSP ROM on Poco F5/Redmi Note 12 Turbo
- To begin with, install the TWRP Recovery on your device.
- Then boot your device to TWRP via the below command:
adb reboot recovery //from OS
fastboot reboot recovery //from Fastboot Mode
- Then go to Wipe > Advanced Wipe > checkmark Dalvik Art Cache, Cache, and Data.
- Now perform a right swipe to wipe these partitions.


- Now go to Wipe > Format Data > Type in Yes > Hit Enter.
- Then transfer the ROM and firmware ZIP to your device.
- Now go to Install, select the firmware ZIP file, and flash it.
- Again go to Install, select the ROM ZIP file, and checkmark:
"Automatically reflash TWRP after flashing a ROM"

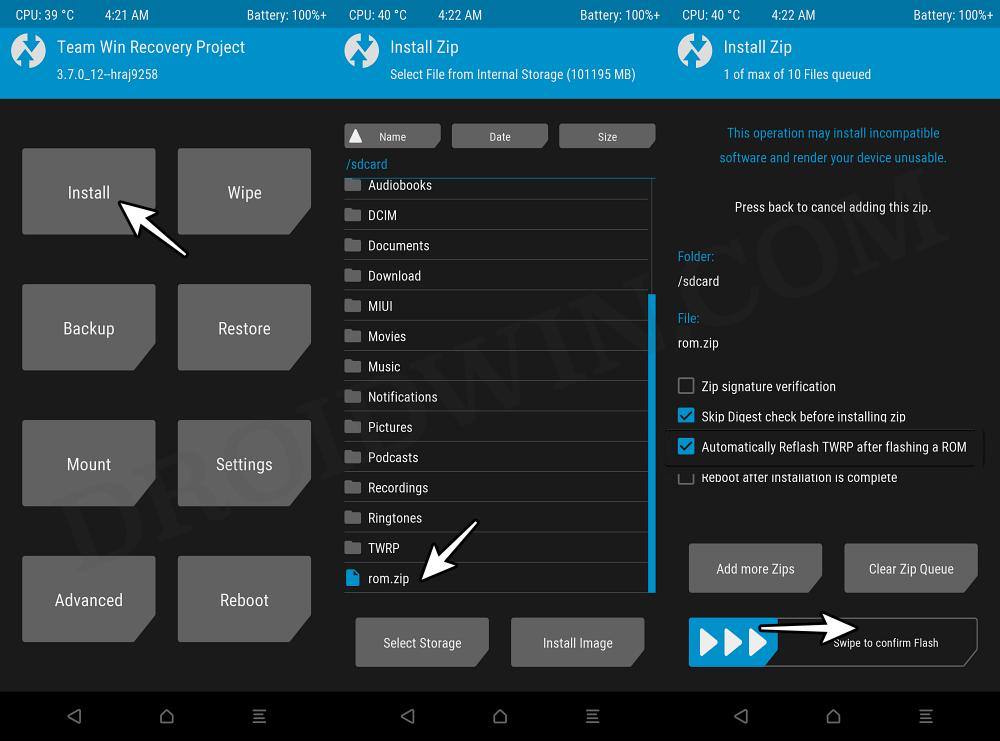
- Then flash the ROM and wait for the process to complete.
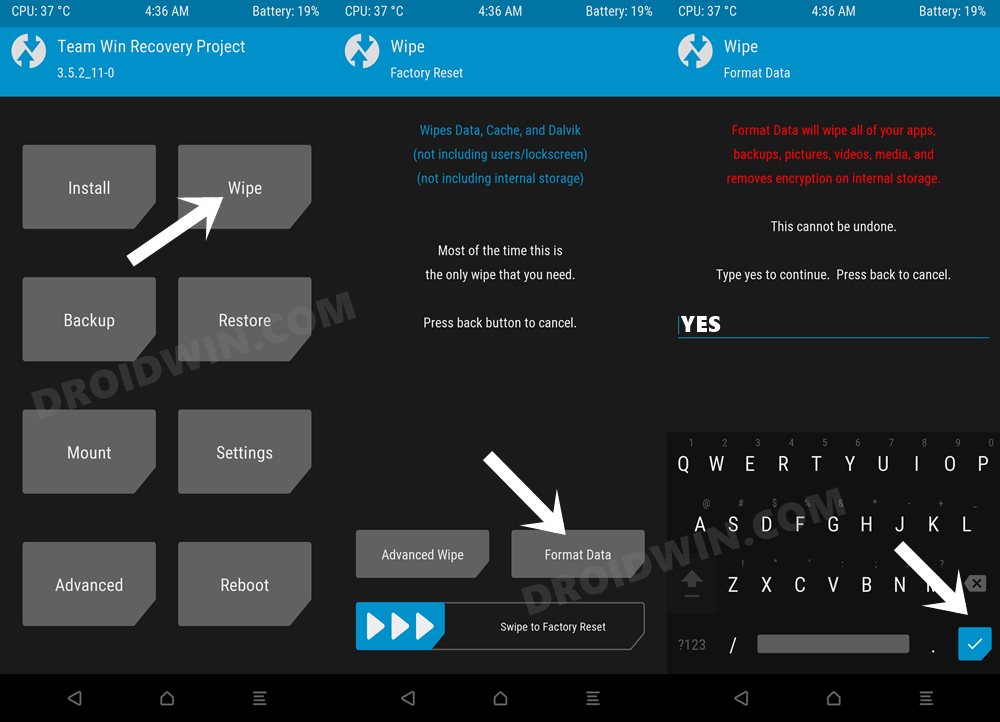
- Once done, go to Wipe > Format Data > Type in Yes > Hit Enter.

- Finally, go to Reboot and select System. Your device will boot to the OS.
Install Android 14 AOSP ROM on Poco F5/Redmi Note 12 Turbo
- From Fastboot Mode, type in the below command to format the device
fastboot -w
- Now type in the below command to flash the ROM:
fastboot update rom.zip
- Once flashed, your device will automatically boot to the OS
Install PixelOS Android 14 on Poco F5 / Redmi Note 12 Turbo
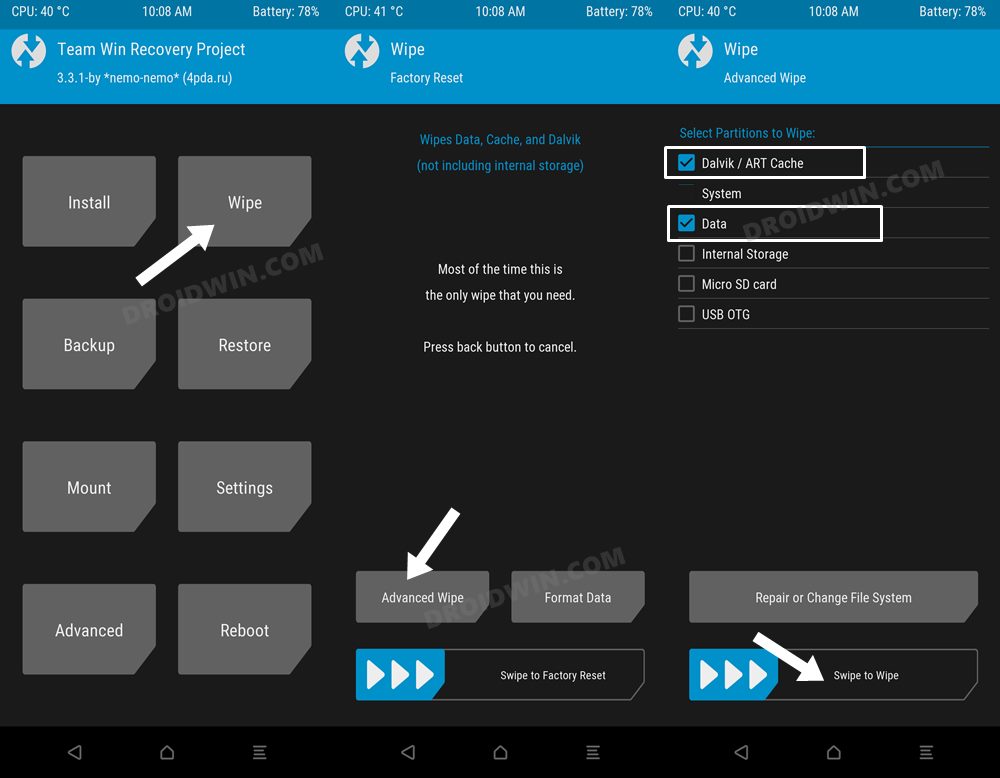
- From TWRP, go to Wipe and checkmark Dalvik Cache, Cache, and Data.
- Then perform a right swipe to wipe these partitions.
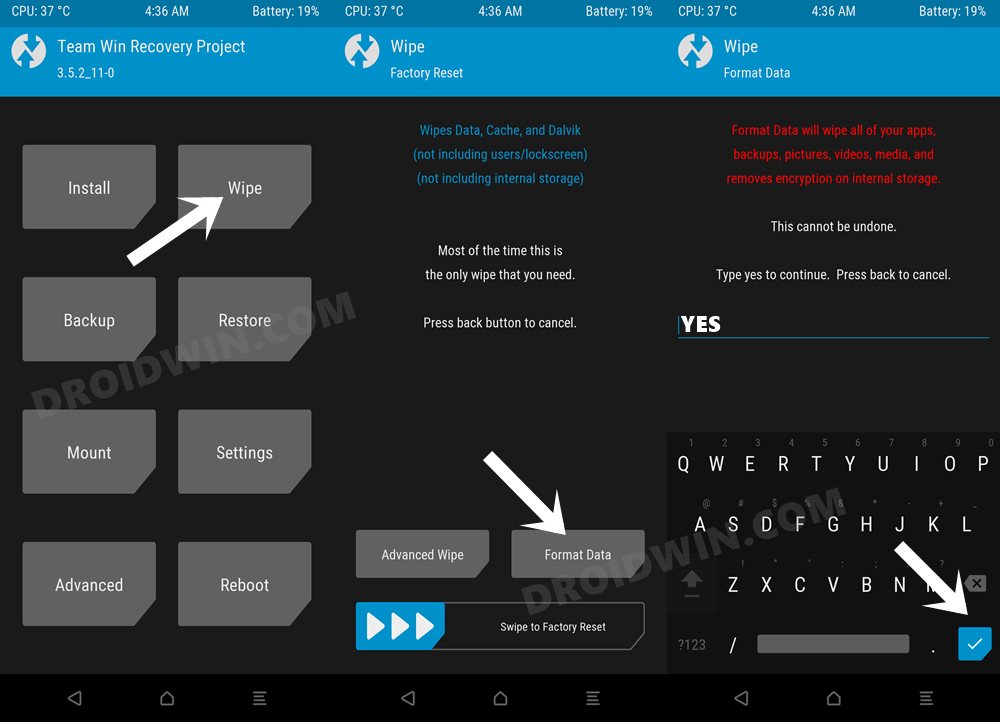
- Once done, go to Wipe > Format Data > Type in YES in the space provided and hit Enter.
- Then transfer the firmware.zip and rom.zip onto your device.
- Now go to Install, select the firmware.zip, and perform a right swipe to flash it.
- Once done, go to Install, and select the rom.zip file.
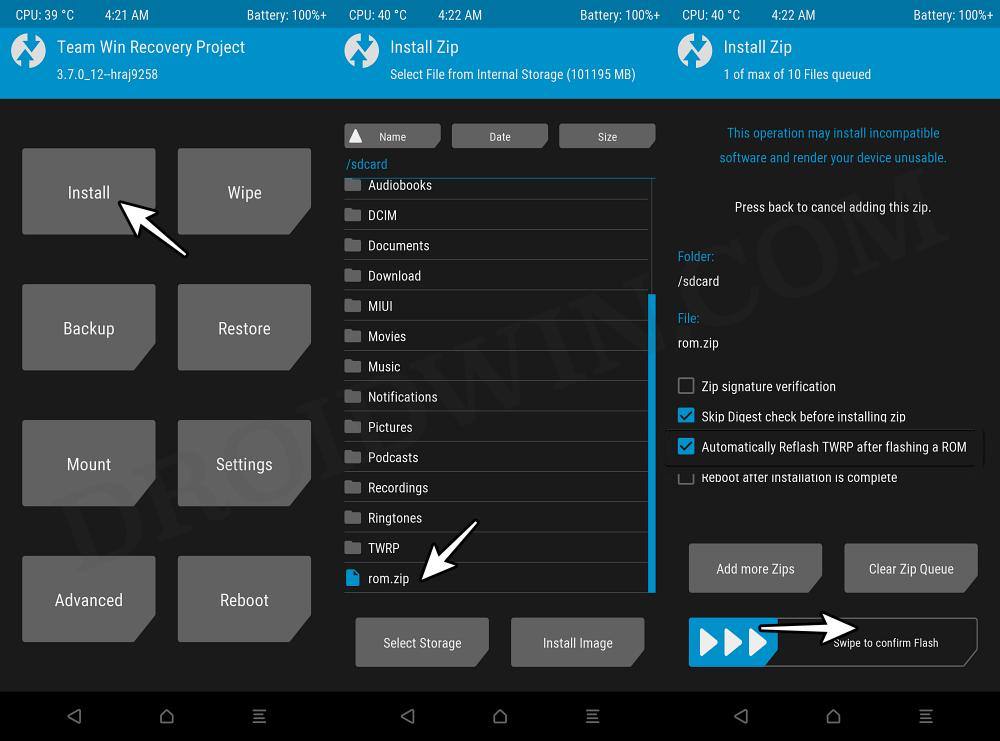
- Now checkmark “Automatically reflash TWRP after flashing a Rom” if you want to retain TWRP.
- Or leave it unchecked if you want to proceed ahead with PixelOS Recovery [recommended].
- Once you have made the decision, proceed ahead and flash the ROM.
- Once flashed, go to Reboot and select Recovery. Your device will reboot to TWRP or PixelOS [depending on the selection you made in steps 7 and 8].
- Then do a format data via the TWRP/PixelOS Recovery.

- Finally, go to Reboot and select System. Your device will boot to the newly flashed OS.
Install Xiaomi EU ROM on Poco F5
Recovery Method
- From TWRP, go to Wipe and tap on Format Data.
- Then, type in Yes in the space provided and hit Enter.

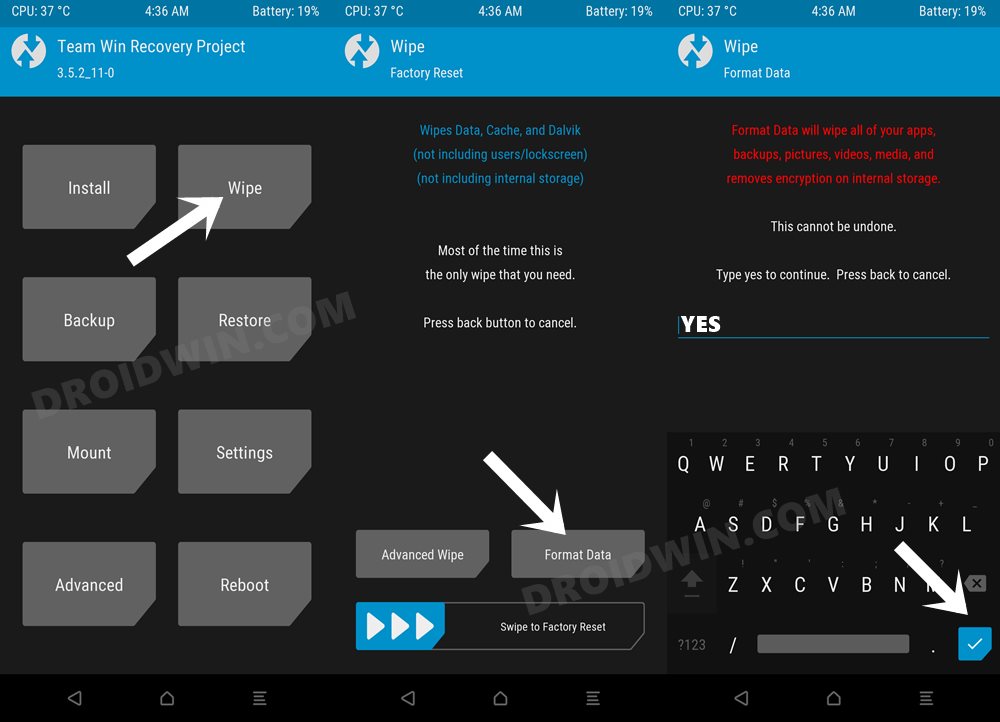
- Once done, transfer the Xiaomi EU ROM to your device.
- Then go to Install, select the ROM ZIP file, and perform a right swipe to flash it.

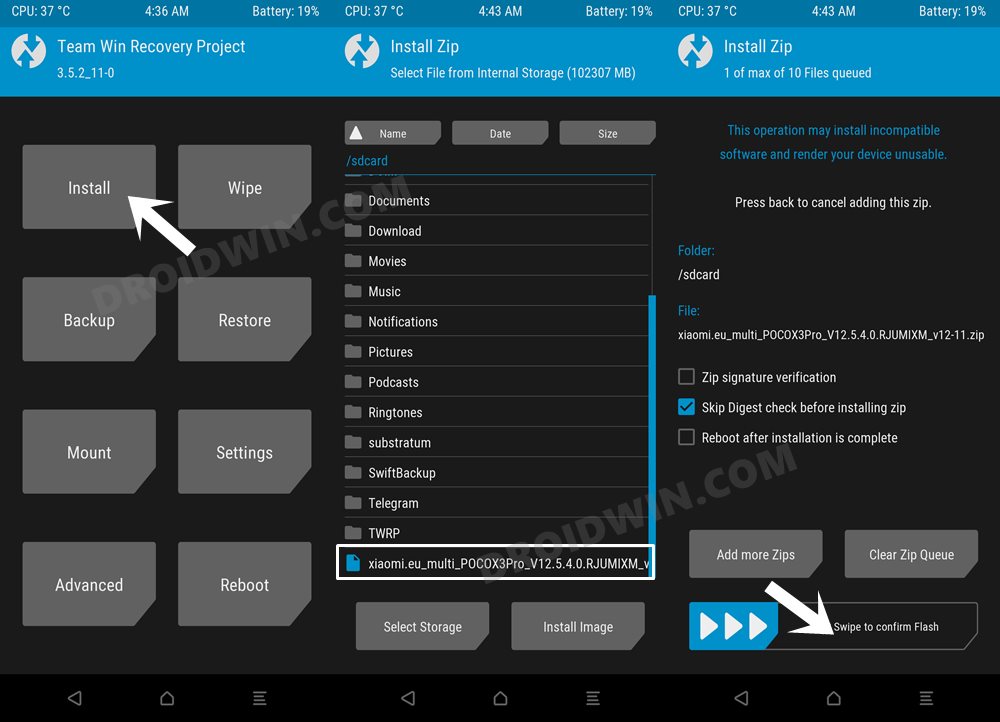
Reference Image - Once done, you may then reboot the device to the OS via Reboot > System.
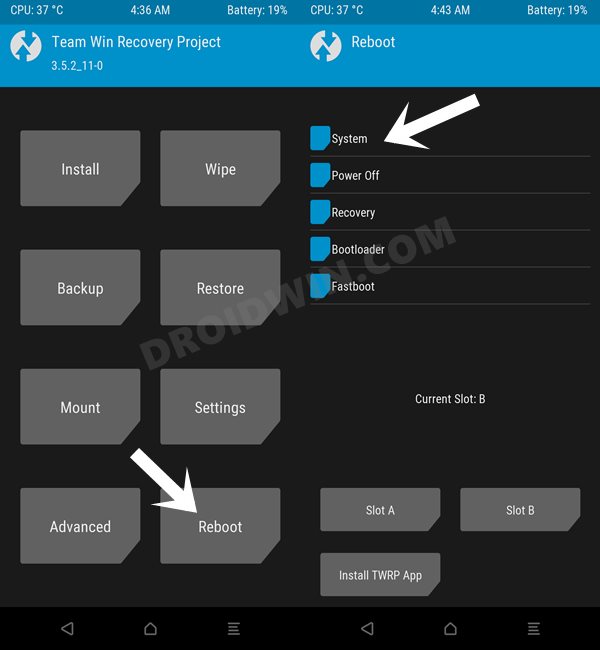

So these were the steps to install the Xiaomi EU ROM Android 13 MIUI 14 using the Recovery Method on your Poco F5/Redmi Note 12 Turbo. Let’s now show you how this could be carried out via the Fastboot Method.
Fastboot Method
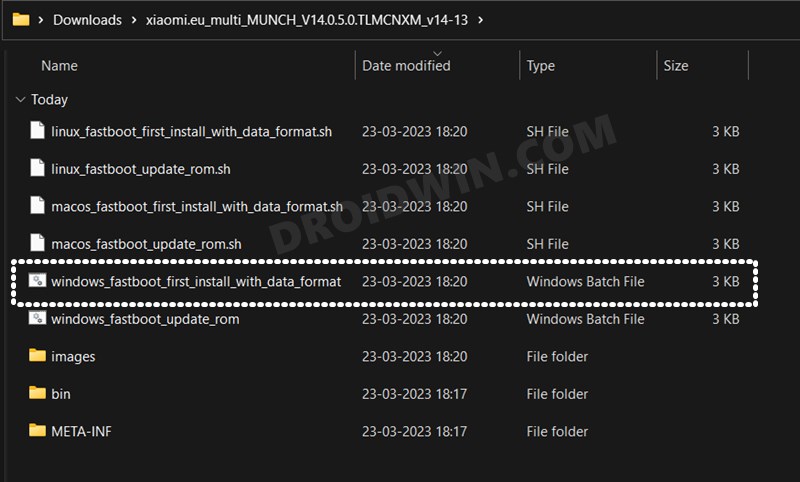
- Double-click to launch the first_install_with_data_format.bat file.
- The flashing will now begin. Once done, your device will automatically boot to EU ROM.

Install LineageOS 21 on Poco F5
- First off, flash the boot.img
fastboot flash boot boot.img
- Next up, flash the dtbo.img
fastboot flash dtbo dtbo.img

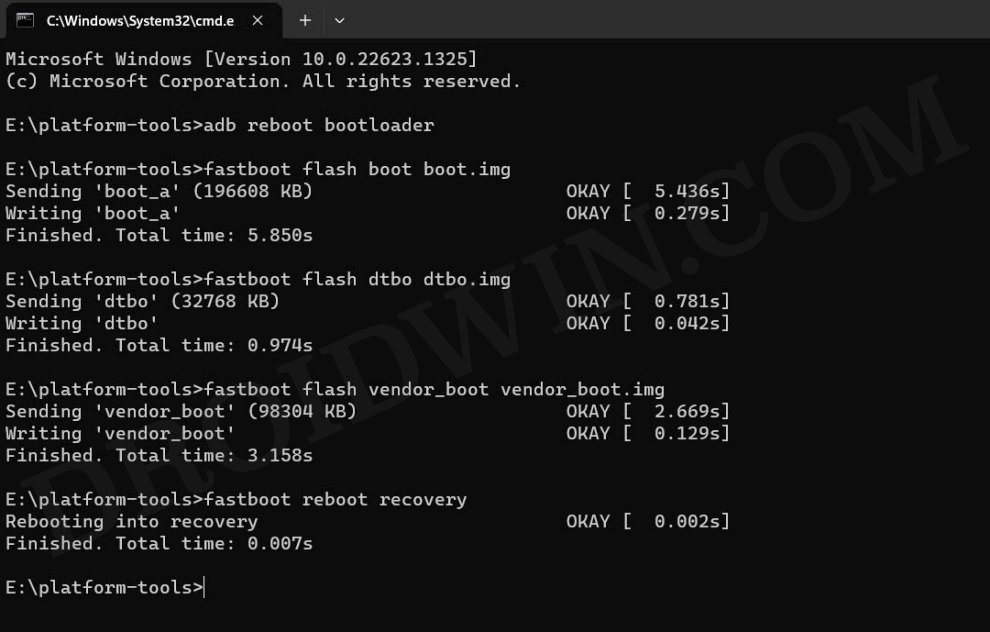
- Now, flash the vendor_boot
fastboot flash vendor_boot vendor_boot.img
- Finally, flash the recovery.img:
fastboot flash recovery recovery.img
- Now type in the below command to boot to the LineageOS Recovery.
fastboot reboot recovery
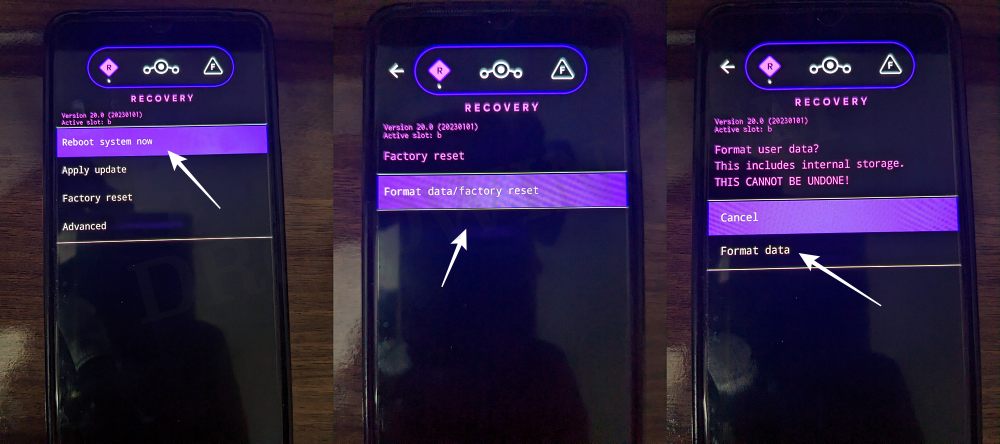
- From the Recovery, go to Factory Reset > Format Data/Factory Reset > Format Data.

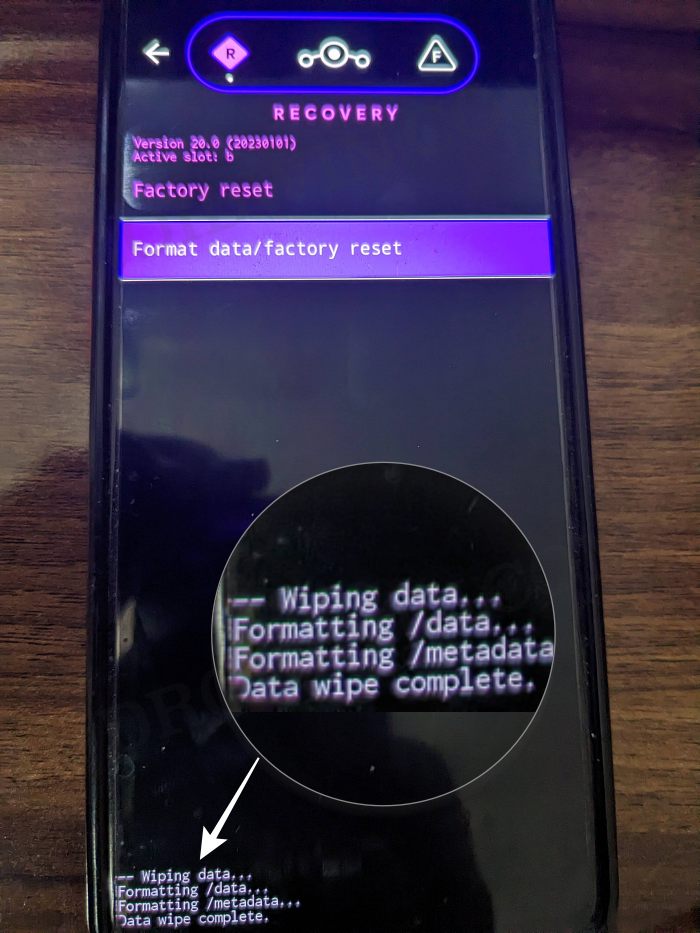
- Your device will now undergo a reset. Once done, you shall get the “Data wipe complete” message.

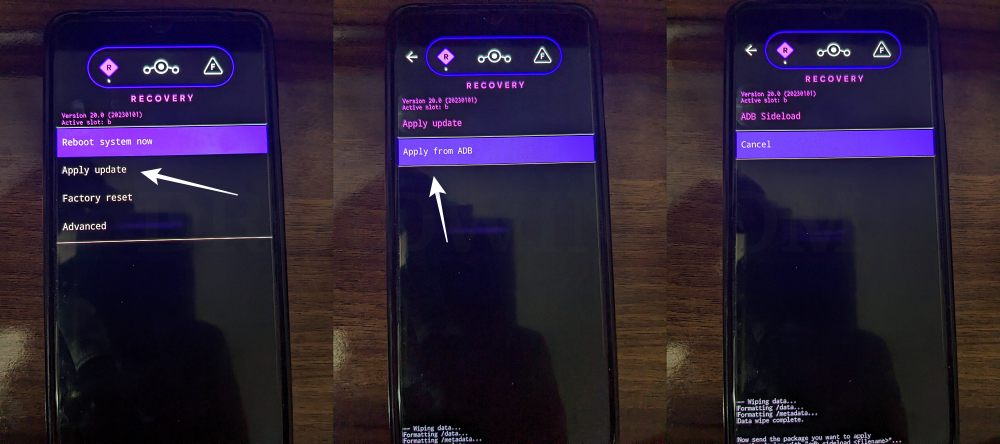
- From the LineageOS Recovery, go to Apply Update > Apply from ADB.


- Then head over to the platform-tools folder, type in CMD in the address bar, and hit Enter.
- This will launch the Command Prompt. So type in the below command to flash the ROM file via Sideload:
adb sideload rom.zip


- The process will now begin and once done, you shall get the Total xfer: 1.00x message [Got an error? See FAQ below].
- If you want to install GApps, then tap on YES in the prompt that appears. It will reboot your device to LineageOS Recovery.
- On the other hand, if you don’t want to flash GApps, then select No > Reboot System Now. Your device will boot to LineageOS.


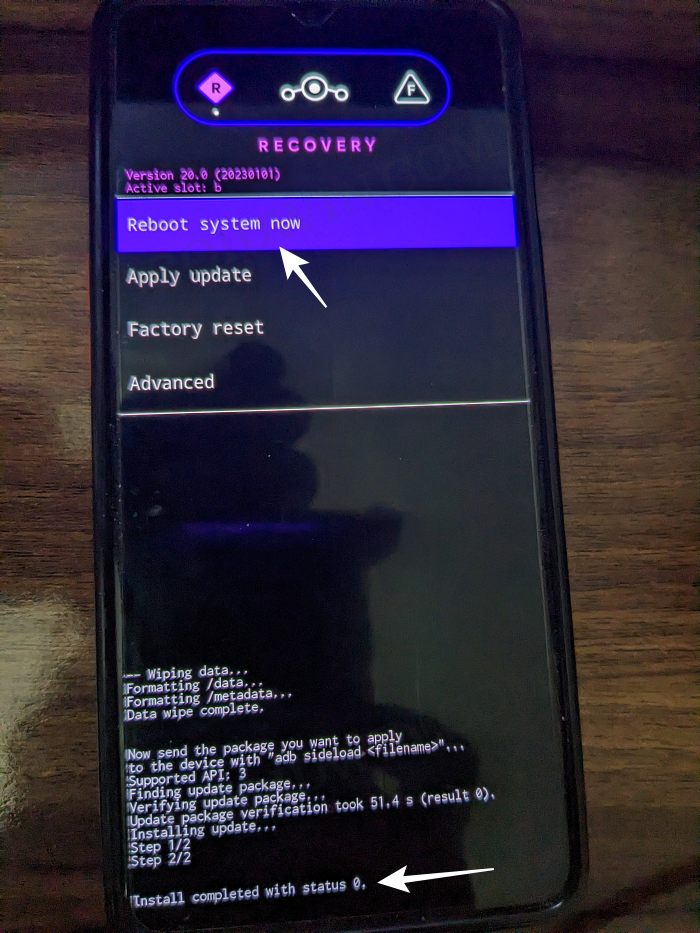
- [Steps 14 to 17 are optional] From recovery, go to Apply Update > Apply from ADB.


- Now type in the below command to flash the GApps file via Sideload:
adb sideload gapps.zip


- You will get a Signature Verification failed message because the GApps package isn’t signed by LineageOS. That’s not an issue, just hit YES to proceed ahead.

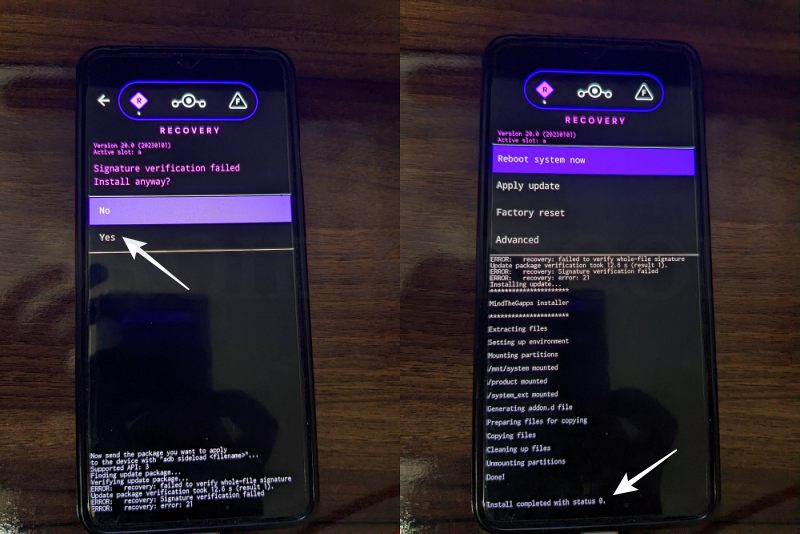
- Once done, you may now finally reboot your device to the OS via “Reboot system now”.


That’s it. These were the steps to install the LineageOS 21 ROM on your Poco F5. If you have any queries concerning the aforementioned steps, do let us know in the comments. We will get back to you with a solution at the earliest.
Install Elite ROM on Poco F5
- From TWRP, go to Install and select the ROM.zip
- Then perform a right swipe to flash it.
- Once done, go to Wipe and select Format Data.
- Then type YES in the space provided and hit the checkmark.
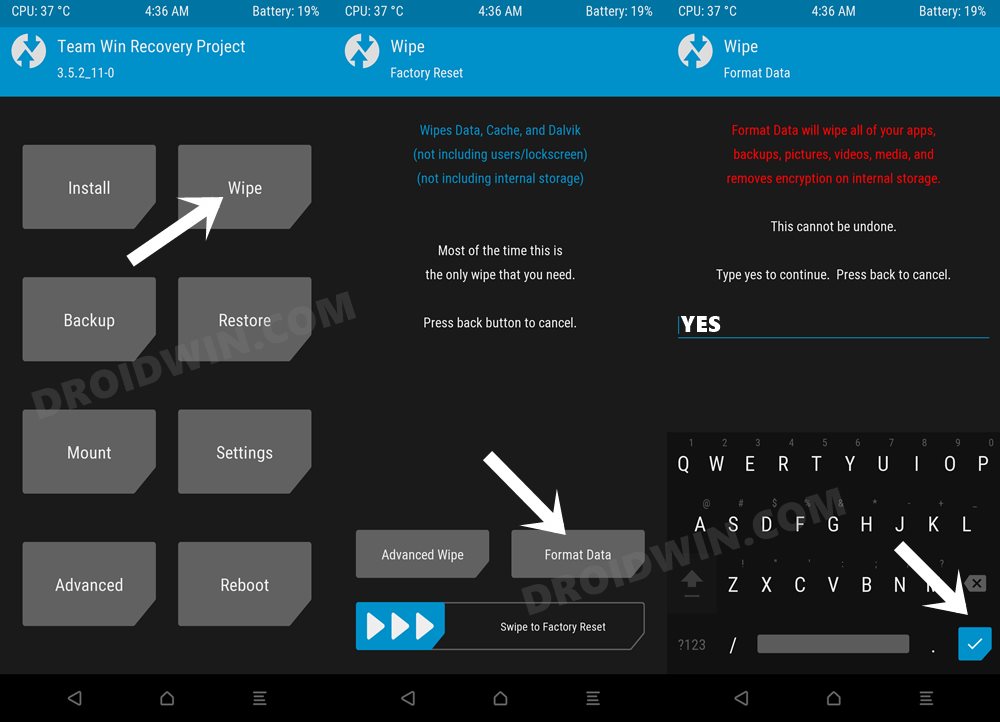
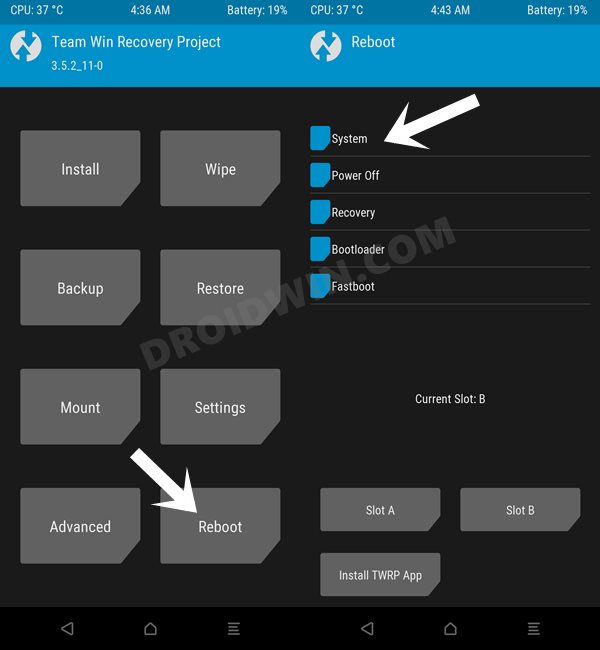
- Finally, go to Reboot and select System.
- Your device will boot to the newly flashed OS.
Install Evolution X Android 14 on Poco F5 / Redmi Note 12 Turbo
- Download the HyperOS firmware from here and then transfer it to your device.
- From TWRP, go to Install, select the firmware.zip, and perform a right swipe to flash it.
- Again, go to Install, select the rom.zip, and perform a right swipe to flash it as well.
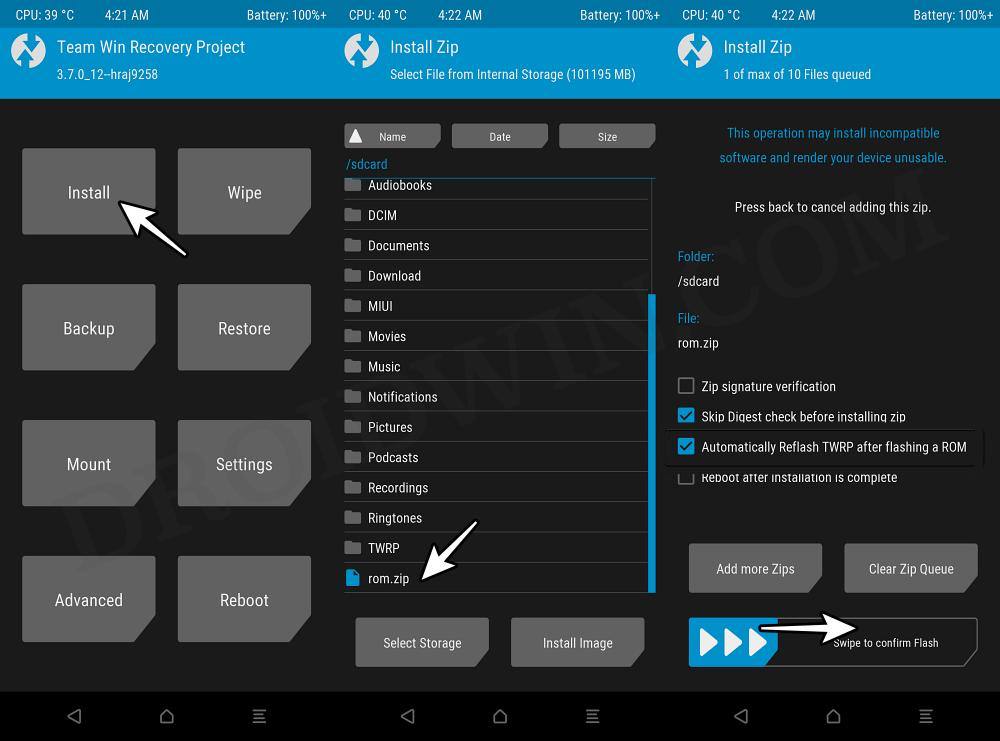
- Once done, you’ll get a few error messages. This is completely normal and nothing to worry about.
- Moving on, now go to Reboot and select Recovery. Your device will reboot to TWRP Recovery.
- Now go to Wipe > select Format Data > type YES in the space provided and hit the checkmark.
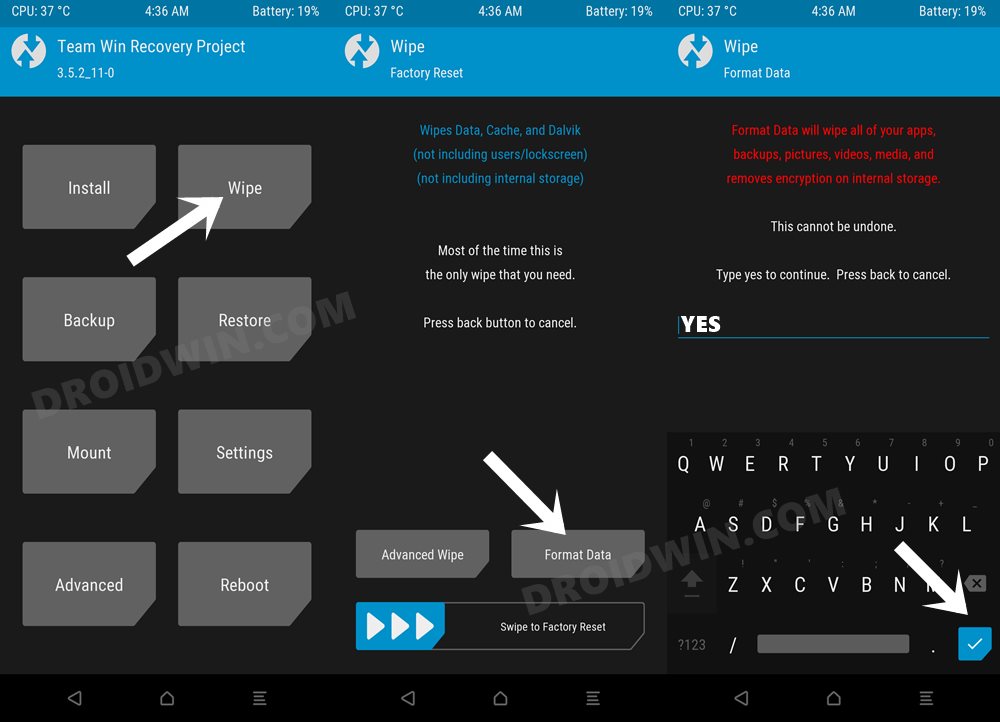
- Once done, select Reboot System Now. Your device will now boot to the newly installed OS.
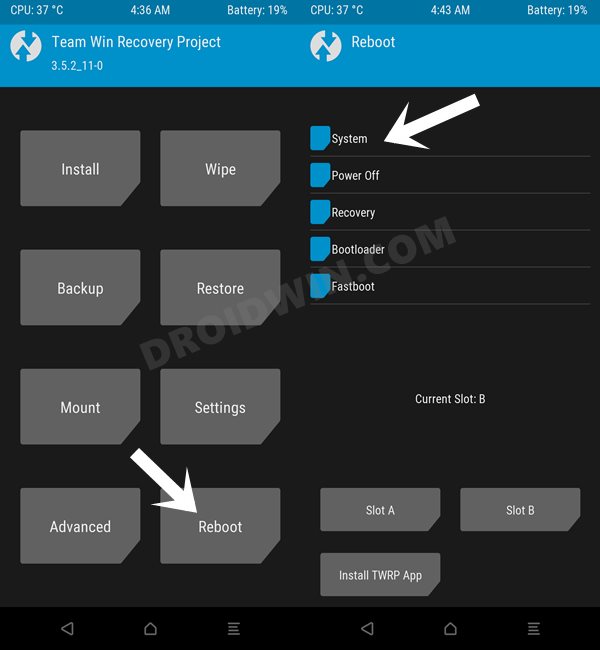
That’s it. These were the steps to install the Android 14 ROM on your Poco F5/Redmi Note 12 Turbo. We will be updating this post with more ROMs as and when they are live. So stay tuned! If you have any queries concerning the aforementioned steps, do let us know in the comments. We will get back to you with a solution at the earliest.
FAQ: Error During ADB Sideload of a Custom ROM
If you get one of the below error messages, then it signifies a successful installation and you can reboot the device to the OS without any issues:
- Total xfer: 1.00x
- adb: failed to read command: Success/No error
- adb: failed to read command: No error
- (~47%) adb: failed to read the command: No error
- adb: failed to read command: Undefined error: 0
