UPDATE 1: Newer Samsung devices like the S23 and S24 series no longer directly use the AP file to obtain root. Instead, you’ll have to extract the boot/init_boot from the AP, patch it via Magisk, and then flash it via Odin for root. Scroll to the end of the guide for the updated instructions for these devices. The original instructions for older Samsung devices is preserved below.
In this guide, we will show you the steps to root any Samsung device via Magisk and Odin. So here is how we will be carrying out this tutorial. To begin with, we will show you how to unlock the bootloader on your Samsung device, [keeping Vaultkeeper in mind]. After this, we will show you the steps to download the stock firmware via Frija. We will then extract this firmware and get the AP file.
This file will be then patched via Magisk, giving us the magisk_patched.tar file. We will then boot your Samsung device to Download Mode and flash this patched AP file (magisk_patched.tar) via Odin. Finally, we will list out the steps to boot your device to the rooted OS and carry out a few optional tweaks. We have also prepared separate guides for each of these steps.
So if you are a newcomer then it is highly recommended that you check out each of those guides as well (we will be linking them to this guide at the required places). On the other hand, if you are quite familiar with rooting Samsung devices, then you may skip those extra detailed guides and only stick with the instructions mentioned here to root your Samsung device via Magisk and Odin. Follow along for the detailed instructions.
- How to Pass Magisk SafetyNet on Rooted Android 11
- Root Android 11 via Magisk Patched boot.img (without TWRP)
- Fix Magisk patched boot.img issue while Rooting Android 11
- Disable DM-Verity or Android Verified Boot without TWRP
Table of Contents
Rooting a Samsung device: The Benefits
Once you unlock the bootloader on your device, you have literally opened the floodgates to a plethora of tweaks. These include the ability to flash custom binaries, custom ROMs, a custom recovery like TWRP, or gain access to the system partition. The latter is also known as rooting the device. In this regard, other OEMs simply require you to get hold of the stock boot.img file, patch it via Magisk and flash it via Fastboot Commands.
However, with Samsung things stand different (as already explained in the introductory paragraph). Anyways, once you have achieved root, you could flash Magisk Modules, Substratum Themes, Xposed Frameworks, and countless other mods. Likewise, flashing a custom kernel is also a possibility. These are just some of the benefits of rooting your Samsung device via Magisk and Odin. However, there are a few risks associated with this method, as mentioned below.
Risks of Rooting a Samsung Device
First and foremost, your device warranty will become null and void. Along the same lines, apps like Google Pay and Netflix will not be able to function properly. The KNOX counter will also be tripped. This will result in your inability to use apps like Samsung Pay, Secure Folder, etc. And the worst part is the fact that this Knox is hardware-related [eFuse]. So even if you return to stock and re-lock the bootloader, the Knox will stay tripped.
Furthermore, the implementation of security measures such as Prenormal RMM State, DEFEX, Vaultkeeper might further complicate the matter. Likewise, the unlocking process will wipe off all the data from your device. So proceed ahead at your own risk. Droidwin and its members wouldn’t be held responsible in case of a thermonuclear war, your alarm doesn’t wake you up, or if anything happens to your device by performing the below steps.
- Detailed Steps to Fix adb is not recognized Error
- Fix: pip is not recognized as an internal or external command
- How to Fix Unauthorized Device with ADB Commands [3 methods]
- How to Fix Error: Cannot load recovery.img
How to Root any Samsung Device via Magisk and Odin
Before we list out the instructions, there are a few prerequisites that your device needs to qualify. Make sure to qualify all these requirements before proceeding ahead.
Important Points to Keep in Mind Before Rooting a Samsung
As opposed to other devices, there are a few additional crucial things that you should keep in mind, namely:
- You cannot unlock the bootloader of the North American (Canada and the USA) edition of Samsung devices. So rooting those devices is not possible.
- Rooting a Samsung device will wipe off all the data on your device. This is because the rooting process requires a CSC file and not the Home_CSC to be flashed via Odin.
- Many Knox-related features might no longer work even if you unroot your device.
- You will not be able to install OTA updates on a rooted Samsung. Your only course of action will be to download the entire firmware via Frija and SamFW, extract it, patch the AP, and then flash the entire firmware [patched AP, BL, CP, and Home_CSC/CSC] via Odin.

- While doing an update, you may use the Home_CSC instead of the CSC as a data wipe is not required in such cases.
- Never try to restore the boot/init_boot, recovery, or vbmeta partitions back to stock. If there’s a need to get this job done, then you should always flash the entire firmware via Odin.
- Moreover, never just flash the patched AP for root as the Odin might shrink the size of the data partition. You should also flash BL, CP, and CSC along with patched AP to obtain root.
STEP 1: Enable Developer Options and OEM Unlocking
First and foremost, you’ll have to enable Developer Options so that your PC can identify the connected device in ADB Mode. Likewise, you’ll also have to enable OEM Unlocking as it will help you in the bootloader unlocking process. SO enable both these toggles as explained below:
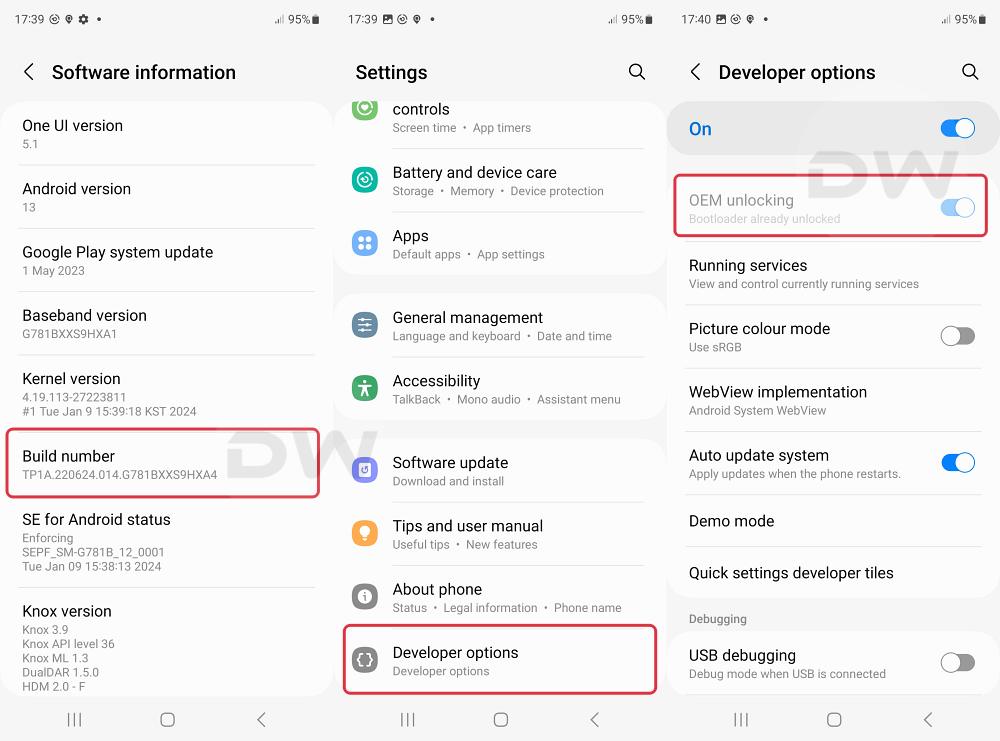
- First off, head over to Settings > About Phone > Software Information.
- Then tap on Build Number 7 times. This will enable Developer Options.
- Go to Settings > Developer Options > Enable USB Debugging from there.
- Likewise, enable the OEM Unlocking toggle from the same menu as well.
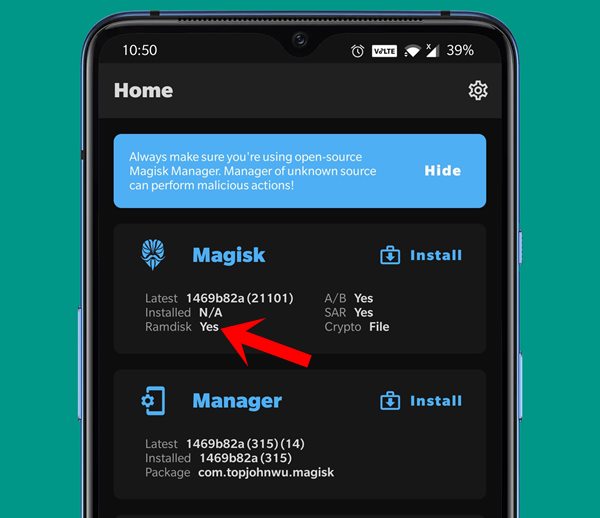
STEP 2: Ramdisk Check
Next up, you’ll also have to check whether your device has a Ramdisk or not. For that, launch the Magisk Manager app on your device and check if it says YES or NO next to Ramdisk. Remember the answer as it will be used at the end to boot your Samsung device to the rooted OS.
STEP 3: Unlock Samsung Bootloader
The entry point for the customizations, the first requirement is that your device needs to have an unlocked bootloader. If you haven’t done so, then refer to our guide: How to Unlock Bootloader on any Samsung Device [New VaultKeeper Method]. The shorter explanation is as follows:
- Start by powering off your device,
- Then press and hold Vol Up + Vol Down together and connect your device to the PC via a USB cable.

- As soon as you see the Warning message on your device, release the pressed keys.
- Now press the Volume Up key once and your device will be booted to Download Mode.
- Now that your device is booted to Download Mode, press and hold the Volume Up key for a few seconds.
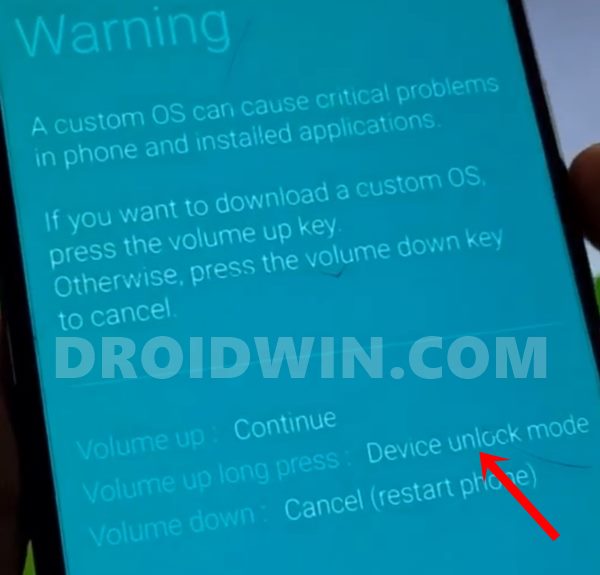
- This will take you to the Device unlock mode (make sure you have taken a backup).
- You will now get a confirmation message, use the Volume Up button to reply to the affirmation.
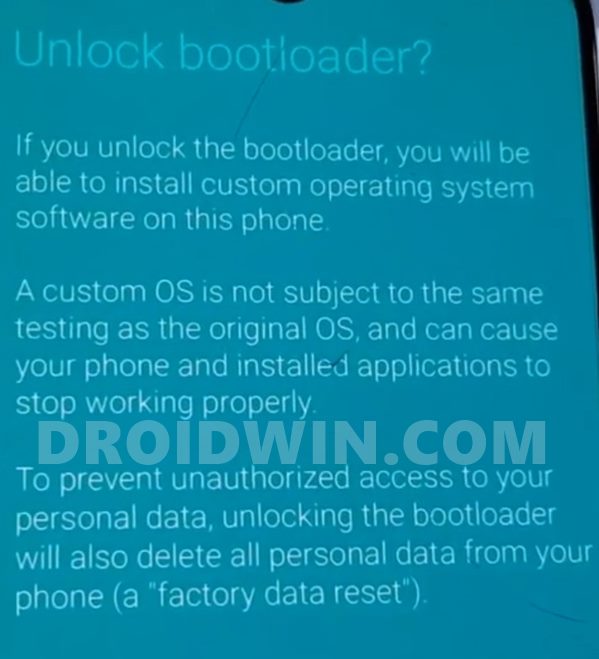
- The process will now begin and should be completed within a few seconds.
- Your device should then automatically boot up with an unlocked bootloader
STEP 4: Download Samsung Stock Firmware
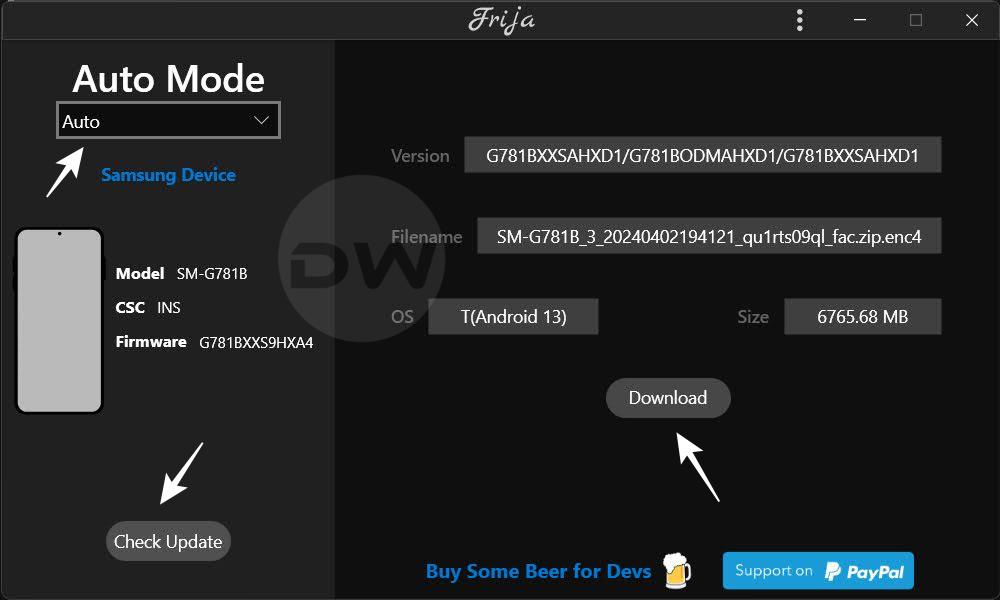
You will now have to download your device’s stock ROM to get the AP file which will then be patched via Magisk and flashed via Odin to obtain root. You should refer to our comprehensive tutorial for the same: How to Download Samsung Stock Firmware/ROM via Frija Tool. For a shorter version, download the Frija Tool, enter your device’s model number and CSC number (you can get it from About Phone > Software Information), and click Download.
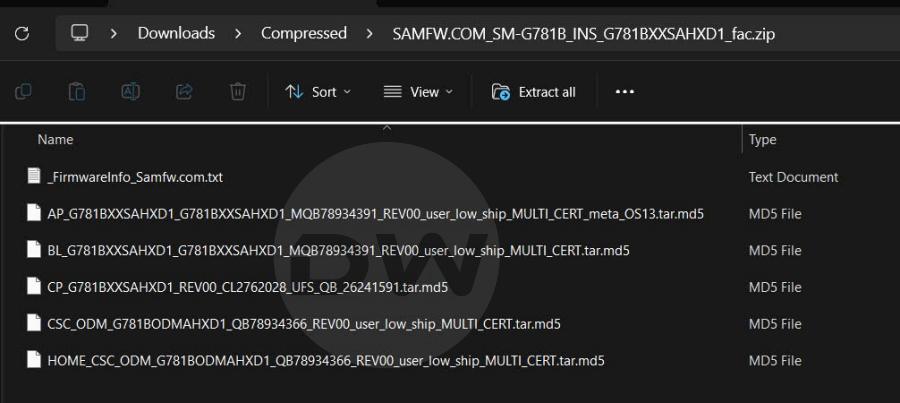
STEP 5: Extract Firmware
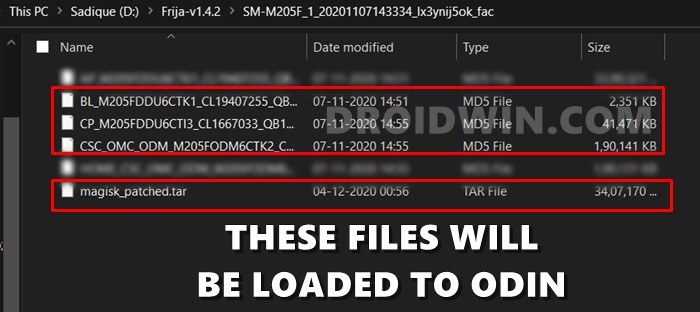
Once the firmware is downloaded, extract it to a convenient location on your PC. This should give you the following five files in .tar.md5 format: AP, BL, CP, CSC, and HOME_CSC. We will be using the AP file out of this to root your Samsung device via Magisk and Odin.
STEP 6: Patch AP File via Magisk
It’s now time to patch the stock AP firmware file that we had just got from the stock firmware. So head over to our detailed guide on this topic: How to Patch Samsung AP Firmware via Magisk. The shorter explanation follows below that you need to transfer the extracted AP file to your device.
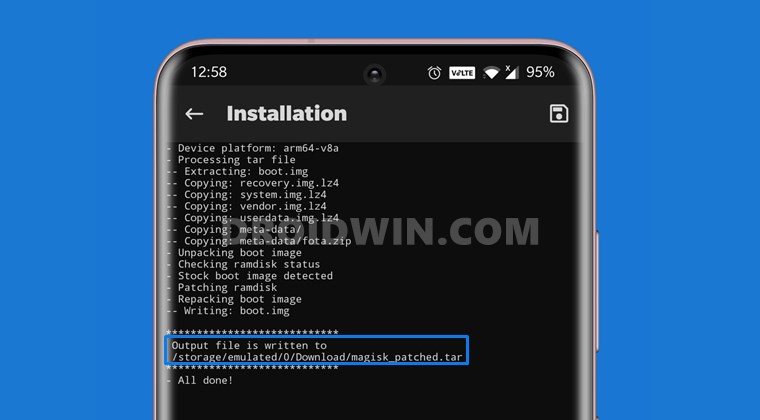
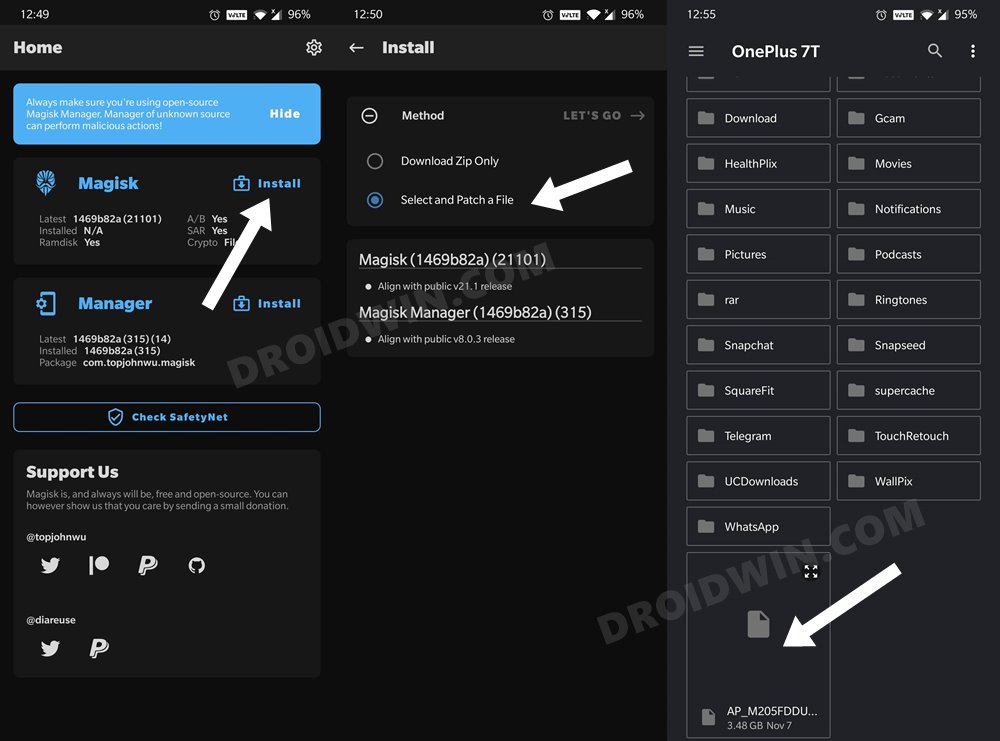
- First off, transfer the extracted AP file to your device.
- Then launch the Magisk app and tap on Install > Select and patch a file.
- Now choose the AP firmware file and tap on Let’s Go.
- The patching will take a few seconds, and once done, you should get the magisk_patched.tar file placed inside the Download folder.
- We will now be using this file to root your Samsung device via Magisk and Odin.
STEP 7: Boot your Samsung Device to Download Mode
You will now have to boot your Samsung device to the Download Mode so that Odin can interact with it. So do check out our guide on How to Boot any Samsung Device to Download Mode. The shorter instructions follows below:
- Start by powering off your device,
- Then press and hold Vol Up + Vol Down together and connect your device to the PC via a USB cable.
- As soon as you see the Warning message on your device, release the pressed keys.
- Now press the Volume Up key once and your device will be booted to Download Mode.
- [GUIDE] Flash ROMs/Magisk/TWRP/Kernels on A/B Partition Devices
- How to Flash Various Files in A/B Partition Devices
- Install Custom ROMs on any Android Device- Includes A/B Partition
- How to Fix FAILED (remote: unknown command) Error
STEP 8: Flash Patched AP file (magisk_patched.tar) via Odin
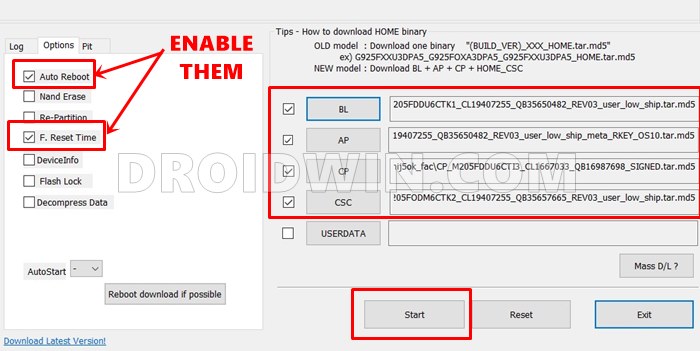
This step requires you to install the Patched AP file (magisk_patched.tar) onto your Samsung device via Odin. Here’s the complete coverage on this topic: How to Flash magisk_patched.tar (patched Samsung AP file) via Odin. The shorter explanation follows below: [NOTE: As explained earlier, we will be using the CSC file and not the Home_CSC because a data wipe is a must].
- First off, download and extract the Odin Tool on your PC.
- Then transfer the magisk_patched.tar file to your PC where the other firmware files (AP, BL, CP, CSC, and HOME_CSC) are present.
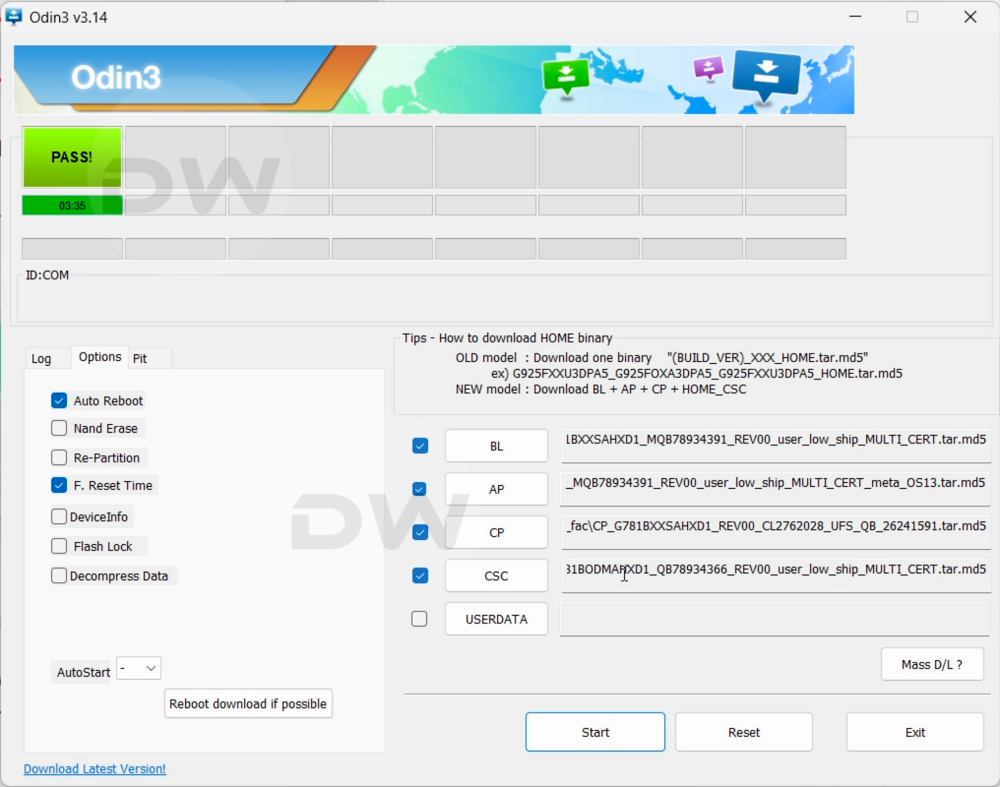
- Now connect your Samsung device to the PC via USB Cable (make sure it is booted to Download Mode). After this, load the following files to the Odin tool:
- First off, click ‘BL‘ and load the BL firmware file.
- Then click ‘AP‘ and load the magisk_patched.tar file.
- After this, click ‘CP‘ and load the CP firmware file.
- Finally, click ‘CSC‘ and load the CSC firmware file (the normal CSC file, not the Home CSC file).
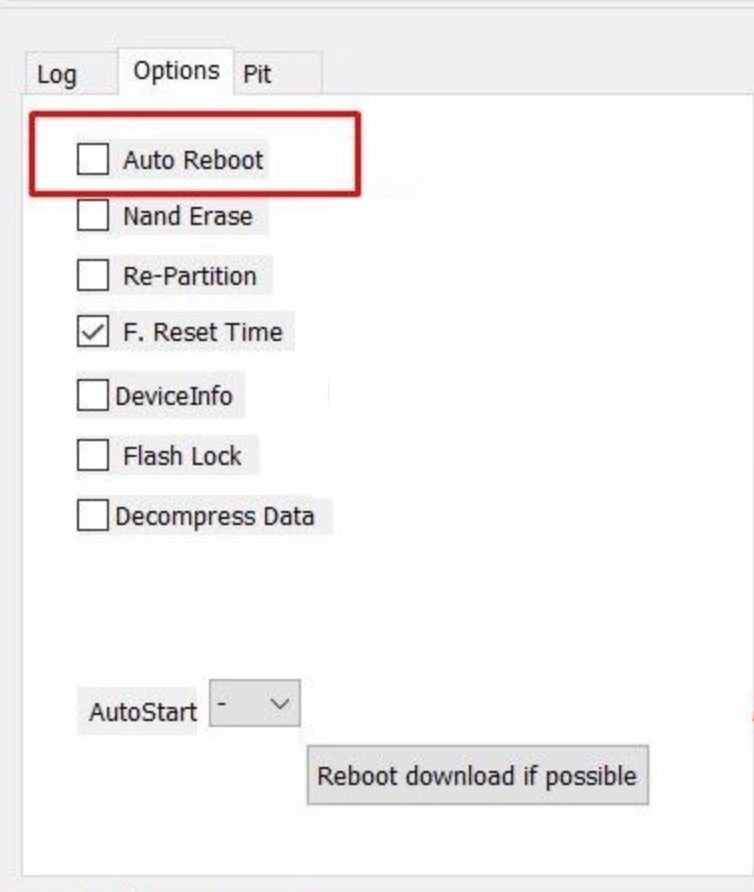
- Once all the files have been loaded, go to the Options tab and uncheck Auto Reboot.
- Finally, click Start to begin the process. Once done, you should get the PASS!‘ message.
With this, you have successfully performed the steps to root your Samsung device via Magisk and Odin. However, do NOT reboot your device now, instead directly move over to the next step.
STEP 9: Reboot to Rooted Samsung OS [For Non Ramdisk Users]
Now that all the steps are completed, it’s time to boot your device. We have an extensive guide on the same topic, including the explanation as to why this needs to be done: How to Boot Rooted Samsung to Recovery Mode and Rooted OS. The shorter explanation follows:
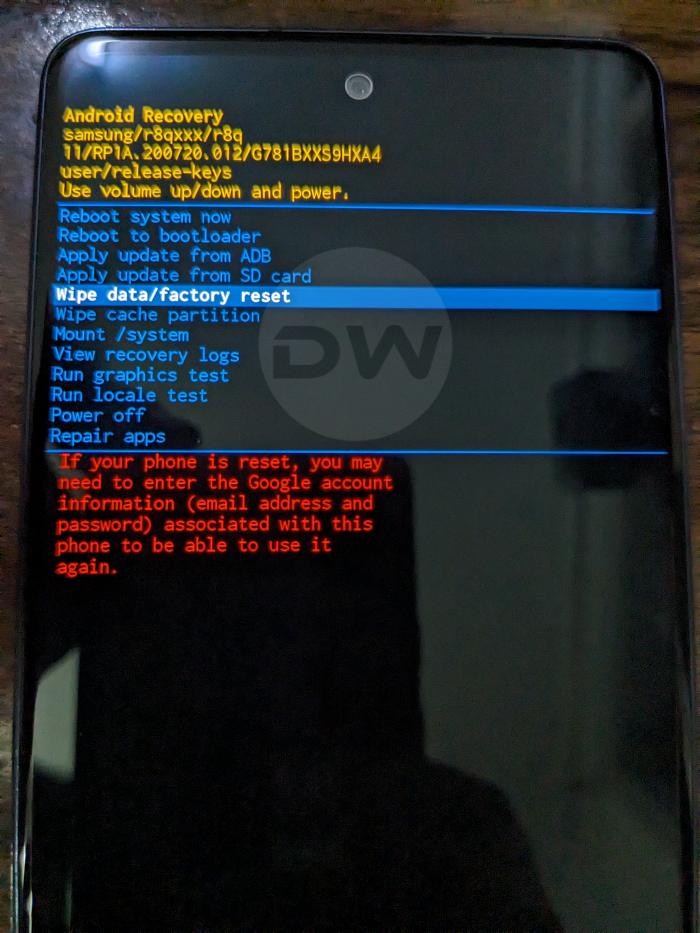
- If the Ramdisk check that we performed earlier via Magisk showed YES, then you could directly boot your device to the OS via the Power key. Agree to do a factory reset if asked.
- However, if there is no Ramdisk [if it showed NO in Magisk], then the steps are slightly different.
- In this regard, your first course of action is to check the hardware key combination for your device that you use to boot it to the Recovery Mode.
- So get hold of the recovery key combinations and then do as follows: Press and hold the recovery key combinations until the device boots up and you see the Bootloader Unlock warning message. Then release all the buttons and you should be booted to the rooted OS with Magisk installed.
- Once your device boots to the OS, launch the Magisk app, and you ‘might’ get a Required Additional Setup dialog box. Tap on OK and Magisk will install the required dependencies. Your device will then automatically reboot.
As to why this happens, it is because since your device doesn’t have a Ramdisk, then Magisk has no choice but to install it to the recovery partition. That is why we took the help of the recovery mode route to boot to the rooted OS. All this has been explained in depth in this guide, do check it out: How to Boot Samsung to Rooted OS.
So on that note, we conclude the guide on how to root your Samsung device via Magisk and Odin. If you have any queries, do let us know in the comments section below. We will get back to you with a solution at the earliest.
How to Root Samsung Devices via Boot/Init_Boot
As discussed in the introductory paragraph, newer Samsung devices have deviated from the traditional rooting method. You no longer have to patch the AP and flash it via Odin. Instead, you’ll have to extract the boot.img/init_boot.img from the AP and then carry out the patching and flashing process.
Along with that, you’ll also have to extract the BL file, get the vbmeta, patch it via Magisk, and flash it via Odin. In this regard, a much better approach will be to combine both these files into one single and then carry out the patching and flashing process in the AP slot. So without further ado, let’s get started.
- To begin with, carry out the STEPS 1 to 3 listed in the above section.
- Then download the stock firmware for your device via Frija/SamFW.
- Now extract the firmware and you’ll get AP, BL, CP, CSC, and Home_CSC.
- Extract the AP file via 7ZIP and you’ll get the init_boot.img.lz4 file.
- Likewise, extract the BL file via 7ZIP and get the vbmeta.img.lz4 file.
- Now select both these files, right-click on them, and select 7ZIP – Add to Archive.
- Then select the Archive Format as “tar”, name the file AP, and hit OK.
- You’ll get the AP.tar file. Transfer it to your device.
- Then launch the Magisk app and tap on Install > Select and patch a file.
- Now choose the AP.tar file and tap on Let’s Go. The patching will take a few seconds.
- Once done, you should get the magisk_patched.tar file placed inside the Download folder.
- Now launch Odin and load this patched AP file along with BL, CP, and CSC files.
- Then boot your device to Download Mode.
- Now click ‘BL‘ and load the BL firmware file.
- Then click ‘AP‘ and load the magisk_patched.tar file.
- After this, click ‘CP‘ and load the CP firmware file.
- Finally, click ‘CSC‘ and load the CSC firmware file.
- Once all the files have been loaded, go to the Options section of Odin and uncheck Auto Reboot.
- Finally, click Start to begin the process. Once done, you should get the PASS!‘ message.
- Now, if your device has Ramdisk [YES in Magisk], then you may directly boot the device to the OS. Once it boots up, launch Magisk and it might ask you to carry out additional setup, tap OK, and wait for the process to complete.
- On the other hand, if the Ramdisk showed as No under Magisk, then DO NOT reboot your device. Instead, refer to STEP 9 in the above section and complete the rest of the process.


ka
Hi, I have followed all of the guides but unfortunately after the last flash with Odin, on the premise that my device said RAMDISK YES, I have rebooted and upon restart the device is stuck with the following messagein a loop: SAMSUNG SET WARRANTY BIT KERNEL. Can you please advise on how to overcome this? Thank you
tasneem
Hi
It gave me a fail on odin.
please help.
Note 3. I was on stock Lollipop.
Alain
Many thanks for this very helpful procedure. I would like to add something that I found helpful while trying to root an S10+ with magisk 26.1. After flashing the initial stock rom I had to wait for the phone to finish updating itself (can be accelerated by preventing a full update to all apps) and reach a stable state before generating the patched AP file with magisk. Comparing patched AP tar files while this stable state was not yet reached has shown that they were different. This is probably caused by some signatures having to match the existing state of the phone.
Another potentially helpful point is to use a patched Odin (not sure if this is necessary, after the first few failed attempts I have resorted to always using the latest patched Odin)
Lastly bad USB cables can prevent a successful patched firmware upload.
Ray
After getting the Pass message from Odin, phone did not automatically reboot. I held down the power button to boot as Ramdisk check via Magisk had showed YES but nothing happened so I held down the Vol- and side key to cancel it. It is now stuck in a bootloop and won’t go into download mode regardless of any combination of buttons
Abdulhafiz Idris
Hi. Just wanted to thank you for the taking your time to help us with this steps. You even simplified it too. Thank you.
Hwgoosen
Good day.
my magisk_patched.tar file is a big zip file.is this supose to be like that?
I did the AP patch and went to downloads to copy the magisk_patched.tar file but its a zip file.
please help
Alvin Manoj
I just got 1 tar.md5 file after extracting the zip file.
Sadique Hassan
Hi Alvin, did you let the Frija Tool complete the decryption process before extracting? Frija usually takes up to 3-4 minutes for the decryption process after downloading the firmware. if you try extracting in between, then you would get only half the files from the firmware.
wahyu
how to install twrp on samsung m11
Juan
Please, I keep my data and install apps if instead CSC file I enter HOME_CSC file in pass 5?
Thanks