In this guide, we will show you the detailed steps to flash any custom ROM via TWRP Recovery. OEMs come with their own underlying UI/UX and it tends to act as the major differentiating factor. Some of the most popular ones include the likes of a clean stock AOSP experience from Pixel, a bloated one from Xiaomi’s MIUI and Oppo’s ColorOS [even OnePlus’ OxygenOS is starting to fall in this domain], and a perfectly balanced OS with regards to features and device stability from Samsung’s One UI.
However, sometimes users might not be satisfied with the default UI skin that the OEM has to offer, but they still proceed to purchase the device owing to some other qualities that the device possesses, including the likes of excellent camera, value for money, all-day battery life, among others. Fortunately, for these set of users, they have a handy way out. they could ditch the stock ecosystem and welcome abode customized firmware on their device.
To carry out the said task, a custom recovery is the most important tool that one should possess [while some ROM might be flashed via Fastboot, but they are far and few in between, such as the Fastboot version of the Paranoid Android ROM]. So in this guide, we will list the steps to flash a custom ROM using the TWRP Recovery. Follow along.
Table of Contents
How to Flash any Custom ROM via TWRP Recovery
The below process will wipe off all the data from your device, so please take a complete device backup beforehand. Moreover, double-check with the developer regarding the Android version that you should be on before flashing their ROM. While most of them recommend being on the latest one, there are a few cases wherein the dev would advise you to be on an older OS build. Once you have checkmarked all these requirements, let’s get started with the guide.
Droidwin and its members wouldn’t be held responsible in case of a thermonuclear war, your alarm doesn’t wake you up, or if anything happens to your device and data by performing the below steps.
STEP 1: Download Android SDK Platform Tools
Your first course of action should be to download and extract the Android SDK Platform Tools on your PC. It will be used for executing ADB Commands.

STEP 2: Enable USB Debugging and OEM Unlock
Next up, you’ll have to enable USB Debugging so that the PC can read the phone in ADB Mode and you can execute the required ADB Commands. Likewise, also enable the OEM Unlock so that you can then unlock the bootloader on your device. Here’s how both these options could be enabled:
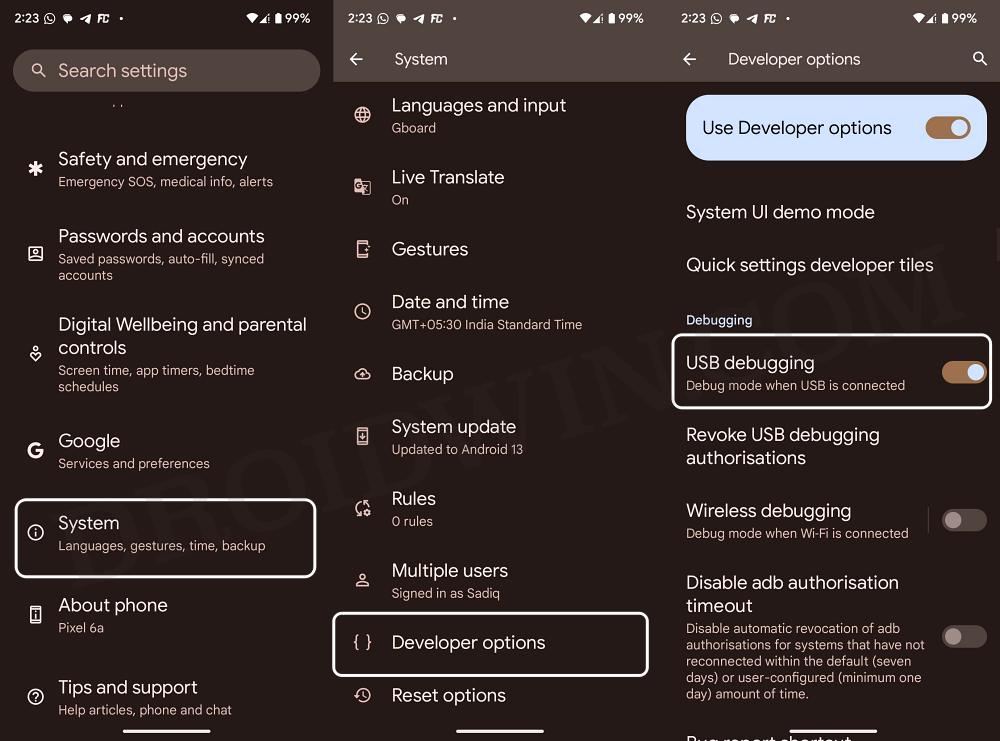
Pixel Devices
- Head over to Settings > System > About Phone > Tap on Build Number 7 times.
- This will enable Developer Options. Go to Settings > System > Developer Options.

- Now enable the toggle next to OEM Unlocking. You’ll get a prompt, tap on Enable/OK.
- Likewise, enable the USB Debugging toggle. You’ll once again get a prompt, tap Allow/OK.
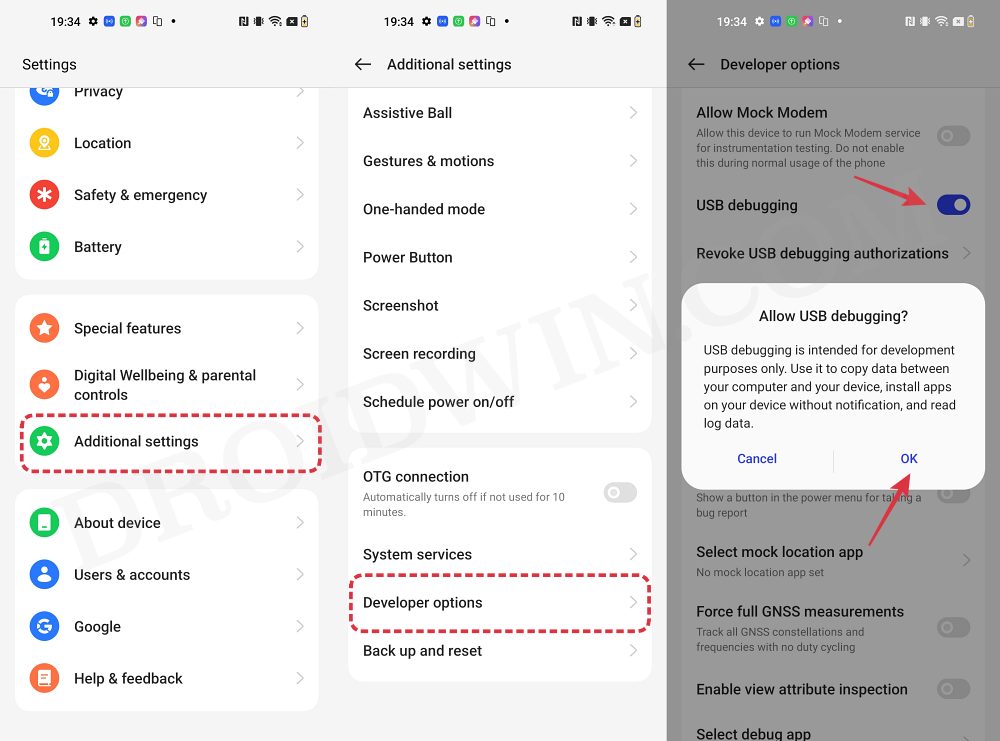
OnePlus
- First off, head over to Settings > About Device > Version > Tap on Build Number 7 times.
- This will enable Developer Options. Go to Settings > Additional Settings > Developer Options.
- Now enable the toggle next to OEM Unlocking and USB Debugging and tap OK in the prompt.
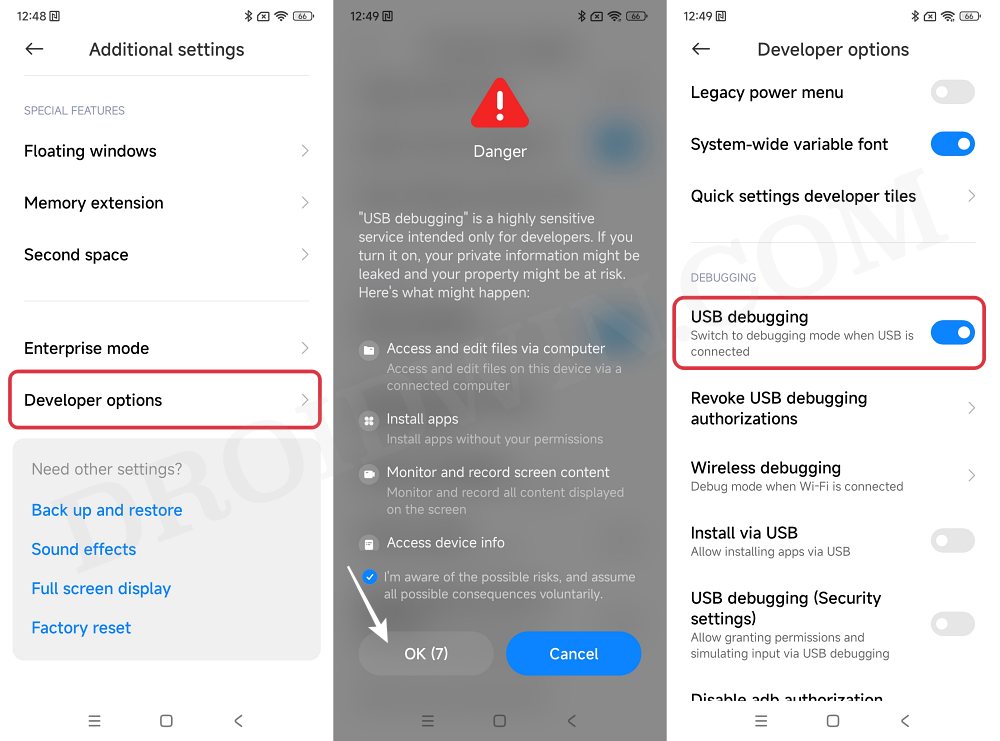
Xiaomi Devices
- To begin with, head over to Settings > About Phone > Tap on OS version/MIUI Version 7 times.
- This will enable Developer Options. Go to Settings > Additional Settings > Developer Options.
- Now enable the toggle next to OEM Unlocking and USB Debugging and tap OK in the prompt.
STEP 3: Unlock Bootloader
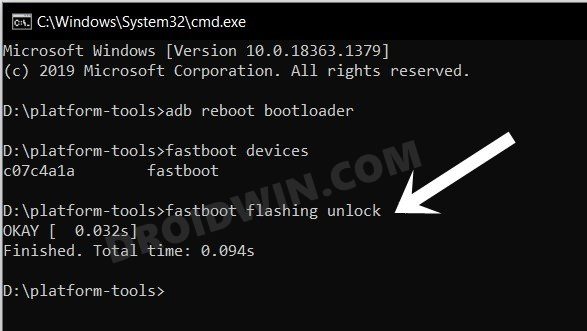
Irrespective of the custom ROM that you are flashing, unlocking the bootloader is a must. So refer to our detailed guide on How to Unlock the Bootloader of Any Android Device. In short, boot your device to Fastboot Mode and use the fastboot flashing unlock command. On the other hand, Xiaomi devices should use the Mi Unlock Tool to get this job done. However, do note that the process will wipe off all the data on your device and might nullify its warranty as well. Only proceed ahead if that’s all well and good.
STEP 4: Download Custom ROM and Associated Files
Now get hold of the ROM file from a trusted site of your choice. Make sure that the ROM is in the ZIP format. Once downloaded, rename the file to rom.zip [so that it becomes easier to type in the CMD window] and transfer it to the platform tools folder on your PC.
Moreover, if the ROM is in the Vanilla format [without any Google Apps and services] and you want to have them on your device, then download the GApps package from here. Apart from that, some devices like Xiaomi also require you to flash the firmware before you flash the custom ROM. So in such cases, you may download the firmware from here.
STEP 5: Install TWRP Recovery
You’ll now have to install the TWRP Recovery on your device. Since every device has a different partition scheme, there is no universal set of flashing instructions that will cover them all. However, we have managed to get hold of nearly all the different flashing methods for the recovery, just refer to our detailed guide on How to Install TWRP Recovery on Android. In short, here’s what you need to do:
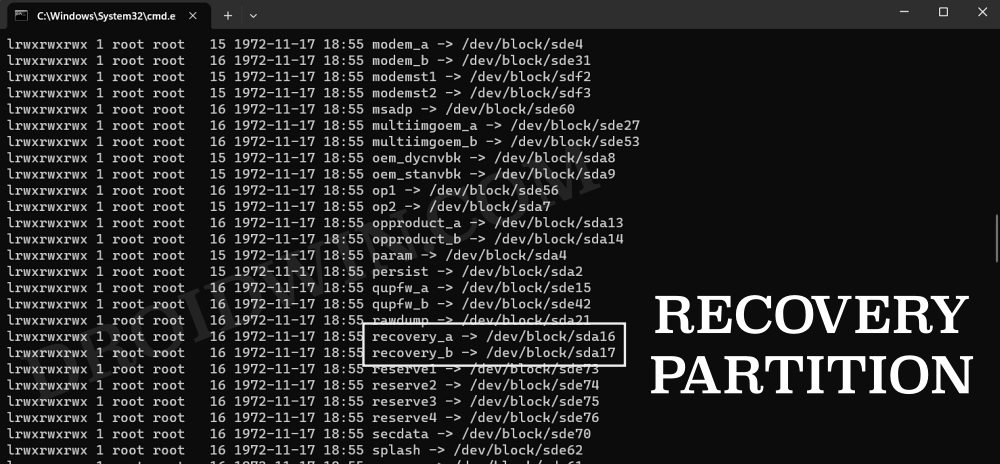
- To begin with, execute the below three commands to check if your device has a recovery partition or not:
adb shell
cd /dev/block/platform
ls -la /dev/block/bootdevice/by-name
- If it has a recovery partition, then directly flash TWRP to the said partition via the below command:
fastboot flash recovery twrp.img
- However, if it doesn’t have a recovery partition, then use the below command to temporarily boot to TWRP:
fastboot boot twrp.img
- Now if your device has a TWRP ZIP file, then flash it from the Install section to make the recovery permanent.
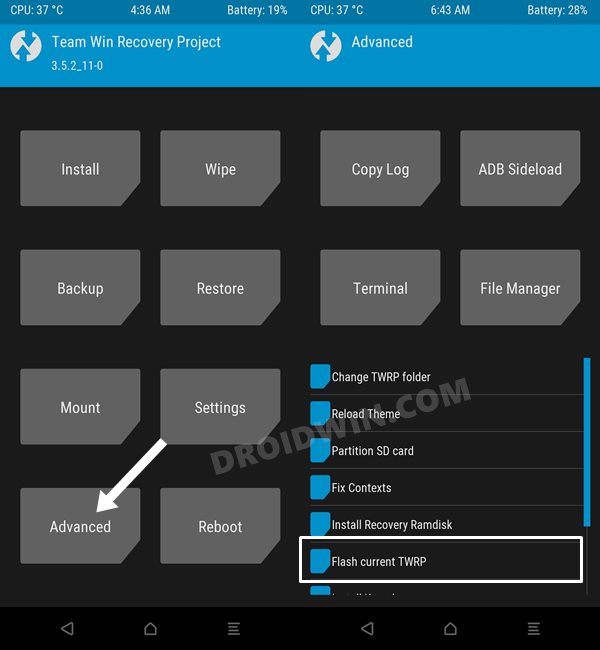
- However, if there’s no AZIP file, then go to Advanced and select Flash Current TWRP.
- If that also doesn’t work out, then go to Advanced > select Install Recovery Ramdisk > select twrp.img > flash it.
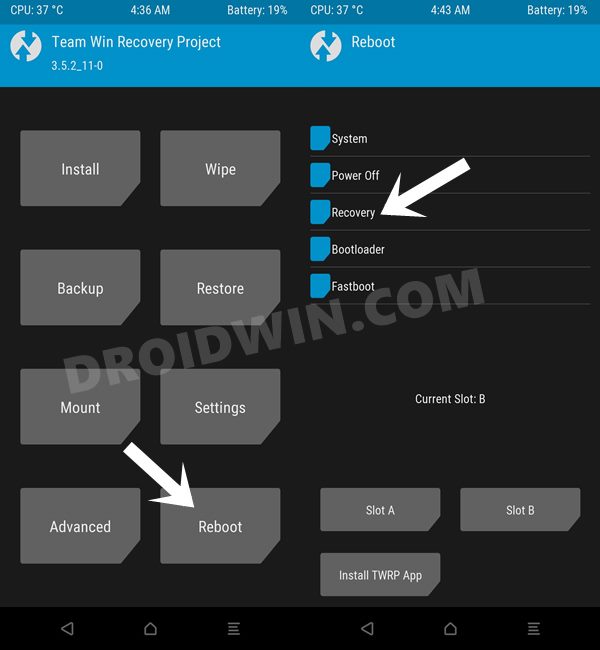
- Once you have flashed the recovery, go to Reboot and select Recovery. Your device will reboot to TWRP Recovery.
STEP 6: Flsh Custom ROM via TWRP Recovery
- First off, open the Command Prompt inside the platform tools folder.
- Then use the below command to boot your device to TWRP Recovery:
adb reboot recovery
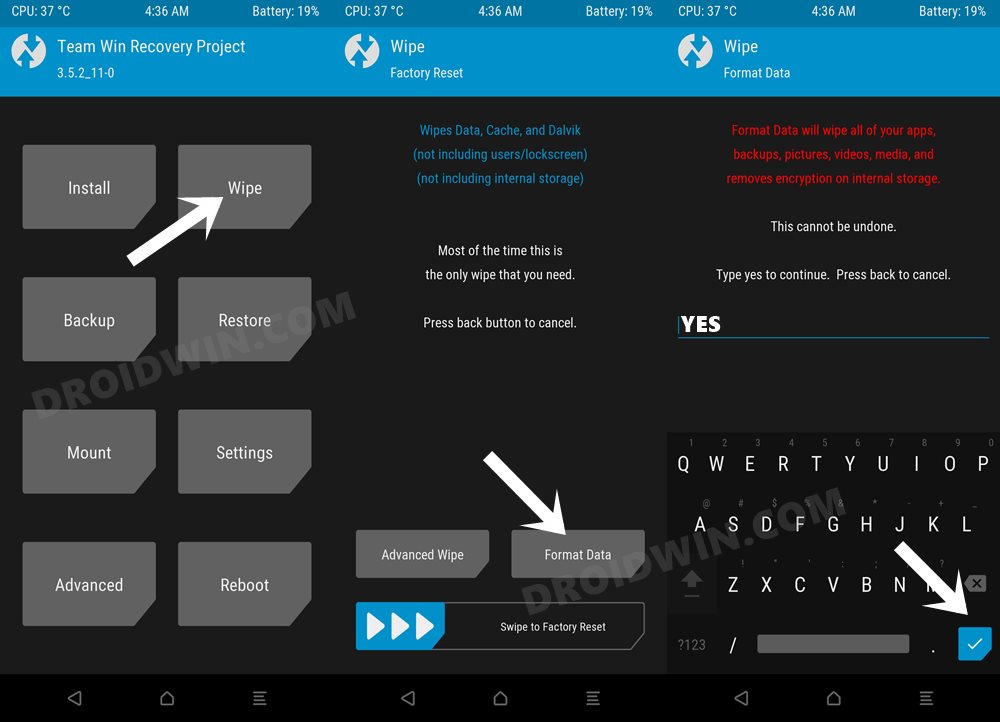
- From TWRP, head over to Wipe > Format Data > type in YES > hit Enter.
- Now transfer the ROM, firmware [if required], and GApps [optional] to your device.
- [For Xiaomi] Go to Install, select the firmware ZIP file and flash it.
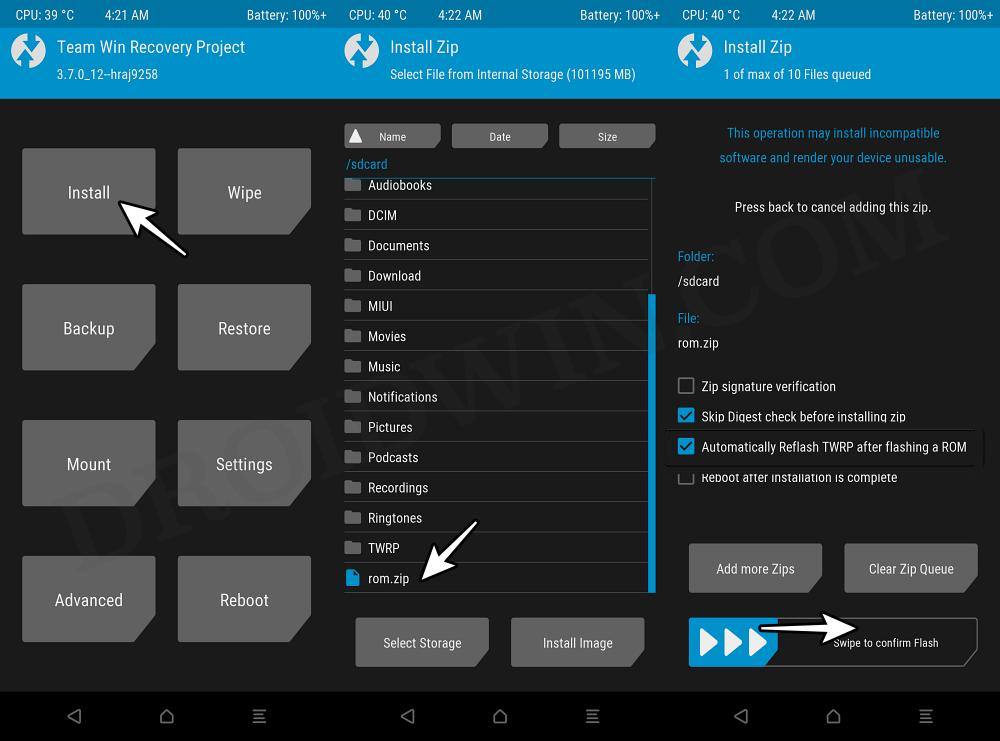
- If you want to retain TWRP instead of the AOSP Recovery that comes with the ROM, then check “Automatically Reflash TWRP after flashing a ROM”.
- Now go to Install, select the ROM ZP file, and do a right swipe to flash it.
- If you want to flash any other ZIP file [such as GApps or Magisk], then go to Reboot and select Recovery. Else skip to STEP 10.
- Now go to Install, select the GApps ZIP file, and perform a right swipe to flash it as well.
- Once done, go to Wipe > Format Data > type in YES > hit Enter.
- If you get any errors while doing a reset, then go to Reboot and select Recovery. Now once again try doing a reset and this time there will be no issues.
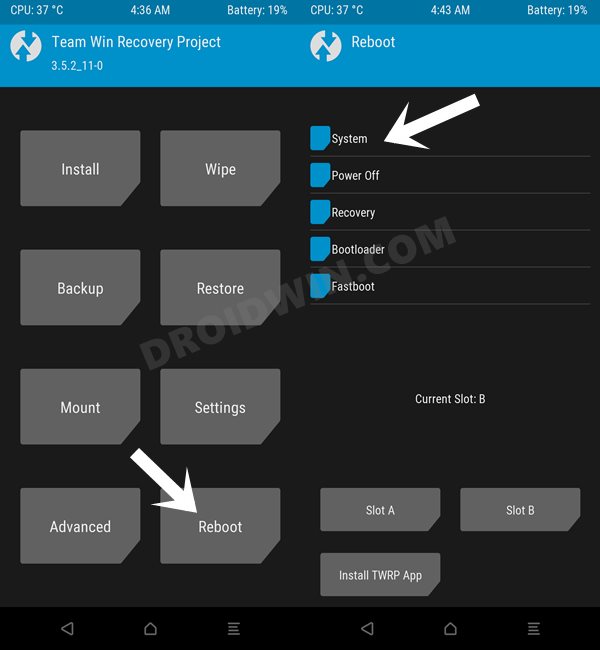
- Finally, go to Reboot and select System. Your device will now boot to the OS. Do note that the first boot will take some time [5-10 minutes], so please be patient.
Fix Device Stuck in Bootloop
If your device is stuck in the bootloop for quite some time, then long press the Power key to turn it off. Then use the hardware key combination to boot to the Recovery Mode. Now do a Format Data once again and then boot to the OS via Reboot > System. NOTE: if you cannot boot to the Recovery, then try booting to the Fastboot Mode and then use the fastboot -w command to perform a reset and then boot to the OS via the fastboot reboot command.
If you are still facing any issues, then go through the entire flashing steps once again and verify that you have carried out each step correctly. If that’s well and good, then have a look at the forum where the file is hosted and check if other users are facing the same issue or not. If not, then there’s something wrong from your end. In that case, you may drop your queries here and we will get back to you at the earliest.
Fix Failed to Mount Partition Error
This error would happen in two instances- right after flashing a custom ROM via TWRP and when trying to do a format data. In the former case, you should ignore that error and instead have a look at the status next to Install Status at the top. If it says Successful [see the below screenshot], then you may simply ignore the error and proceed ahead.
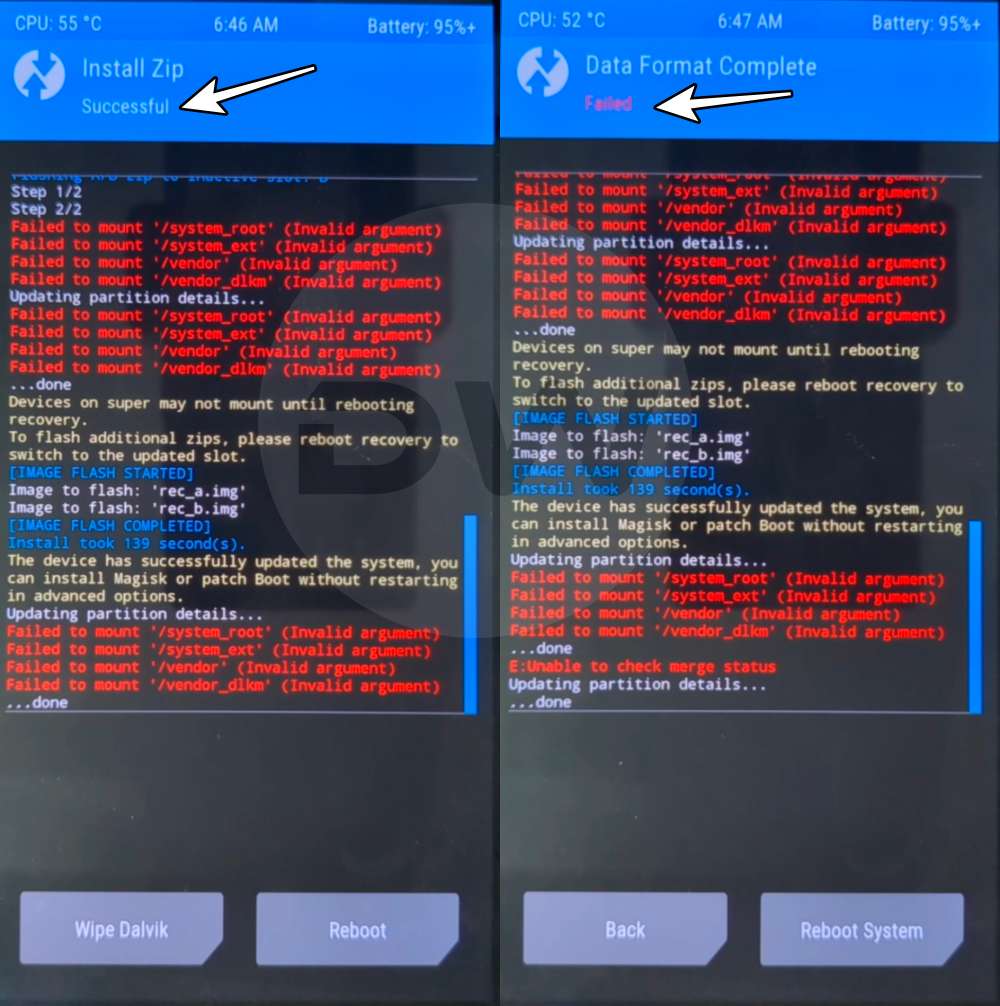
On the other hand, if you get this error while trying to do a format data, then apart from the error message, even if the status shows Failed [see above screenshot], then you’ll have to reboot to TWRP via Reboot > Recovery and then pretty doing a format data. This time you won’t face any issues.