In this guide, we will show you the steps to unlock the bootloader, install TWRP Recovery, and root your OnePlus 7T device. This OEM has always known to be among the most active players in custom development. By default every OEM ships their device with a locked bootloader. The reasoning on their part is quite simple- they only want the end-user to stick with the stock usage experience that they have to offer. Well, for some that are more than enough. But not for many other tech enthusiasts like us.
When there is an open-source ecosystem like Android, why not make full use of the same. In this regard, the first step requires unlocking the device’s bootloader. This will, in turn, allow you to carry out a plethora of customizations on your device. To begin with, you could try your hands on various custom ROMs or replace your device stock recovery with a custom one like TWRP. This in turn will allow you to flash IMG and ZIP files, create and Restore Nandroid backup, fix recovery bootloop, install Magisk in Ramdisk and the list goes on.
Along the same lines, you could also gain access to the system partition of your device via Magisk. This in turn is possible via two different methods. You could either directly flash the Magisk ZIP via TWRP or extract the stock boot.img from payload.bin, patch it via Magisk and then flash it via Fastboot. As far as this guide goes, we will be sticking with the former method. So without further ado, let’s get on with the tutorial to unlock the bootloader, install TWRP Recovery, and root your OnePlus 7T device.
- How to Pass Magisk SafetyNet on Rooted Android 11
- Root Android 11 via Magisk Patched boot.img (without TWRP)
- Fix Magisk patched boot.img issue while Rooting Android 11
- Disable DM-Verity or Android Verified Boot without TWRP
Table of Contents
How to Unlock Bootloader, Install TWRP and Root OnePlus 7T
before we list out the instructions, we would like to make you aware of the risks of these tweaks. First and foremost, it will make your device’s warranty null and void and will wipe off all the data from your device. Along the same lines, apps like Google pay and Netflix might not function along the expected lines (though it could be fixed: How to Pass Magisk SafetyNet on Rooted Android Devices).
Likewise, there’s also a possibility of the device getting bricked or going to a bootloop state (again a fix is there as well: Unbrick Your OnePlus 7T and bring it back from a Dead State). Now that you are aware of the risks and are ready to proceed ahead, then here are the steps to unlock the bootloader, install TWRP Recovery, and root your OnePlus 7T. Proceed ahead with caution. Droidwin and its member wouldn’t be held responsible if something goes wrong with your device, and also in case of a thermonuclear war!
Just to reiterate the facts, TWRP doesn’t support OxygenOS 11 yet. But since as of now, the OnePlus 7 series haven’t received the stable Android 11 update or even the Open Beta update. you might be running OxygenOS 10 (Android 10 only). Hence TWRP will work perfectly without any issue.
But if you are seeing this guide a few months down the line with OxygenOS 11 installed, and this error message is still there, then you should head over to another guide to root your OnePlus 7T that doesn’t involve TWRP (using the boot.img method).
STEP 1: Install Android SDK

First and foremost, you will have to install the Android SDK Platform Tools on your PC. This is the official ADB and Fastboot binary provided by Google and is the only recommended one. So download it and then extract it to any convenient location on your PC. Doing so will give you the platform-tools folder, which will be used throughout this guide to install the TWRP Recovery on OnePlus Nord 2T.
STEP 2: Enable USB Debugging and OEM Unlocking
Next up, you will also have to enable USB Debugging and OEM Unlocking on your device. The former will make your device recognizable by the PC in ADB mode. This will then allow you to boot your device to Fastboot Mode. On the other hand, OEM Unlocking is required to carry out the bootloader unlocking process.
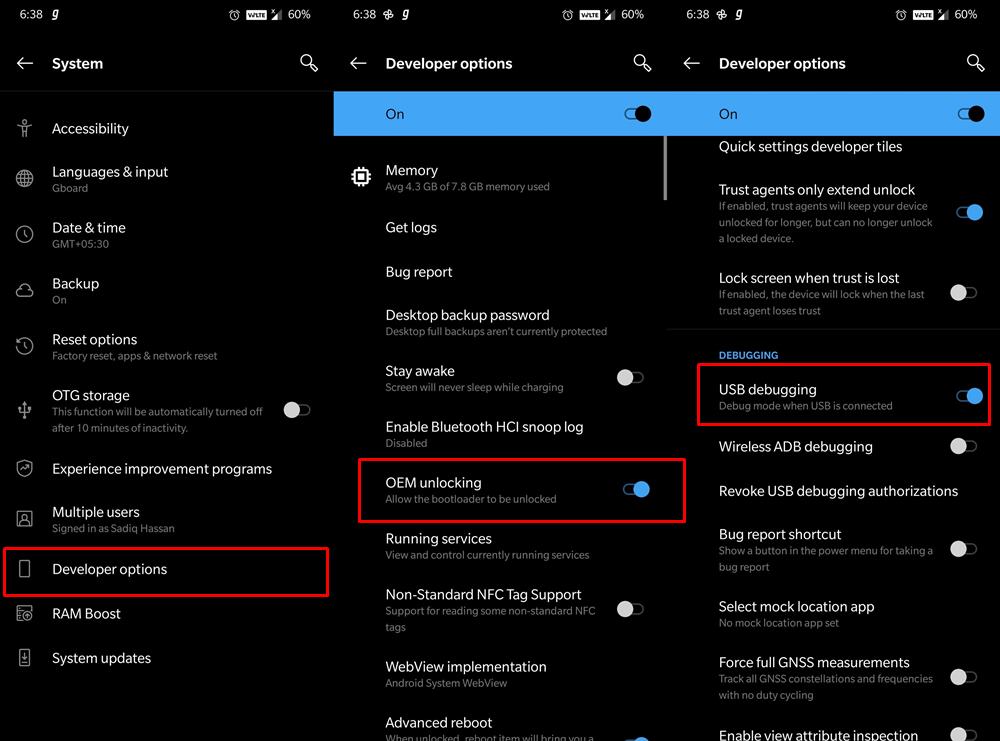
So head over to Settings > About Phone > Tap on Build Number 7 times > Go back to Settings > System > Advanced > Developer Options > Enable USB Debugging and OEM Unlocking.
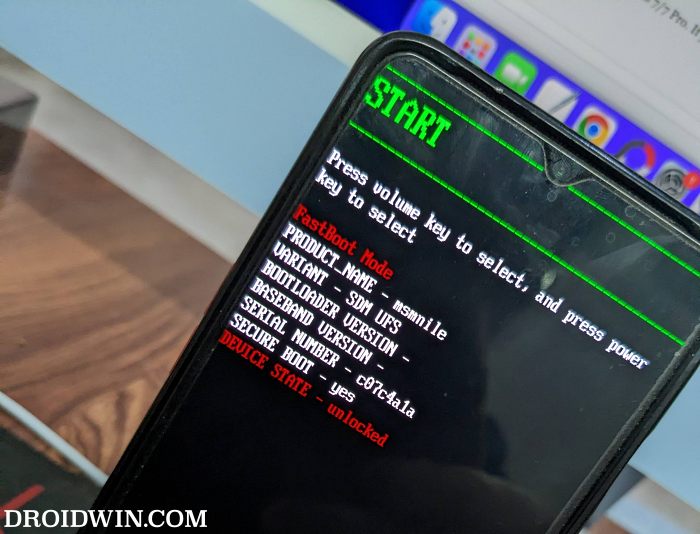
STEP 3: Unlock Bootloader on OnePlus 7T
Next up, you will also have to unlock the device’s bootloader. Do keep in mind that doing so will wipe off all the data from your device and could nullify its warranty as well. So if that’s all well and good, then refer to our guide on How to Unlock Bootloader on any OnePlus [Video]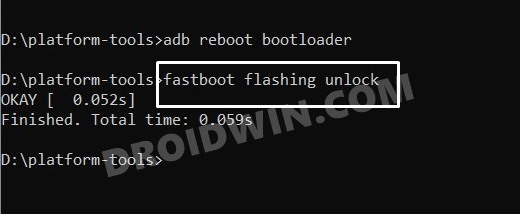
STEP 4: Download TWRP Recovery for OnePlus 7T
- To begin with, grab hold of the TWPR for your OnePlus 7T from the below link.
- Android 11: TWRP 3.4.0-2 Test
- Android 12: twrp-3.7.0_12-1-oos12-fbe-hotdogb.img
- Then rename the TWRP file to recovery, so that the complete name becomes recovery.img.
- Now transfer this recovery.img file to the platform-tools folder on your PC.
STEP 6: Boot to Fastboot Mode
- Now connect your device to the PC via a USB cable. Make sure USB Debugging is enabled.
- Then head over to the platform-tools folder, type in CMD in the address bar, and hit Enter. This will launch the Command Prompt.

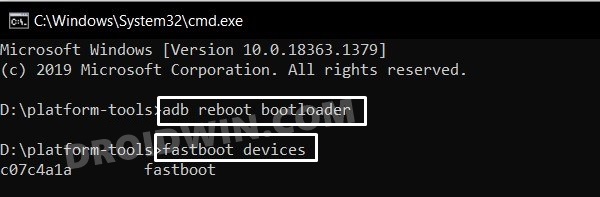
- Type in the following command in the CMD window to boot your device to Fastboot Mode
adb reboot bootloader
- To verify the Fastboot connection, type in the below command and you should get back the device ID.
fastboot devices
- If you are not getting any serial ID, then make sure to install Fastboot Drivers on your PC.

STEP 7: Install TWRP Recovery on OnePlus 7T
- If you want to test the TWRP for one-time usage, then execute the below command:
fastboot boot twrp.img
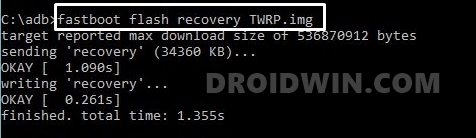
- On the other hand, if you want to permanently flash TWRP, then type in the below command:
fastboot flash recovery recovery.img
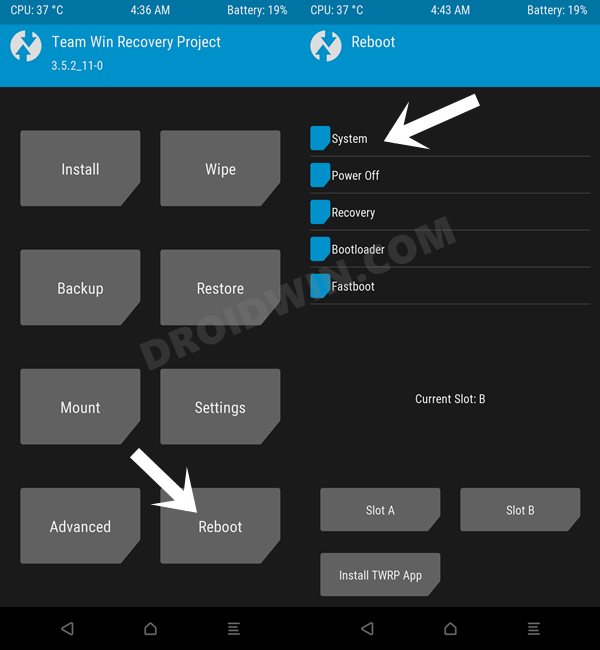
- Now use the below command to boot your device to TWRP Recovery [if it doesn’t happen automatically].
fastboot reboot recovery
- You may now test out the TWRP recovery and carry out the desired task.
- Once done, you could now boot your device to the OS via Reboot > System.
STEP 4: Root OnePlus 7T via Magisk
- To begin with, download the Magisk APK and change its extension to ZIP.
- Then transfer the Magisk,zip file to your device via TWRP Recovery.
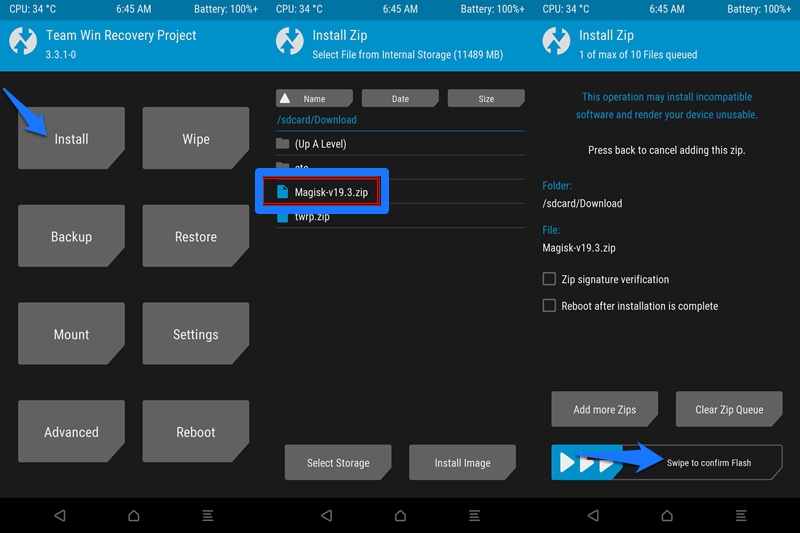
- Now that your device is booted to TWRP, go to the Install section.
- Navigate to the Magisk ZIP file, select it, and perform a right swipe to flash it.
- Once the flashing is done, you may reboot your device to the OS. So go to Reboot and tap on System.
That’s it. These were the steps to install TWRP Recovery and root your OnePlus 7T. Let’s now address another important point i.e. how to install OTA updates on your rooted OnePlus device. Follow along.
FAQ 1: Install OTA on Rooted OnePlus 7T
Many users have asked us whether they could install OTA updates on their rooted OnePlus device. Well, the question is completely genuine, and the answer is in the affirmative. Yes, you could install OTA updates on your rooted OnePlus 7T. Refer to our comprehensive guide to know the detailed steps for the same: How to Install OxygenOS OTA on Rooted OnePlus devices.
FAQ 2: Hide Root on Rooted OnePlus 7T
As you might be aware, upon rooting your OnePlus 7T via Magisk, DM Verity gets triggered. This results in the inability of apps like Google Pay to function properly. Likewise, the WideVine L1 Certification of Netflix gets degraded to L3 and you wouldn’t be able to watch videos in HD. However, there is a handy method to hide root on your OnePlus and let all the apps function as it would normally do. This guide shall help you out: How to Pass Magisk SafetyNet on Rooted Android 11.
That’s it. These were the steps to unlock the bootloader, install TWRP, and root OnePlus 7T. If you have any queries concerning any of the aforementioned steps, do let us know in the comment section. We will get back to you with a solution at the earliest.


MENESI
Hello Bro,Thanks for Explaining every thing.
I flashed TWRP in both slots (Oxygen OS 11 Beta OnePlus 7t), It doesn’t read internal storage.
How to restore Stock Boot Image instead of TWRP in both slots?
Sadique Hassan
Hi Menesi, it seems to be the case of data encryption. You will have to wipe off the data partition so that TWRP reads your internal storage. But if you are looking to revert to stock, then this guide will help you out: How to Uninstall TWRP and Restore Stock Recovery on Android
Deep Lathia
After booting to twrp, When i go to TWRP to install Magisk via the zip file I’m unable to see any data. It says “Internal Storage 0mb”. Please let me know if you can help me with the same.
Sadique Hassan
Hi Deep, it seems the data partition seems to have been encrypted. There could be two different ways out of this. You could either try flashing the no-verity-opt-encrypt.zip and see if it helps. Otherwise, you will have to format the data partition from TWRP (which will wipe off all the data from your device). After this, you may then transfer Magisk via ADB Push command or Mount OTG Pendrive if you have one. I am also planning to cover a comprehensive guide just on this issue, in which I will be explaining all the above points in detail. So you may refer to that as well. In the meantime, you could try out the above tweaks.