In this guide, we will show you the steps to root your Android device without using a PC. When it comes to stepping into custom development, then there is a plenitude of tweaks to look forward to. From flashing custom ROMs to recoveries and overclocking the device via a custom kernel, the possibilities stand endless. However, gaining administrative privileges has always been the go-to choice for tech enthusiasts as it opens the floodgates to a plethora of customizations.
To carry out this process, there are three major steps that you need to checkmark: unlock the bootloader [which requires a PC], then patch the boot.img [which could be done on your device], and finally flash it via Fastboot Commands [which again requires a PC]. So as you can see two out of three steps call for the need for a PC. However, there could be a few rare cases wherein your PC might not be able to identify the connected device, even if you have the drivers installed.
Likewise, in some instances, you might not have a PC nearby but there’s an urgent need to root your device via Magisk. Or you are just an enthusiast like me who wishes to test out new and weird ways of getting things done, then in all these scenarios, your best bet is to root your Android device without using a PC. And in this guide, we will show you how to do just that. Follow along.
Table of Contents
Root Android Device without PC: Where lies the Issue?
In general terms, you could root your Android device using TWRP or without TWRP. In the first method, you will have to flash the Magisk Installer ZIP file. The second method calls for patching the stock boot.img file and then flashing it via fastboot commands. So here is what happens in both these methods:
ISSUE 1: Via TWRP
It calls for having a TWRP Recovery installed on your device. For booting (temporary install) or flashing (permanent install) this recovery, you will have to execute fastboot commands. This in turn done by executing the commands inside the PowerShell or Comand Prompt window, once you have installed Android SDK Platform Tools “on your PC”. But wait! Can’t we execute ADB and Fastboot commands via Android apps like Termux and Terminal Emulator?
Well, you can, but it requires a rooted Android device in the first instance! And what about using apps like Flashify that is able to flash ZIP and IMG files without making use of TWRP? Well, running that app also requires a rooted Android device. So all this ultimately proves that you cannot root your Android device via TWRP without a PC. Now let’s turn our attention towards the second method.
ISSUE 2: Via Magisk
Okay, now what if we don’t take the help of TWRP in the first place. Well rooting an Android device without TWRP has been there for ages. It is more preferred than the above method because, for most of the devices, there is no active TWRP build. The first step requires getting the Stock Boot.img File. Most of the OEMs nowadays ship their stock firmware in the payload.bin file. And that requires Python installed on your PC to extract [UPDATE: you could now directly extract payload.bin on your device without the need for a PC]. Read: How to Extract payload.bin and get the stock boot image file.
But there are still some devices whose firmware files come under just a compressed ZIP file. This could then easily be extracted onto your device using the WinZIP or WinRAR apps for Android. Well, even the device that has a payload.bin file could ask for the stock boot.img file from their friends. Hence they could nagate the entire extracting process. So the first step of getting the stock boot.img file is possible without using a PC.
The second step involves patching the stock boot.img file via Magisk Manager app. Well, this is again possible without using the PC. Just install Magisk and then patch the boot.img file. Again you could also skip this method as well and one of your friends to directly upload a patched stock boot.img file for you. Read: Patch Stock Boot Image via Magisk and Flash it using Fastboot
So in a nutshell, the first two steps for rooting via Magisk don’t require a PC. Now comes the third and final part: you have to flash this patched boot IMG file via Fastboot. First off, you will have to boot your device to fastboot. This you could easily do by turning off your device and using the hardware key combinations to boot your device to Fastboot mode.
But unfortunately, this is where things come to a standstill. You cannot flash IMG files without using Fastboot Commands inside a PowerShell or Command Prompt on your PC. Though some Android apps might allow you to directly flash IMG and ZIP files (as mentioned before), but it requires a rooted Android device in the first place.
So to round off, you cannot use both the methods (With TWRP or Without TWRP) to root your Android device without PC. A Windows or Mac PC is a definite requirement. Now before we move ahead, I would like to discuss another pretty important point that you might have come across:
ISSUE 3: One-Click Root Apps- Why You Shouldn’t Use Them
First and foremost, keep a safe distance from all the one-click root apps. I repeat, do not ever use these types of apps, EVER. They bring in quite a lot of risks and you are inviting unwanted privacy risks. Look, I get it. Rooting in itself isn’t safe- but you actually would have complete knowledge as to what are you doing at every step.
Unfortunately the same cannot be said about these apps. Furthermore, they wouldn’t even work on newer Android devices. They were mostly designed to work with API level 25 (Nougat 7.1) or lower. Anyways if you are able to install on onto current generation devices, then I would suggest uninstalling these apps right away.
With this, it concludes that we cannot root an Android device via TWRP, without TWRP and it isn’t recommended [author’s personal view] to do so via one-click root apps. Then what else could we do? Well, in this guide, I am going to show you how to root any Android device without a PC, Magisk, and TWRP! Yup, you read that right. We would not be using any of these three components (and of course those shady one-click root apps). Follow along for the detailed instructions.
Root any Android Device without PC via OTG [Recommended]
The below instructions are listed under separate sections for ease of understanding. Make sure to follow the same sequence as mentioned. Droidwin and its members wouldn’t be held responsible in case of a thermonuclear war, your alarm doesn’t wake you up, or if anything happens to your device and data by performing the below steps.
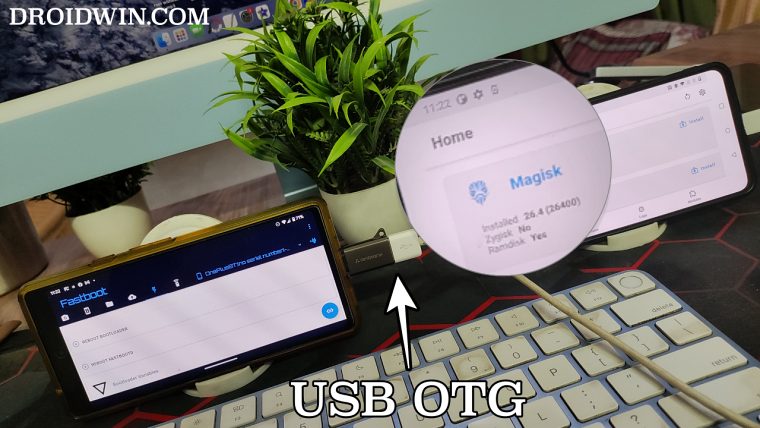
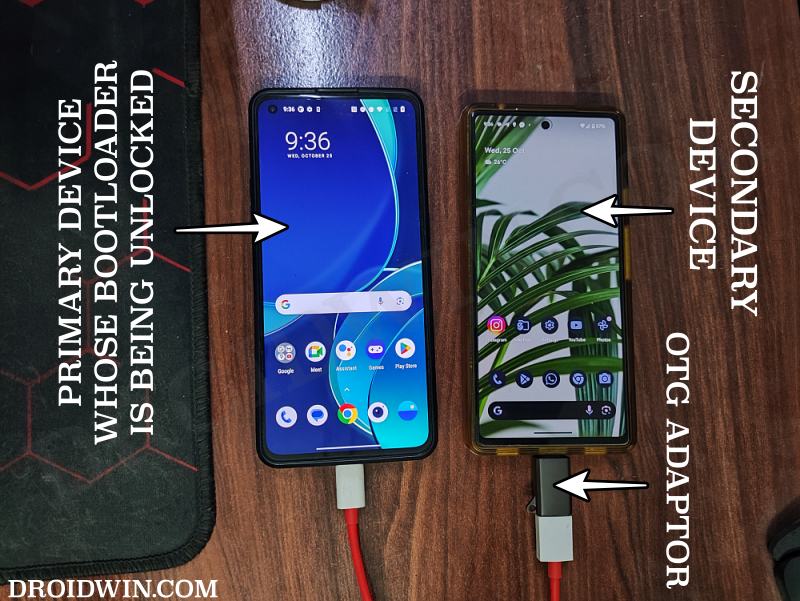
You’ll need a second Android phone, a USB cable, and a USB OTG adapter. The primary device is the one whose bootloader is being unlocked whereas the secondary device is the one on which we will be carrying out the process.
STEP 1: Enable USB Debugging and OEM Unlocking
Next up, you will also have to enable USB Debugging and OEM Unlocking on your device. The former will make your device recognizable by the PC in ADB mode. This will then allow you to boot your device to Fastboot Mode. On the other hand, OEM Unlocking is required to carry out the bootloader unlocking process.
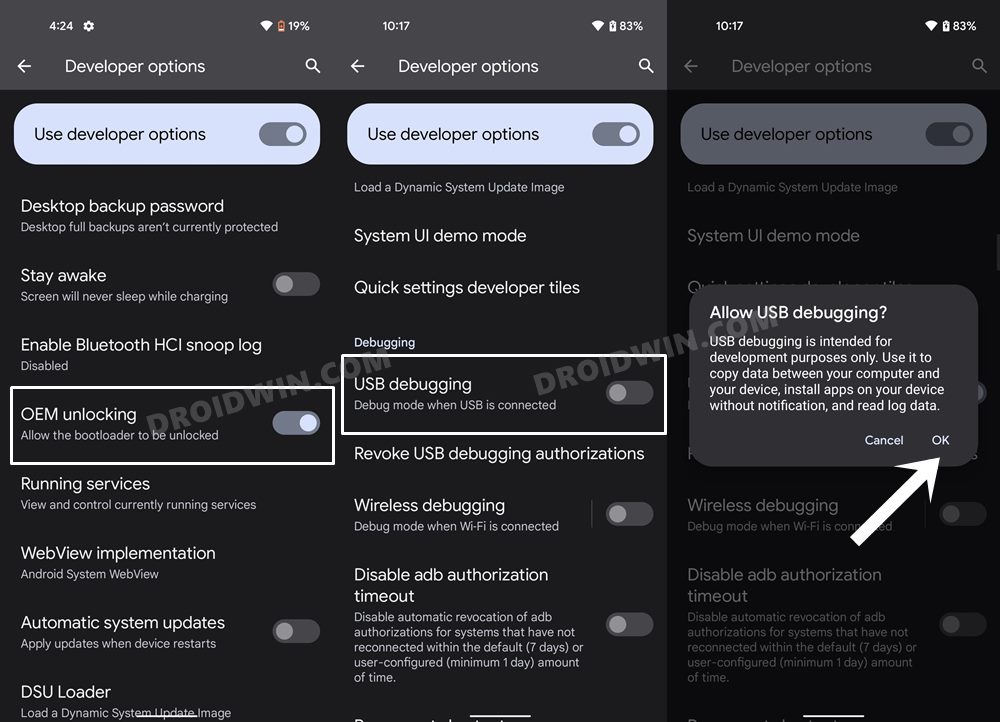
So head over to Settings > About Phone > Tap on Build Number 7 times > Go back to Settings > System > Developer Options > Enable USB Debugging and OEM Unlocking.
STEP 2: Unlock Bootloader Without PC
Next up, you will have to unlock the device’s bootloader, but since we are not using a PC, therefore, refer to our guide on How to Unlock Bootloader on any Android without PC [Video].
STEP 3: Get Boot/Init_Boot.img
NOTE: If your device came with Android 12 or older version out of the box, then you’ll have to use the boot.img. On the other hand, if it came with Android 13 or newer version, then you’ll have to use the init_boot.img. Moreover, the below process should be carried out on your secondary device.
- To begin with, download the firmware/ROM for your device.
- Make sure to download the same version that is currently installed on your device [you could verify the same from Settings > About Phone > Build Number].
- Once downloaded, extract the boot/init.img to any convenient location on your device.
- If it is a ZIP/RAR file, then you could easily extract them via the default or third-party file manager app. On the other hand, if it is in payload.bin format, then refer to our guide on How to Extract payload.bin without PC [Video].
STEP 4: Patch Boot/Init_Boot.img via Magisk
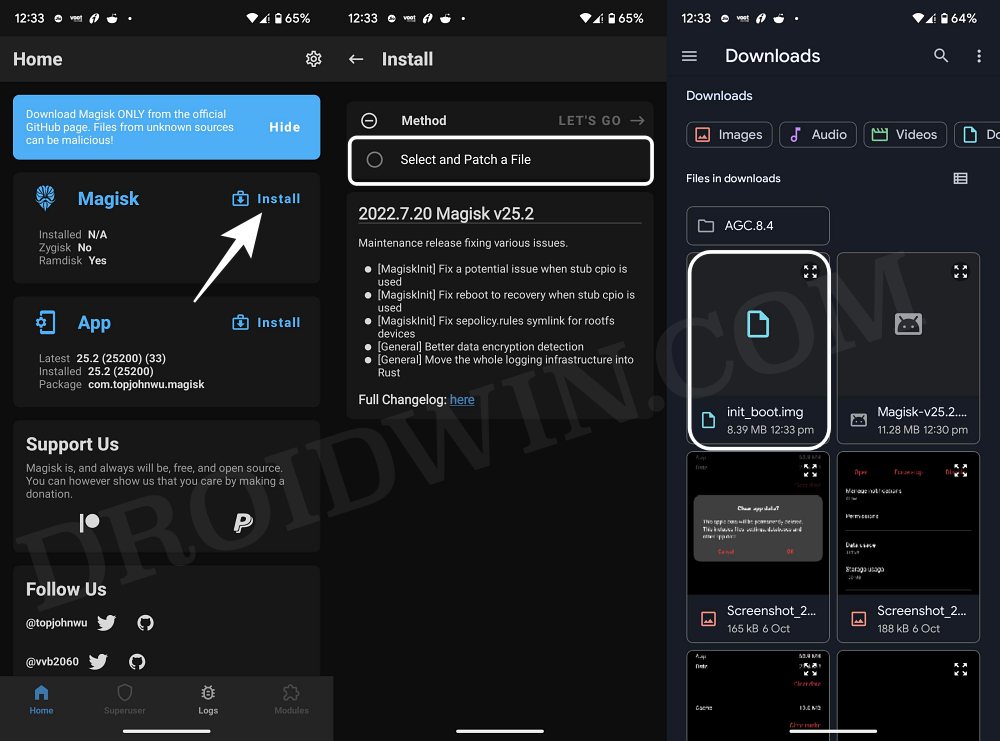
- Download and install the Magisk App on your device.
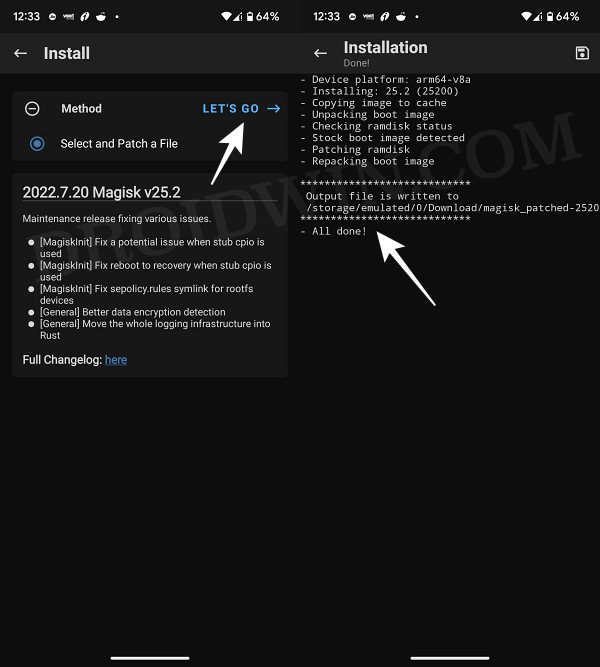
- Then launch it and tap on the Install button next to Magisk.
- After that, choose ‘Select and Patch a File’, and navigate to the stock boot/init_boot.img file, and select it.

- Then tap on the Let’s Go button situated at the top right.
- The boot/init_boot.img file will now be patched and placed under the Downloads folder on your secondary device.
- Transfer this patched boot.img file to your secondary device’s Internal Storage, but not inside any folder.
STEP 5: Boot Device to Fastboot Mode without PC
- First off, connect the USB OTG adaptor to your second device.
- Likewise, plug in the USB Type A end to the OTG.
- On the other hand, plug the Type C end to your primary device.
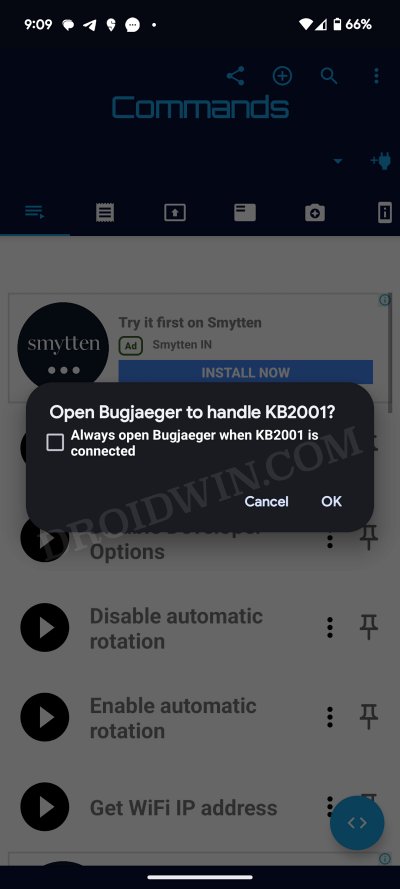
- Now download and install the Bugjaeger app on your second device.
- Then launch the app and you’ll get a prompt “Open Bugjaeger to handle <device name>”. Tap OK.
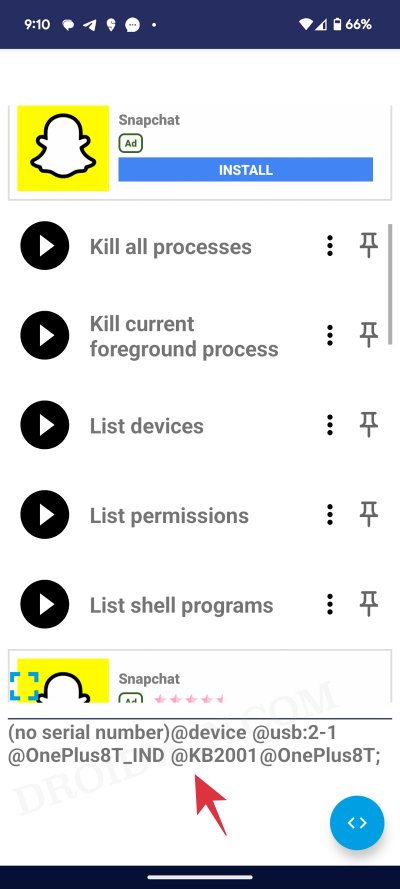
- Now from the Commands page of the app, tap on List Devices. Your primary device should be listed at the bottom.
- If that doesn’t happen, then unplug and replug the USB cable/OTG. You might have to do this a few times until you get the prompt/device name.
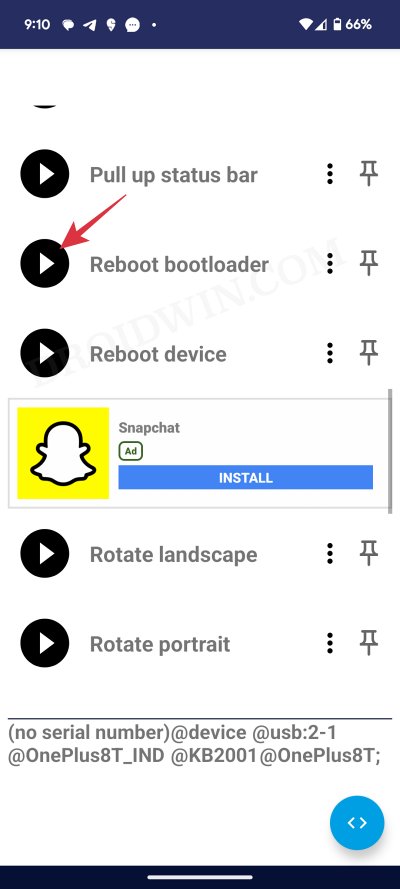
- Once that happens, tap on the Reboot Bootloader icon. Your primary device will now boot to Fastboot Mode.
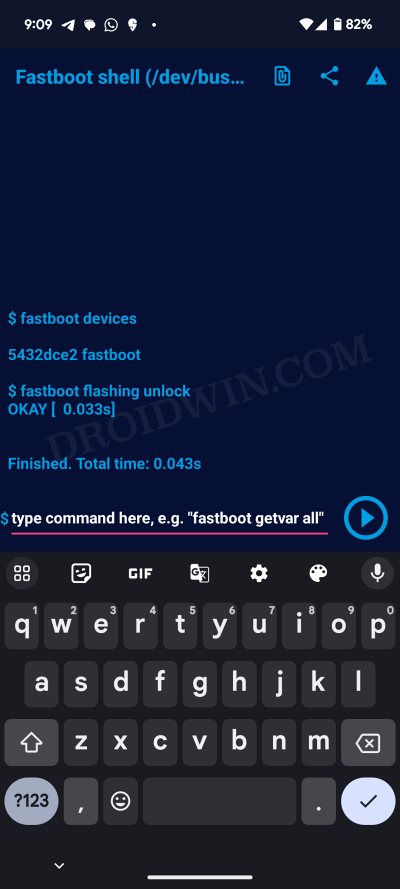
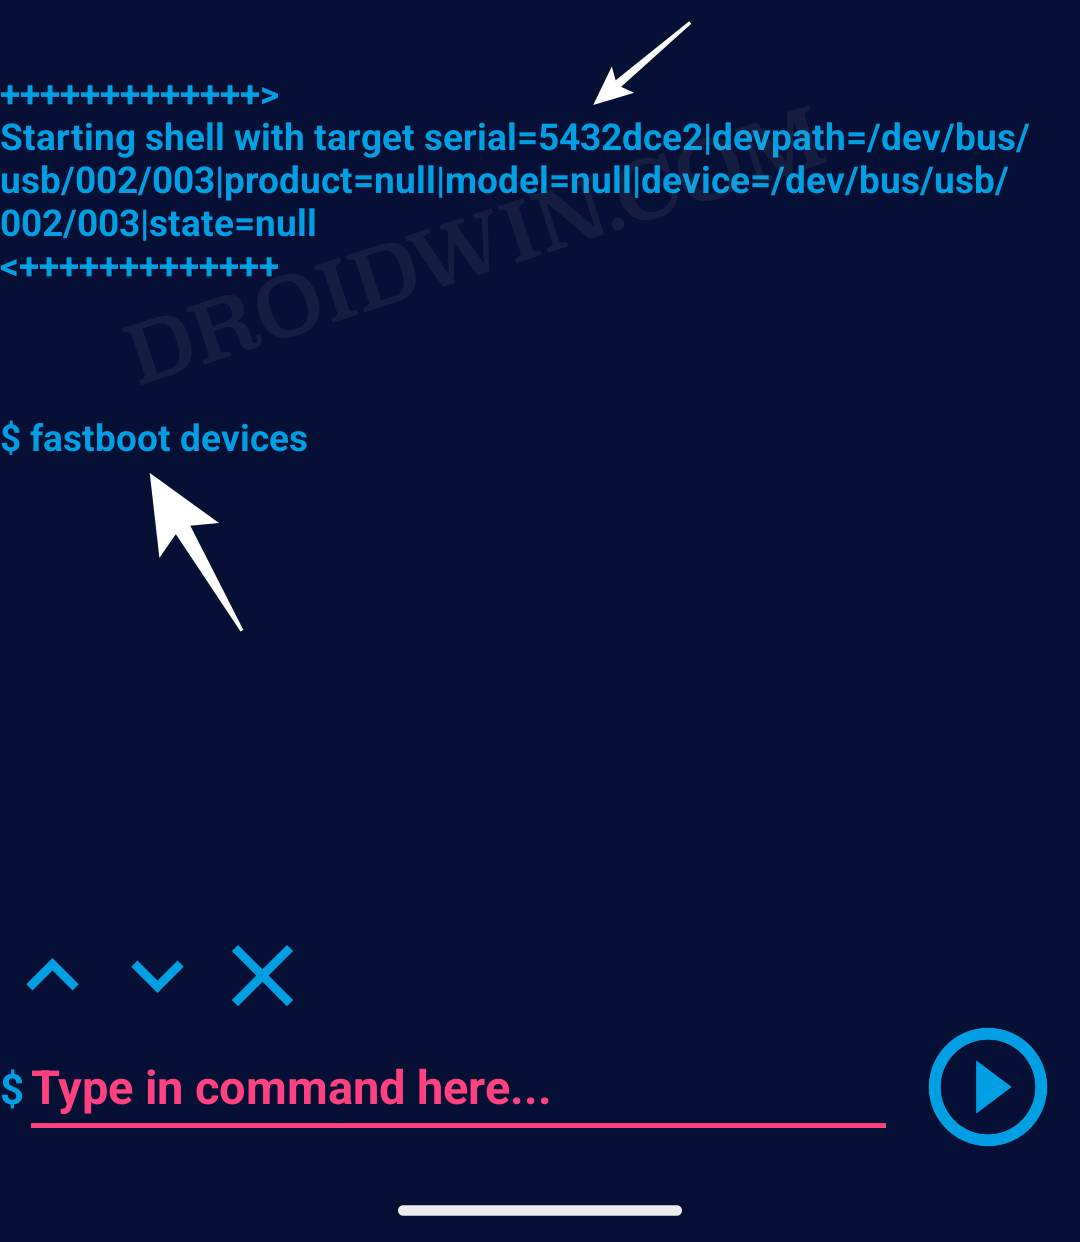
- Then tap on the shell icon at the bottom right of the app. This will open the Command window. Type in the below command:
fastboot devices
- Now type in the below command and make sure that you are getting a serial ID
fastboot devices
- If that is not the case, then unplug and plug the USB or/and OTG a couple of times or try using a different USB cable. It should ultimately work.
STEP 6A: Root Device using Magisk Patched Boot.img
This step is applicable for those devices that came with Android 12 or older versions out of the box. [See FAQ 1 for more details].
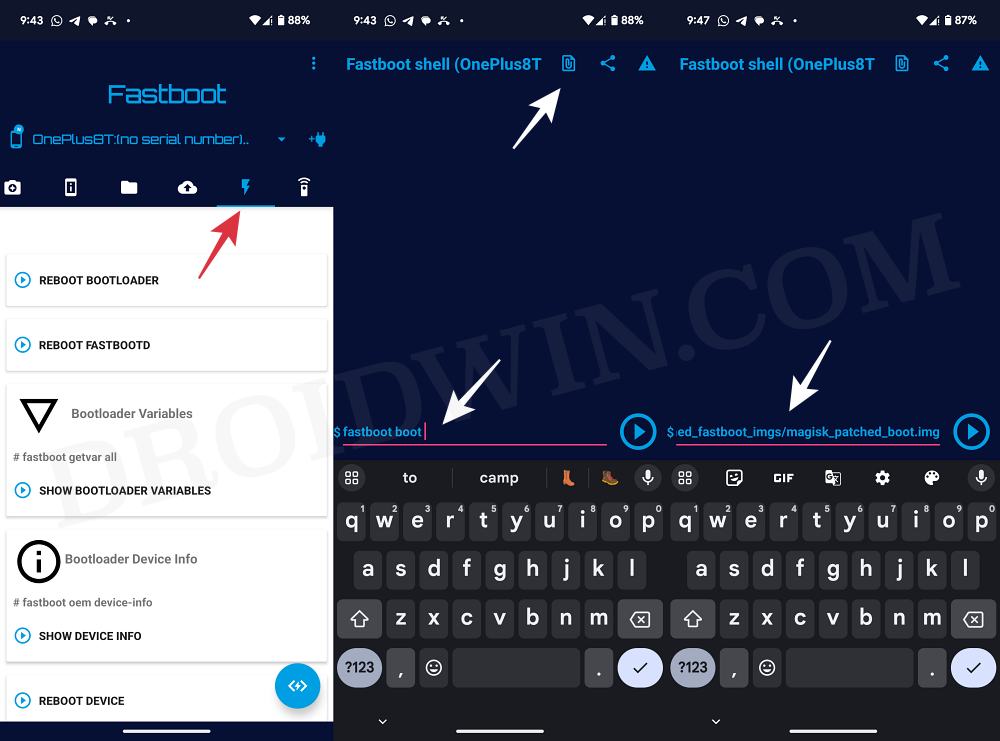
- To begin with, go to the Flashing tab of the Bugjaeger app.
- Then tap on the console icon at the bottom right.
- Now type in fastboot boot <space> and tap the file icon at the top right.
- Then select the patched boot.img file. It will be loaded in the command field.
- Just hit Enter and your device will now reboot to the rooted OS.
- However, it’s a temporary root, let’s now make this root permanent.
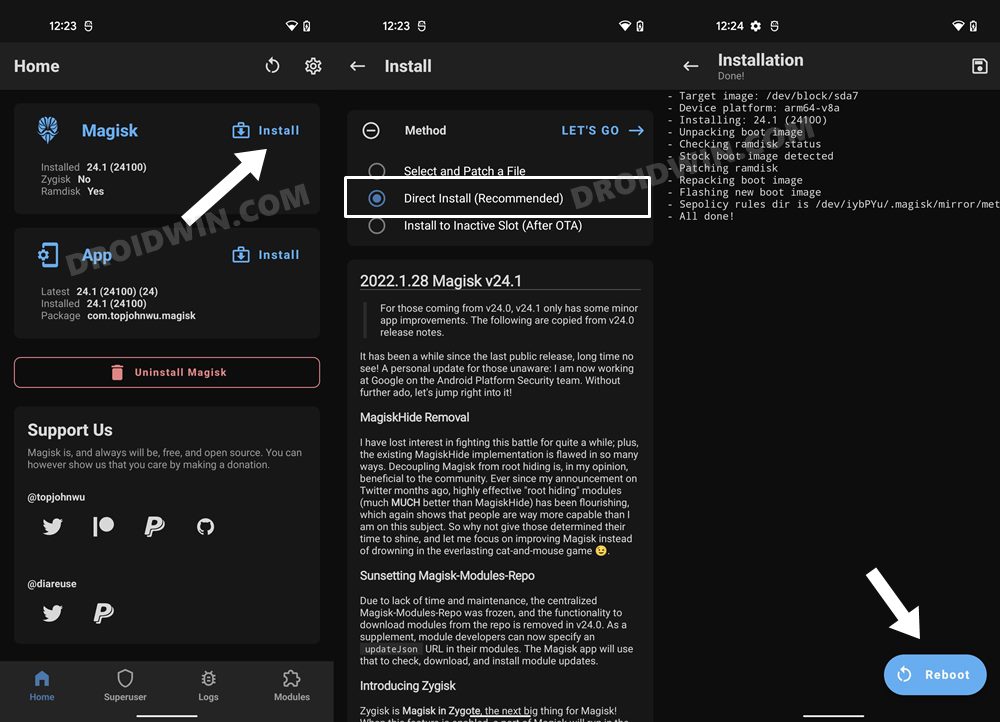
- So launch the Magisk app and tap on Install.
- Then tap on Direct Install (Recommended) > Let’s Go situated at the top-right.
- [NOTE: If you get a Require Additional Setup prompt, then tap on OK and you’ll be automatically taken to the Install section from where you could select Direct Install > Reboot].
- Once done, hit the Reboot button situated at the bottom right.
- That’s it, your device will now boot to the rooted OS.
STEP 6B: Root Device using Magisk Patched Init_Boot.img
This step is applicable for those devices that came with Android 13 or higher versions out of the box. [See FAQ 1 for more details].
- To begin with, go to the Flashing tab of the Bugjaeger app.
- Then tap on the console icon at the bottom right.
- Now type in fastboot flash init_boot <space> and tap the file icon at the top right.
Reference Image - Then select the patched init_boot.img file. It will be loaded in the command field.
- Now just hit Enter and your device will now reboot to the rooted OS
Root any Android Device without PC via VMOS

Till now, we have discussed all the reasons why the conventional rooting methods don’t work without a PC. This has given you a complete background. So now that this out of the way, let’s focus on the brighter side and check out the fix. It will involve using an Android emulator. Yes, you heard it right, we would be using an Android emulator within an Android device. For the unaware, an emulator is a software program that allows you to run incompatible apps onto the hardware on which it is installed.
For example, you could play PS4 games onto Android device via a PS4 Emulator app for Android, or run Android apps on your PC via Bluestacks. But here, we will be taking a slightly different approach. We would be using Android Emulator inside the Android OS itself. So rather than actually rooting your device, we would be rooting this emulator. This in turn will give you a plethora of advantages, as mentioned below:
Benefits of this method
- You DO NOT need an unlocked bootloader.
- Likewise, you DON’T REQUIRE TWRP Recovery.
- Furthermore, you WILL NOT need MAGISK.
- As a result, your warranty WILL NOT be void.
- It is completely risk-free. If anything unknown happens at any point in time in time, you can easily close this emulator just as you do for any other Android app. Then simply relaunch it and try again, and you should face no issues. Till now, I have tried this process across many devices and it has given me success in the first attempt itself.
- All the rooting tweaks and modifications you do will remain inside this secondary environment. As a result, your primary device, and its apps will remain unaffected. This means you could continue to use Google Pay, Pokemon Go, and even stream Netflix content in HD (no degradation of Widevine from L1 to L3). With that said, here are the required instructions steps to root your Android device without a PC. Follow along.
STEP 1: Install the Emulator on your Android Device
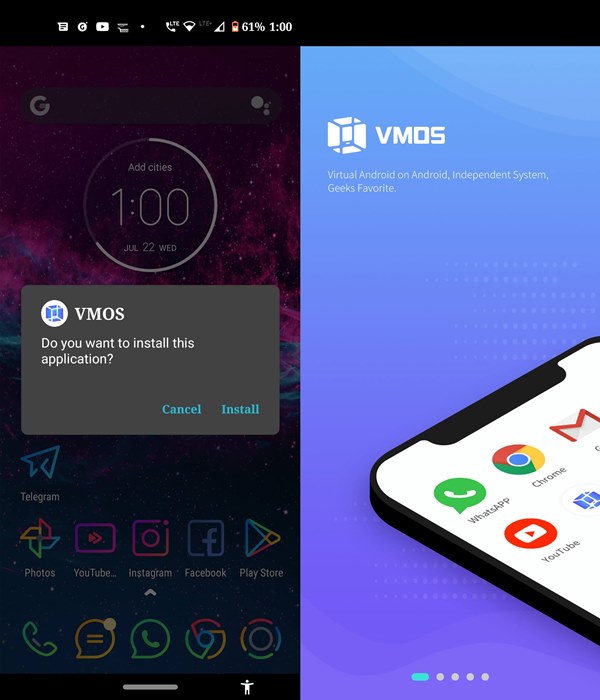
For this tutorial, we will be making use of the VMOS Emulator. Well, there is no point in guessing that the app isn’t available on Play Store. So you will have to download and install it from the official VMOS site (click on the VMOS Download button, no need for the Pro version). Once downloaded, install it onto your device (you might have to enable unknown sources from Settings. Since you are here to root your Android device without PC, you already knew this).
STEP 2: Set up the Emulator
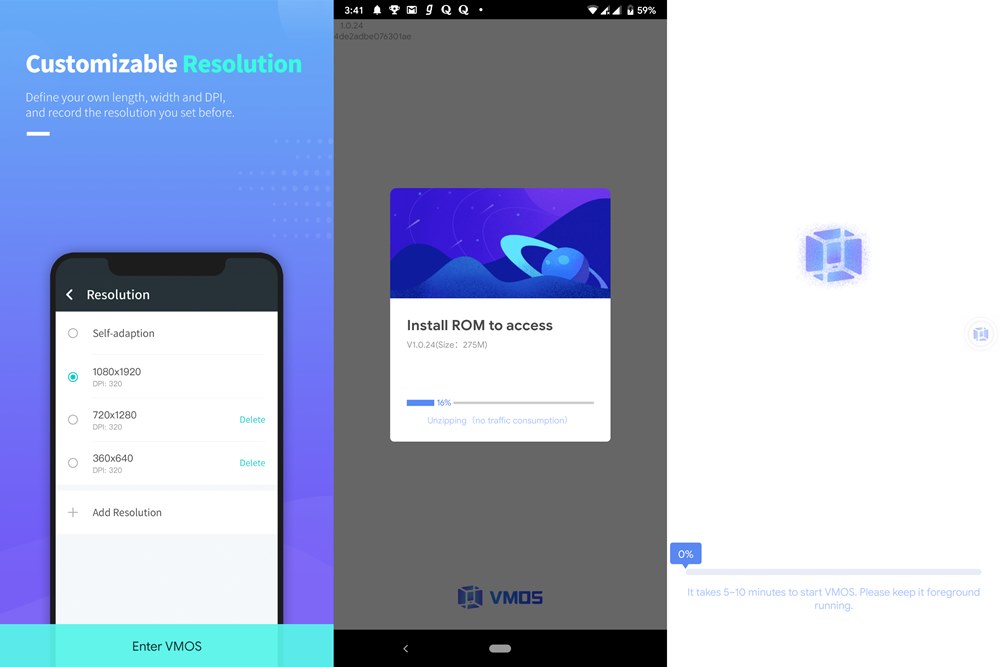
Scroll through the welcome screen and tap on the “Enter VMOS” button. It might ask you to give permissions to use floating window mode. It is up to you to hit Off or On (for the ease of usage, I have kept it ON). Once that is done, you will have to give a couple of other permissions, that are compulsory.
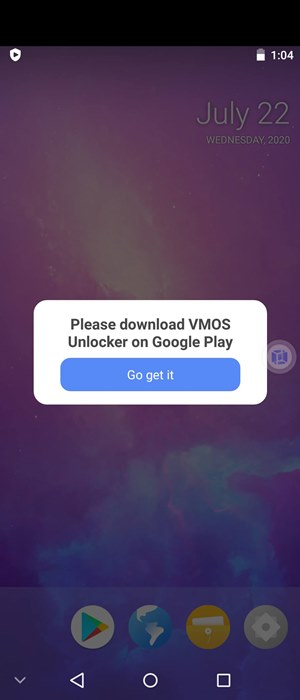
Once that is done, the app will then extract the necessary components and then will start the app’s process. All this will take a couple of minutes, after this, you will get a message to download VMOS Unlocker on Google Play. Tap on Go Get It. If the app is no longer available on the Play Store, then head over to your browser and download the APK from this link: VMOS Unlocker APK (4.8MB). Once installed, just launch it and then close it (it will just be a Calculator app).
STEP 3: Root your Android device without PC via Emulator
- Now that everything is set up, you could start with the process to root your Android device without PC. Follow the below steps:
- Launch the VMOS app and now it will check whether the VMOS Unlocker has been installed or not. Since we have already installed it, the check should be completed within a few seconds.
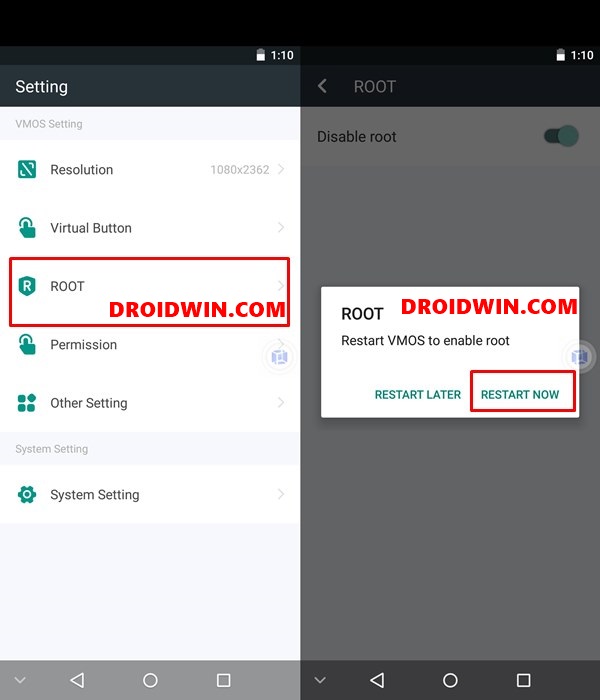
- After this, head over to the Settings menu, that could be done either from App Drawer or from the Settings icon in the Notifications toggle.
- Within the Settings menu, go to Root, and enable the Root toggle.
- You will then get a notification to restart the emulator. Tap on Restart Now. When it relaunches, you will have successfully rooted your device without PC.
STEP 4: Verification with Screenshot

- Let’s now verify that you have successfully rooted your device. For that, we would be making use of the Root Checker app.
- So head over to Play Store (from VMOS itself), search for, and download the Root Checker.
- launch it and you should get the following message “Congratulations Root Access is properly installed on your device”.
- The device name will be shown as VMOS and the Android version as 5.1.1. This you might have already noticed as VMOS is only able to operate inside the Android emulator.
- [GUIDE] Flash ROMs/Magisk/TWRP/Kernels on A/B Partition Devices
- How to Flash Various Files in A/B Partition Devices
- Install Custom ROMs on any Android Device- Includes A/B Partition
- How to Fix FAILED (remote: unknown command) Error
Conclusion
So with this, we conclude the guide on how to root your Android device without a PC. The only drawback (if you would call one) is the fact that it is based on Android Lollipop. For me, it is a blessing in disguise as most of the apps now cause conflict with Android 10 or higher versions. But now, they run without any issues as such. One example of the same is the Xposed Installer App.
Beginning with Android 9.0 Pie, you require a couple of Magisk Module to make it compatible. But running it inside the VMOS didn’t require anything as such. Add to the fact that everything happens inside the emulator itself and does not cause any effect as such to your device, well we couldn’t have asked for more. On that note, do let us know your views about the same in the comments section below. And since Android 11 stable build is now live, here are some articles that might be of some help to our readers:


Thomas
VMOS unlocker is not on google play. The link to download the app does not help- you can download the app, but VMOS does not accept it- it stands still, so you cannot root with VMOS at the moment.
Do you have any solution for me ?
Your support with you articles is really great.
Kind regards Thomas
Hans
Can you guide me how to root oppo A83 (cph1729) 3 gb ram. I saw your blog and tried some things like converted ozip to zip and patched boot.img. via magisk app.but the problem is when I enter this adb command: adb reboot bootloader, my devices turns off and cmd shows waiting for any device….
Please help me out of this…
Sadique Hassan
Hi Hans, could you please try out this guide and let me know if the issue got rectified or not: Fix Waiting for Device Error in ADB or Fastboot Commands