In this guide, we will show you the steps to take a backup of all the partitions on your OnePlus device via the MSM Download Tool Read Back Mode. MSM Tool has long been the go-to choice for tech enthusiasts as it has completely streamlined the process of unbricking any OnePlus device that has an underlying Qualcomm chipset. You just need to boot your device to EDL Mode, flash the OPS firmware via this tool, and your device will be up and running again.
Well, most of you might already be aware of the aforementioned process, but what you might not be aware of is the fact that you could also take a backup of all the partitions on your OnePlus device via the MSM Download Tool’s hidden Read Back Mode. And in this guide, we will show you how to do just that, But before that, you might ask what’s the need to carry out this task, and more importantly, why should one do so via the MSM Tool. Let’s check out.
Table of Contents
What is MSM Download Tool Read Back Mode
The ReadBack is a hidden mode in the MSMDownload Tool that allows you to take individual [or complete] partition backups. For example, in case the abl partition has been corrupted, then you could extract the abl.img from the OPS firmware via Readback Mode and subsequently flash it on your device. Likewise, you could extract the boot.img/init_boot.img for root, vbmeta to disable the verity checks, and so on.
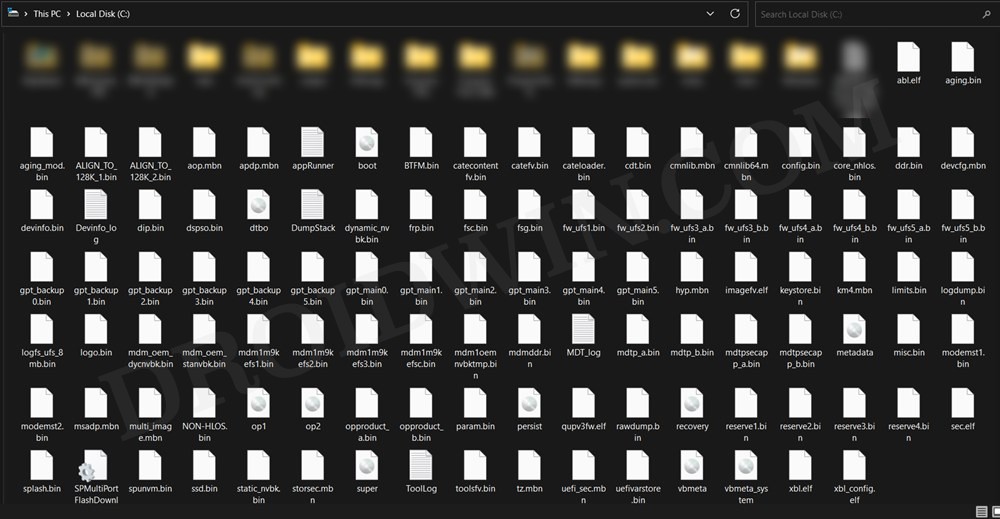
This will save your time and bandwidth as you wouldn’t need to download the entire firmware in case you need just a couple of firmware files. Likewise, you could carry out this task even if your device’s bootloader is locked or even if it is completely bricked. There’s just one minor issue with this feature- it extracts all the files directly inside the C drive, without giving us any option to change the directory or create a folder beforehand. So a messy C drive is on the cards!
How to Use MSM Download Tool Read Back Mode
The below instructions are listed under separate sections for ease of understanding. Make sure to follow the same sequence as mentioned. Droidwin and its members wouldn’t be held responsible in case of a thermonuclear war, your alarm doesn’t wake you up, or if anything happens to your device and data by performing the below steps.
STEP 1: Boot to EDL Mode
- To begin with, power off your device. Likewise, connect one end of the USB cable to your PC but keep the other end empty.
- Then press and hold the Volume Up and Volume Down keys and while holding both keys, connect your device to the other end of the US cable.
- You will soon hear a connection prompt signifying that the device is booted to EDL and you now leave the pressed keys.
STEP 2: Verify EDL Connection
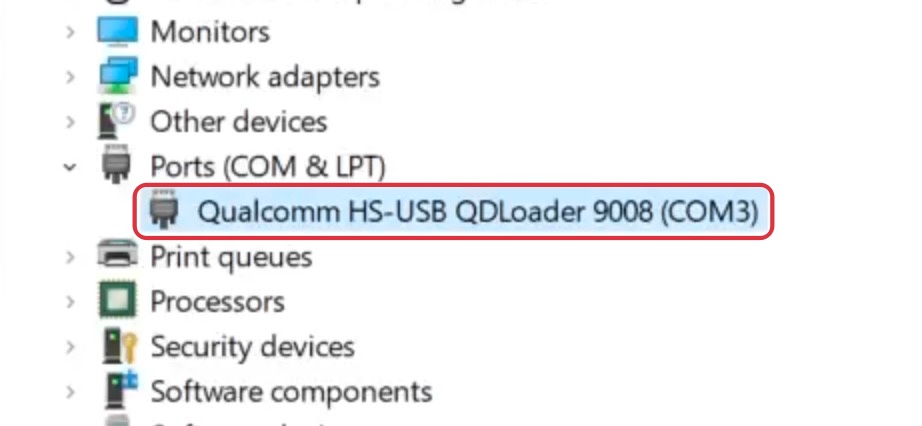
- Right-click on the Start menu and select Device Manager. Then expand the Ports section.
- If your device is listed as Qualcomm HS-USB QDLoader 9008, then you are good to go ahead.

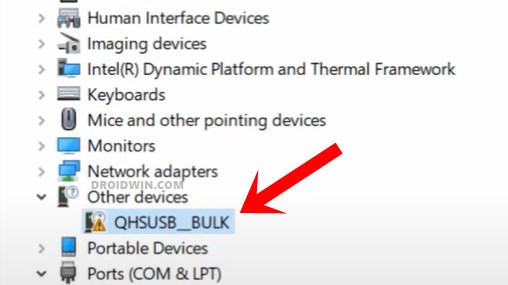
- However, if it is listed as QHUSB_BULK, then install the Qualcomm US Drivers.
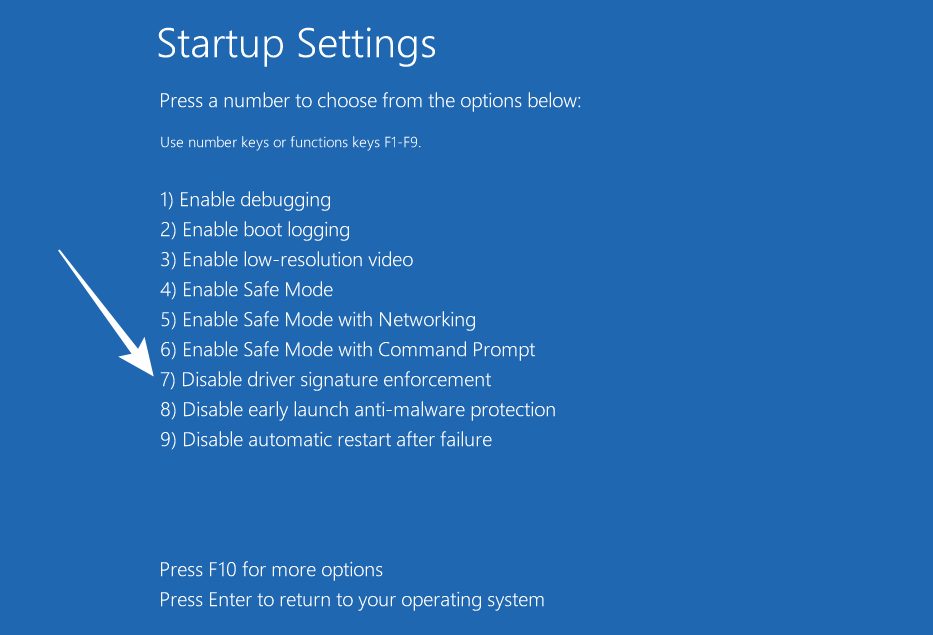
STEP 3: Disable Driver Signature Verification
- To begin with, press and hold the Shift key, and while doing so, click Restart.
- Your PC will now boot to Windows Recovery Environment.
- Select Troubleshoot > Advanced Options > Startup Settings > Restart.
- Then press F7 or 7 and your PC will reboot to the OS with Driver Signature Verification disabled.
STEP 4: Enable and Use Read Back Mode in MSM Download Tool
- First off, get hold of the MSM Tool for your device from here.
- Then unplug your device from the PC [but leave it booted to EDL Mode].
- Now launch the MSM Tool, select others under Login, and click Next.
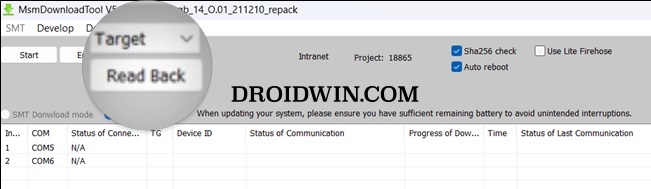
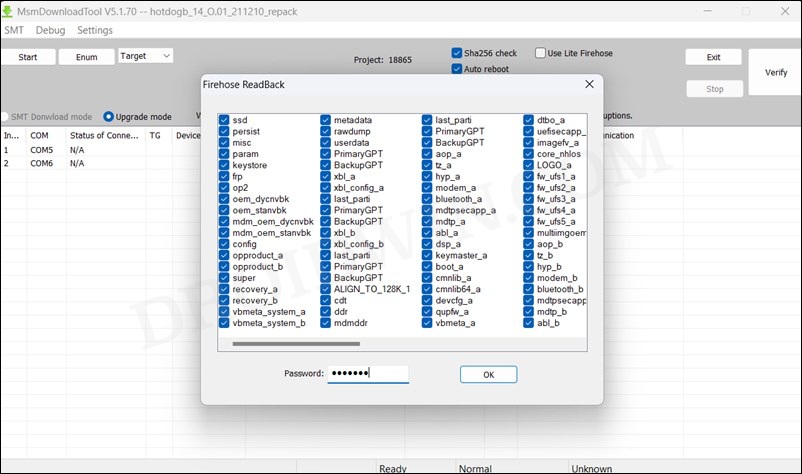
- Once the MSM Tools loads up, press the F8 [or Fn+F8] key. It will bring up the Read Back prompt.
- Select the desired portions from the list or press Ctrl+A to select all the partitions.
- Then type in oneplus under Password and hit OK. You should now see the Read Back button, click on it.
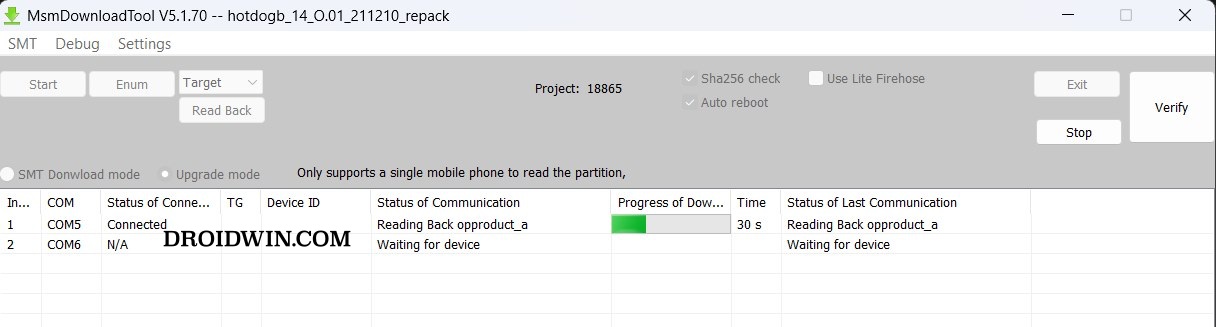
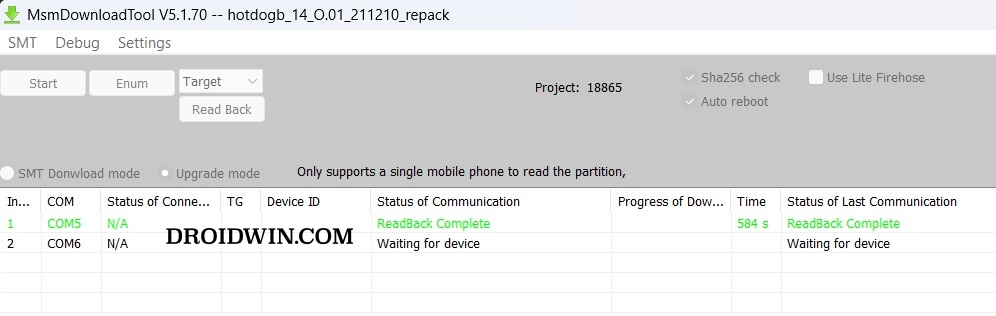
- Now connect your device to the other end of the PC and the Read Back process will now start.
- It could take up some time, depending on the number of partition files that you had initially selected.
- Once the process gets completed, you could grab hold of all those files from the C Drive.
That’s it. These were the steps to take a backup of all the partitions on your OnePlus device via the MSM Download Tool Read Back Mode. If you have any queries concerning the aforementioned steps, do let us know in the comments. We will get back to you with a solution at the earliest.


esi
Thanks for the tutorial , now that we have this files, how can we use them to recover phone completely.
Dav
Is there a way to use the MSM readback output files to restore a phone to the backup?
faka
You have a reliable source for a working MSMDownload
Sadique Hassan
Hi mate, all the sources til OnePlus 9 series are reliable. For 10/11, we could bypass the login but there’s no way of establishing a secure connection with the Oppo servers, so it’s a standstill for both these devices. But for the rest, it’s all working well and good.
As far as the aforementioned guide [MSM Read Back] is concerned, I’ll upload a video in a couple of days which should further clarify all your doubts.
Sadique Hassan
UPDATE: Added the video