In this guide, we will show you various methods to fix the Instagram battery drain issue on your Android device. When it comes to the social media domain, then this offering from Meta is undoubtedly the best in this domain, with Reels being one of the major driving forces behind its meteoric rise to fame. However, despite all the goodies in its arsenal, it isn’t free from its fair share of issues.
In this regard, numerous users have voiced their concern that Instagram is draining an astronomical amount of battery on their Android devices. For instance, a user claimed to have used the app for 18 minutes but the app was found constantly running in the background for 5h 35mins, thereby exhausting all the precious battery juice from their device. If you are also facing this issue, then this guide will help you out. Follow along for the fixes.
Table of Contents
Fix Instagram App Battery Drain on Android

It is recommended that you try out each of the below-mentioned workarounds and then see which one spells out success. So with that in mind, let’s get started.
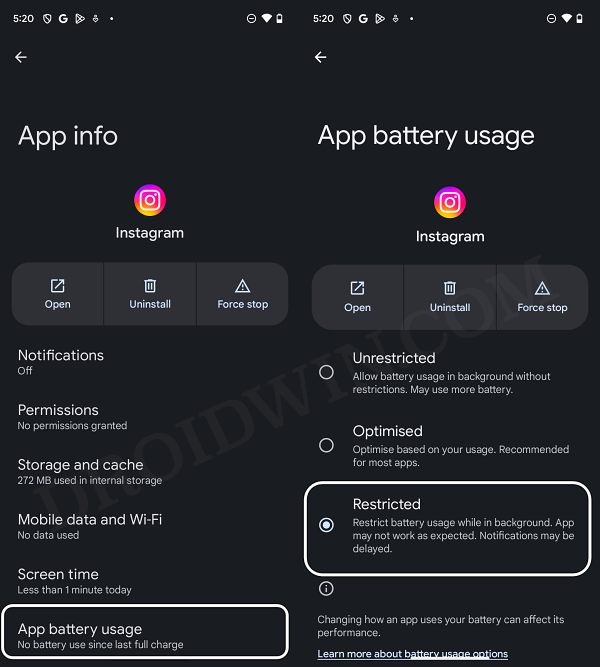
FIX 1: Restrict Battery Usage
Your first course of action should be to implement restrictions on the Instagram app while it is functioning in the background. Here’s how it could be done:
- Head over to Settings > Apps > All Apps > Instagram.
- Then go to the App Battery Usage and select Restricted.
- Check if it fixes the Instagram battery drain issue on Android.

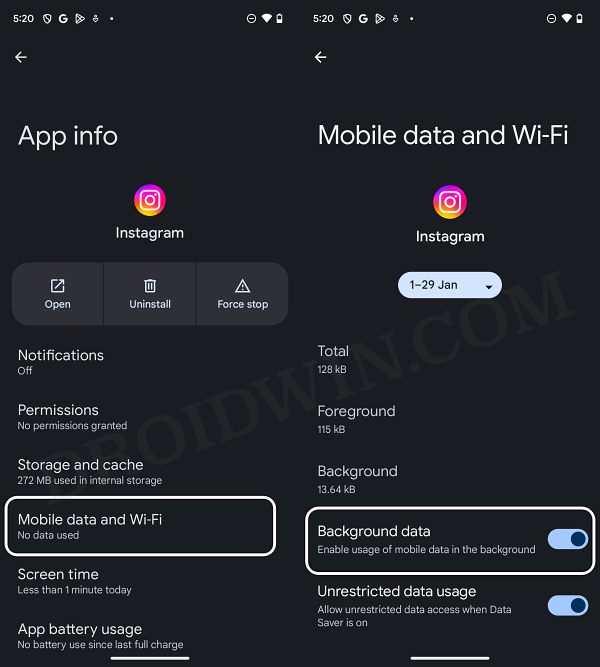
FIX 2: Restrict Data Usage
Along the lines of restricting battery usage, you should also consider restricting the app’s background data usage using the below-listed steps and check out the results.
- Head over to Settings > Apps > All Apps > Instagram.
- Then go to the Mobile Data and WiFi section.
- Now disable Background Data and Unrestricted Data Usage.
- Check if it fixes the Instagram battery drain issue on Android.
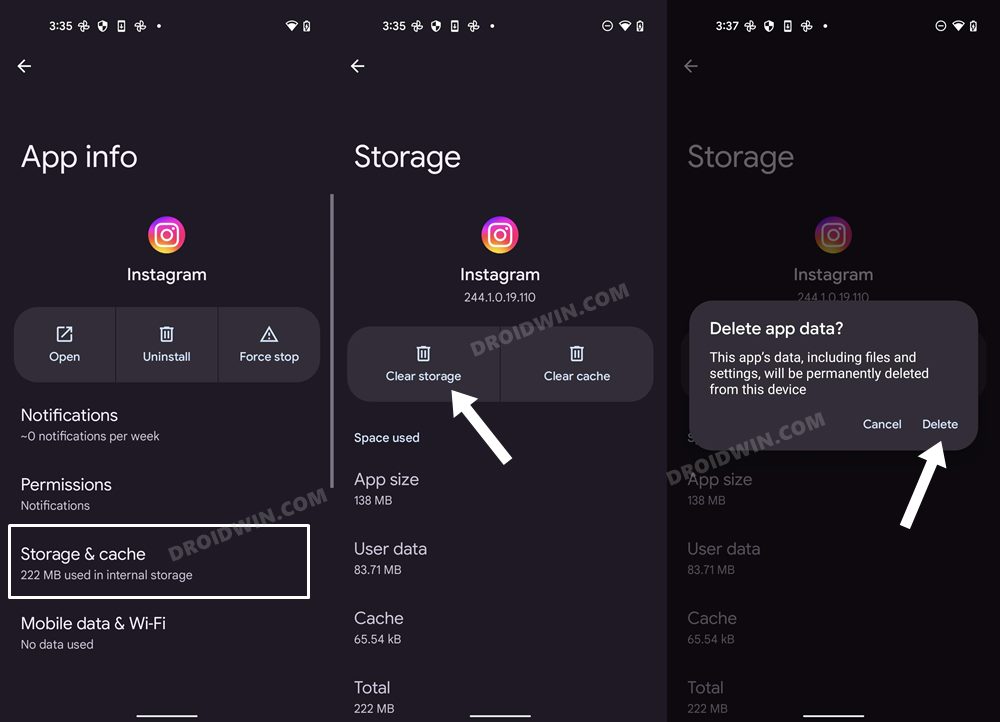
FIX 3: Delete Data
The issue might also occur due to the app’s data being corrupted. Therefore, you should consider deleting the data and then letting the app repopulate a fresh instance of the same from scratch. Here’s how it could be done:
- Head over to Settings > Apps > All Apps > Instagram.
- Then go to Storage and Cache and tap on Delete Data.
- Then launch the app, set it up, and check the results.
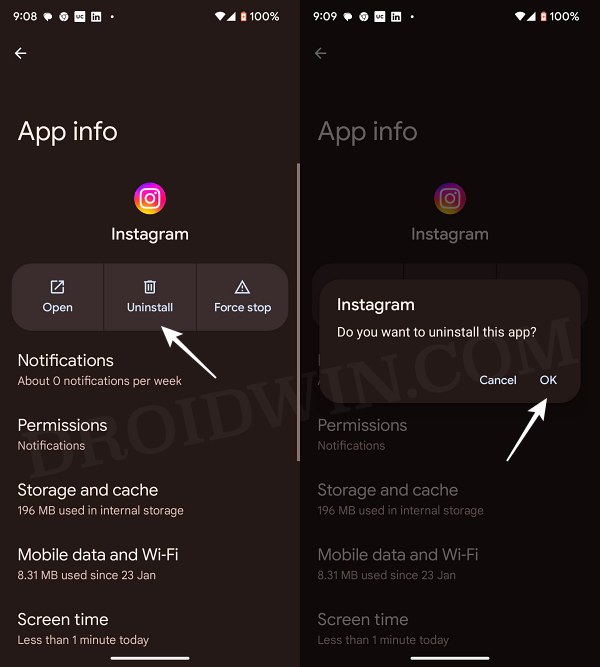
FIX 4: Downgrade Instagram
You might also get bugged by this issue if the app’s data is corrupted. Therefore, you should consider downgrading the app to its earlier stable build that was free from this issue. Here’s how it could be done:
- Head over to Settings > Apps > All Apps > Instagram.
- Now tap on Uninstall > OK in the confirmation prompt.
- Then install an older version of the app from APKMirror.
- Now install it, launch it, and then check out the results.
FIX 5: Instagram Lite
If none of the aforementioned methods spelled out success, then your last course of action should be to switch to Instagram Lite. As is evident from its name, it is a light and trimmed-down version of the app with only a few selected features, thereby proving to be the most viable option in the current scenario. Owing to its lightweight, it wouldn’t consume the same exorbitant amount of battery life as compared to its counterpart. So let’s give it a try and check out the results:
- Head over to Settings > Apps > All Apps > Instagram.
- Now tap on Uninstall > OK in the confirmation prompt.
- Then download and install Instagram Lite from the Play Store.
- Launch it, sign in to your account, and check the results.
That’s it. These are the five different methods that should help you fix the Instagram battery drain issue on your Android device. As far as the official stance on this matter is concerned, the developers are yet to acknowledge this issue, let alone give out any ETA for the rollout of a fix. As and when any of these two things happen, we will update this guide accordingly. In the meantime, the aforementioned workarounds are your best bet.


