This guide will show you the steps to root your Pixel 8/Pro via the Magisk patched init_boot.img. The Silicon Valley giant has just taken off the lid from its latest offering. Its eighth offering does have some intriguing things to offer, but not all of them might be in sync with the user’s requirements. While the likes of improved cameras, AI integration, and a whopping 7 years of OS upgrades are welcomed any day of the week, the same might not be said for temperature sensors.
Then if we turn our attention towards custom development, things are all sorted out in this domain. Pixel devices have always been the go-to choice for tech enthusiasts and the eighth series is sure to follow in the footsteps of its predecessors. Among all the tweaks that you could carry out, it’s the ability to gain administrative privileges that has always been at the forefront for the masses. So with that in mind, let’s make you aware of the steps to root Pixel 8/Pro via Magisk.
Table of Contents
Benefits and Risks of Rooting Pixel 8/Pro
Once you root your device, you will be in a position to flash a plethora of mods. These include the likes of Magisk Modules, Xposed Framework, Substratum Themes, and Viper4Android among others. Along the same lines, you could also flash a custom kernel and implement your desired CPU profile. However, such tweaks do come with a few risks as well.
![]()
To begin with, it will wipe off all the data and could nullify the device’s warranty as well. Along the same lines, it will degrade the Widevine L1 certification to L3, thereby preventing you from streaming content in HD [FIXED]. The SafetyNet will be triggered [FIXED], thereby preventing you from using banking apps [FIXED]. So if that’s well and good then let’s get started with the steps to root your Google Pixel 8/Pro.
How to Root Google Pixel 8/Pro via Magisk Patched Init_Boot.img
![]()
The below instructions are listed under separate sections for ease of understanding. Make sure to follow the same sequence as mentioned. Droidwin and its members wouldn’t be held responsible in case of a thermonuclear war, your alarm doesn’t wake you up, or if anything happens to your device and data by performing the below steps.
NOTE: Device shipped with Android 12 or older versions uses the boot.img file for root whereas devices shipped with Android 13 or higher versions use the patched init_boot.img. Since the Pixel 8/Pro comes with Android 14 out of the box, we will be using the init_boot.img file for obtaining root. Follow along.
STEP 1: Install Android SDK

First and foremost, you will have to install the Android SDK Platform Tools on your PC. This is the official ADB and Fastboot binary provided by Google and is the only recommended one. So download it and then extract it to any convenient location on your PC. Doing so will give you the platform-tools folder, which will be used throughout this guide.
STEP 2: Enable USB Debugging and OEM Unlocking
Next up, you will also have to enable USB Debugging and OEM Unlocking on your device. The former will make your device recognizable by the PC in ADB mode. This will then allow you to boot your device to Fastboot Mode. On the other hand, OEM Unlocking is required to carry out the bootloader unlocking process.
![]()
So head over to Settings > About Phone > Tap on Build Number 7 times > Go back to Settings > System > Developer Options > Enable USB Debugging and OEM Unlocking.
STEP 3: Unlock Bootloader on Pixel 8/Pro
Next up, you will also have to unlock the device’s bootloader. Do keep in mind that doing so will wipe off all the data from your device and could nullify its warranty as well. So if that’s all well and good, then please refer to our detailed guide on How to Unlock the Bootloader on Pixel 8/Pro
![]()
STEP 4: Get Pixel 8/Pro Init_Boot.img
- To begin with, download the factory image for your Pixel 8/Pro from below:
Pixel 8 [Shiba] Factory Image
Pixel 8 Pro [Husky] Pro Factory Image
- Make sure to download the same version that is currently installed on your device [you could verify the same from Settings > About Phone > Build Number].
- Once downloaded, extract it to any convenient location on your PC.
- Then go to the Images folder and you should get the init_boot.img file. Copy it and then transfer it to your device.
STEP 5: Patch Pixel 8/Pro Init_Boot.img via Magisk
- Download and install the Magisk App on your device.
- Then launch it and tap on the Install button next to Magisk.
- After that, choose ‘Select and Patch a File’, and navigate to the stock init_boot.img file, and select it.

- Then tap on the Let’s Go button situated at the top right.
- The init_boot.img file will now be patched and placed under the Downloads folder on your device.
- You should transfer this file to the platform-tools folder on your PC and rename it to magisk_patched_init_boot.img.
STEP 6: Boot Pixel 8/Pro Fastboot Mode
- Now connect your device to the PC via a USB cable. Make sure USB Debugging is enabled.
- Then head over to the platform-tools folder, type in CMD in the address bar, and hit Enter. This will launch the Command Prompt.
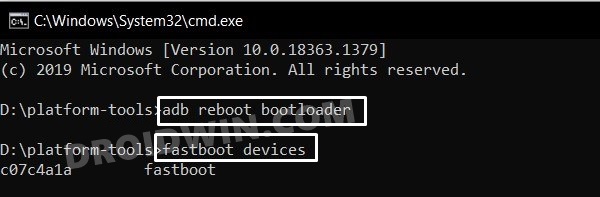
- Type in the following command in the CMD window to boot your device to Fastboot Mode
adb reboot bootloader
- To verify the Fastboot connection, type in the below command and you should get back the device ID.
fastboot devices

STEP 7: Root Pixel 8/Pro using Magisk Patched Init_Boot.img
- Now type in the below command to flash the patched init_boot file
fastboot flash init_boot magisk_patched_init_boot.img
- If the above command gives out an error, then you should manually flash the init_boot to both partitions via the below two commands
fastboot flash init_boot_a magisk_patched_init_boot.img
fastboot flash init_boot_b magisk_patched_init_boot.img
- NOTE: If your device gets stuck in the bootloop, then simply press and hold the volume down keys for a few seconds until your device boots to the OS. You may then release the keys [thanks Eric for the tip!].
How to Install OTA Updates on Rooted Pixel 8/Pro
How To Install OTA Updates On Rooted Pixel 8/Pro [4 Methods]
These were the steps to root your Pixel 8/Pro via Magisk patched boot.img. If you have any queries concerning the aforementioned steps, do let us know in the comments section below. We will get back to you with a solution at the earliest.


tommy
And how ist the process for Update?
Sadique Hassan
please refer to this guide: https://droidwin.com/how-to-install-ota-updates-on-rooted-pixel-8-pro-4-methods/
Lisa Lorenzin
This is a terrific guide – thank you for creating and sharing it!
One small problem – the link to the factory images is incorrect. It links to the OTA versions, which do not fully extract, rather than the factory images themselves. To fix, just change https://developers.google.com/android/ota#shiba to https://developers.google.com/android/images#shiba and same for husky.
Chris
So if I unlock the bootloader and run with Magisk, etc, can I still get the 7 years of updates? Any roadblocks with both running unlocked/rooted and OTA updates for an 8 purchased from Verizon?
ys
There are some twists and turns in the middle. Still following the blogger’s method, it was completed relatively smoothly. Thank you and greetings from China
Sadique Hassan
Thanks for the appreciation mate.
EagleDig
Hi ! Thanks for this tuto.
The same for me, bootloop and press volume down do not change anything.
Why flash Init_boot.img and no boot.img like on Pixel 7 pro ?
thanks
Sadique Hassan
Hi EAGLEDIG, Near about all devices that come with Android 13 or higher version out of the box, require you to flash and patch the stock init_boot.img for root instead of the usual boot.img.
Moroever, the Pixel 7 series was also rooted via init_boot only and not the boot.img because it shipped with Android 13.
EagleDig
I tried again with Magisk 26.3, all done, no bootloop
Sadique Hassan
Glad that you were able to rectify it.
Ivan
Hello,
After rooting, the phone is stuck with the message “The bootloader is unlocked and software integrity cannot be guaranteed”. I cannot set the phone in fastboot.
Ivan
Update. I can enter into fastboot mode by holding the vol-down button. But the phone does not start after that.
JJ
Hi,
I have followed the above steps, however when flashing to the magisk bootloader, I receive the ‘Bootloader is unlocked and software integrity cannot be guaranteed…’ message. It tries to boot, I see the google splashscreen, but immediately returns to the Bootloader is unlocked screen…
Any advice
Sadique Hassan
Hi JJ, just to re-confirm, you got the bootloop at the end, i.e. after flashing the patched init_boot or during any of the middle steps.
And did you use the “fastboot flash init_boot magisk_patched_init_boot.img” OR “fastboot flash init_boot_a magisk_patched_init_boot.img
fastboot flash init_boot_b magisk_patched_init_boot.img” command?
Alex
Update magisk – it needs to be v23 or higher.
Sadique Hassan
Hi Mate, as advised by Eric, you could stop the bootloop by holding the volume down key. Do let me know if that works out.
Eric
I was able to stop the bootloop by holding volume down.
Sadique Hassan
Hi Eric, thanks for this vlauble piece of information, will surely help the rest of the users.
Just to re-confirm, you got the bootloop at the end, i.e. after flashing the patched init_boot or during any of the middle steps.
And did you use the “fastboot flash init_boot magisk_patched_init_boot.img” OR “fastboot flash init_boot_a magisk_patched_init_boot.img
fastboot flash init_boot_b magisk_patched_init_boot.img” command?
Eric
Hi, I followed all the steps exactly but am now in a bootloop on the screen that says “The bootloader is unlocked…” and “Press power button to pause/resume”. As soon as I hit resume, it goes to the “Google” logo boot screen and then back to the “bootloader is unlocked…” screen. Please help, is there anything I can do?