In this guide, we will make you aware of ten different methods that shall help you to increase/improve the internet speed on your Windows 11 PC. There has been this long-standing debate where users have voiced their concern that they aren’t getting the download speed or bandwidth that they had initially opted for. In this regard, we would like to mention an important clarification- bandwidth and download speed are two different terminologies.
Bandwidth is the maximum amount of data that you could transfer over the internet at a given point in time. On the other hand, the download speed is the rate at which this data transfer takes place. In this regard, the actual download speed usually ranges from 1:8 to 1:10. So if you have opted for a 100 Mbps plan, then you should be getting the download speed anywhere between 8-10 Mbps.
But even if that is not the case, then you shouldn’t directly contact the ISP. Rather, there are a few handy network tweaks that you should first give a try. And in this guide, we will make you aware of just that. So without further ado, let’s get started with the guide to increase or improve the internet speed on your Windows 11 PC. Follow along.
Table of Contents
How to Increase Internet Speed in Windows 11

Do note that there’s no universal fix as such. You will have to try out each of the below-mentioned workarounds and anyone or a combination of two or more should spell out success for you. So keeping that in mind, let’s get started.
FIX 1: The Basic Workarounds
If this is a minor hiccup and you don’t regularly face issues with network speed, then the basic workarounds might be able to work out in your favor. Let’s check them out:
Restart Router
First off, it is recommended to restart your router to remove all the temporary bottlenecks and cache that might have been accumulated.
Try out Wired Connection
It’s no hidden secret that the wired connection offers a better network speed than its wireless counterpart. So you may opt for the ethernet cable and establish the wired connection. However, it’s usually better only for one or two-time use.
But for subsequent and daily usage, the wired connection might lead to quite a few difficulties from the ease of usage front. If you also echo this thought, then check out our other below-listed workaround to increase or improve the internet speed on your Windows 11 PC.
Remove Other Devices from Network
If possible, you should consider disconnecting other devices from the network. This is because the ISP has provided you with a fixed quota of bandwidth. So more the number of devices connected to your bandwidth, the more will be its dispersion.
As a result, each device will end up getting only a minuscule amount of bandwidth to deal with. So if there are other devices that are connected to your WiFi, try disconnecting them from the network, so that your prioritized device gets the major chunk of bandwidth.
FIX 2: Switch to 5GHz Band
While many PCs nowadays support the newer 5Ghz band, but they still stay on the 2.4GHZ spectrum. Well, if your adapter supports 802.11ac, then it will support 5GHz as well, whereas 802.11b/g/n wouldn’t. To verify the same, open Command Prompt, execute the below command, and refer to the Radio Types Supported section.
netsh wlan show drivers
If it has 802.11a or 802.11c, then your PC supports 5Ghz. On the other hand, if it says 802.11b, 802.11g, and 802.11n, then your PC doesn’t support 5Ghz. So if your PC does support the higher frequency, then consider switching over to this 5Ghz spectrum and you might gain a considerable improvement in the internet speed. Here’s how it could be done:
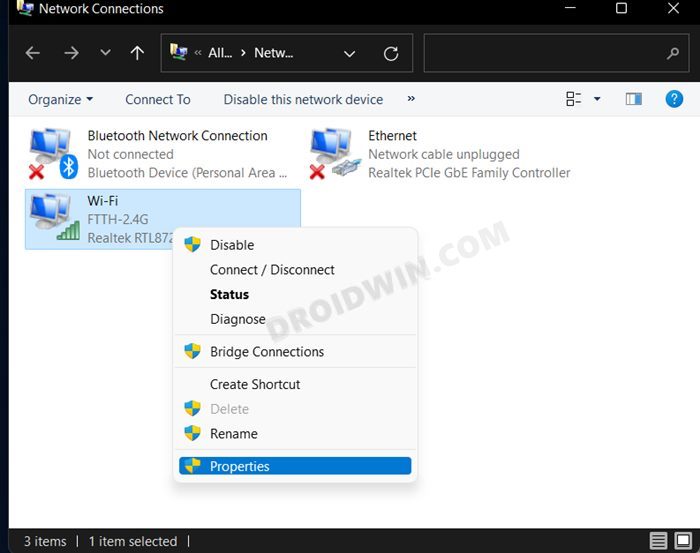
- Open the Run dialog box via the Windows+R shortcut keys, type in ncpa.cpl, and hit Enter.
- After that, right-click on your WiFi network and select Properties.

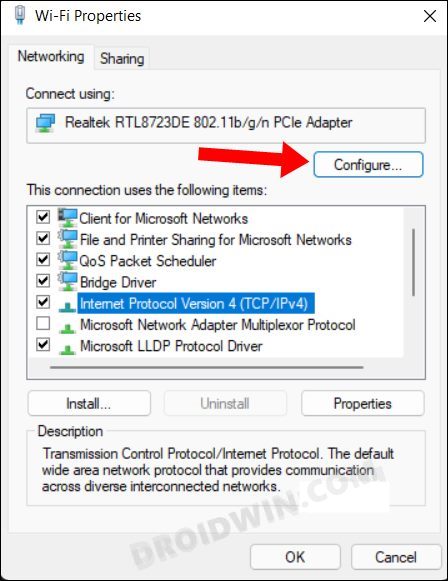
- Then click on the Configure button under the WiFi Properties dialog box.
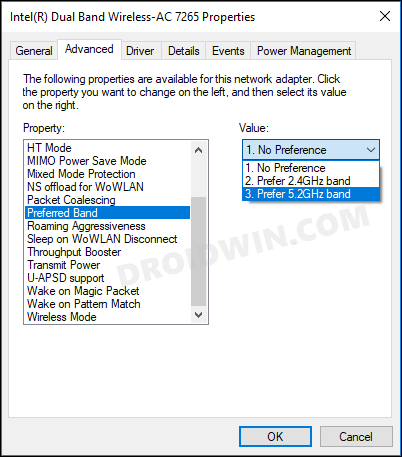
- Now go to the Advanced tab and select Preferred band under the Property section.
- Then select Prefer 5Ghz Band from the Value drop-down menu and hit OK to save the changes.
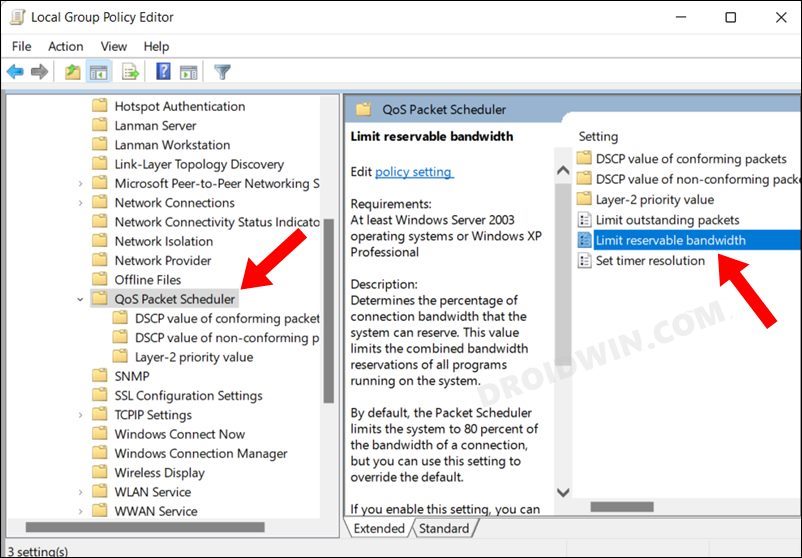
FIX 3: Remove Reserved Bandwidth for Windows Updates
The OS has reserved 20% of the bandwidth quota for Windows updates. However, if there’s no update available or you don’t have any plans to install it as of now, then you could remove that bandwidth restriction. This, in turn, will help you to increase or improve the internet speed on your Windows 11 PC. So with that in mind, refer to the below instructions to try it out:
- To begin with, enable the Windows Group Policy Editor on your PC
- Then bring up Run via Windows+R shortcut keys, type in gpedit.msc, and hit Enter. This shall launch the Group Policy Editor.
- After that, head over to the below location using the left menu bar.
Computer Configuration > Administrative Templates > Network > QoS Packet Scheduler
- Now double-click on the Limit Reservable bandwidth from the right-hand side.
- Select Enabled, change the bandwidth limit to 0%, and click Apply > OK to save the changes.
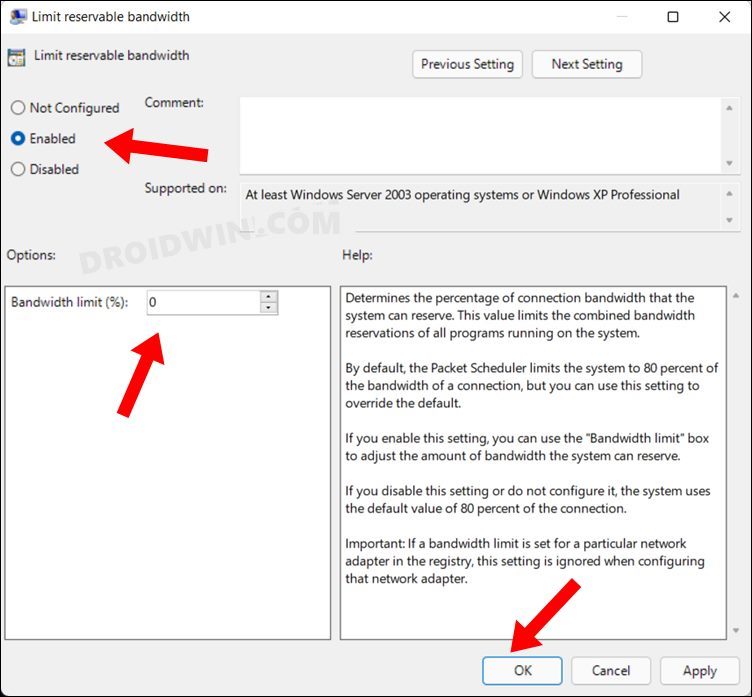
It might take some time before the changes are implemented. However, you could force activate it right away as well, by executing the below command in the CMD window:
gpupdate /force
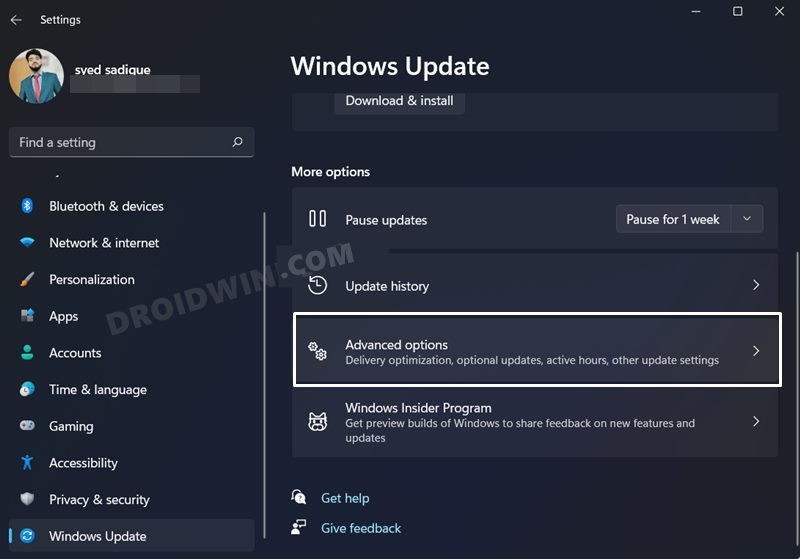
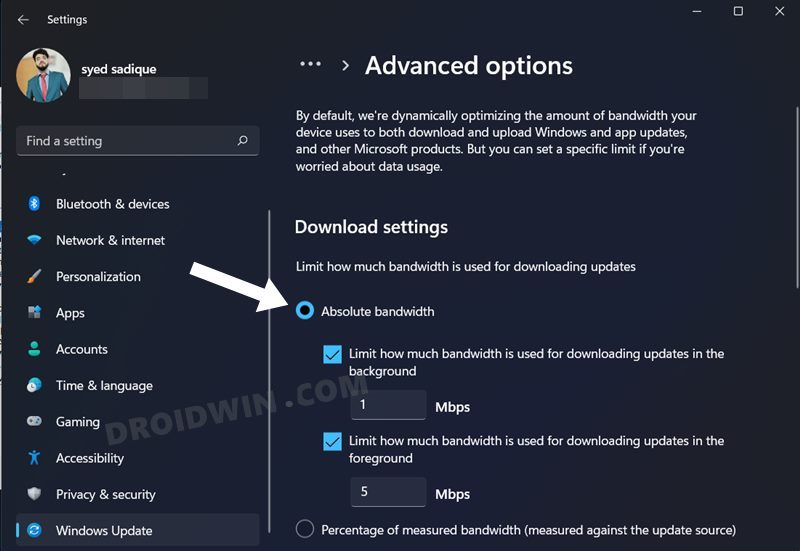
FIX 4: Limit Bandwidth for Windows Updates
If you don’t wish to take the aggressive route of removing the reserved bandwidth for Windows updates, then you could also opt for limiting the bandwidth. Here’s how:
- Use the Windows+I shortcut keys to open the Settings menu.
- Then select Windows Update from the left menu bar and go to the Advanced Options.
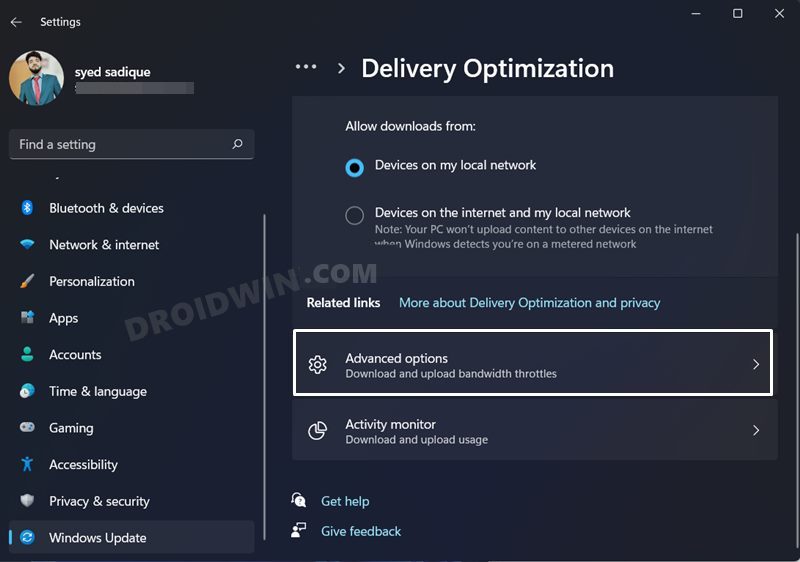
- After that, select Delivery Optimization and go to Advanced Options.
- Now select Absolute bandwidth and checkmark both the options.
- Then type in the desired Mbps values under both the fields.
FIX 5: Turn Off Metered Connection
If you are on limited network bandwidth, then the Metered Connection could end up doing wonders. But since it works by putting a cap on the maximum attainable speed, a slower browsing experience is on the cards. So as soon as you are on a decent plan, consider disabling this option in order to increase or improve the internet speed on your Windows 11 PC.
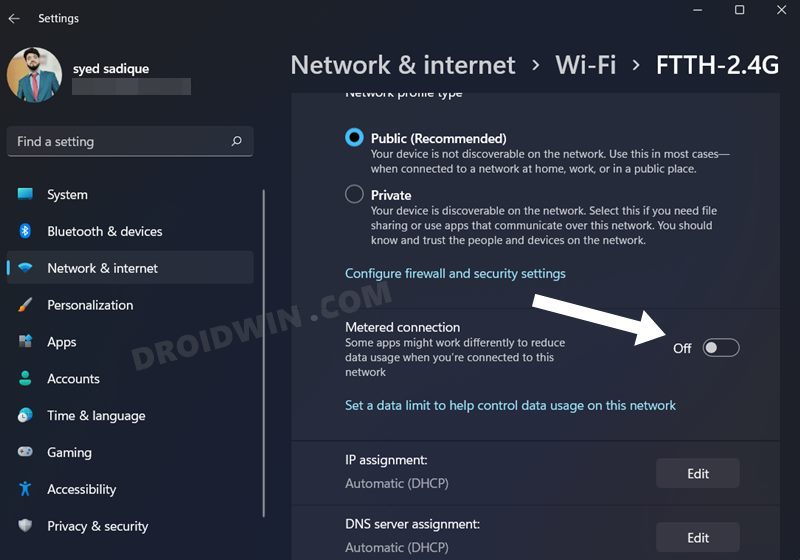
- Open the Settings menu via Windows+I shortcut keys.
- Then go to the Network and Internet section from the left menu bar.
- Now click on WiFi and subsequently select your network from the list.
- After that, disable the toggle next to Metered Connection. That’s it.
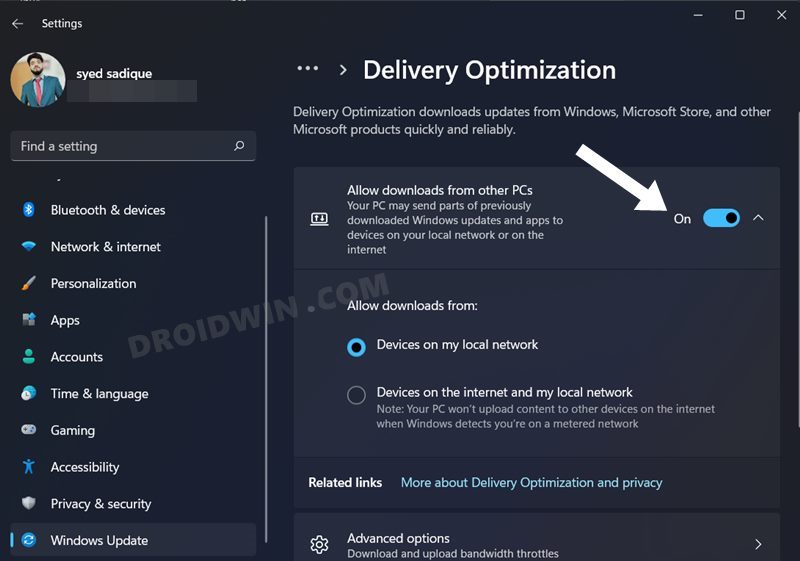
FIX 6: Disable Peer-to-Peer Updates
One of the Delivery Optimisation’s handy features is if you have downloaded a particular Windows update, then other devices on the same network could directly export it from your PC rather than downloading it from the Microsoft Servers. However, doing so ends up clogging the network. Therefore, it is recommended to disable this feature and let other devices on your network download these updates from scratch via the Microsoft servers. Here’s how:
- Use the Windows+I shortcut keys to open the Settings menu.
- Then select Windows Update from the left menu bar and go to the Advanced Options.
- After that, select Delivery Optimization and go to Advanced Options.
- Finally, disable the toggle next to “Allow downloads from other PCs”.
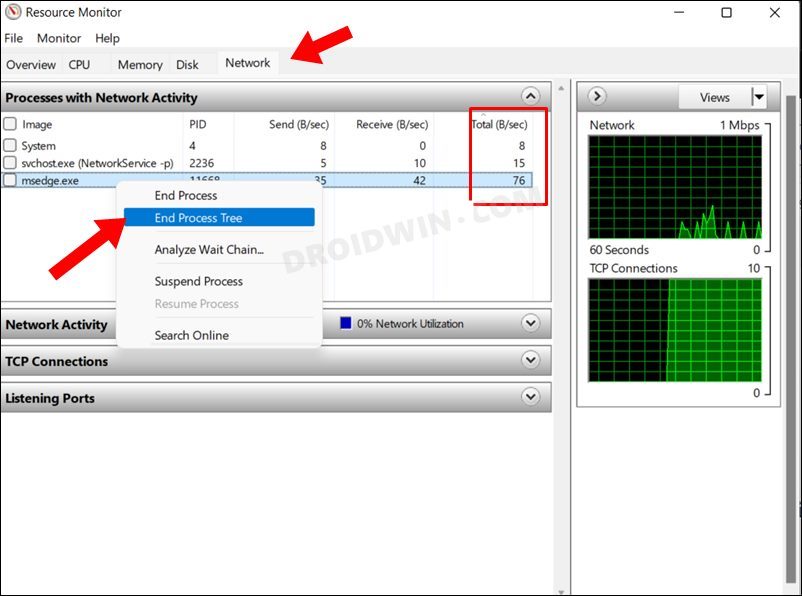
FIX 7: End Background Tasks Consuming Data
There are quite a few apps and processes running in the background that could end up consuming unnecessary network resources. Therefore, you should consider disabling these services to increase or improve the internet speed on your Windows 11 PC. And for that, there are two different approaches, either use the Resource Monitor or the Task Manager. We have listed both these methods, you may try out the one that is in sync with your requirements.
Via Resource Monitor
- Bring up the Run dialog box via Windows+R shortcut keys.
- Then type in resmon and hit Enter. It shall launch the Resource Monitor.
- Now go to the Network tab and click on the Total (B/sec).
- It shall sort the processes in descending order of network consumption. In other words, the one at the top would be consuming the maximum data.
- So select the process that is hogging an astronomical amount of resources and isn’t of much importance, right-click on it and select End Process Tree.
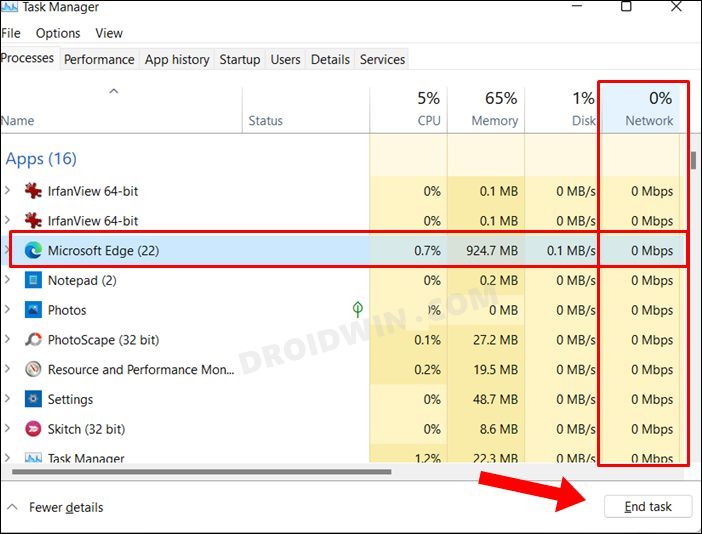
Via Task Manager
- Use the Ctrl+Shift+Esc Shortcut keys to open the Task Manager.
- Then refer to the Network section.
- Now the app that is consuming way too much network resources and isn’t needed as of now and hit the End Task button.
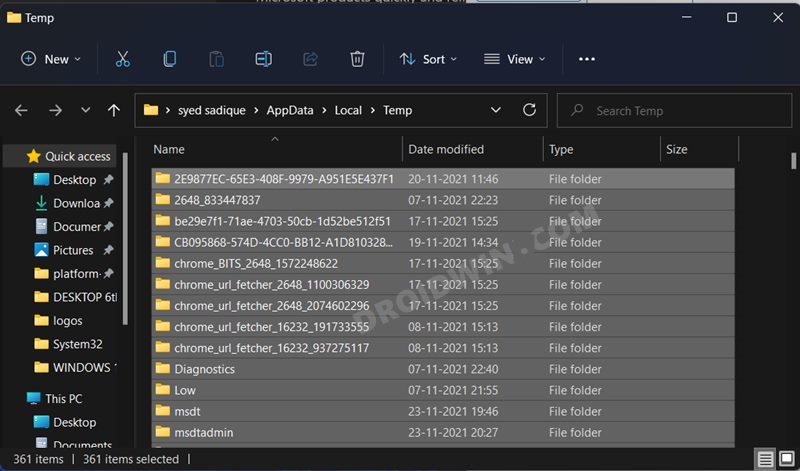
FIX 8: Delete Temporary Files
The next method that shall help you to increase or improve the internet speed on your Windows 11 PC requires you to delete the temporary cache files from your PC. Here’s how it could be done:
- To begin with, open the Run dialog box via Windows+R shortcut keys.
- Then type in %temp% and hit Enter. It shall take you to the stored cached directory.
- Now use the Ctrl+A shortcut keys to select all the files and
- Finally, hit the Delete key to remove them or Shift+Del to permanently delete them
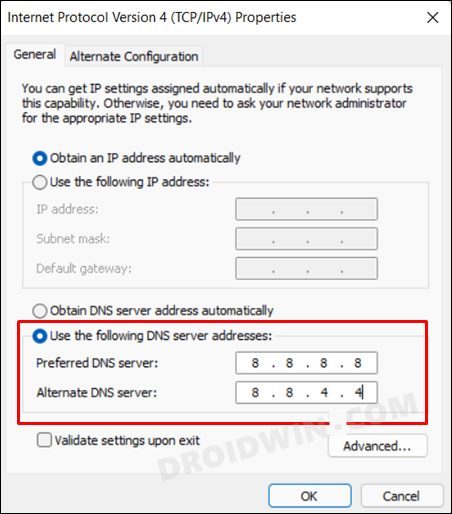
FIX 9: Switch to Different DNS
By default, your PC is running on the DNS that has been allocated by your Internet Service Provider. However, you have the option to switch to an alternate third-party domain name server. As for this guide, we will be using the Google DNS and see if it manages to increase or improve the internet speed on your Windows 11 PC. Follow along.
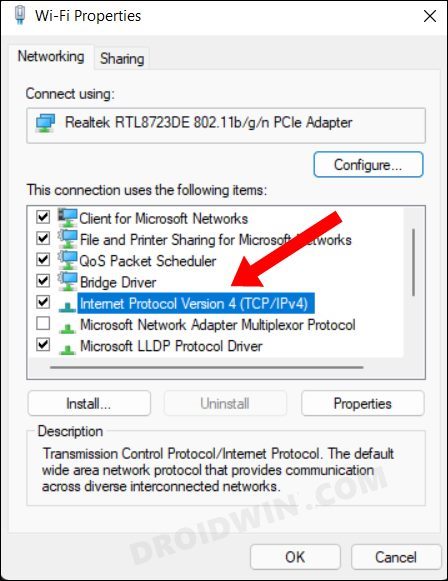
- Open the Run dialog box via Windows+R shortcut keys.
- Then type in ncpa.cpl, and hit Enter. This shall launch the Network Connections dialog box.
- Right-click on your network and select Properties.
- Now double click on the Internet Protocol Version 4.
- After that, select Use the following DNS Server address and type in the below values:
- Preferred DNS Server: 8.8.8.8
- Alternate DNS Server: 8.8.4.4
- Finally, hit OK to save the changes.
FIX 10: Disable Large Send Offload
While the Large Send Offload was initially designed to streamline the distribution of network resources for the background running app. However, it seems to be giving much more liberty than required. As a result, various backend services are able to exhaust an exorbitant amount of network bandwidth when LSO is enabled. To rectify this issue, the only way out is to keep this disabled, which seems to have given positive results to various users. So refer to the below instruction steps to turn off this functionality.
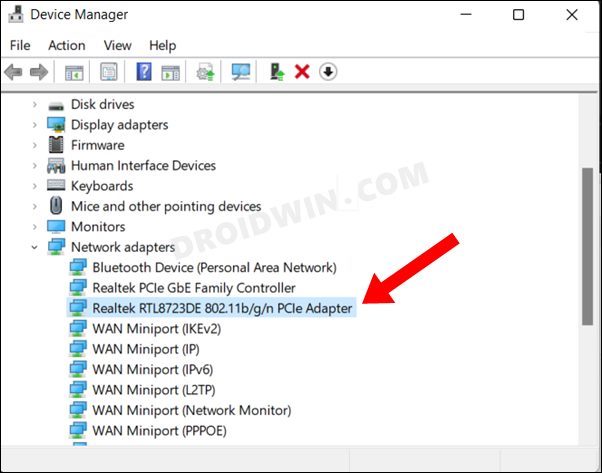
- Use Windows+X shortcut keys and select Device Manager from the menu that appears.
- After that, expand the Network Adapter section and double click on your adapter.
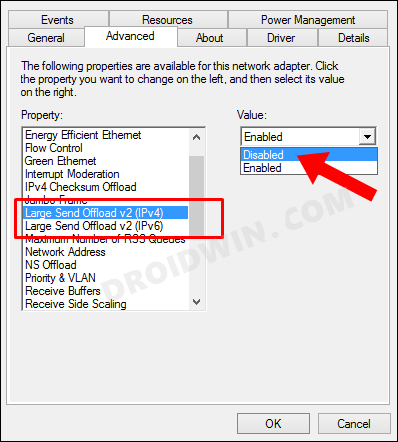
- Now go to the Advanced tab and select Large Send Offload V2 (IPv4) from the Property section.
- Then select Disabled from the Value drop-down menu.
- Likewise, do the same for Large Send Offload V2 (IPv6) and click OK to save the changes.
Concluding Remarks
So these were some of the handy methods to increase or improve the internet speed on your Windows 11 PC. Try out all the mentioned tweaks and anyone or the combination of two or more will surely work out in your favor. If you have any queries concerning the aforementioned steps, do let us know in the comments. We will get back to you with a solution at the earliest.


