In this guide, we will show you the steps to flash the firmware on your Pixel 8/Pro via Fastboot. The newest addition to the Pixel family has some eye-catching features in the form of improved cameras, AI integration, and a whopping 7 years of OS upgrades. On the other hand, the [unnecessary] addition of the temperature sensor might raise a few eyebrows. If we strictly talk about the OS updates, then there are no brownie points in guessing that Pixels are among the earliest adopters.
You just need to head over to the Settings menu and download and install the update right away. So this then begs the all-important question: when Google is already rolling out the updates in ich a streamlined manner, why is there a need to go out of the way and opt for the Fastboot method to install/flash the firmware on your Pixel 8/Pro? And more importantly, how you could carry out this task. This guide is here to answer all your queries. Follow along.
Table of Contents
Why Should You Flash Firmware on Pixel 8/Pro via Fastboot?
![]()
There could be quite a few instances wherein this method could come in handy. For instance, if you wish to go back to the stock ROM from a custom ROM, then you just need to flash the firmware via Fastboot [or using the Android Flash Tool]. Likewise, if your device is in a bricked state, then you have no choice but to opt for the Fastboot Method to unbrick it.
However, this process comes with its fair share of drawbacks as well. First off, it requires an unlocked bootloader, which will wipe off all the data from your device and might nullify the warranty. Apart from that, it might be a tad bit technical and lengthier in comparison with its counterpart ADB Sideload. With this, you would have got a decent idea regarding this method. So let’s now get started with the steps to flash the firmware on your Pixel 8/8 Pro via Fastboot.
How to Flash Firmware on Pixel 8/Pro via Fastboot?
Before starting, please take a backup of all the data on your device. Droidwin and its members wouldn’t be held responsible in case of a thermonuclear war, your alarm doesn’t wake you up, or if anything happens to your device and data by performing the below steps.
STEP 1: Install Android SDK

First and foremost, you will have to install the Android SDK Platform Tools on your PC. This is the official ADB and Fastboot binary provided by Google and is the only recommended one. So download it and then extract it to any convenient location on your PC. Doing so will give you the platform-tools folder, which will be used throughout this guide.
STEP 2: Enable USB Debugging and OEM Unlocking
Next up, you will also have to enable USB Debugging and OEM Unlocking on your device. The former will make your device recognizable by the PC in ADB mode. This will then allow you to boot your device to Fastboot Mode. On the other hand, OEM Unlocking is required to carry out the bootloader unlocking process.
![]()
So head over to Settings > About Phone > Tap on Build Number 7 times > Go back to Settings > System > Developer Options > Enable USB Debugging and OEM Unlocking.
STEP 3: Unlock Bootloader on Pixel 8/Pro
Next up, you will also have to unlock the device’s bootloader. Do keep in mind that doing so will wipe off all the data from your device and could nullify its warranty as well. So if that’s all well and good, then please refer to our detailed guide on How to Unlock the Bootloader on Pixel 8/Pro
![]()
STEP 4: Download Pixel 8/Pro Firmware
- Next up, grab hold of your device’s stock firmware [factory image] from below:
Pixel 8 [Shiba] Factory Image
Pixel 8 Pro [Husky] Pro Factory Image

- Once you have downloaded the firmware, extract it inside the platform-tools folder.
STEP 5: Boot Pixel 8/Pro to Fastboot Mode
- To begin with, connect your device to the PC via a USB cable. Make sure USB Debugging is enabled.
- Then head over to the platform-tools folder, type in CMD in the address bar, and hit Enter. This will launch the Command Prompt.

- Type in the following command in the CMD window to boot your device to Fastboot Mode
adb reboot bootloader
- To verify the Fastboot connection, type in the below command and you should get back the device ID.
fastboot devices
We are done with all the prerequisites and can begin with the flashing. Regarding this, there are two different methods that you could opt for: Fastboot Script and Fastboot Command. In the script method, the flash-all batch file will flash all the firmware files to their respective partitions.
On the other hand, in the Fastboot Commands method, we will manually flash each file to its respective partitions. We have explained both these methods below, you may refer to the one that is in sync with your requirements.
STEP 6A: Flash Firmware on Pixel 8/Pro via Fastboot Script
You will first have to decide whether or not you want to format your device. If you are unbricking your device, fixing bootloop, or performing an OS upgrade/downgrade, then a reset is a must. On the other hand, if you are flashing the same OS version firmware with just the higher security patch, then you might skip the formatting [though we would still recommend a format]. So depending on your need, you may refer to the associated section given below.
With Data Format
- Just double-click on the flash-all.bat file and the flashing will start.
- Once done, use the below command to boot your device to the OS:
fastboot reboot
Without Data Format
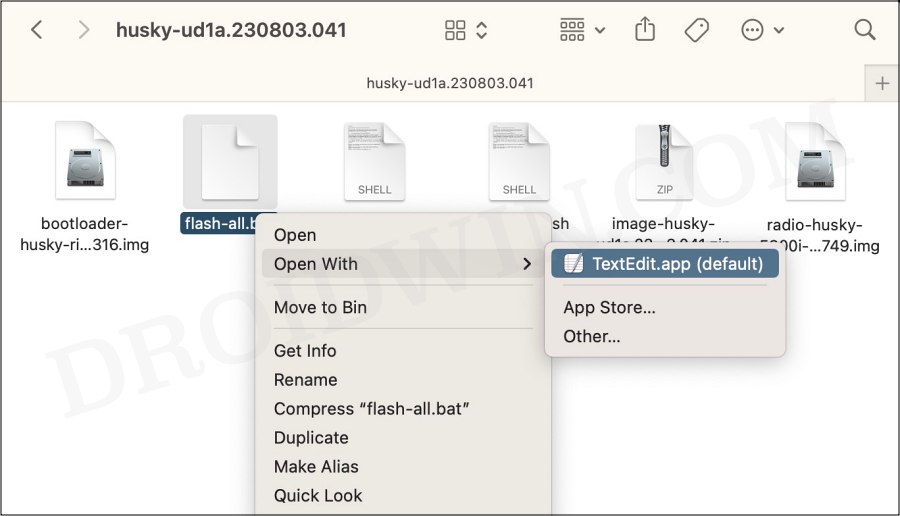
- Right-click on the flash-all.bat file and select Show More Options > Edit with Notepad [Windows] or TextEdit [Mac].
- Now delete the -w keyword from the fastboot update command line. For example, if the command was:
fastboot -w update image-filename.zip
Original Command - Then it will change to
fastboot update image-filename.zip
Modified Command - Once done, save the changes. Finally, launch this “modified” flash-all.bat file to start the flashing process.
- Once done, use the below command to boot your device to the OS:
fastboot reboot
STEP 6B: Flash Firmware on Pixel 8/Pro via Fastboot Commands
- To begin with, extract the firmware inside the platform-tools folder.
- Then, rename the bootloader, image, and radio files as instructed below so that it becomes easier to type in the CMD window:
- bootloader-codename-codename-version.img to bootloader.img
- image-codename-version.zip to image.zip
- radio-codename-version to radio.img
- Next up, connect your device to the PC via a USB cable. Make sure it is booted to Fastboot Mode
- Then head over to the platform-tools folder, type in CMD in the address bar, and hit Enter. This will launch the Command Prompt.
- Now type in the following command in the CMD window to flash the bootloader file:
fastboot flash bootloader bootloader.img
- After that, execute the below command to boot your device back to Fastboot Mode:
fastboot reboot-bootloader
- Next up, flash the radio file using the below command:
fastboot flash radio radio.img
- You will now again have to boot your device to Fastboot Mode, so use the below command for that:
fastboot reboot-bootloader
- Now, decide whether you want to format your device or not. Generally, it is recommended to perform a factory reset [and is a must in case of bricked or bootloop]. On the other hand, if you are only installing monthly security patches without any change in the Android version, then you may skip the format.
- We have listed both commands below, you may refer to the one that is in sync with your requirement
FACTORY RESET: fastboot -w update image.zip
WITHOUT RESET: fastboot update image.zip
- Once the flashing is complete, you may now use the below command to boot your device to the OS
fastboot reboot
That’s it. These were the two different methods to flash the stock firmware on your Pixel 8/Pro via Fastboot. If you have any queries concerning the aforementioned steps, do let us know in the comments. We will get back to you with a solution at the earliest.