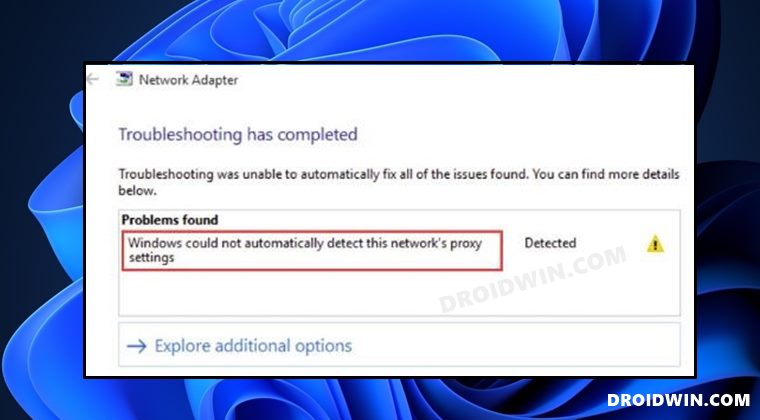
In this guide, we will show you various methods to fix the “Windows could not automatically detect this network’s proxy settings” error. If your network isn’t working along the expected lines, then you might notice a yellow exclamation mark on top of the WiFi icon. Upon further debugging the issue, you will be greeted with the aforementioned error message as the root cause of this issue. Unfortunately, this error doesn’t give out any plausible reason (nor the fix) behind the occurrence of this issue.
So what could lead to this bug? Well, there could be quite a few reasons for the same, including the likes of incorrect network configuration, firewall or proxy server blocking the connection, issues with the network setup, outdated network drivers, third-party DNS causing a conflict with the server, among others. Fortunately, you could easily address most of these concerns which in turn would resolve the underlying issue as well. So without further ado, let’s check out the methods to fix the “Windows could not automatically detect this network’s proxy settings” error.
Table of Contents
Fix Windows could not automatically detect this network’s proxy settings
Do note that there’s no universal fix as such. You will have to try out each of the below-mentioned workarounds and then see which one works best in your favor. So with that in mind, let’s get started.
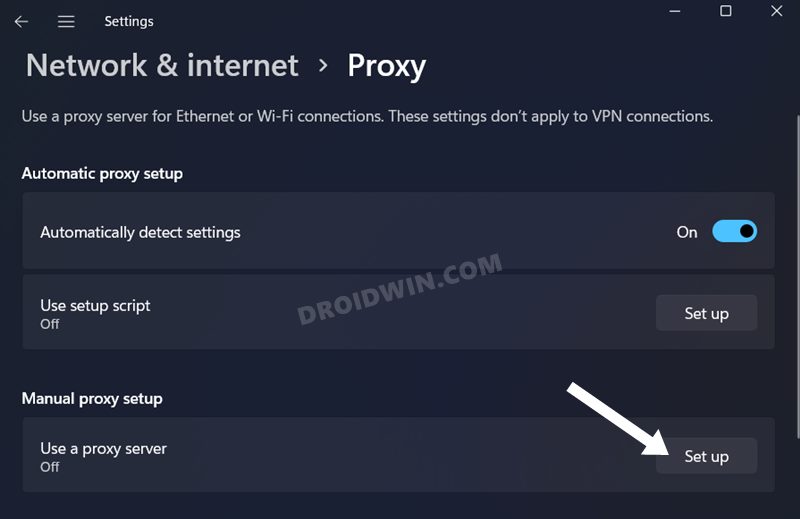
FIX 1: Disable Proxy
Apart from hiding your actual IP Address and giving you the ability to access geo-restricted contents, a proxy server also acts as a firewall and web filter. However, in some instances, the data packets might not be able to get past these many network layers and instead are lost midway during the exchange process. So to avoid that from happening, you should consider disabling the proxy on your PC. Here’s how it could be done:
- Bring up the Settings menu vis Windows+I shortcut keys.
- Then select Network and Internet from the left menu bar and go to Proxy.
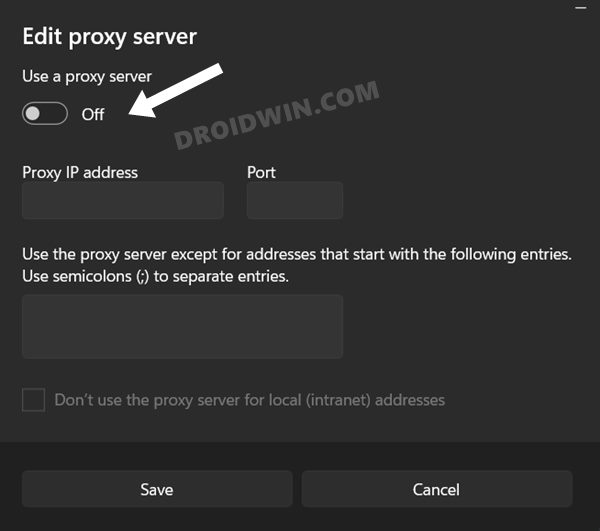
- After that, click on Use a Proxy Server.

- Now turn off the toggle next to it.
- Check if it fixes the Windows could not automatically detect this network’s proxy settings.
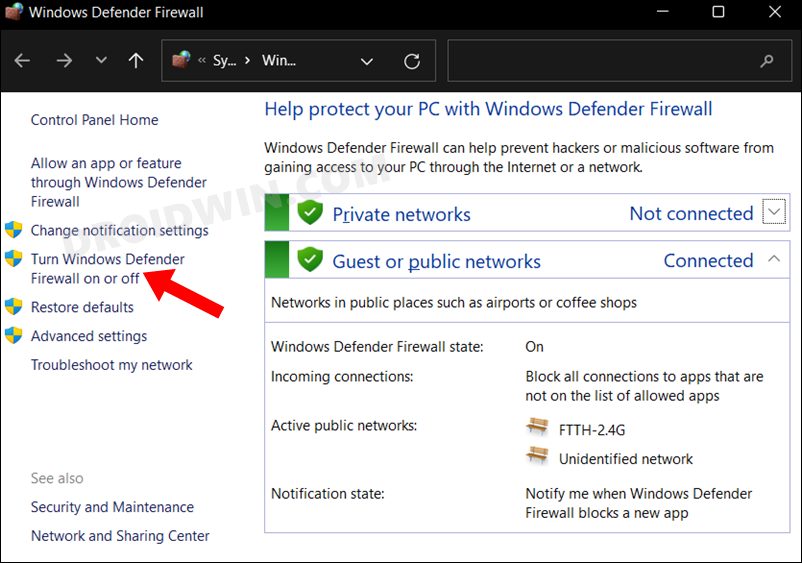
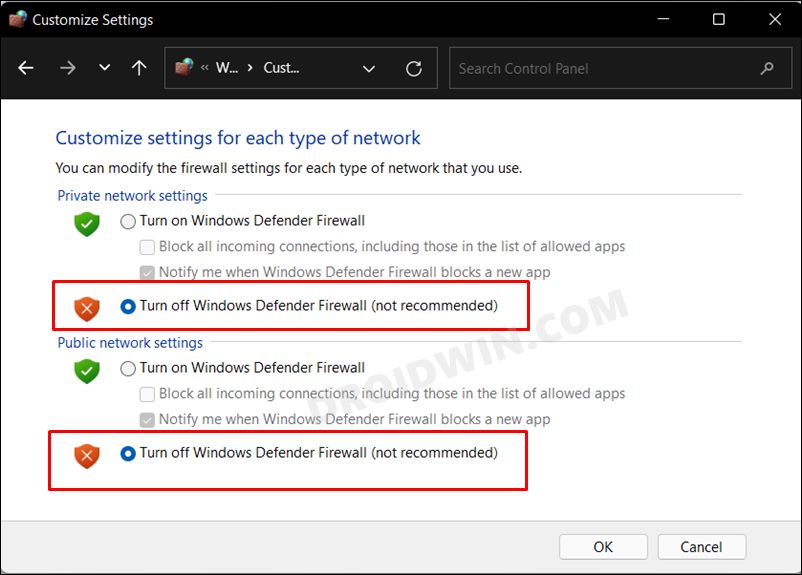
FIX 2: Disable Firewall
Sometimes, the built-in Firewall might act a little bit over-protective and tends to block the data exchanges even though the data packets might be coming from a legitimate source. So you should consider temporarily disabling the Firewall, using the below-given instructions:
- Head over to the Start Menu, search Windows Defender Firewall, and open it.
- Then click on Turn on or off Windows Defender Firewall from the left-hand side.
- After that, select Turn off under both the Public and Private networks.
- Check if it fixes the Windows could not automatically detect this network’s proxy settings.
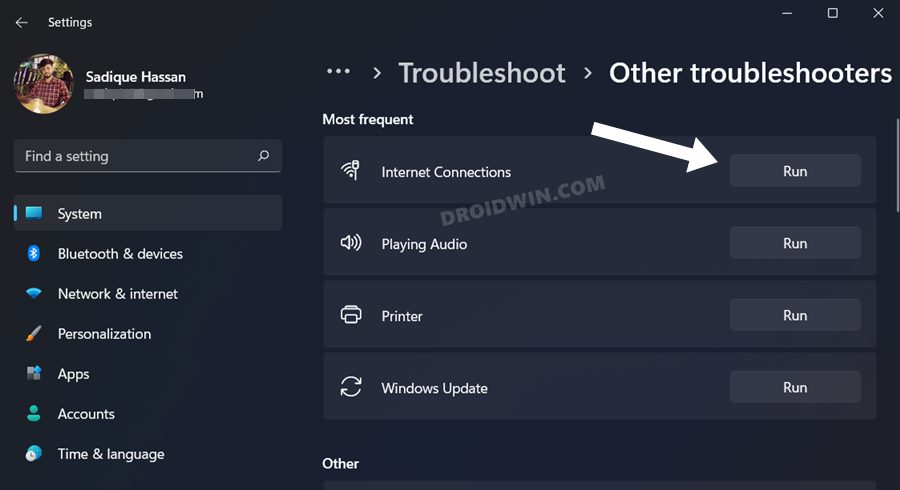
FIX 3: Run Network Adapter Troubleshooter
Windows comes with quite a few troubleshooter apps, and one of them focuses specifically on network-related issues.So let’s put it to the test right away and check out the results:
- Bring up the Settings Menu via the Windows+I shortcut keys
- Then select System from the left menu bar and go to Troubleshoot.
- After that, go to Other Troubleshooters and click Run next to Internet Connections.
- The tool will now run and look for network-related issues. Likewise, it will bring up the associated fixes as well. Just click on a fix to implement it.
- Check if it fixes the Windows could not automatically detect this network’s proxy settings.
FIX 4: Use Default DNS Server Address
Domain Name Server is like a phonebook that stores the IP Address for the websites. Web browsers don’t understand the URL in plain text format, rather they need the website’s associated IP Address, and for that, they look it up in the DNS record book.
In this regard, many users might use a third-party DNS such as the one from Google, OpenDNS, or Cloudflare. However, in some instances, they might create an issue or two when it comes to the file syncing process. Therefore, you should consider reverting to the stock DNS, using the instructions given below:
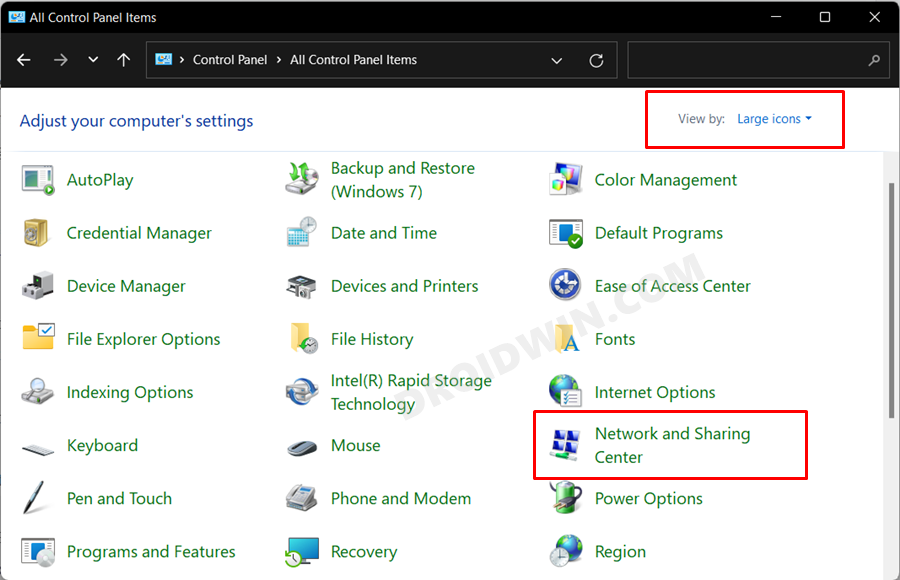
- To begin with, head over to the Start Menu, search Control Panel, and open it.
- Then change the View by type to Large Icons from the top-right menu and click on Network and Sharing Center.
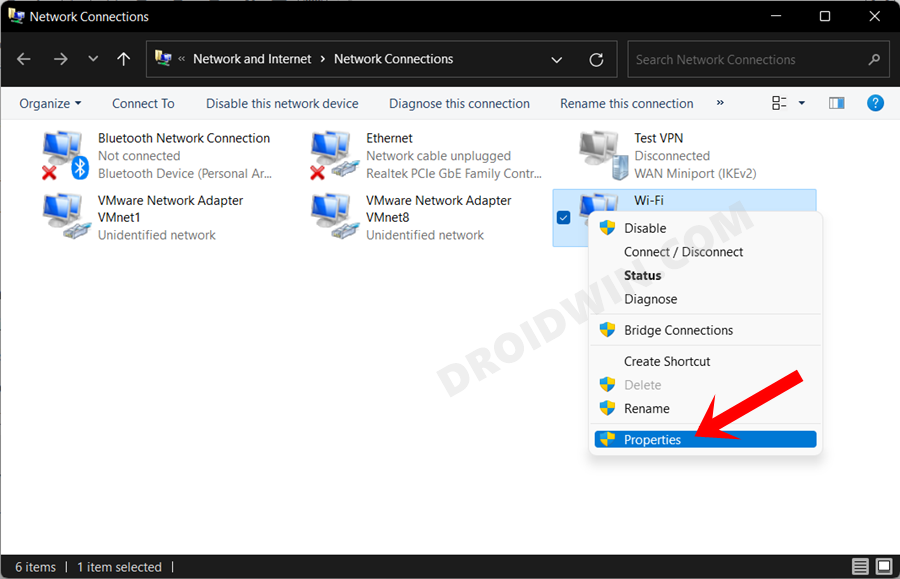
- After that, click on the Change adapter settings option from the left menu bar.
- Now right-click on your currently connected network and select Properties.
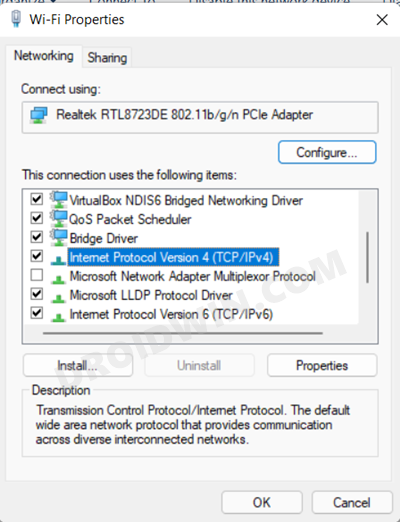
- Scroll to the Internet Protocol Version (TCP/IPv4) and double-click on it to open its Properties.
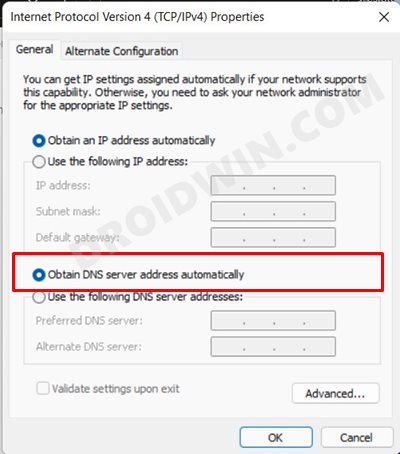
- After that, select Obtain DNS Server address automatically.
- Once done, check if it fixes the Windows could not automatically detect this network’s proxy settings.

FIX 5: Update Network Drivers
Using old or outdated network drivers could result in quite a few issues, including the one that we are currently dealing with. Therefore, it is recommended to update these drivers to their latest version, using the instructions given below:
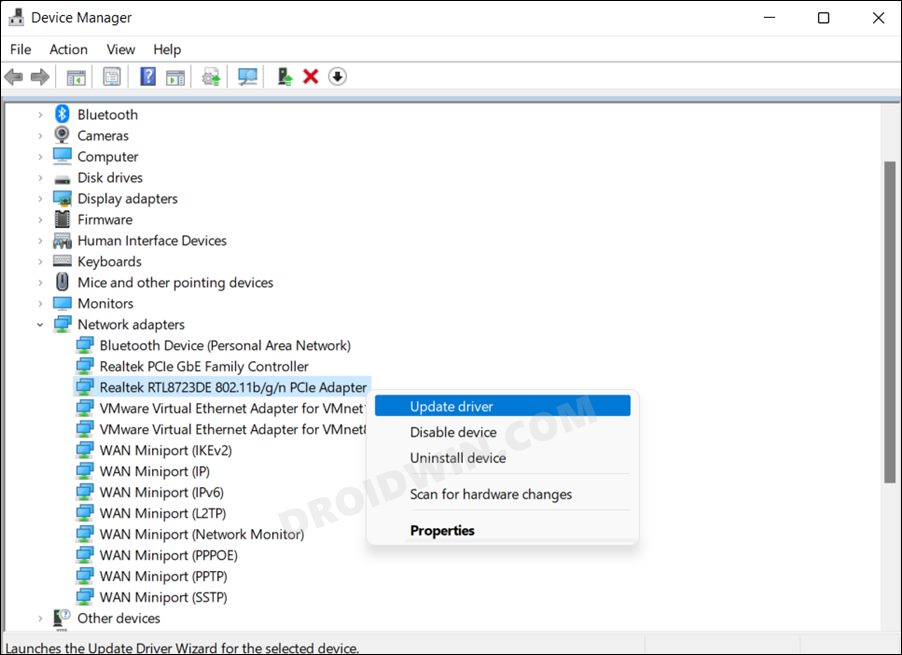
- To begin with, right-click on the Start menu and select Device Manager.
- Then expand the Network Adapter section and right-click on the WiFi adapter, and select Update Driver.
- Your WiFi Adapter name will be the one having 802.11 b/g/n or 802.11 a/c.
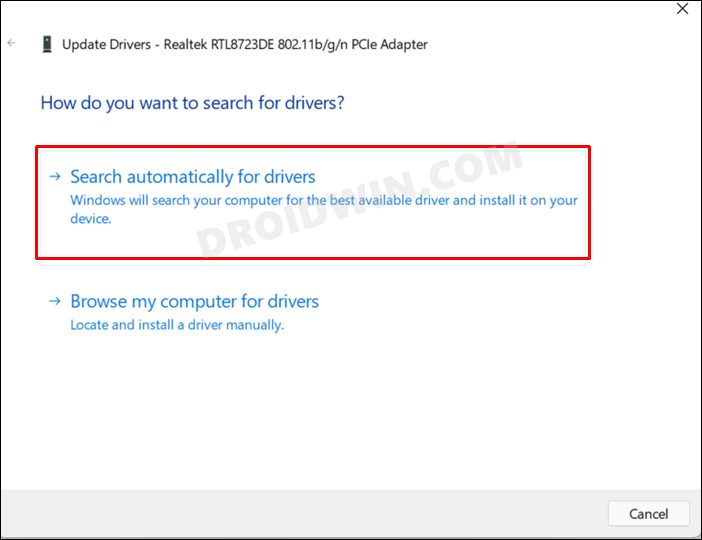
- Now select Search automatically for updated drivers.
- Windows will now search online for the drivers and would subsequently download and install them. Once done, restart your PC.
- Now check if it fixes the Windows could not automatically detect this network’s proxy settings.
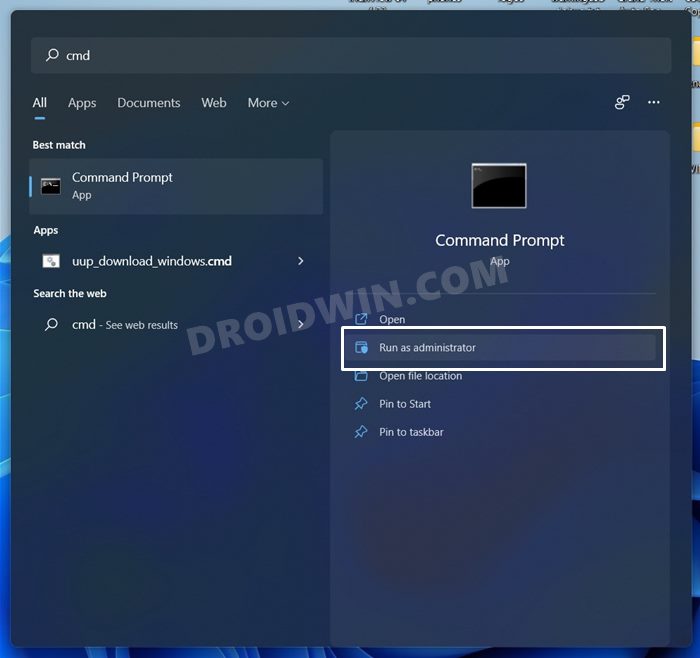
FIX 6: Reset Network Configuration
If the network settings or its configuration have got corrupted then it might conflict with your wireless adapter. Therefore, you should consider resetting the setting to its factory default state. These include resetting the Windows Socket and IP Address, flashing the current DNS, and then renewing its new settings. So proceed with the below instructions to try it out:
- Head over to the Start Menu, search CMD, and open it as an administrator.
- Then execute each of the following five commands, one at a time, in this CMD window:
netsh winsock reset
netsh int ip reset
ipconfig /release
ipconfig /renew
ipconfig /flushdns
- Once done, check if it fixes the Windows could not automatically detect this network’s proxy settings.
FIX 7: Use a System Restore Point
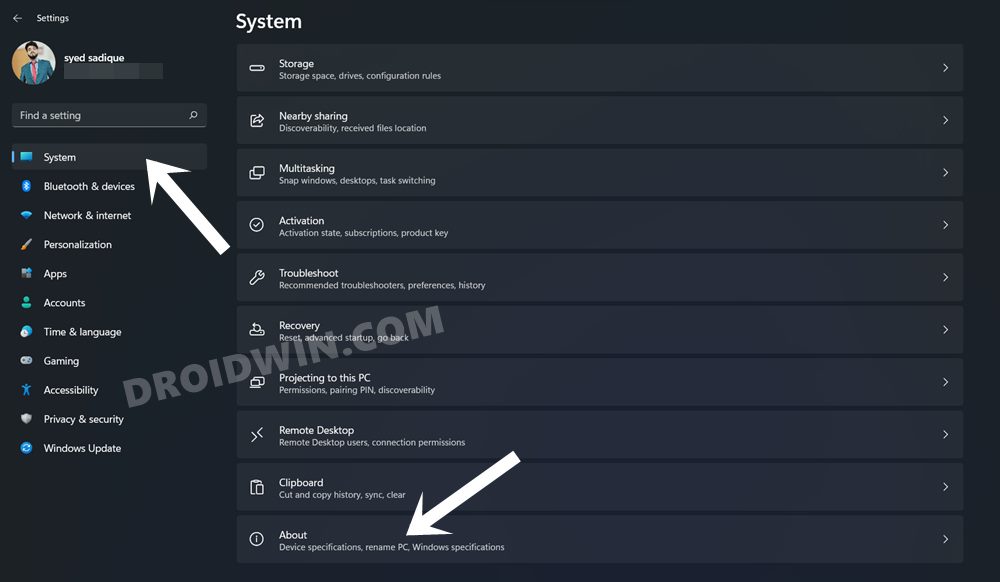
- To begin with, open the Settings page via the Windows+I shortcut keys.
- Then go to the System tab from the left menu bar, scroll all the way to the bottom and click on About.
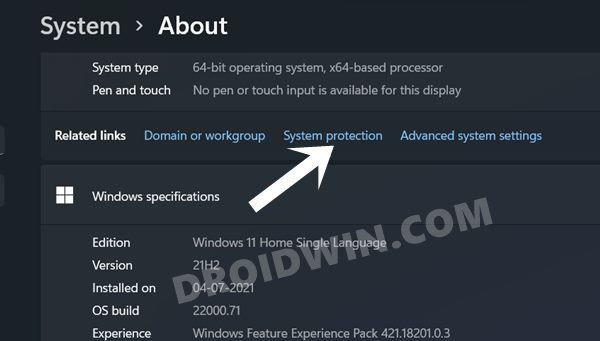
- After that, click on the System Protection option present on the Related Links tab.
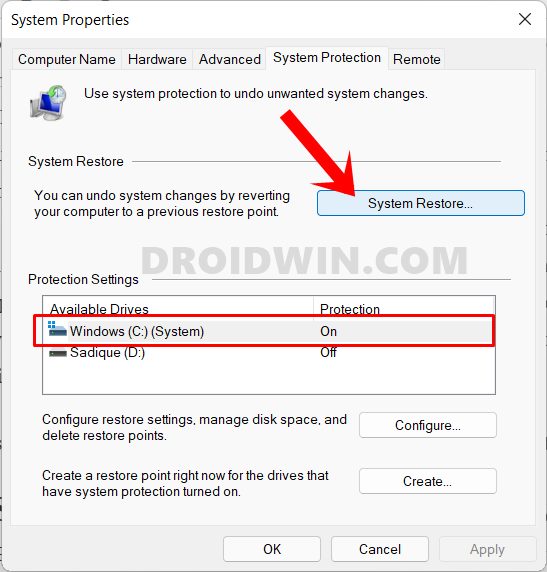
- This shall launch the System Properties dialog box. Go to the System Protection tab and click on System Restore.
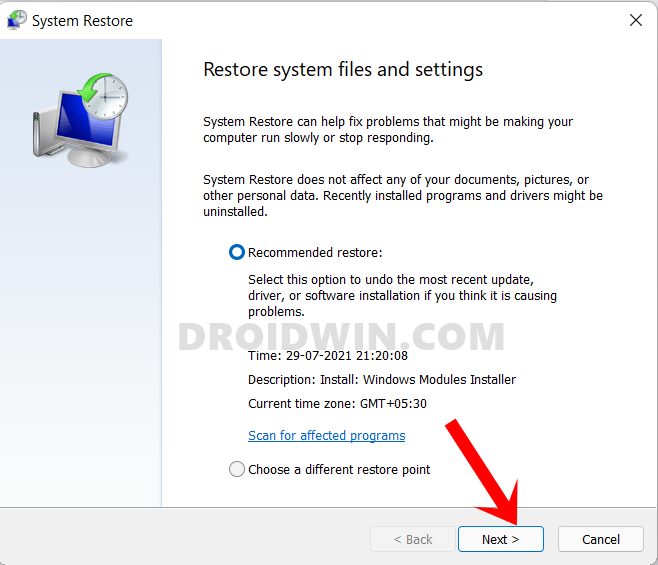
- Windows will now bring up the backup under the Recommended Restore section. This is the backup that it finds most suitable according to your PC’s current condition.
- If you are satisfied with it, enable the Recommended Restore option and hit Next.
- However, if you wish to select any other custom backup, then select Chose a Different Restore point and click Next.
- Now select the desired custom restore point and hit Next.
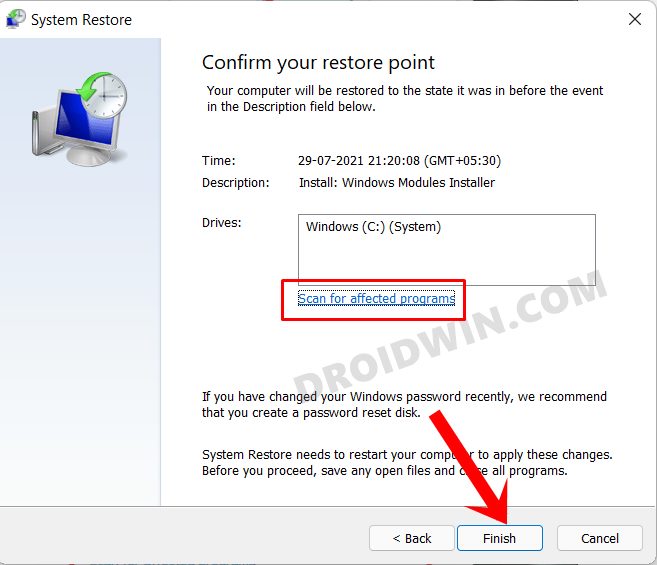
- Windows will now bring up the finalized screen showing all your selections. You may click on the Scan for Affected program option and get a list of all the programs that would be uninstalled/re-installed after this restore.
- If everything is as per your requirement, hit the Finish button and wait for the restore to complete. Once done, your PC will automatically boot to that system restore. And this should resolve the underlying proxy issue as well.

So with this, we round off the guide on how you could fix the “Windows could not automatically detect this network’s proxy settings” error. We have listed seven different methods for the same. Do let us know in the comments which one spelled out success for you. Likewise, all your queries are welcomed in the comments section below.


