In this guide, we will show you various methods to fix the issue of the Windows 11 Settings menu not opening or working. Well, it goes without saying that the Settings app on your PC is perhaps the one that you interact with the most. It has become all the more important ever since Microsoft decided to slowly ditch the Control Panel and add most of its features to this menu (though it’s still a long way to go before the transformation is complete).
But as opposed to other Universal Windows Platform (UWP) apps, the Settings app is a system app that comes pre-installed with the OS. Therefore, it might prove to be a little challenging when it isn’t working along the expected lines. This is because you wouldn’t be able to use the Repair, Reset or Uninstall options as you would have done for other apps. But even then, there do exist some handy workarounds that shall help you fix the issue of the Windows 11 Settings menu not opening or working. So without any further ado, let’s check them out.
Table of Contents
How to Fix Windows 11 Settings Menu Not Working/Opening
Do note that there’s no universal fix as such. You will have to try out each of the below-mentioned workarounds and then see which one works in your favor. So keeping that in mind, let’s get started.
FIX 1: Try Basic Workarounds
- In some instances, it could just be a UI glitch that could be preventing you from accessing the Settings menu. So in the cases, a simple restart of the PC should be enough to fix the issue.

- Likewise, you could also consider taking an alternate route to open this menu. In this regard, here are the various methods through which you could open the Settings menu in Windows 11:
- Via the Windows+I shortcut keys.
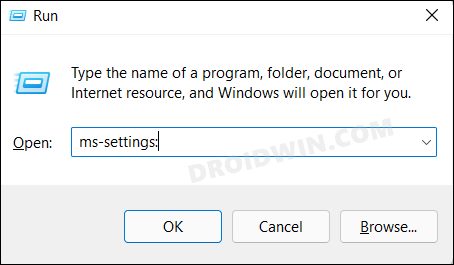
- Bring up Run via Windows+R then type ms-settings: and hit Enter.
- Open Command Prompt, type start ms-settings: and hit Enter.
- Right-click on Taskbar, select Taskbar Settings, and then head over to the desired settings menu.
Check if these basic tweaks manage to fix the Windows 11 Settings menu not opening or working. if your answer is in a negative tone, then proceed ahead with the rest of the methods given below.
FIX 2: Re-Register Settings App
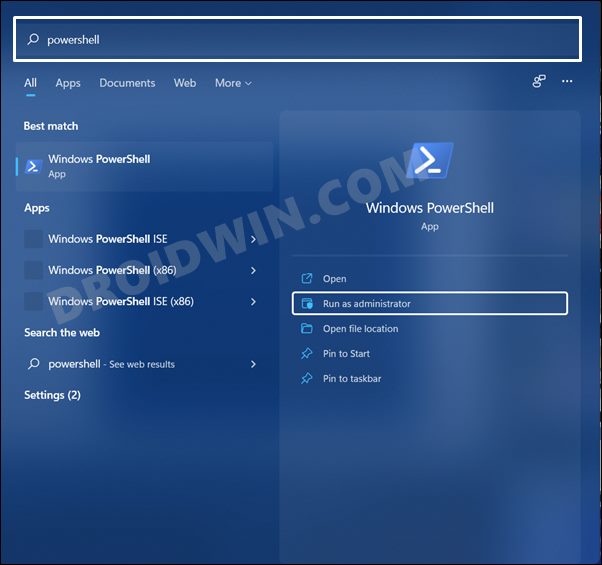
Your first course of action should be to de-register and then re-register the Settings app. This will give it a fresh instance to work upon and might end up rectifying the underlying issue as well. So head over to the Start menu and launch PowerShell as an administrator. Then copy-paste the below command and hit Enter:
Get-AppXPackage -AllUsers -Name windows.immersivecontrolpanel | Foreach {Add-AppxPackage -DisableDevelopmentMode -Register “$($_.InstallLocation)\AppXManifest.xml” -Verbose}
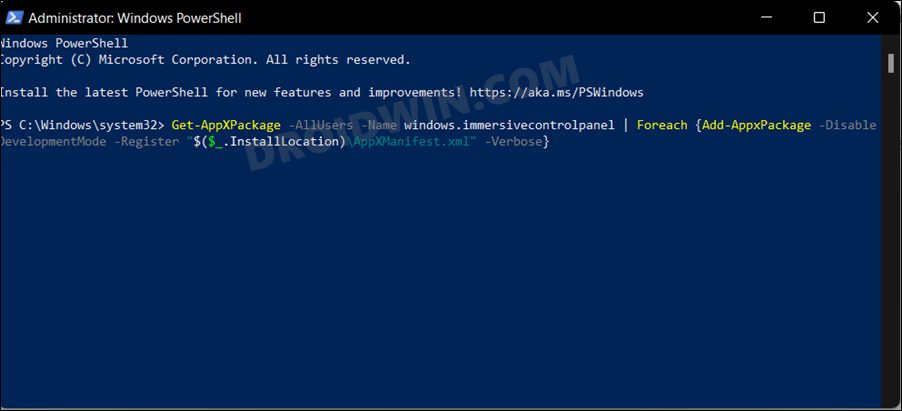
Once the command has been successfully executed, you should get the VERBOSE: Operation completed message. Now restart your PC and then check if the Windows 11 Settings menu not opening or working issue has been fixed or not.
FIX 3: Using Powershell
The above registration command is actually an amalgamation of two different commands. So rather than using the single aforementioned command, you could break it down into two separate commands and then execute them individually. For that, launch the PowerShell as an administrator and then copy-paste the following commands, one at a time, in the Powershell window:
Get-appxpackage microsoft.ui.xaml.cbs |? {($_.version -ne “2.62106.1002.0”)} | remove-appxpackage
Add-appxpackage -Register -DisableDevelopmentMode -ForceApplicationShutdown C:\Windows\SystemApps\Microsoft.UI.Xaml.CBS_8wekyb3d8bbwe\AppxManifest.xml
Once both the commands have been successfully executed, restart your PC and then check if it fixes the Windows 11 Settings menu not opening or working issue.
FIX 4: Using SFC and DISM Commands
System File Checker and Deployment Image Servicing and Management are two command-line utility tools that scan for the corrupt Windows files and then replace them with their working counterpart. The major difference between the two is whereas the SFC replaces the corrupt files with the working ones from the cached directory on your PC, DISM does so by downloading the working files from the online Microsoft servers. And as of now, we would be making use of both these tools to fix the underlying issue. Follow along.
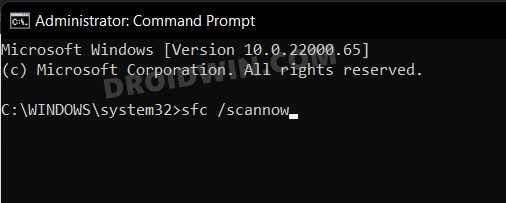
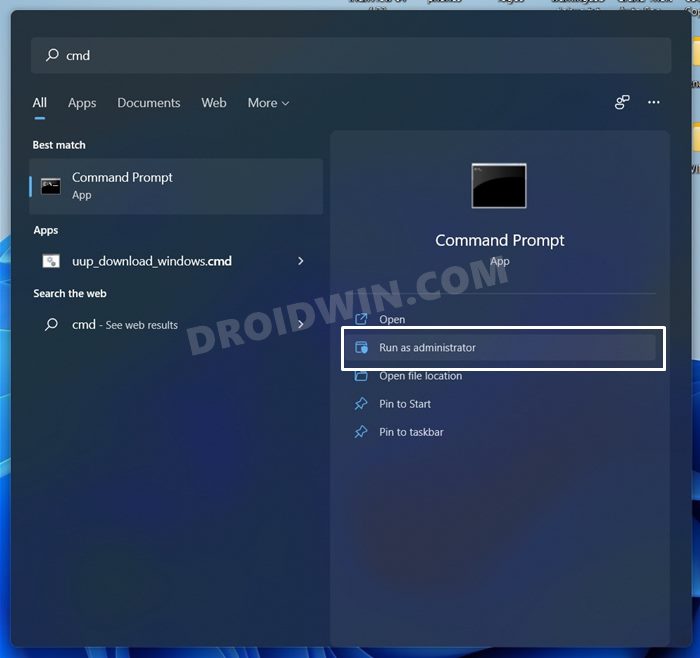
- To begin with, head over to the Start Menu, search Command Prompt, and launch it as an administrator.
- Then copy-paste the below command to open the SFC Tool:
sfc /scannow
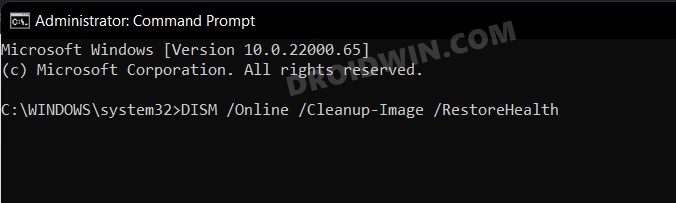
- Once the SFC Scanning is complete, it’s time to use the DISM Tool. So copy-paste the below command:
DISM /Online /Cleanup-Image /RestoreHealth
Once DISM finishes the scanning, it is recommended to reboot your PC. Once it boots up, check if it fixes the issue of the Windows 11 Settings menu not opening or working.
FIX 5: Install Pending Updates via CMD
Windows regularly release new quality updates that irons out underlying bugs and bring in system stability. So if there’s any pending update that you haven’t yet installed, then now is probably the best time to do so. But since the Settings menu is currently inaccessible, we will be using the Command Prompt to install the update. So launch CMD as an administrator and execute the following three commands, one after the other:
Install-Module PSWindowsUpdate
Get-WindowsUpdate
Install-WindowsUpdate
Once all three commands have been executed, restart your PC. Then verify if the Windows 11 Settings menu not opening or working issue has been fixed or not.
FIX 6: Boot to Safe Mode
In this method, we will be performing a clean boot. In other words, all the third-party apps and services will be disabled and your PC will only be running the essential system services. If it does end up rectifying the issue, then the culprit is a third-party app which we will then be uninstalled from your PC. Here’s how all of this could be carried out
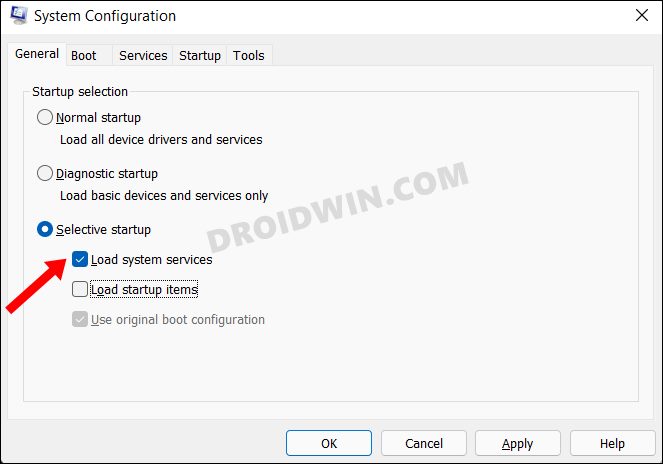
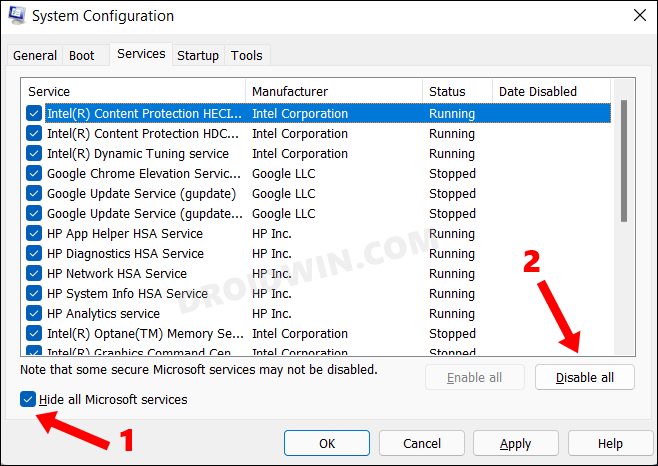
- Head over to the Start Menu, search MSConfig, and open the System Configuration menu.
- Now select Selective Startup and uncheck Load Startup Items.
- After that, go to the Services tab and checkmark Hide All Microsoft Services.
- Then click on Disable All button. This will disable all the non-Microsoft services.
- Now restart your PC and then check if the Windows 11 Settings menu not opening or working issue has been fixed or not.
- if your answer is affirmative, then the issue is indeed with a third-party app. So go to the Control Panel, and uninstall the third-party apps that you had recently installed after which you are facing this error.
- However, if the issue is still there, then proceed ahead with the other methods given below.
FIX 7: Restart Telemetry Service
The Telemetry service is responsible for managing UI/UX, application health, quality, and performance. If there’s an issue with this service, then its repercussions are bound to be faced with the UWPs. In such cases, you should consider giving this service a fresh start, which could be done as follows:
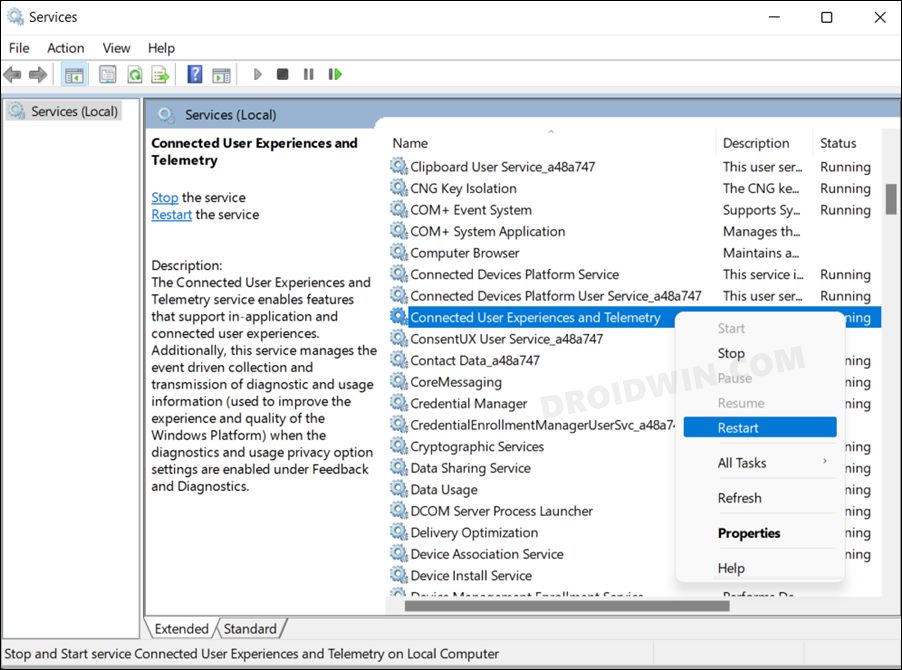
- Use the Windows+R shortcut keys to open the Run dialog box.
- Then type in the below command and hit Enter to open the Services menu.
services.msc
- Now scroll to the Connected User Experiences and Telemetry service, right-click on it, and select Restart.
- Once the service restarts, check whether the Windows 11 Settings menu not opening or working issue has been fixed or not.
FIX 8: Create Telemetry Registry Key
In this, we will be creating the AllowTelemetry Registry key and assigning it a new Value Data. So proceed ahead with the instructions and implement this method right away.
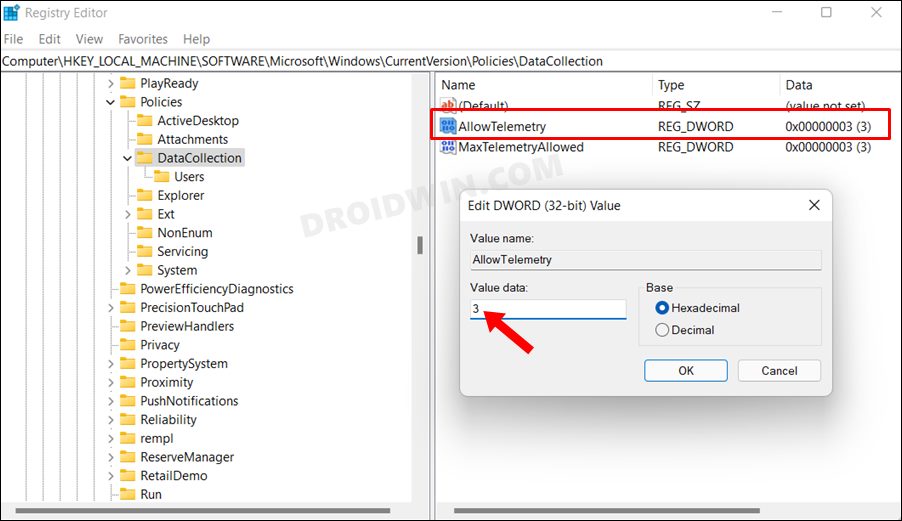
- Launch Registry Editor via Start Menu and head over to the below location:
Computer\HKEY_LOCAL_MACHINE\SOFTWARE\Microsoft\Windows\CurrentVersion\Policies\DataCollection
- Check if there’s a file named AllowTelemetry or not on the right-hand side. If it’s not there, then right-click in an empty location on the right-hand side and select New > DWord 32-Bit Value.
- Name it AllowTelemetry and hit OK to save it. Now double click to open it and assign 3 in the Value data field.
- Finally, click OK to save the changes and then restart your PC.
- Verify if it fixes the Windows 11 Settings menu not opening or working issue.

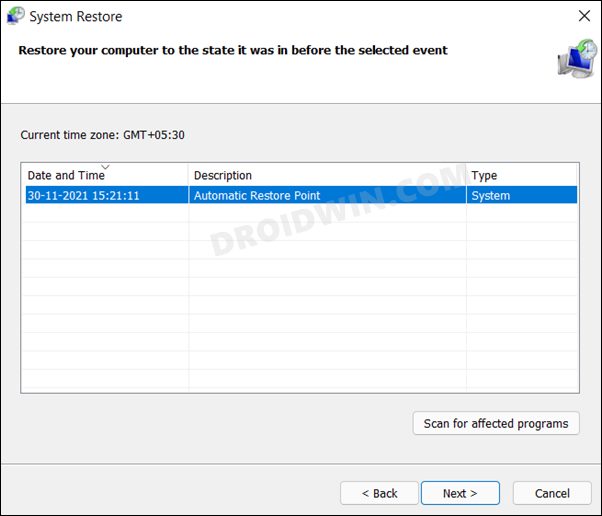
FIX 9: Use System Restore
If you had created a system restore point before the issue first began, then the best bet is to restore it right away. Here’s how it could be done:
- To begin with, launch the Run dialog box via Windows+R shortcut keys.
- Then copy-paste the below command and hit Enter. This shall launch the System Restore menu.
rstrui
- Now click Next, select the Restore point, and again click Next. Wait for the process to complete.
- Once done, verify if it fixes the Windows 11 Settings menu not opening or working issue.
FIX 10: Reset PC (Without Data Wipe)
If none of the above methods spelled out success, then you will have to take the nuclear approach of resetting the PC. However, there’s no need to go for Data Wipe as the issue isn’t with a third-party app (if that would have been the case, then your issue would have been rectified via the Safe Mode method).
As of now, the issue is due to corrupt Windows system settings and hence it should be fixed with a reset. But still, we would recommend taking a backup, just to be on the safer side. Once done, refer to our comprehensive guide on How to boot to Windows 11 Recovery Environment and Perform a Reset or use the short instructions.
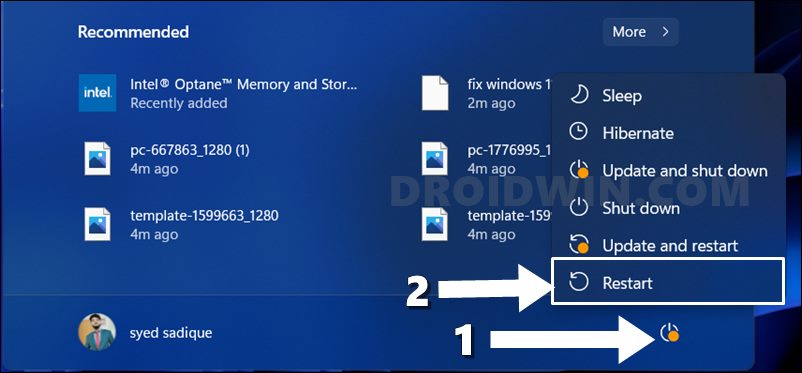
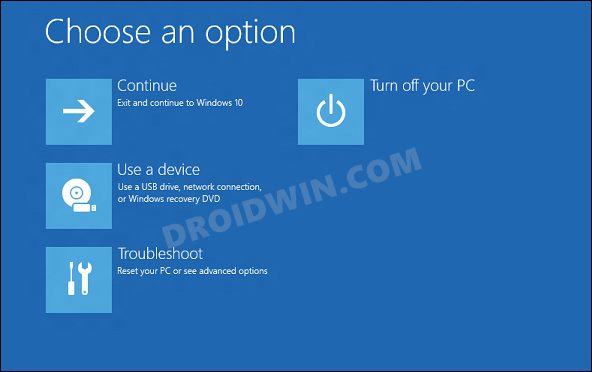
- Bring up the Power Menu. Then while pressing the Shift key, click on Restart.
- This shall take you to the Windows 11 Recovery Environment
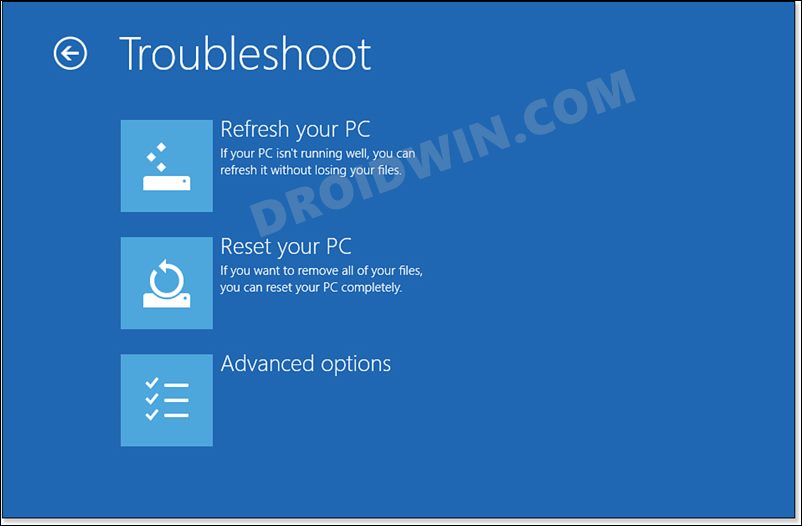
- First off, select Troubleshoot from the Choose an Option screen.
- Then select Refresh your PC from the Troubleshoot screen.
- Now proceed with the on-screen instructions to complete the process (make sure to select the option to Keep My Data when asked).
- Once done, restart your PC and with that, the underlying Settings issue would have been fixed.
So with this, we round off the guide on how you could fix the issue of the Windows 11 Settings menu not opening or working. We have listed ten different methods for the same. Do let us know in the comments section which one worked out in your favor. Likewise, all your queries are welcomed in the comments below.


