In this guide, we will show you the steps to convert your Asus ROG Phone 6 from Chinese [CN] to Global ROM [WW]. When it comes to the gaming domain, then there’s no denying the fact that the offering from Asus is the best in this segment. To further cement this statement, one shouldn’t look any further than its sixth iteration. With Snapdragon 8+ Gen 1 chipset, 16GB RAM, and 265H refresh rate, its rise to fame were already on the cards.
However, there are quite a few users who have purchased the Chinese variant of this device but now wish to convert it to Global, due to numerous reasons. For some, it is the language barrier, whereas others just don’t like the UI that the Chinese counterpart has to offer. Plus the plethora of bloatware apps aren’t doing any good either. So if you also echo this thought, then this guide shall help you convert your Asus ROG Phone 6 from Chinese [CN] to Global ROM [WW]. Follow along.
Table of Contents
How to Convert Asus ROG Phone 6 from Chinese [CN] to Global ROM [WW]
The below instructions are listed under separate sections for ease of understanding. Make sure to follow the same sequence as mentioned. Droidwin and its members wouldn’t be held responsible in case of a thermonuclear war, your alarm doesn’t wake you up, or if anything happens to your device and data by performing the below steps. [Fingerprint Sensor and the back camera will work without any issues after converting your ROG Phone 6 from CN to WW. Even the WideVine Certification will remain on L1].
STEP 1: Install Android SDK
 First and foremost, you will have to install the Android SDK Platform Tools on your PC. This is the official ADB and Fastboot binary provided by Google and is the only recommended one. So download it and then extract it to any convenient location on your PC. Doing so will give you the platform-tools folder, which will be used throughout this guide.
STEP 2: Enable USB Debugging
Next up, you will have to enable USB Debugging on your device so that it is recognizable by the PC in ADB mode. This will then allow you to boot your device to Fastboot Mode. So head over to Settings > About Phone > Tap on Build Number 7 times > Go back to Settings > System > Advanced > Developer Options > Enable USB Debugging.
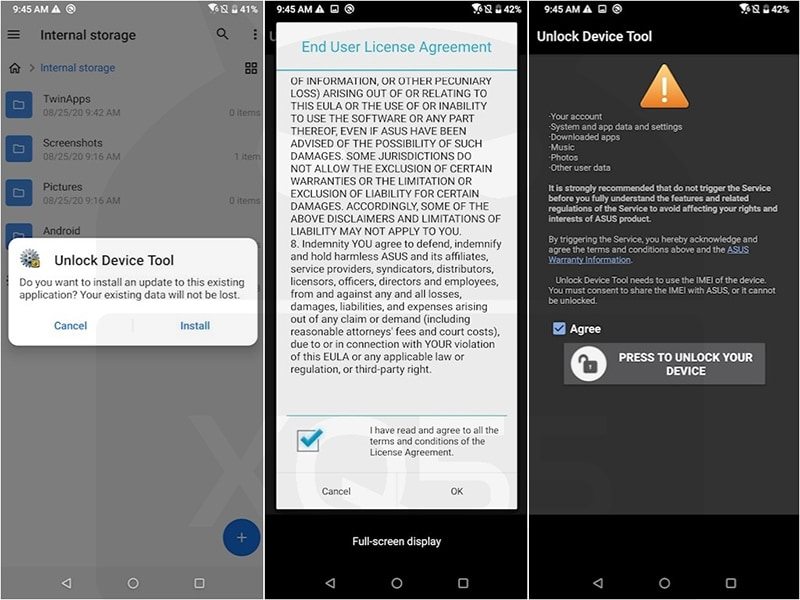
STEP 3: Unlock Bootloader on Asus ROG Phone 6
After this, you will have to unlock the bootloader on your device. Do keep in mind that this process will wipe off all the data and might nullify the device’s warranty as well. So if that’s all well and good, then refer to our comprehensive guide on Unlock Bootloader on Asus ROG Phone 6/Pro
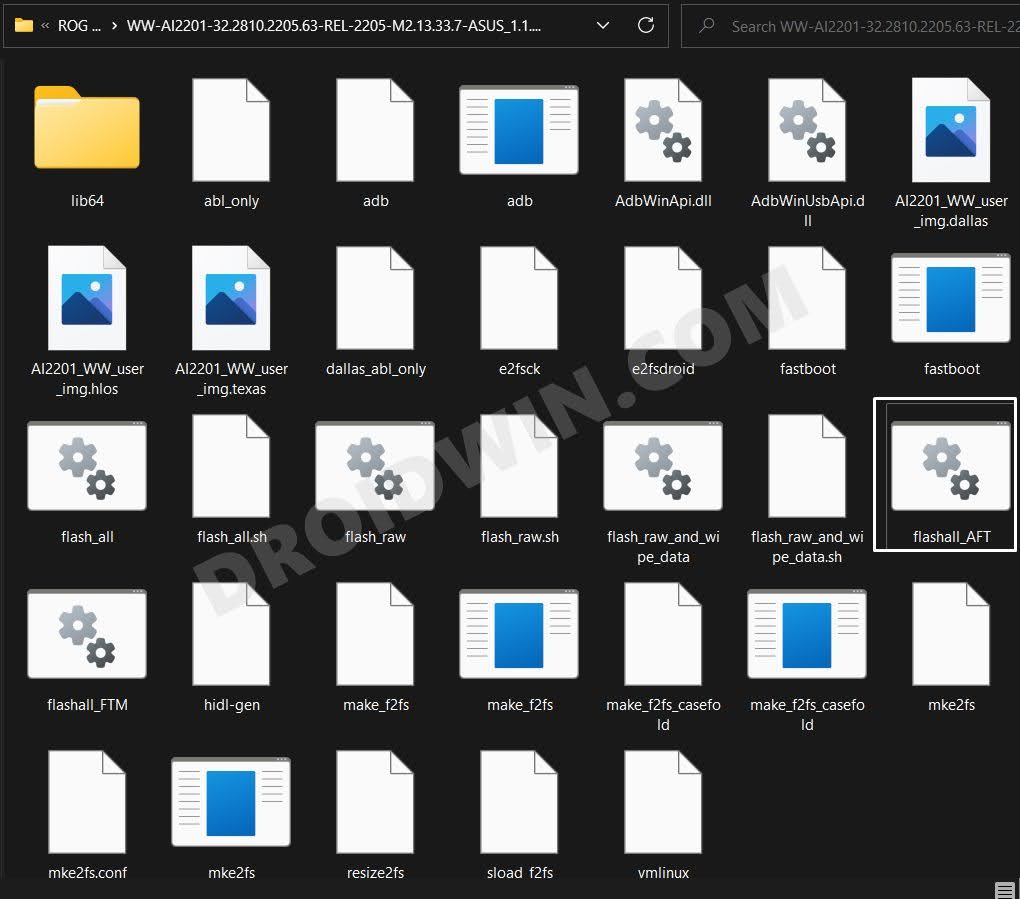
STEP 4: Download Asus ROG Phone 6 Global RAW Firmware
Download the ROG Phone 6 Global RAW firmware from here [Credits: XDA Senior Member AndroPlus]. Then extract it to any convenient location on your PC [Password: https://androplus.org].
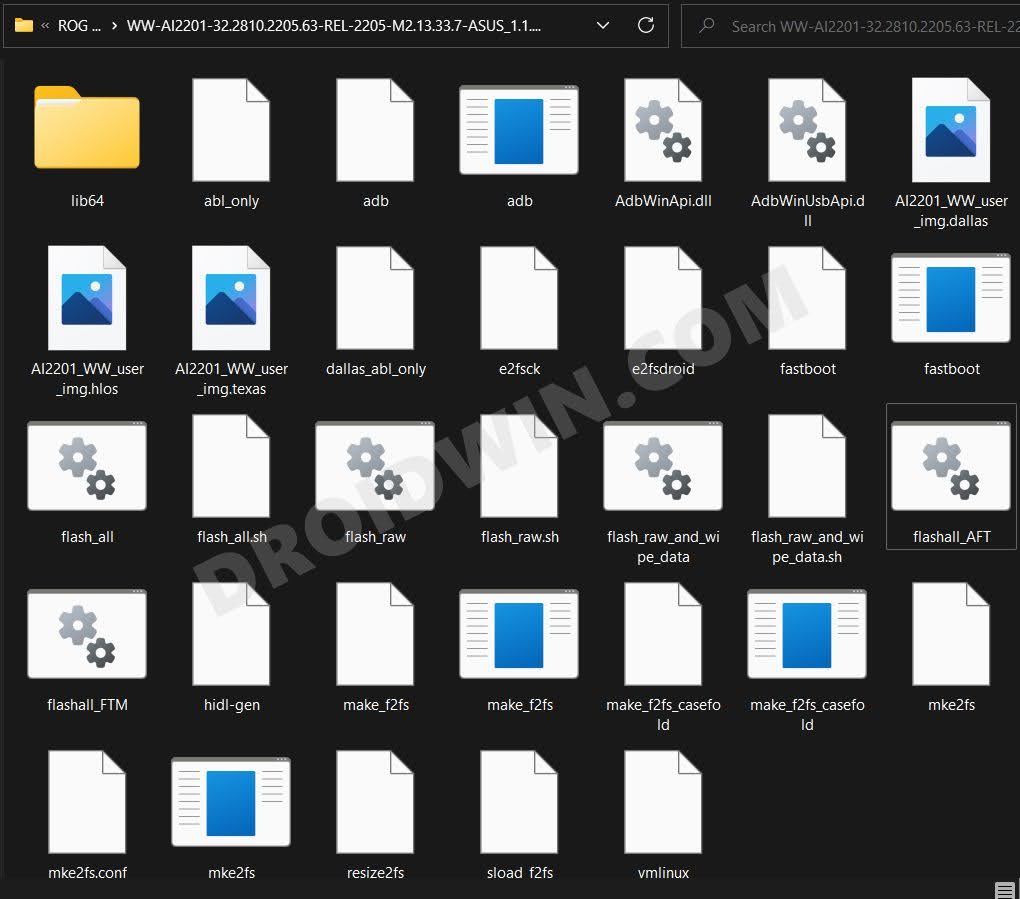
STEP 5: Convert Asus ROG Phone 6 from Chinese [CN] to Global [WW]
- To begin with, double click on the flashall_AFT file to start the flashing process.

- Once done, it will display FLASH COMPLETE. RESTART message. So reboot your device now.
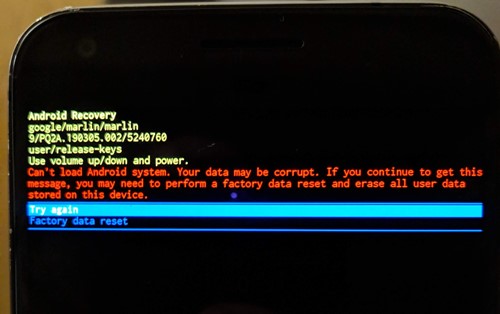
- It will now boot to the stock recovery and you might get the message that “Can’t load Android system”. It’s completely normal.
- So use the Volume keys to select Factory Data Reset and then press the Power key to confirm it.
- Your device will now undergo a reset. Once done, it will boot to the Global ROM.
That’s it. These were the steps to convert your Asus ROG Phone 6 from Chinese [CN] to Global ROM [WW]. If you have any queries concerning the aforementioned steps, do let us know in the comments. We will get back to you with a solution at the earliest.


Boon
Can it global to CN also?
Sébastien CHARLES
Hi, and thx for your guides.
I have just one question:
Is this guide works for the ROG Phone 6 with Mediatek processor, like the Batman Edition ?
I purchased a phone with CN rom, and would like to change for the Global Rom.
Thx for your answer.
Andrew McNaughton
The 6GHz Wi-Fi radio seems to be disabled on CN model. Is there a way to re-enable it?
Also, why does OTA updates not work with this? What are they transmitting to ID the phone that can’t be modified? It’s so strange that WW converted device can load the official firmware but only if placed manually on the storage.
Anael Matal
Are the operating system updates automatic or is it necessary to do some additional procedure?
Jorge Martinez
Hi, I already have my computer converted to the WW version, but I can’t install updates or OTG, how can I update it? what steps to follow, help please.
Charles
I have tried this with the pro version, but now the phone has a black screen and will not turn on, yet still connects to the pc but isn’t recognized by the pc. any advice?
Deborah
This guide (along with many others linked to it) worked for me!! Thank you sooooo much for this! It took me 10hours but I also did have to learn everything from scratch so… you’re an amazing teacher thankyou
debs
Hey thanks so much for publishing this guide! I have an issue, though. every time I click flashall_AFT, i get : ‘findstr’ is not recognized as an internal or external command,
operable program or batch file.
“Start downloading Texas images…”
[command] : fastboot.exe flash all abl_only
and it stops there. I would really appreciate the help! thank you in advance 🙂
Dj De Guzman
Does this work on the Rog 6 Batman Edition?
Jorge Martinez
Hello, I have a ROG 6 device, which apparently already came with the WW, but I cannot update neither OTA nor manual, and on the back it has the Tencent logo, which makes me think that the seller had already made the guide that you have, the problem now lies in what I want to update, what would be the method or what steps should I follow, help please.
Stanislav
How I can do this whit ROG phone 5 s?
Nexus`
Thanks so much for this guide. I have converted my CN to WW ROM. Wish there was a video to follow though.
Also, at the end of the conversion I had received a pop-up stating:
“The installed firmware does not match the device origin. Please note that you may not receive any FOTA updates.”
What is FOTA updates?
Are FOTA updates important?
How may I receive FOTA updates?
Thanks.
Willy
Is it able to update firmware in the future?
Christopher
Hi, this also works for the pro versio?
Heitor
Hi, I wanted to know if the global ROM includes the Portuguese language and also if it has normal apps from an Android, for example the Play Store
Heitor
Oi, eu queria saber se assim que instalar a ROM global ela vai ter a opção de ficar português e também vai ter todos aplicativos de um Android normal (inclusive a play story)
Sadique Hassan
Hi Christopher, the Global WW Raw firmware is only available for ROG Phone 6. Once I get hold of that firmware for the Pro version, I will update this guide and let you know.
kc
Thanks for the info,im waiting 6 pro