In this guide, we will show you the steps to try out the new Black Screen of Death on your Windows 11 PC. As soon as this new iteration of OS was announced, the tech enthusiasts wasted little time in trying it out. There are quite a few new and noteworthy features this time around that managed to catch everyone’s attention.
The completely revamped UI, changes to the Taskbar and Windows Menu, and icon style changes are documented quite a lot. However, what some of you might have missed is the color change of the dreadful Windows BSOD error. From the trademark blue screen, it has now transformed over to been scarier (yet classy) black UI.
And truth be told, it definitely looks more impressive than its counterpart. But getting hold of this new BSOD might prove to be a tough job? Well, not exactly, as this guide will show you. Here are the instructions to try out the new Black Screen of Death on your Windows 11 PC. Follow along.
- How to Change Taskbar Size in Windows 11
- How to Replace PowerShell with Command Prompt in Windows 11
- 10 Methods to Open Command Prompt (CMD) in Windows 11
- How to Fix: This PC can’t run Windows 11 | The PC must support TPM 2.0
How to Try Black Screen of Death on your Windows 11 PC

This tutorial will show you how to manually create a BSOD error on your PC. It goes without saying that it is quite risky and could spell trouble for you. Though it would easily be fixed upon the next restart, there’s always a chance of things going south.
So try it at your own risk. Droidwin and its members wouldn’t be held responsible in case of a thermonuclear war, your alarm doesn’t wake you up, or if anything happens to your PC and data by performing the below steps.
- Bring up the Run dialog box using the Windows+R shortcut key combinations.
- Then type in regedit and hit Enter. This shall launch the Registry Editor.
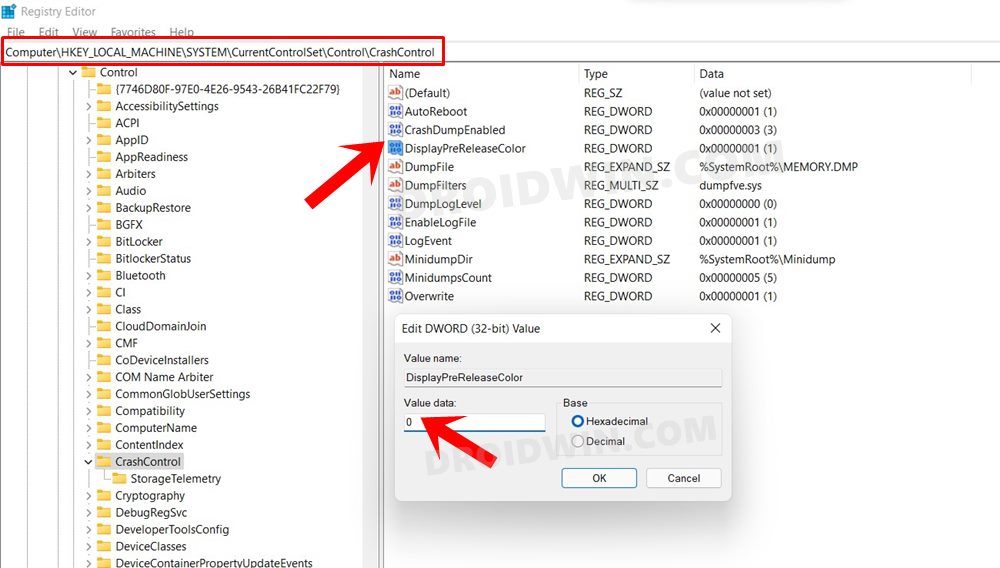
- Now go to the below location (you may also copy-paste this location directly in the address bar):
Computer\HKEY_LOCAL_MACHINE\SYSTEM\CurrentControlSet\Control\CrashControl
- Double click on the DisplayPreReleaseColor and change its Value Data to 0.

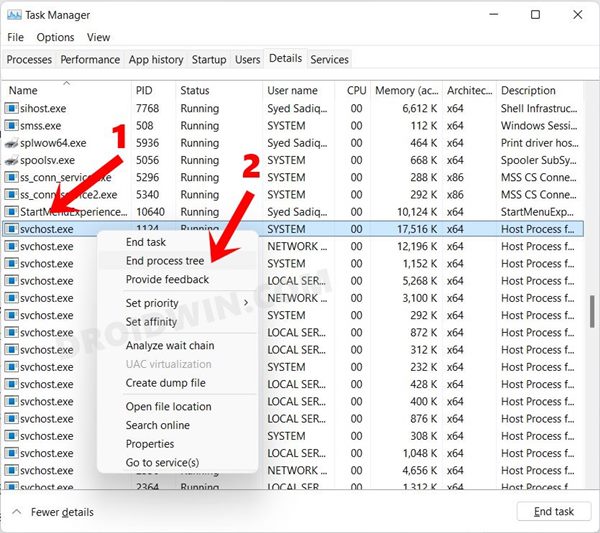
- Once that is done, use the Ctrl+Shift+Esc keys to launch the Task Manager.
- Go to the Details tab, select svchost.exe, right-click on it, and select End Process Tree.
- You will now get a warning message, enable the “Abandon unsaved data and shut down” option.
- Finally, hit the Shutdown button. As soon as your PC starts, it will crash and you shall be taken to the BSOD, but this time, with a Black B!
Once you are done playing around with the dark-themed BSOD, it’s time to bring your PC back to life. For that, perform a normal reboot or if that doesn’t work out, then press and hold the Power key for 10-15 seconds. Likewise, once your PC boots up, make sure to change the Value Data of DisplayPreReleaseColor to 1, just to be on a safer side.
So this was all from this guide on how you could try out the new Black Screen of Death on your Windows 11 PC. Do let us know your views on the same in the comments below. Likewise, if you want more such interesting articles, do let me know in the comments, along with the OS type.


