In this guide, we will show you the steps to enable all LTE and 5G bands on your Galaxy S23 Ultra. The latest flagships from the South Korean giant behold a plethora of 4G and 5G bands, however, they are hidden and their usability is restricted by the OEM, mainly due to the fact that different countries use different band frequencies for these spectrums.
But since this limitation is software-based, you could easily bypass it and henceforth enable all LTE and 5G bands on your Galaxy S23 Ultra. But what’s the benefit of doing so? Let’s say you live in India but have imported the device from the USA. Now it’s obvious that India uses a different 5G band s compared with the US carrier.
So you could carry out this tweak, unlock and enable the band that is in sync with your region, and hence use 5G right away. Apart from that, in some cases, the carrier themselves block some frequencies and bands even if you are in the supported regions. So to overcome all these restrictions, you could use the nifty workaround that has been shared in this guide.
Table of Contents
How to Enable All LTE and 5G Bands on S23 Ultra
If you own a US-based S23 device, then you could unlock all Sub-6 bands such as n78, and mmWave bands, as well as 5G SA bands. For the Canadian variant, you could unlock Sub-6 bands such as n78 and 5G SA bands. As far as the supported devices are concerned, it has been tested on Samsung S23 Ultra (S918U, S918U1, S918W) but it should also work on Galaxy S23 and S23 Plus.
Droidwin and its members wouldn’t be held responsible in case of a thermonuclear war, your alarm doesn’t wake you up, or if anything happens to your device and data by performing the below steps.
The Prerequisite: Flash USA Firmware [XAA CSC]
If you are currently on the US firmware (XAA or any other USA CSC) then you could skip this step. Otherwise, refer to the below instructions to flash the US firmware via Odin. Do keep in mind that the process will wipe off all the data, so take a complete device backup beforehand.
STEP 1: Download Samsung USB Drivers
In most instances, as soon as you connect your device to a PC via a USB cable, the associated USB drivers are automatically installed. However, if that isn’t the case with you, then you may manually install the drivers as well. To do so, get hold of the official USB Drivers from the below link and launch the setup file. Then proceed with the on-screen instructions to install it onto your PC.
Download: Samsung USB Drivers
STEP 2: Download Odin
Next up, download the Odin Tool. This will be needed to flash the Android 12 OneUI 4.0 firmware onto your Samsung device for the downgrade process. So grab it from the below link and then extract it to any convenient location on your PC.
Download: Odin3-v3.14.4.zip
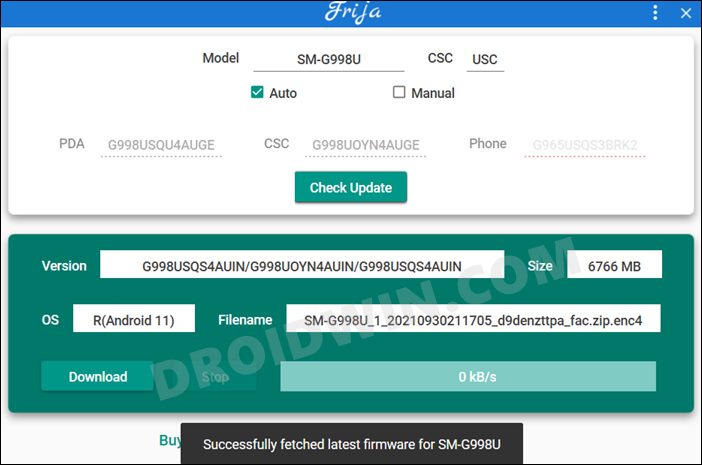
STEP 3: Download XAA CSC Firmware
You will now have to download the One UI 5 firmware for your device corresponding to the USA firmware, most preferably the XAA CSC Code. For that, you could use the Frija Tool, the SamMobile website, or the SamFW site.
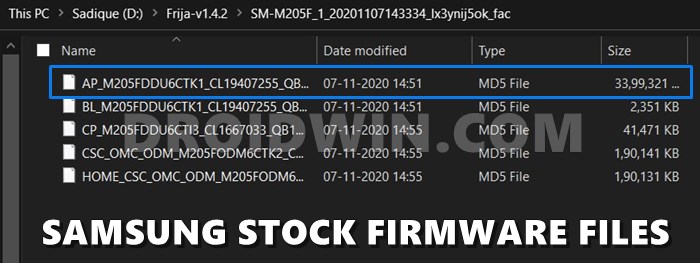
STEP 4: Extract Downloaded Firmware
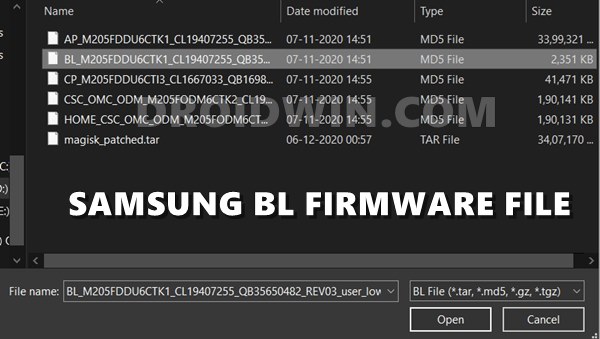
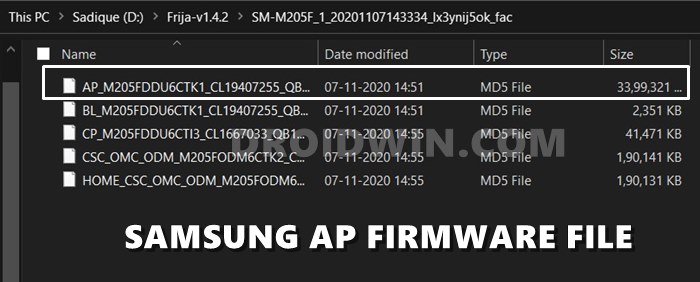
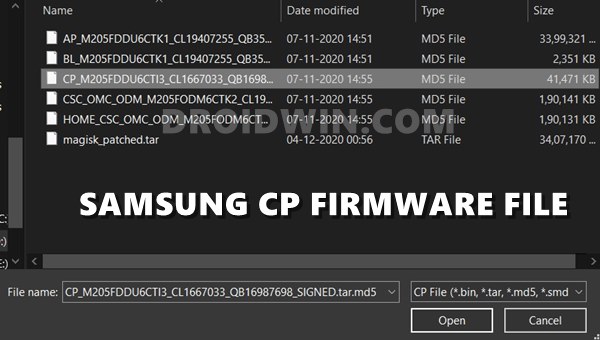
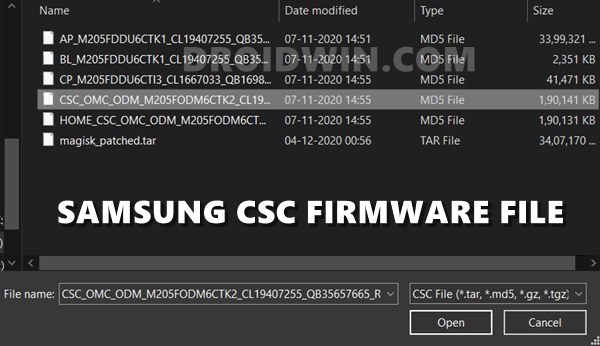
Once you have downloaded the firmware, extract it to any convenient location on your PC. Doing so shall give you the AP, BL, CP, CSC, and Home CSC files. Out of that, we will be using the first four files [AP, BL, CP, and CSC].
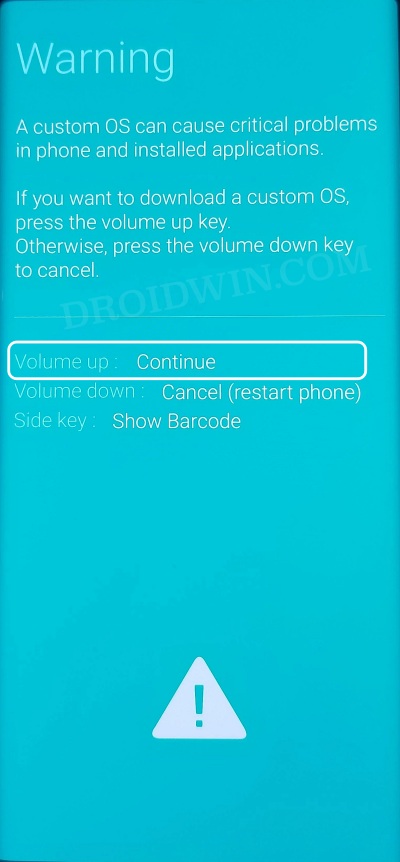
STEP 5: Boot your Samsung Device to Download Mode
You will now have to boot your Samsung device to Download Mode. This is because Odin would only be able to recognize and hence interact with your device in Download Mode. So to boot your device to this mode, you may refer to our detailed guide: How to Boot Galaxy S23/Plus/Ultra to Download Mode [3 Methods]. Or refer to the shorter instructions:
- Plug one end of the USB cable into your PC but keep the other end free.
- Then power off your device. Now press and hold Vol Up + Vol Down together.
- While having both these keys pressed, connect your device to the other end of the USB cable.
- As soon as you see the Warning message on your device, release the pressed keys.
- Then press the Volume Up key once and your device will boot to Download Mode.

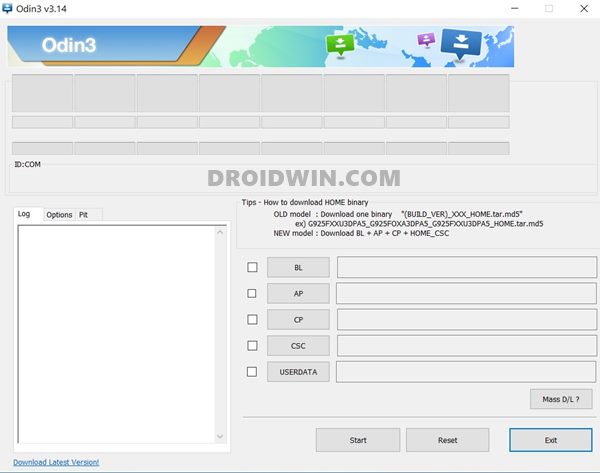
STEP 6: Install USA Firmware on S23 Ultra
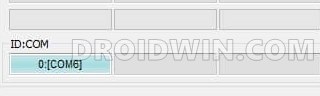
- To begin with, connect your device to the PC via USB cable. Make sure it is booted to Download Mode.
- Then head over to the folder where you had extracted Odin and double-click on the Odin3_v3.14.4.exe file to launch the Odin Tool.
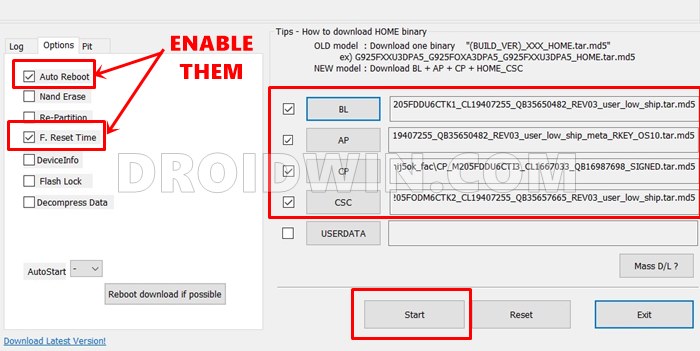
- You should now see the ID:COM port of the tool is highlighted. This signifies that the tool is able to recognize your device and the connection stands successful. So you may now proceed ahead to load the BL, AP, CP, and CSC files to Odin.
- First off, click on the BL button, navigate to the extracted firmware file and select the BL file from there.
- Then click on AP and upload the AP firmware file. This might take some time.
- After this, click CP and load the CP firmware file.
- Finally, click CSC and upload the CSC file (the normal CSC, not the Home CSC).
- Once you have loaded all four files, go to the ‘Options’ section of Odin and check Auto Reboot and F.Reset Time (see below image).
- Finally, hit the Start button and wait for the process to complete.
- As soon as the installation is done, you should get the PASS message and your device will boot to the OS. You may now disconnect it from your PC and close the tool.


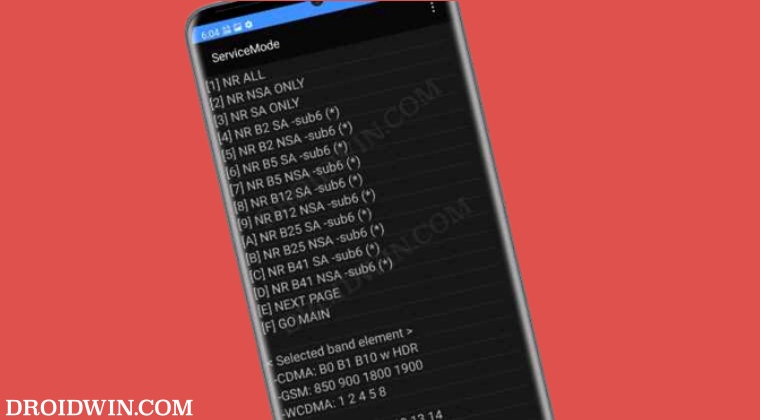
Enable All LTE and 5G Bands on S23 Ultra via Service Menu
- Bring up the Dialer and type either of the two below codes.
*#73# OR *#27663368378#
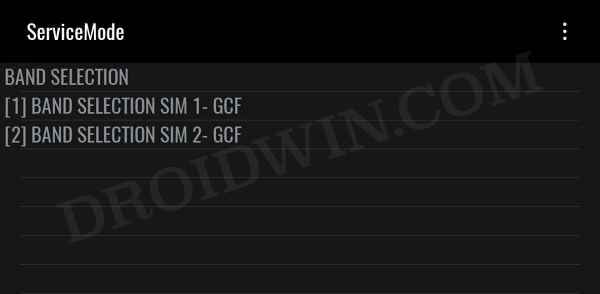
- It should open the ServiceMode > RF TEST screen.
- Select the first option, Band Selection, from the list.
- Now select the appropriate SIM from the list.
- Dual SIM users would see two SIMs, so make the selection carefully.
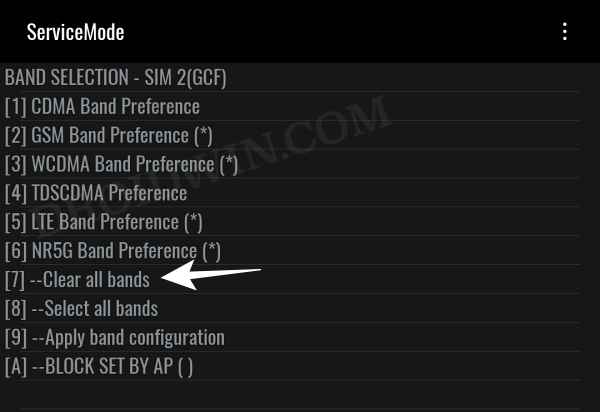
- Then select Option 7 to Clear All Bands.
- The checkmark next to Option A (Block Set By AP) and a few others should now be removed.
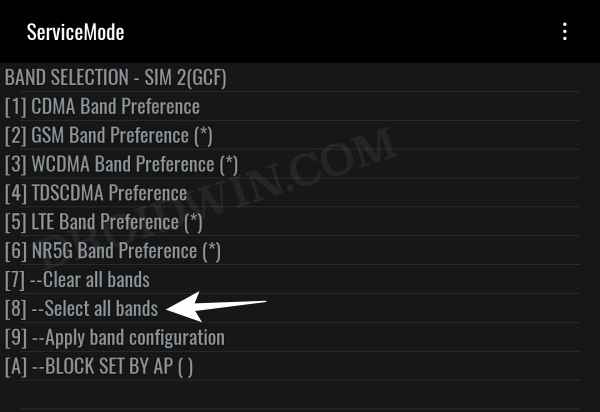
- Now select Option 8 twice to add additional bands.
- Likewise, doing so will also make the checkmarks re-appear.
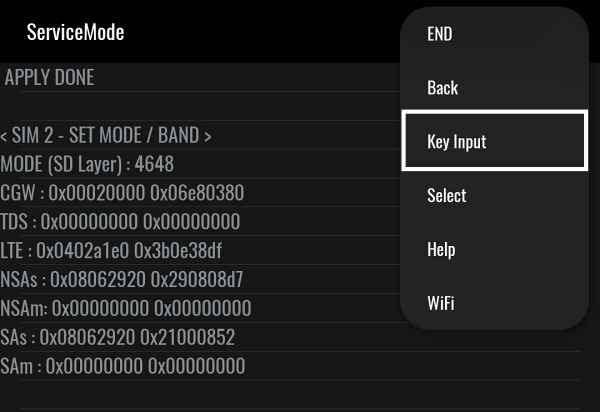
- Then select Option 9 to Apply Band Configuration. You will get the APPLY DONE prompt.
- Now tap on the overflow icon situated at the top right and select Key Input.
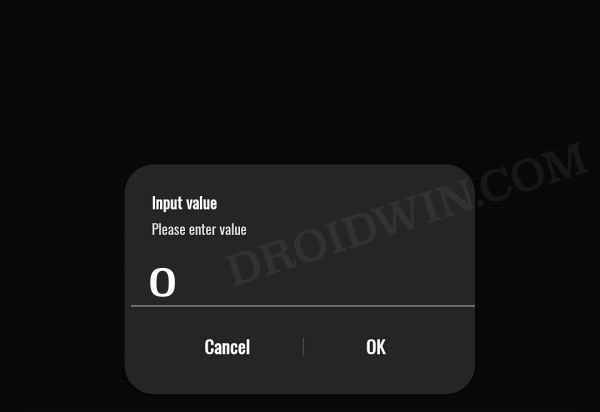
- Then type in 0 in the space provided and hit OK. That’s it.

These were the steps to enable and select the band of your choice on your Samsung Galaxy S23 Ultra. If you have any queries concerning the aforementioned steps, do let us know in the comments. We will get back to you with a solution at the earliest.
FIX: Cannot Access the Band Selection Menu
If you are unable to access the Band Selection menu on your Samsung device, then you should try out the below tweak.
- Start on XAA (or VZW) U1 firmware and enable debugging in the Developer Menu.
- Then use the SamFW FRP tool to change to VZW CSC if you’re on XAA or another CSC.
- Now using the SamFW FRP tool, go to MTP -> Enable Secret Code for VZW.
- You should be able to use *#73# OR *#27663368378#* secret code without any issues.
- If required you could easily switch back to XAA CSC using the SamFW FRP tool.
Another Method to Enable all LTE and 5G bands in Galaxy S23 Ultra
Using the below steps, you could easily enable all the LTE and 5G bands on your galaxy S23 Ultra.
- To begin with, open the Service Mode via the below command
*#73# OR *#27663368378#*
- Then go to UE SETTING & INFO -> SETTING -> SYSTEM.
- Now go to the next page 4 times -> SET LTE BAND CONFIG -> SET DEFAULT LTE BAND.
- After that, again bring up the Service Mode page via the below command
*#73# OR *#27663368378#*
- Then go to UE SETTING & INFO -> SETTING -> PROTOCOL -> NR5G.
- Next, go to NR5G PRUNE STATUS -> REMOVE NR5G PRUNE.
- Again bring up the Service Mode page via the below command
*#73# OR *#27663368378#*
- Then go to UE SETTING & INFO -> SETTING -> PROTOCOL.
- Now select GCF -> REMOVE ONLY NR WHITELIST.
- [Optional] If you wish to enable mmWave bands as well, then bring up Service Mode as before.
- Then go to UE SETTING & INFO -> SETTING -> PROTOCOL.
- Now select NR5G -> Sub6/mmWave -> ALL ENABLE.
Unlock All Bands on Galaxy S23 Ultra via Protocol Simulation
You could also enable all bands on your Galaxy S23 Ultra via Protocol Simulation. In this method, we will be simulating a change in your CSC to GCF (Global Certification Forum). While this won’t actually change your CSC to GCF, but will change the options in the service menu as if you were on GCF CSC, which should give you access to all SA and NSA bands [Credits: XDA Senior Member wr3cckl3ss1].
- Open the Service Mode via the below code
*#27663368378#*
- Then go to Service Mode Main Menu -> PROTOCOL STATE.
- Now go to PROTOCOL SIMULATION -> IMEI PRE CFG SIMULATION.
- In this menu, click [1] AP, then click GCF. Then click [2] NET1 and change it to GCF.
- Do the same for [3] NET2. All GCF and finally Press [4] Write.
- Now restart your device and check out the results.
How to Enable All 5G NR Features on Galaxy S23 Ultra
Given here are the steps to enable all the 5G NR features on your S23 Ultra device.

- To begin with, open the Service Mode via the below command
*#73# OR *#27663368378#*
- Then go to UE SETTING & INFO -> SETTING -> PROTOCOL -> AS.
- Now go to Next Page -> NR CDRX CONTROL -> NR CDRX ENABLE.
- For the unaware, NR CDRX is the 5G power saving mode.
- Again bring up the Service Mode page via the below command
*#73# OR *#27663368378#*
- Then go to UE SETTING & INFO -> SETTING -> PROTOCOL -> AS.
- Tap on Next Page 2 times -> NR DSS CONTROL -> NR DSS ENABLE.
- Here’s NR DSS is the 5G Dynamic Spectrum Sharing.
How to Enable 5G SA on Galaxy S23 Ultra
If your country supports standalone 5G, then here’s how to enable 5G SA onto your Galaxy S22 Ultra
- To begin with, open the Service Mode via the below command
*#73# OR *#27663368378#*
- Then go to UE SETTING & INFO -> SETTING -> PROTOCOL -> NR5G.
- Now select NR5G SA/NSA Mode Control -> SA/NSA ENABLE.
- Again bring up the Service Mode page via the below command
*#73# OR *#27663368378#*
- Then go to UE SETTING & INFO -> SETTING -> PROTOCOL -> NR5G.
- Now select NR5G SA/NSA Mode Control -> Remove SA Permit List.
- Again bring up the Service Mode page via the below command
*#73# OR *#27663368378#*
- Then go to UE SETTING & INFO -> SETTING -> PROTOCOL -> NR5G.
- Now select Next Page -> NR5G NRDC -> NRDC ENABLE.
- Do note that NRDC is for dual connectivity with Sub6 + mmWave bands in parallel and it only applies to 5G SA networks.
That’s it. These were the steps to enable and select the 5G and LTE bands of your choice on your Samsung Galaxy S23 Ultra. In this regard, we have also listed the steps to enable LTE, 5G, 5G, 5G NR, and 5G SA networks. If you have any queries concerning the aforementioned steps, do let us know in the comments. [The credit for this guide goes to XDA Senior Member peacey8].


Dani
257-SA band can be selected?