In this guide, we will show you the steps to fix the Samsung Bootloop issue due to Prenormal KG/RMM state being triggered. Every OEM (including Samsung) ships their devices with a locked bootloader. The reason on their part stands simple- they only wish the user to remain inside the stock ecosystem that the company has to offer. But at the same time, they leave a small window open for the tech enthusiasts.
Making use of this opening, users unlock their device bootloader and step into the world of custom development. This allows them to install custom ROMs, flash custom recoveries, gain access to the system partition, and flash mods such as Magisk Modules, Xposed Framework, Substratum Themes, etc. However, when it comes to Samsung devices, unlocking the bootloader isn’t the only gateway that you need to bypass.
It has put in place some other stringent security measures that end up conflicting with the flashing of custom binaries. These include the likes VaultKeeper, Prenormal RMM State, DEFEX, and KNOX. In this guide, our focus will be on the Prenormal RMM or KG/RMM State and the steps needed to fix it. So without further ado, let’s get started.
Table of Contents
When Does the Prenormal KG/RMM State gets Triggered?
This issue arises when the device’s KG/RMM State is set to Prenormal. As soon as that happens, your device wouldn’t allow you to flash any custom binaries. In other words, you wouldn’t be able to unlock the bootloader for a certain time period, flashing TWRP or custom ROMs wouldn’t be possible and neither could you root your device.
Taking a real-life example, one of our readers recently flashed the TWRP Recovery onto his device. Right after flashing, you directly need to boot your device to TWRP via hardware key combinations. However, he messed up the button combinations and his device instead attempted to boot to the OS. At this stage, the KG/RMM got triggered and his device got stuck in a bootloop.
This is just one of the many examples when you might face this issue, there could be many others. With that said, let’s now make you aware of the steps to check if Prenormal RMM State has been triggered on your device. After that, it will be easy for us to fix the Samsung bootloop issue due to the KG/RMM state.
How to Check if the Samsung Device has KG/RMM state Enabled?
There exist three different types of signs that could help you to verify if Prenormal RMM has become active on your device or not. Let’s check them out.
- First off, if the OEM Unlock toggle has been greyed out or is missing from the device’s Developer Options.
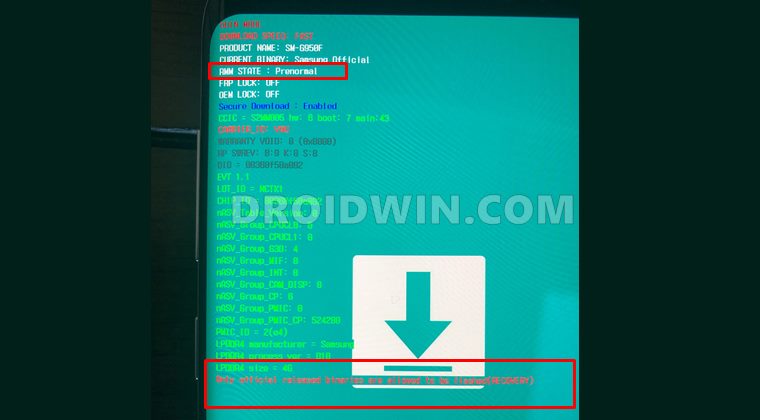
- Secondly, if you see the ‘KG State: Prenormal‘ message when your device is booted to Download Mode.
- Third, when you see the “Only official released binaries are allowed to be flashed” message while flashing custom binaries via Odin Tool.
Even if your device checkmarks any one of these three signs, then it signifies that Prenormal is now active. So your next course of action should be to fix the KG/RMM state and avoid bootloop on your Samsung device. Here’s how it could be done:
- Unbrick Samsung | Flash Stock Firmware via Odin
- How to Patch Samsung AP Firmware via Magisk
- Flash magisk_patched.tar (patched Samsung AP file) via Odin
- How to Boot Rooted Samsung to Recovery Mode and Rooted OS
How to Fix Prenormal KG/RMM State on Samsung device
There’s only one fix for this issue: you will have to download Stock Firmware via Frija/Samloader/SamMobile and flash it onto your device via Odin. To do so, you may refer to our comprehensive guide to Flash Samsung Stock Firmware via Odin.
Once the firmware is flashed, boot up your device, sign in with your Google account and wait for a period of seven days. Once a week has passed by you may unlock the bootloader and try flashing the custom binaries via Odin, it should be completed without any issues. However, if you are still facing this issue, then here is another workaround that you could try:
- To begin with, install the stock firmware onto your Samsung device via Odin [Flash Samsung Stock Firmware via Odin].
- Once flashing is complete, boot up the device and skip all the setup.
- Then go to Settings > General Management > Date and Time.
- Turn off Automatic Automatic date and time. Now manually set the date back to 10-15 days (7 days is the waiting time, we are keeping a few days in the buffer).
- After this, go to Settings > Biometrics and Security > Other Security settings and turn off Find My Device.
- At this point in time, make sure that you aren’t connected to any network. To be on the safer side, consider enabling the Airplane Mode.
- Now go to Developer Options and enable OEM Unlock, If it’s already enabled or greyed out, then the bootloader is unlocked.
- You may now boot the device to the Download Mode and verify that the KG/RMM has indeed been bypassed. To verify the same, you may see KG STATE as Checking, FRP LOCK: Off, and OEM LOCK: ON(U).
With this, you would have successfully fixed the Prenormal KG/RMM State on your Samsung device. Let’s now check out how you could prevent it from happening in the first place, in future.
How to Prevent Prenormal KG/RMM State on Samsung
So by now, you are acquainted with the instructions to fix the KG/RMM issue. However, it doesn’t mean that you wouldn’t face this issue ever again. Therefore the best bet is to carry out the below-mentioned instructions and prevent the Prenormal KG/RMM State from getting triggered again in the future.
Unlock Bootloader
To begin with, you will need to have the device’s bootloader unlocked. If you haven’t done so, then you may refer to our guide to Unlock Bootloader on any Samsung Device [New VaultKeeper Method].
Install TWRP Recovery
Next up, you shall have the TWRP recovery installed onto your device. To do so, please refer to our guide to Install TWRP Recovery on Samsung via ODIN.
Transfer KG/RMM State Bypass ZIP to Device
Now download the KG/RMM State Bypass v3 zip and No Verity ZIP file and transfer both 0f them to your device. On the other hand, if you are stuck in TWRP and can’t boot to OS, then you would have to take the help of ADB Sideload, Mount, or USB OTG. You may refer to our guide to Transfer or Install Files via TWRP Recovery- 3 Methods.
- How to Nand Erase and Re-Partition Samsung via Odin
- Extract PIT File from Samsung Firmware: Unbrick Guide
- How to Create Samsung Combination Firmware and Flash it via Odin
- How to Install Android 11 (OneUI 3.0) on any Samsung Phone via Odin
Boot Device to TWRP
Once both the files have been transferred, it’s time to boot the device to TWRP Recovery. You may either use the hardware key combinations or try out the below fastboot command:
- Enable USB Debugging on your device.
- Install Android SDK Platform Tools on your PC.
- Head over to this platform tools folder, type in CMD in the address bar, and hit Enter. This will launch Command Prompt.

- Now type in the below command in the CMD window to boot your device to TWRP:
adb reboot recovery

Prevent Prenormal KG/RMM State via TWRP
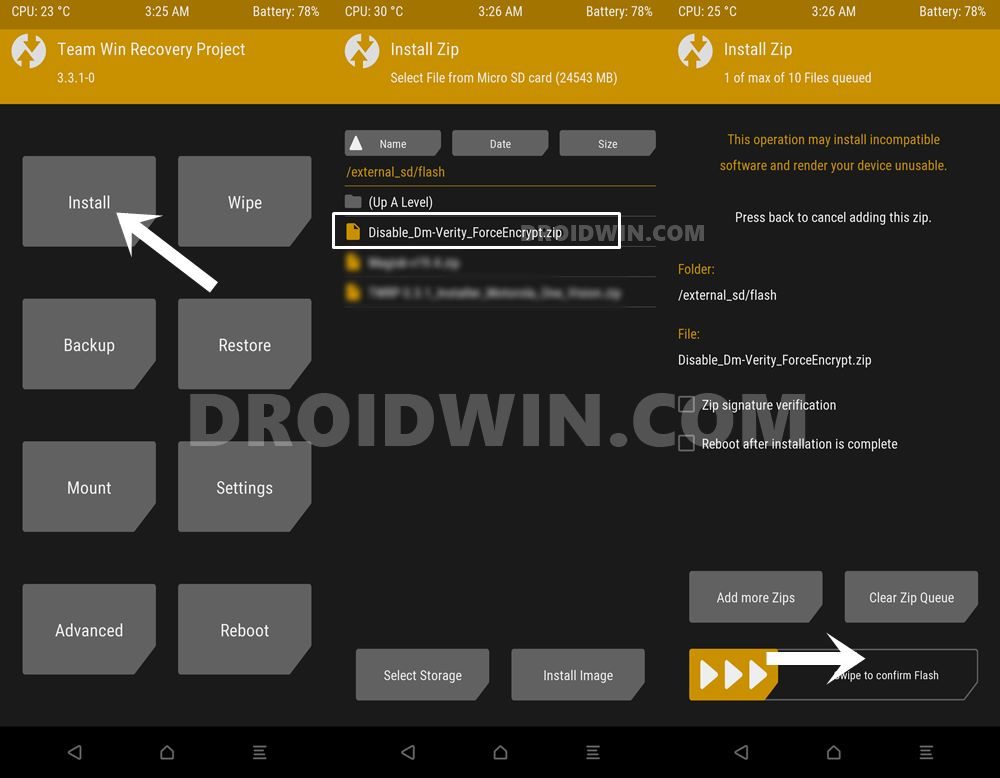
- From the TWRP home screen, go to Install.
- Select the Disable_Dm-Verity_ForceEncrypt_11.02.2020.zip file.
- Then perform a right swipe to flash it.
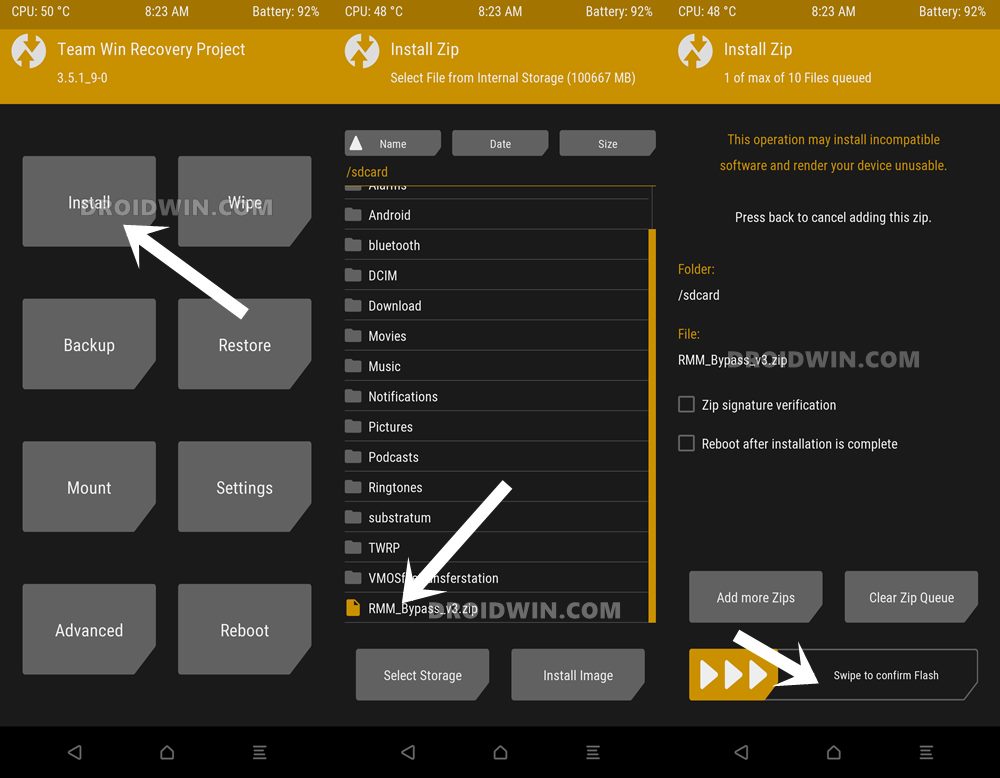
- Again go to the Install section of TWRP.
- This time select the KG/RMM State Bypass v3 zip file.
- Likewise, perform a right swipe to flash this file as well.
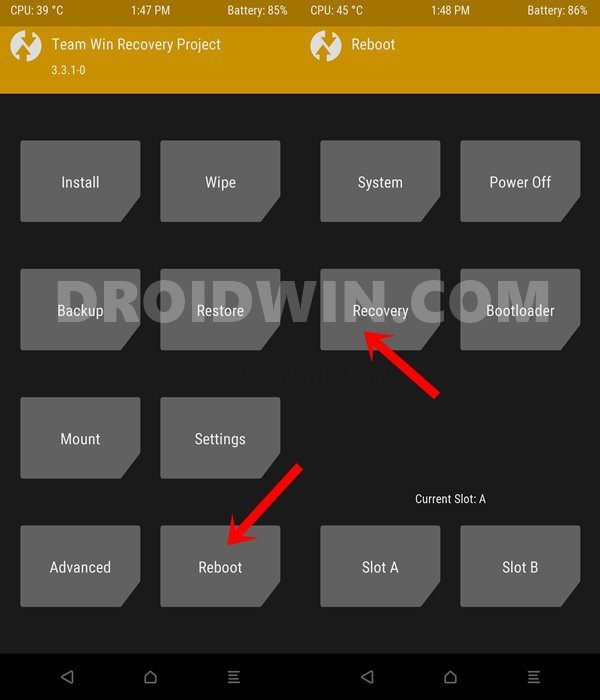
- Once both the files have been flashed, go to Reboot and select Recovery. Your device will reboot to TWRP.
- Finally, you may now reboot the device to the OS. For that, go to Reboot and select System.
So this was all from this guide on how to fix the Samsung Bootloop issue due to Prenormal KG/RMM state being triggered. The KG State will now show Checking whereas the ‘RMM State’ should spell ‘Normal’. With that said, do keep in mind that after performing the aforementioned steps, the first boot might take up some time, it is completely normal. Apart from that, if you have any other queries, do let us know in the comments section below. We will get back to you with a solution at the earliest.


David Smith
Finally I found some usefull information instead of someones guesses.
Thank You.