In this guide, we will show you the steps to root your Nothing Phone 2 via Magisk. There were initially a few concerns whether a newcomer will be an active player in the custom development. However, Nothing with its first offering had put all such doubts to rest. And there is every chance that its second iteration will follow in the same footsteps as its predecessor. In this regard, there stands a plethora of tweaks that you could carry out on your device.
From flashing custom ROMs to installing a custom recovery an everything in between, the possibilities stand endless. However, it goes without saying that the ability to gain administrative access has forever been the go-to choice for the masses. If you also echo the same thought, then let’s get started with the steps to root your Nothing Phone 2 via Magisk.
Table of Contents
How to Root Nothing Phone 2 via Magisk
Once you root your device, you will be in a position to flash a plethora of mods. These include the likes of Magisk Modules, Substratum Themes, LSPosed Framework, and Viper4Android among others. Along the same lines, you could also flash a custom kernel and implement your desired CPU profile. However, such tweaks do come with a few risks as well.
To begin with, rooting requires you to unlock the bootloader- which will wipe off all the data and could nullify the warranty as well. Likewise, SafetyNet will be triggered which will result in your inability to use banking apps (though you could still pass SafetyNet in Rooted Android 12). So if all that’s well and good, then let’s get started with the steps to root your Nothing Phone 2 via the Magisk patched boot.img file.
How to Root Nothing Phone 2 via Magisk
The below instructions are listed under separate sections for ease of understanding. Make sure to follow the same sequence as mentioned. Droidwin and its members wouldn’t be held responsible in case of a thermonuclear war, your alarm doesn’t wake you up, or if anything happens to your device and data by performing the below steps.
STEP 1: Install Android SDK

First and foremost, you will have to install the Android SDK Platform Tools on your PC. This is the official ADB and Fastboot binary provided by Google and is the only recommended one. So download it and then extract it to any convenient location on your PC. Doing so will give you the platform-tools folder, which will be used throughout this guide.
STEP 2: Enable USB Debugging and OEM Unlocking
Next up, you will also have to enable USB Debugging and OEM Unlocking on your device. The former will make your device recognizable by the PC in ADB mode. This will then allow you to boot your device to Fastboot Mode. On the other hand, OEM Unlocking is required to carry out the bootloader unlocking process.
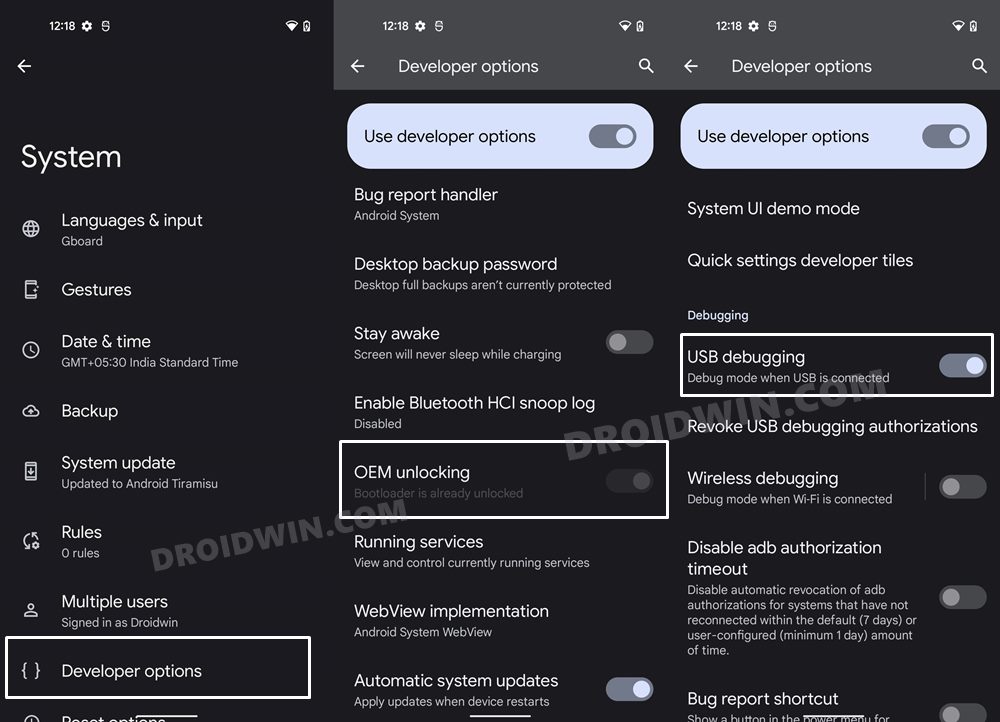
So head over to Settings > About Phone > Tap on Build Number 7 times > Go back to Settings > System > Advanced > Developer Options > Enable USB Debugging and OEM Unlocking.
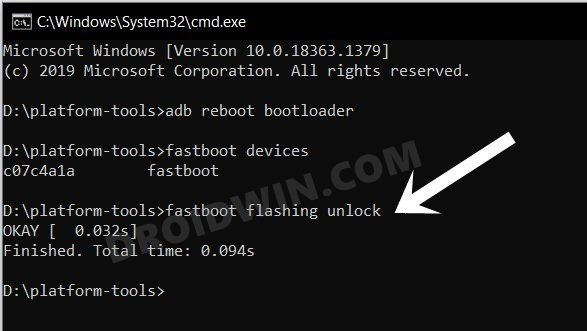
STEP 3: Unlock Bootloader on Nothing Phone 2
Next up, you will also have to unlock the device’s bootloader. Do keep in mind that doing so will wipe off all the data from your device and could nullify its warranty as well. So if that’s all well and good, then please refer to our detailed guide on How to Unlock Bootloader on Nothing Phone 2.
STEP 4: Extract Nothing Phone 2 Boot.img from Payload.bin
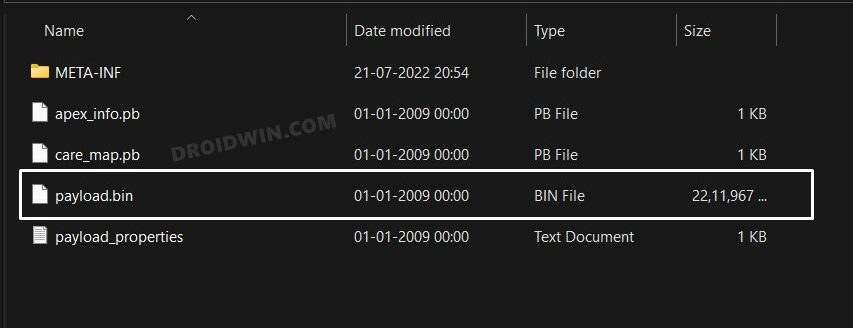
- To begin with, download the stock firmware for your device.
- Make sure to download the same version that is currently installed on your device.
- Once downloaded, extract it to any convenient location on your PC. Doing so shall give you a couple of files, including the payload.bin.

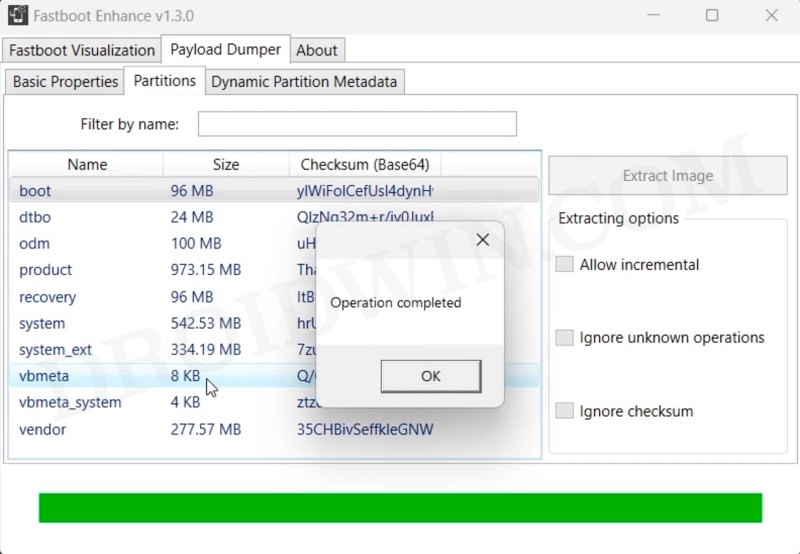
- You will now have to extract this payload file using the Fastboot Enhance Tool.
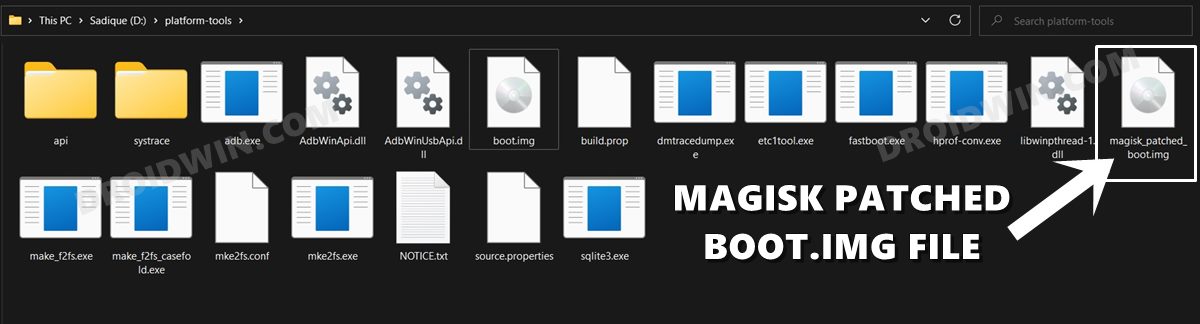
- Once done, transfer the boot.img file to the platform-tools folder on your PC.
STEP 5: Patch Boot.img via Magisk
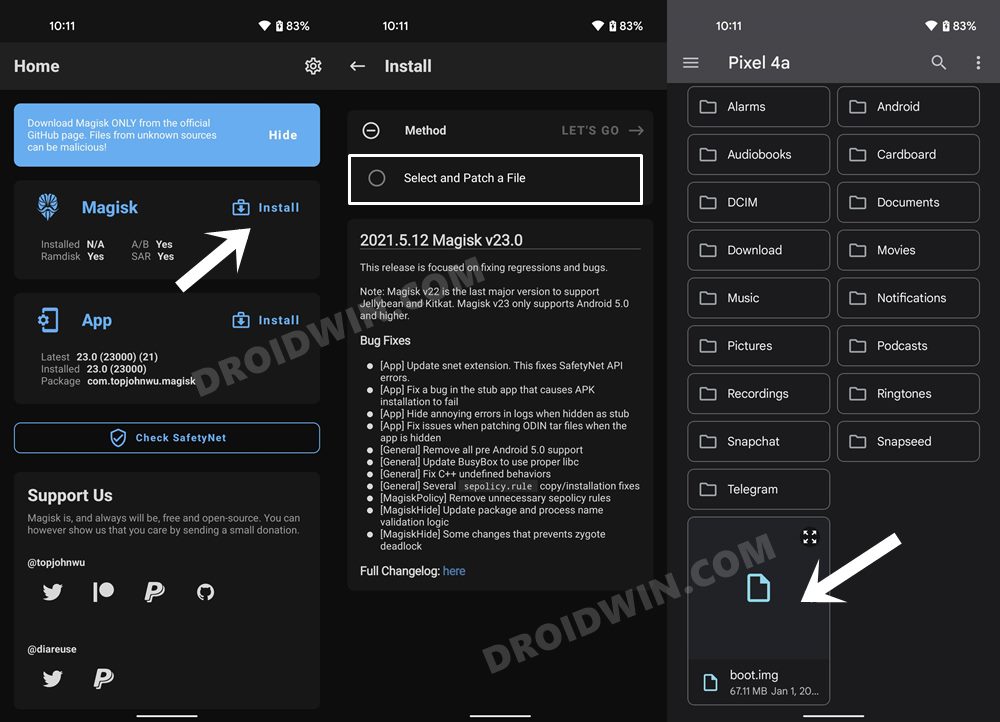
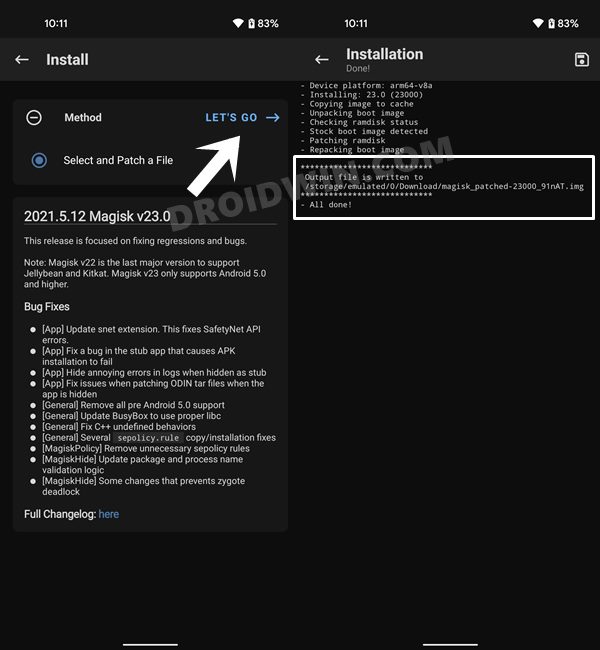
- Download and install the latest version of the Magisk App.
- Then launch it and tap on the Install button next to Magisk.
- After that, choose ‘Select and Patch a File’, navigate to the stock boot.img file, and select it.
- Then tap on the Let’s Go button situated at the top right.
- The boot.img file will now be patched and placed under the Downloads folder on your device.
- You should transfer this file to the platform-tools folder on your PC.
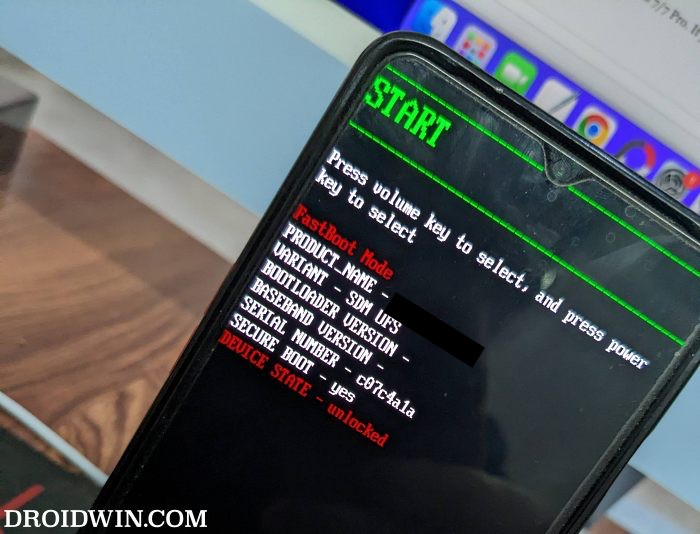
STEP 6: Boot to Fastboot Mode
- Now connect your device to the PC via USB cable. Make sure USB Debugging is enabled.
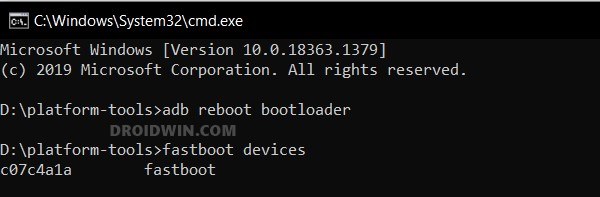
- Then head over to the platform-tools folder, type in CMD in the address bar, and hit Enter. This will launch the Command Prompt.
- Type in the following command in the CMD window to boot your device to Fastboot Mode
adb reboot bootloader
- To verify the Fastboot connection, type in the below command and you should get back the device ID.
fastboot devices

STEP 7: Boot Nothing Phone 2 using Magisk Patched Boot.img
Now, there exist two different methods to proceed ahead. You could either directly flash the patched boot.img file [see FAQ] or temporary boot it. The second approach is highly recommended because you could easily test if everything is working well or not. If it is, then you could proceed ahead with the permanent installation.
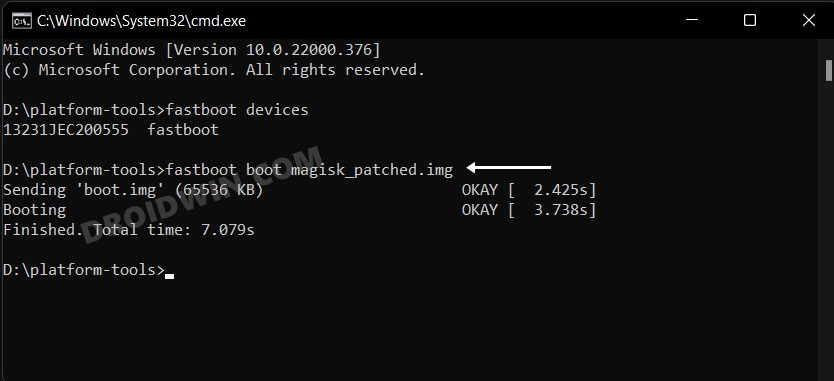
On the other hand, if things don’t go as planned and your device ends up in a bootloop/ softbrick, then just a normal reboot will fix the issue. So on that note, let’s get started with the second approach. For that, you need to execute the below command in the CMD window to temporarily boot your device to the rooted OS.
fastboot boot magisk_patched.img
STEP 8: Permanent Root Nothing Phone 2 via Direct Install
After executing the above command, your device will be booted to the OS with a temporary root. Here’s how to make it permanent:
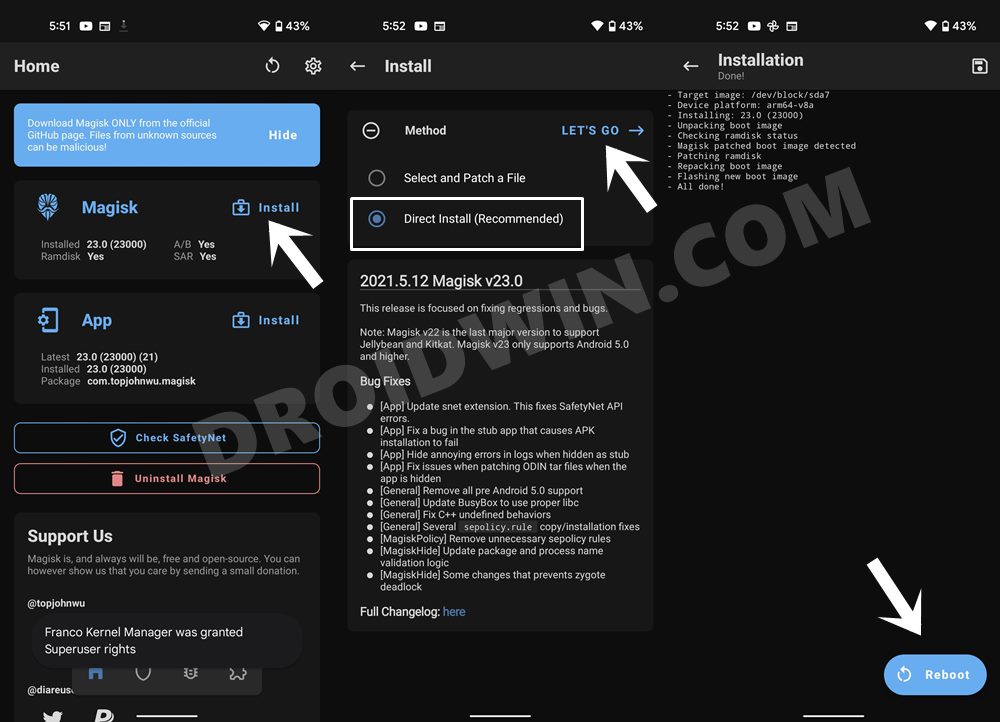
- To begin with, launch the Magisk App.
- Then tap on Install > Direct Install and tap Let’s Go situated at the top-right.
- Once done, hit the Reboot button situated at the bottom right.
- That’s it, your device will now boot to the rooted OS.
So with this, we round off the guide on how you could root your Nothing Phone 2 via Magisk patched boot.img. If you have any queries concerning the aforementioned steps, do let us know in the comments section below. We will get back to you with a solution at the earliest.
FAQ: Another Method to Root Nothing Phone 2
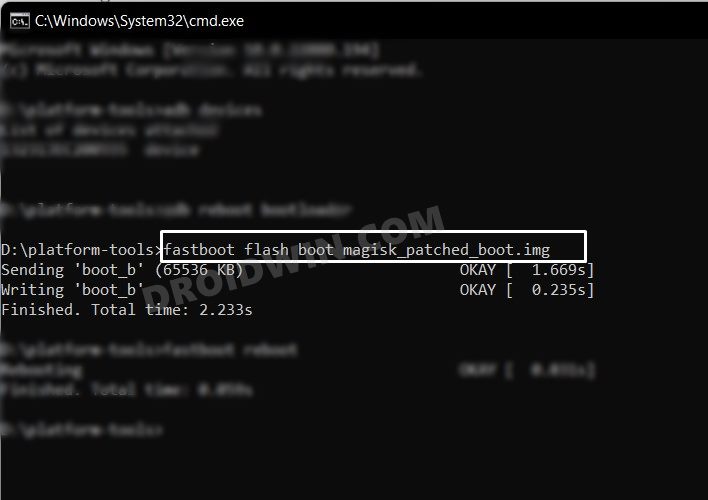
As mentioned in STEP 7. we used the approach of temporary booting to the rooted OS and then used Magisk’s Direct Install method to permanently root your device. However, if you wish to root your device by directly flashing the patched boot.img, then use the below command:
fastboot flash boot magisk_patched_boot.img