In this guide, we will show you the steps to install the /e/OS onto your OnePlus 9/Pro device. Smartphone owners are divided into two segments- there’s this one group of users who wish to distance themselves from all types of Google Apps, Services, and Framework, or in other words, have a de-Googled ecosystem. According to their notion, the Silicon Valley giant is a data hogger and the sooner they break their ties with them, the better it is for them as well as for their data.
Then, on the other hand, there are those sets of users who are deep into the Google ecosystem and it is a really impossible task to break their partnership with Google. Since they have been using a Google-based OS for ages, they have to be dependent on Google for carrying out near about every task. From sending and receiving emails in Gmail to uploading files to Google Drive, or using the Chrome browser for a seamless integration across numerous devices, it’s hard to imagine a world without Google for them.
If you belong to the second set, then probably this OS might not be in the best of your interest. But if you are part of the first set of users, then you might be looking at one of the best players in this domain that could free you from all types of Google-related stuff and replace them with their open-source counterparts.
Table of Contents
What is /e/OS?

Well, this is the million-dollar question that most of you might be having in your mind. So before you proceed to flash the ROM, let’s make you acquainted with the underlying concept of this ROM, the types of apps that it comes preinstalled with, and all its DeGoogled features.
/e/OS is an installable open-source OS for smartphones, which is forked from LineageOS/AOSP, and is completely “deGoogled”, or in other words, without any Google Apps, Services, or Framework. In other words, to remove or disable any feature or code that is sending data to Google servers, or at least to anonymize those accesses AND to offer non-Google default online services, including for search. In this regard, the ROM checkmarks the following prerequisites:
DeGoogled Features of /e/OS
- /e/OS is open source which means it is auditable by anyone with code knowledge
- the Google default search engine is removed and replaced by other services (see below in default apps and services)
- Google Services are replaced by microG and alternative services (see below for more details)
- All Google apps are removed and replaced by equivalent Open Source applications. [The only exception being the Maps Application].
- No use of Google servers to check connectivity
- NTP servers are not Google NTP servers anymore
- DNS default servers are not Google anymore
- Geolocation is using Mozilla Location Services.
- It has its own hosting service Murena Cloud which consists of its own Drive, Mail, Calendar, Contacts, Notes, Tasks, and Office. It is built upon NextCloud, Postfix, Dovecot, and OnlyOffice.
List of Preinstalled Apps in /e/OS
- Web-browser: a deGgoogled fork of Chromium, built from Bromite patch-sets, with specific /e/OS settings. It features an ad-blocker by default.
- Mail: a fork of K9-mail for better user experience, some bugfixes and support for oauth, with OpenKeyChain for PGP encryption support
- Message: a fork of QKSMS
- Camera: a fork of OpenCamera
- Dialer: default Android dialer application
- Calendar: a fork of Etar calendar, that fixes crashes with calendar invitations
- Contact: default Android contact application
- Clock: a fork of Android deskclock application
- Gallery: default Android gallery3d application
- Filemanager: Android documentsui application
- Sound recorder: default LineageOS sound recorder
- Calculator: default Android calculator2 application
- Keyboard: default Android keyboard
- App Lounge is the /e/OS application installer, that offers millions applications. Applications are accessed from Google Play Store (commercial apps), F-Droid (open source apps), and also Progressive Web Apps.
- Maps: MagicEarth (as mentioned before, this is the only app which is not open-sourced)
- PDF reader: PdfViewer Plus
- Notes: a fork of NextCloud Notes to support Murena online accounts
- Tasks: OpenTasks
So with this, you would have got a decent idea regarding /e/OS, let’s now make you aware of the steps to install it onto your OnePlus 9/Pro.
How to Install /e/OS on OnePlus 9/Pro [De-Googled ROM]
The below process will wipe off all the data from your device, so please take a complete device backup beforehand. Droidwin and its members wouldn’t be held responsible in case of a thermonuclear war, your alarm doesn’t wake you up, or if anything happens to your device and data by performing the below steps. Before flashing, make sure to be on the Android 13 firmware. If you are on Android 14, then downgrade via the instructions given here.
STEP 1: Install Android SDK
First and foremost, you will have to install the Android SDK Platform Tools on your PC. This is the official ADB and Fastboot binary provided by Google and is the only recommended one. So download it and then extract it to any convenient location on your PC. Doing so will give you the platform-tools folder, which will be used throughout this guide.

STEP 2: Enable USB Debugging and OEM Unlocking
Next up, you will have to enable USB Debugging and OEM Unlocking on your device. The former will make your device recognizable by the PC in ADB mode. This will then allow you to boot your device to Fastboot Mode. On the other hand, OEM Unlocking is required to carry out the bootloader unlocking process.
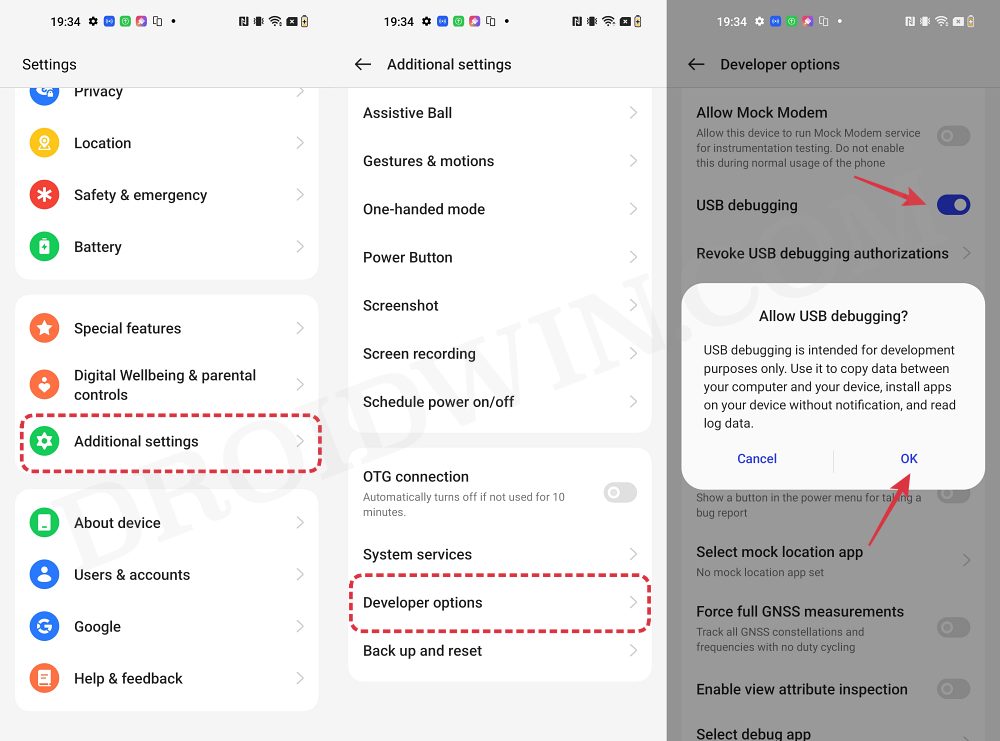
So head over to Settings > About Phone > Tap on Build Number 7 times > Go back to Settings > System > Advanced > Developer Options > Enable USB Debugging and OEM Unlocking.
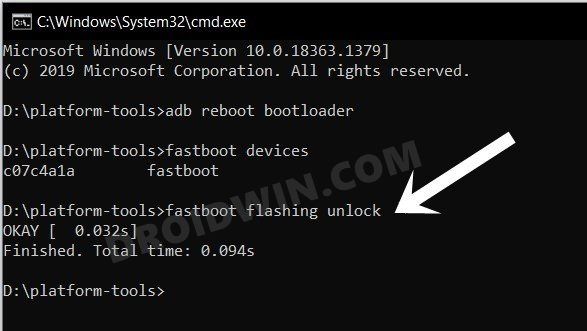
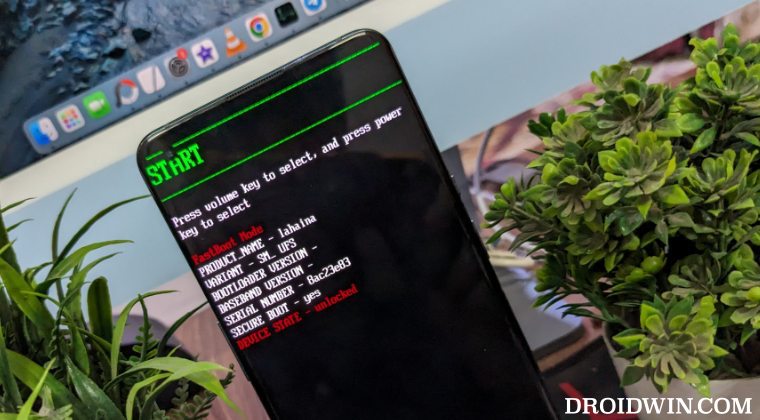
STEP 3: Unlock Bootloader
Next up, you will also have to unlock the device’s bootloader. Do keep in mind that doing so will wipe off all the data from your device and could nullify its warranty as well. So if that’s all well and good, then please refer to our detailed guide on How to Unlock Bootloader on OnePlus 9, 9 Pro and 9R
STEP 4: Download /e/OS for OnePlus 9/9 Pro
- Now, get hold of the desired ROM and its associated files from below:
ONEPLUS 9: /e/OS ROM | RECOVERY FILES
ONEPLUS 9 PRO: /e/OS ROM | RECOVERY FILES
super_empty.img: DOWNLOAD LINK [SEE NOTE]
- Rename the ROM to rom.zip and transfer it to the platform tools folder.
- Likewise, transfer the recovery files to the platform tools folder as well.
NOTE: We are using the super_empty.img from LineageOS. It’s not a cause of any concern as it should be supported across all AOSP ROMs. But still, if the developer has provided his own super_empty.img file, then please go with that. Moroever, you could check for the latest version of that file from here [only download the super_empty file from there]. As far as the reason for the flashing of this file is concerned, it is done to avoid Error Update 7 (status 1).
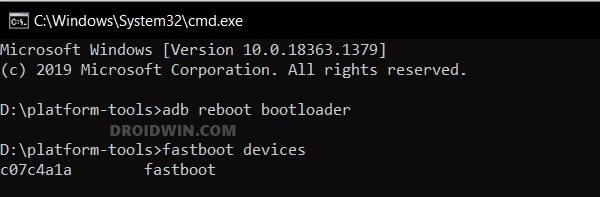
STEP 5: Boot to Fastboot Mode
- Connect your device to the PC via a USB cable. Make sure USB Debugging is enabled.
- Then head over to the platform-tools folder, type in CMD in the address bar, and hit Enter. This will launch the Command Prompt.
- After that, type in the following command in the CMD window to boot your device to Fastboot Mode
adb reboot bootloader

- To verify the Fastboot connection, type in the below command and you should get back the device ID.
fastboot devices
- If you’re not getting any ID, then install Fastboot Drivers on your PC.
STEP 6: Install /e/OS Recovery on OnePlus 9/Pro
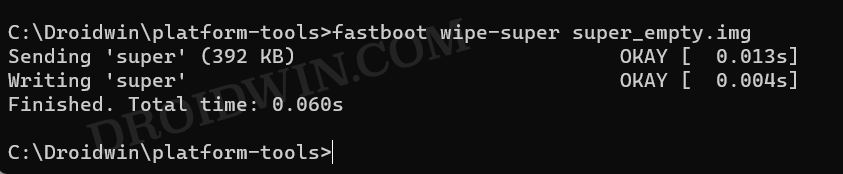
- First off, wipe the super partition to avoid Error 7:
fastboot wipe-super super_empty.img
- Next up, flash the dtbo.img file:
fastboot flash dtbo dtbo.img
- Then flash the vbmeta.img:
fastboot flash vbmeta vbmeta.img
- Now flash the vendor_boot.img file:
fastboot flash vendor_boot vendor_boot.img
- Then flash the recovery file to the boot partition:
fastboot flash boot recovery.img
- Now boot to the newly flashed recovery:
fastboot reboot recovery

STEP 7: Install /e/OS ROM on OnePlus 9/Pro
- From recovery, select Factory reset -> Format data/factory reset.
- Once done, go to Apply update -> Apply from ADB.
- Then type in the below command in the CMD window to sideload the ROM:
adb sideload rom.zip
- Finally, Reboot to System and your device will boot to the newly flashed OS.

These were the steps to install /e/OS on your OnePlus 9/Pro. If you have any queries concerning the aforementioned steps, do let us know in the comments. We will get back to you with a solution at the earliest.
Will I Switch to e/OS/?
Unfortunately no. While I’m not doubting the legitimacy and the capability of this ROM, but I am so deeply engrossed in the Google ecosystem that it’s next to impossible for me to step out of this fence. Near about all the tasks that I carry out involve the use of Google Apps, Services, and Framework.
Moreover, while this might come as a surprise to many by this statement, but I still trust Google more than any other open-source ROMs out there. It’s just my personal opinion and you are free to voice your opinions against it. The comment section is all yours!


