In this guide, we will show you two different methods through which you can go back to stock ROM from any custom ROM on your Pixel device. The devices from the Silicon Valley giant have been known to be quite active players in custom development. Apart from being blessed with tons of mods and tweaks, they also have impressive support of custom ROMs. However, having customized firmware as your daily driver has never been a more challenging task.
From Play Integrity and SafetyNet failing [resulting in the inability to use banking and payment apps] to Widevine Certification getting downgraded to L3 [resulting in the inability to watch DRM contents in Full HD], the caveats associated with these ROMs are unfortunately on a rise with Google only making it worse with time. As a result, for many users, having to deal with these issues at frequent intervals results in a troublesome and infuriating usage experience.
And they are found more often than not willing to switch back to the stock usage. Although this means having to remain content with a limited set of features, but at least they wouldn’t have to deal with the aforementioned issues daily. If you also echo the same thought process, then this guide will help you in this journey of making this switch. So without further ado, let’s get started with the steps to go back to stock ROM from any custom ROM on your Pixel device.
Table of Contents
How to Go Back to Stock from Custom ROM on Pixel [2 Methods]
We have listed two different methods of getting this job done. Go through both of them once and then try out the one that is in sync with your requirements. Moreover, before starting, please take a backup of all the data on your device. Droidwin and its members wouldn’t be held responsible in case of a thermonuclear war, your alarm doesn’t wake you up, or if anything happens to your device and data by performing the below steps.
METHOD 1: Via Android Flash Tool
This is an automated method and is usually the recommended one as it is easier to carry out. However, the entire flashing is carried out via the web browser. So make sure that you have good network connectivity and moreover, enough resources to support the uninterrupted running of the browser [hey Chrome users!]. If that’s well and good, then let’s get started with the steps.
STEP 1: Enable USB Debugging and OEM Unlocking
First off, you will have to enable USB Debugging and OEM Unlocking on your device. The former will make your device recognizable by the PC in ADB mode. This will then allow you to boot your device to Fastboot Mode. On the other hand, OEM Unlocking is required to carry out the bootloader unlocking process.
![]()
So head over to Settings > About Phone > Tap on Build Number 7 times > Go back to Settings > System > Advanced > Developer Options > Enable USB Debugging and OEM Unlocking.
STEP 2: Unlock Bootloader
To flash the stock firmware on your Pixel device via Android Flash Tool, you will have to unlock the device’s bootloader as well. If you haven’t done so, then you may refer to our guide on How to Unlock Bootloader on Google Pixel Devices.
![]()
STEP 3: Go Back to Stock via Android Flash Tool
- To begin with, connect your device to the PC via a USB cable.
- Then head over to the Android Flash Tool [link] and click on Allow ADB Access.

- You will get a Debugging prompt on your device, click Allow.
- Make sure that your device shows connected under the Selected Device section.
- Under Selected build, it is recommended to select the latest firmware.
- Now click on the pencil (edit) icon next to Selected build. As you can see Wipe Device, Lock Bootloader, and Force Flash All Partitions are enabled by default.
- In this regard, Wipe Device is highly recommended and Force Flash All Partitions is a must, so leave those boxes checked.
- On the other hand, the bootloader option depends on your personal preference. I wish to have it unlocked even after the flashing is complete, so I have unchecked the Lock Bootloader option.
- So once you have made the decision, click on the Install Build button.
- You will now get a confirmation dialog box, click Confirm.
- The tool will now start downloading and subsequently flashing the stock firmware onto your device.
- During the flashing process, your device will automatically boot to Fastboot and FastbootD Modes.
- Once the flashing is done, you will be notified of the same. You may now unplug your device and boot it to the newly installed OS [if it doesn’t happen automatically].
That’s it. These were the steps to go back to Stock ROM from a Custom ROM on Pixel. let’s now show you how the same could be done via the Fastboot Commands.
METHOD 2: Via Fastboot Commands
![]()
This method is slightly more complicated than the earlier one but gives you more granular control over the entire process. Moreover, you don’t have to be dependent on the browser for the flashing. Everything will be carried via Command Prompt itself, which hardly requires any resource whatsoever. So on that note, let’s get started.
STEP 1: Install Android SDK

First and foremost, you will have to install the Android SDK Platform Tools on your PC. This is the official ADB and Fastboot binary provided by Google and is the only recommended one. So download it and then extract it to any convenient location on your PC. Doing so will give you the platform-tools folder, which will be used throughout this guide.
STEP 2: Enable USB Debugging and OEM Unlocking
First off, you will have to enable USB Debugging and OEM Unlocking on your device. The former will make your device recognizable by the PC in ADB mode. This will then allow you to boot your device to Fastboot Mode. On the other hand, OEM Unlocking is required to carry out the bootloader unlocking process.
![]()
So head over to Settings > About Phone > Tap on Build Number 7 times > Go back to Settings > System > Advanced > Developer Options > Enable USB Debugging and OEM Unlocking.
STEP 3: Unlock Bootloader
To flash the stock firmware on your Pixel device via Android Flash Tool, you will have to unlock the device’s bootloader as well. If you haven’t done so, then you may refer to our guide on How to Unlock Bootloader on Google Pixel Devices.
![]()
STEP 4: Download Pixel 8/Pro Firmware
- Next up, grab hold of your device’s stock firmware [factory image] from the official Google page:
- Once you have downloaded the firmware, extract it inside the platform-tools folder.
STEP 5: Boot Pixel 8/Pro to Fastboot Mode
Since your device is currently in a soft brick or bootloop stage, you. wouldn’t be able to use the adb command, instead you’ll have to use the hardware keys. Here’s how:
- Now connect your device to the PC via a USB cable. Make sure USB Debugging is enabled.
- Then head over to the platform-tools folder, type in CMD in the address bar, and hit Enter. This will launch the Command Prompt.

- Type in the following command in the CMD window to boot your device to Fastboot Mode
adb reboot bootloader
- To verify the Fastboot connection, type in the below command and you should get back the device ID.
fastboot devices
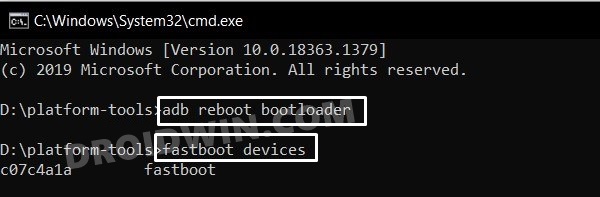
- If you are not getting any serial ID, then install the Fastboot Drivers.
Now there are two different approaches that you could take: either flash the firmware via Factory Reset or without Reset. In a normal use-case scenario, you might have gone ahead without a wipe, but since your device is currently in a bricked state, therefore it is highly recommended that you opt for a factory reset.
STEP 6: Go Back to Stock ROM via Fastboot
- Just double-click on the flash-all.bat file and the flashing will start.
- Once done, use the below command to boot your device to the OS:
fastboot reboot
That’s it. These were the two different methods to go back to stock ROM from any custom ROM on your Pixel device. If you have any queries concerning the aforementioned steps, do let us know in the comments. We will get back to you with a solution at the earliest.


