In this guide, we will show you two different methods to change the network priority on your Windows 11 PC. When it comes to network adapters, it’s usually the WiFi and Ethernet (and Virtual Adapters for some users who use VirtualBox). So if two or more adapters are currently active on your PC, then you would usually opt for the one that gives you a higher rate of data transfer. But what about the OS? How does the system decide which one should it give higher preference to?
Well, each network adapter on your PC has been assigned a Metric, which in turn depends on a number of parameters. These include the speed of that link, the number of hops it takes to reach that specific destination, and the Delay time. Taking these three factors into consideration, each of the adapters gets assigned a Metric. The one having the lowest metric gets the highest privileges by the system. In this regard, if we keep our attention on the speed parameter, then the numerical metric system is as follows [Source: Microsoft Documentation].
| Link Speed | Metric |
|---|---|
| Less than 500 Kb | 75 |
| Greater than or equal to 500 Kb and less than 4 Mb | 65 |
| Greater than or equal to 4 Mb and less than 20 Mb | 55 |
| Greater than or equal to 20 Mb and less than 80 Mb | 45 |
| Greater than or equal to 80 Mb and less than 200 Mb | 35 |
| Greater than or equal to 200 Mb and less than 2 Gb | 25 |
| Greater than or equal to 2 Gb and less than 10 Gb | 20 |
| Greater than or equal to 10 Gb and less than 40 Gb | 15 |
| Greater than or equal to 40 Gb and less than 100 Gb | 10 |
| Greater than or equal to 100 Gb | 5 |
So the system always follows a fixed pattern and straightaway gives the highest preference to the one with the lowest pecking order. But that might not be the best case in every use case scenario. Fortunately, we do have an option to change the metric of each of these adapters and assign the lowest (best, which is 5) to the one that is in sync with our requirement. And in this guide, we will show you how to do just that. Given here are two different methods to change the network priority in Windows 11.
Table of Contents
How to Change Network Priority in Windows 11
You could carry out this task via two different methods, using Control Panel and via the Powershell commands. We have listed both these methods below, you may refer to the one that you find easier to execute. So on that note, let’s get started.
Via Control Panel
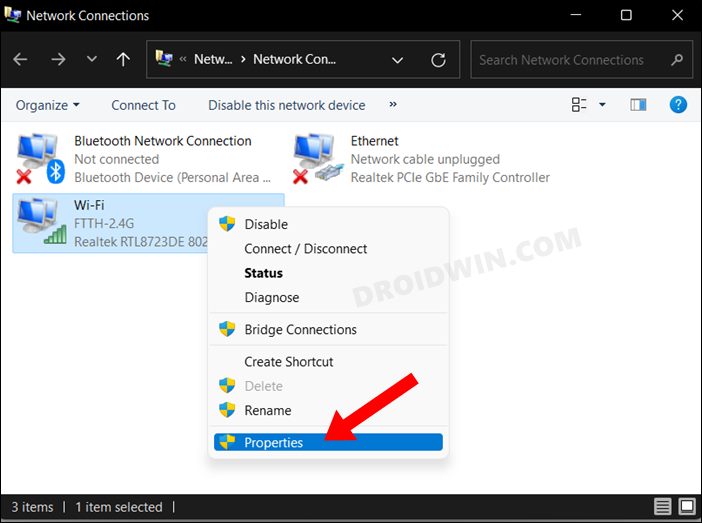
- Head over to the Start menu, search View Network Connections, and open it.
- Then right-click on the network whose priority you want to change and select Properties.

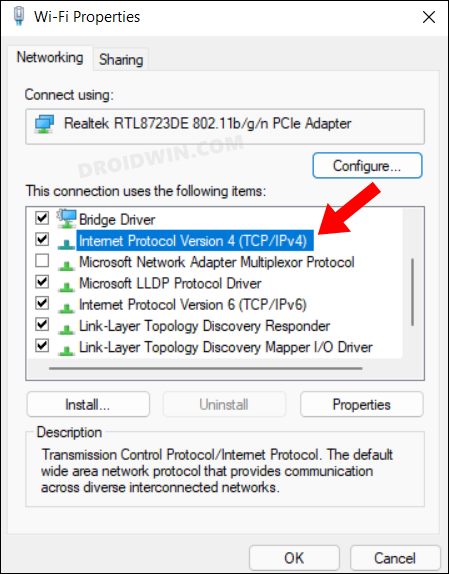
- Now double-click on Internet Protocol version 4 (TCP/IPv4) to open its Properties.

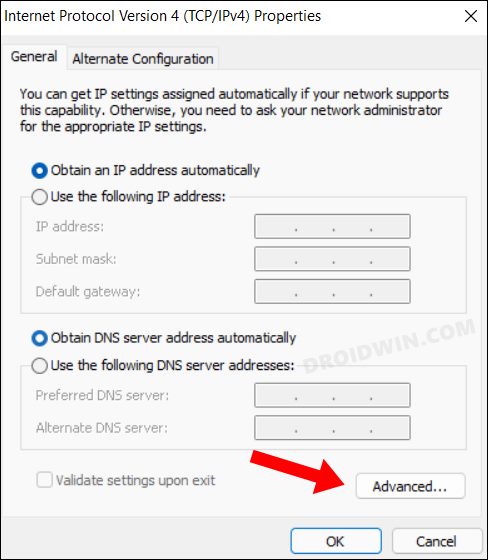
- After that, click on the Advanced button situated at the bottom right.

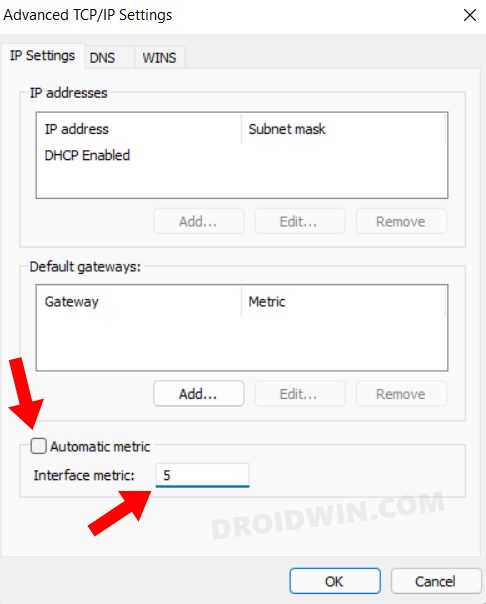
- Now uncheck Automatic metric and then manually type in the value in the Interface metric field.

- For example, if you wish to give it the highest priority, then type in 5 and hit OK to save the changes.
- Likewise, you may now configure the metric for all the other adapters from the View Network Connections page. Just make sure not to assign the same value to two adapters.
So with this, we round off the first method to change the network priority on your Windows 11 PC. Let’s now check out the second approach to carry out the said task.
Via Powershell
- Head over to the Start menu, search Powershell, and launch it as an administrator.
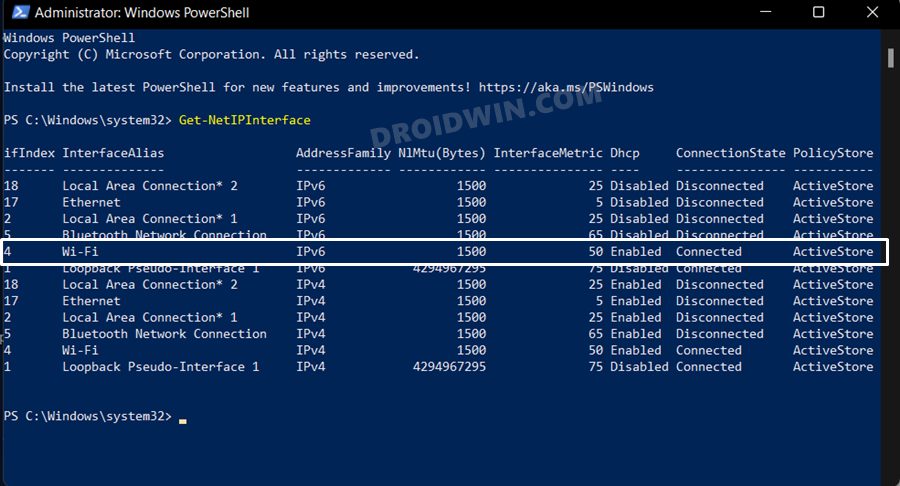
- Then copy-paste the below command to get a list of all the network adapters of your PC
Get-NetIPInterface
- After that, note down the interface index (IFIndex) value corresponding to the desired adapter.

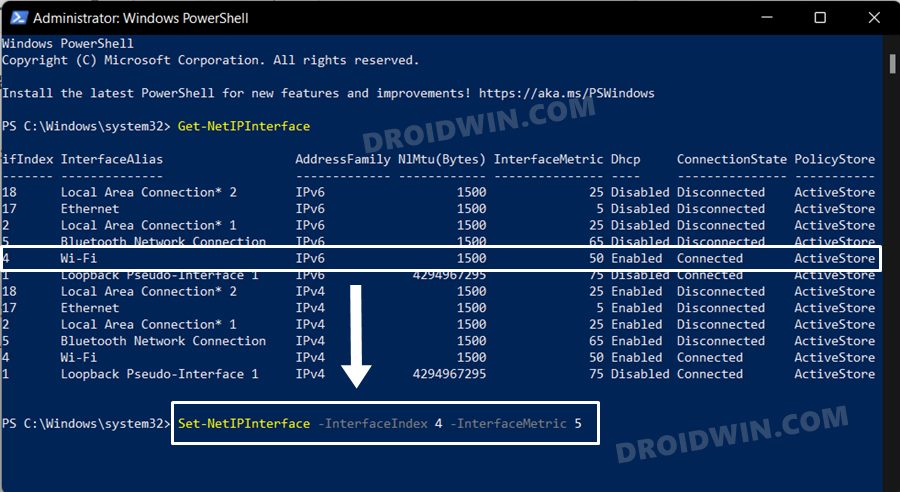
- Now execute the below command, replacing IFIndex with the value that you had copied above and IFMetric with the value as per your requirement (with 5 being the highest priority)
Set-NetIPInterface -InterfaceIndex IFIndex -InterfaceMetric IFMetric

- Likewise, you may now do so for all the adapters, just replace their IFIndex and IFMetric values accordingly. Again, make sure not to assign the same IFMetric values to two adapters.
On that note, we conclude this tutorial on how you could change the network priority on your Windows 11 PC. We have listed two different methods for the same. If you have any queries concerning any of these two methods, then do let us know in the comments. We will get back to you with a solution at the earliest.
